Configuring a Security Gateway Object in SmartConsole
A Chassis can work as a Security Gateway![]() Dedicated Check Point server that runs Check Point software to inspect traffic and enforce Security Policies for connected network resources., or as a VSX Gateway
Dedicated Check Point server that runs Check Point software to inspect traffic and enforce Security Policies for connected network resources., or as a VSX Gateway![]() Physical server that hosts VSX virtual networks, including all Virtual Devices that provide the functionality of physical network devices. It holds at least one Virtual System, which is called VS0..
Physical server that hosts VSX virtual networks, including all Virtual Devices that provide the functionality of physical network devices. It holds at least one Virtual System, which is called VS0..
This procedure describes the configuration of a Security Gateway in SmartConsole![]() Check Point GUI application used to manage a Check Point environment - configure Security Policies, configure devices, monitor products and events, install updates, and so on..
Check Point GUI application used to manage a Check Point environment - configure Security Policies, configure devices, monitor products and events, install updates, and so on..
Note - There can be some variations in the wizard steps due to release updates. In these cases, follow the instructions on the screen.
Configuring a Security Gateway Object
|
Step |
Instructions |
|---|---|
|
1 |
Connect with SmartConsole to your Management Server |
|
2 |
From the left navigation panel, click Gateways & Servers. |
|
3 |
Create a new Security Gateway object in one of these ways:
|
|
4 |
In the Check Point Security Gateway Creation window, select Wizard Mode or Classic Mode. This procedure describes the Wizard mode. If you choose Classic Mode, make sure you set all the necessary configuration parameters. |
|
5 |
On the General Properties page:
|
|
6 |
On the Trusted Communication page:
|
|
7 |
On the End page:
Check Point Gateway properties window opens on the General Properties page. |
|
8 |
If during the Wizard Mode, you selected Skip and initiate trusted communication later:
|
|
9 |
On the General Properties page:
|
|
10 |
In the navigation tree, select Topology. Configure:
|
|
11 |
Click OK |
|
12 |
Publish the SmartConsole session. |
|
13 |
Configure the applicable Security Policy
|
 ) > Gateway
Confirming the Policy Installation
To make sure that the policy was installed successfully:
|
Step |
Instructions |
|
|---|---|---|
|
1 |
Connect to one of the SGMs over SSH or a serial console. |
|
|
2 |
Run:
|
|
|
3 |
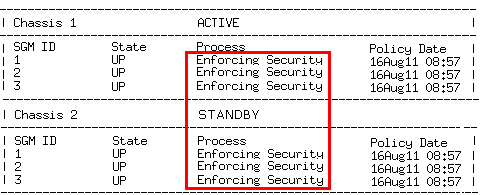
Make sure that the SGM status is "Enforcing Security" on the ACTIVE and STANDBY Standby Chassis. Example:
|
|
|
4 |
Make sure the Policy Date matches the date and time the policy was installed. |
Confirming the Security Gateway Software Configuration
To make sure the software configuration is correct:
|
Step |
Instructions |
|
|---|---|---|
|
1 |
Connect to one of the SGMs over SSH or a serial console. |
|
|
2 |
Run:
|
Use the command to collect and show diagnostic information about the system.
If there is a problem, fix it before using the system.