Important Information about Creating MGCP Security Rules
You can configure the Security Rule Base![]() All rules configured in a given Security Policy. Synonym: Rulebase. so that the Security Gateway
All rules configured in a given Security Policy. Synonym: Rulebase. so that the Security Gateway![]() Dedicated Check Point server that runs Check Point software to inspect traffic and enforce Security Policies for connected network resources. allows MGCP calls.
Dedicated Check Point server that runs Check Point software to inspect traffic and enforce Security Policies for connected network resources. allows MGCP calls.
Best Practice - Configure Anti-Spoofing on the interfaces of the Check Point Security Gateway.
-
To allow MGCP conversations, create rules that let MGCP control signals through the Security Gateway.
It is not necessary to configure a rule
 Set of traffic parameters and other conditions in a Rule Base (Security Policy) that cause specified actions to be taken for a communication session. that specifies which port to open and which endpoint can talk. The Security Gateway automatically gets this information from the signaling. For VoIP signaling rules, the Security Gateway automatically opens ports for the endpoint-to-endpoint RTP/RTCP media stream connections.
 -
Make sure to configure Keep all connections on the Security Gateway. Otherwise, it drops your connection every time you install the policy.
-
Double-click your Security Gateway object.
-
From the left tree, click Other > Connection Persistence.
-
Select Keep all connections.
-
Click OK.
-
Note - The old policy rules are still intact for calls already in-progress and they will not be dropped.
MGCP Rules for a Call Agent in the External Network
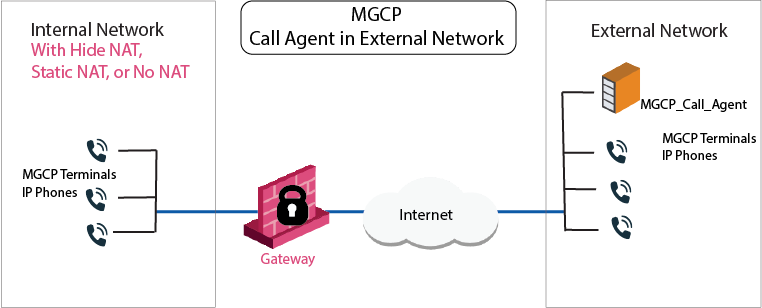
An MGCP topology with a Call Agent in the external network is shown in the image. You can configure Hide or Static NAT for the phones in the internal network.
In this image, the IP phones use a Call Agent on the external side of the Security Gateway. This topology enables the a Call Agent that is maintained by another organization. It is possible to configure Hide NAT, Static NAT or no-NAT for the phones on the internal side of the Security Gateway.
This procedure shows how to:
-
Allow bidirectional calls between the MGCP phones in the internal network (Net_A) and phones in an external network (Net_B)
-
Configure NAT for the internal phones

VoIP rule for this scenario:
|
Source |
Destination |
Services & Applications |
Action |
|---|---|---|---|
|
MGCP_Call_Agent |
Net_A |
mgcp_CA or mgcp_MG or mgcp_dynamic_ports |
Accept |
-
Configure the Network Objects (nodes or networks) for IP phones managed by the MGCP Call Agent and their calls, subject to Security Gateway inspection.
For the example in the image, these are Net_A and Net_B.
-
Configure the Network Object
 Logical object that represents different parts of corporate topology - computers, IP addresses, traffic protocols, and so on. Administrators use these objects in Security Policies. for the Call Agent (MGCP_Call_Agent).
 -
Configure the VoIP rule.
-
Configure Hide NAT or Static NAT for the phones in the internal network.
Do this by editing the Network Object.
See Setting Up Your Network with Network Address Translation (NAT).
-
Install the Security Policy.
Sample MGCP Rules for a Call Agent in DMZ
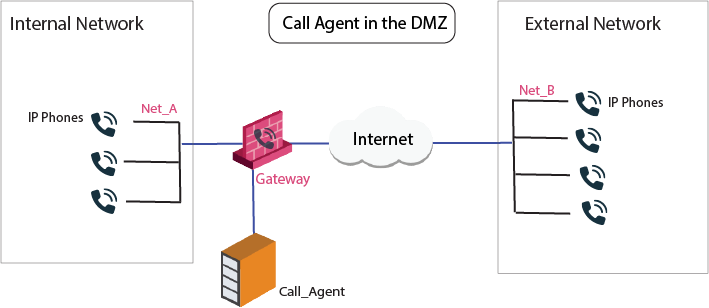
In this image, the same Call Agent controls both endpoint domains. This topology makes it possible to provide Call Agent services to other organizations.

VoIP rule for this scenario:
|
Source |
Destination |
Services & Applications |
Action |
Comments |
|---|---|---|---|---|
|
Net_A Net_B Call_Agent |
Net_A Net_B Call_Agent |
mgcp_CA |
Accept |
Bidirectional calls |
To enable bidirectional calls between phones in internal and external networks (Net_A and Net_B):
-
Configure the Network Objects (nodes or networks) for the phones that are permitted to make calls and their calls subject to Security Gateway inspection.
In the image, these are Net_A and Net_B.
-
Configure the Network Object for the Call Agent (Call_Agent).
-
Configure the VoIP rule.
-
Configure Hide NAT or Static NAT for the phones in the internal network.
Do this by editing the Network Object for the internal network (Net_A).
See Setting Up Your Network with Network Address Translation (NAT).
-
Install the Security Policy.
Sample MGCP Rules for a Call Agent to Call Agent
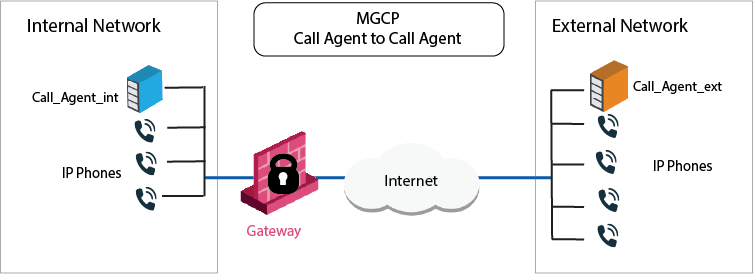
In this image, each Call Agent controls a separate endpoint domain. When there are one or more Call Agents, the signaling passes through each Call Agent. Whene the call has been set up, the media passes endpoint to endpoint. Here, a Call Agent-to-Call Agent topology shows Call Agents on opposite sides of the Security Gateway.

VoIP rule for this scenario:
|
Source |
Destination |
Services & Applications |
Action |
Comments |
|---|---|---|---|---|
|
Call_Agent_Int Call_Agent_Ext |
Call_Agent_Ext Call_Agent_Int |
mgcp_CA |
Accept |
Bidirectional calls |
To enable bidirectional calls between phones in internal and external networks:
-
Configure the Network Object for the Proxy objects (Call_Agent_Int and Call_Agent_Ext).
-
Configure the VoIP rule.
-
To Configure Hide NAT or Static NAT for the phones in the internal network, edit the Network Object for Net_A.
-
Select the Network Object and double-click.
-
The Network window opens.
-
In the NAT tab, select Add Automatic Address Translation Rules, and then the Translation method, Hide, or Static.
-
Install the security policy.
-
