Creating Threat Prevention Rules
Create and manage the policy for the Threat Prevention.
-
The Threat Prevention page shows the rules and exceptions for the Threat Prevention policy. The rules set the Threat profiles for the network objects or locations defined as a protected scope.
Click the Add Rule button to get started.
-
You can configure the Threat Prevention settings in the Threat Prevention profile for the specified rule
 Set of traffic parameters and other conditions in a Rule Base (Security Policy) that cause specified actions to be taken for a communication session..
 -
To learn about bots and protections, look through the ThreatWiki.
|
|
Best Practice - Disable a rule when you work on it. Enable the rule when you want to use it. Disabled rules do not affect the performance of the Gateway. To disable a rule, right-click in the No column of the rule and select Disable. |
Configuring Mail Settings
General
-
Emulate emails for malicious content (requires Threat Emulation) - When this option and the Threat Emulation
Check Point Software Blade on a Security Gateway that monitors the behavior of files in a sandbox to determine whether or not they are malicious. Acronym: TE. blade are enabled, the Threat Emulation blade scans SMTP traffic. -
Scan emails for viruses (requires Anti-Virus) - When this option and the Anti-Virus
Check Point Software Blade on a Security Gateway that uses real-time virus signatures and anomaly-based protections from ThreatCloud to detect and block malware at the Security Gateway before users are affected. Acronym: AV. blade are enabled, the Anti-Virus blade scans SMTP traffic. -
Extract potentially malicious attachments (requires Threat Extraction) - When this option and the Threat Extraction
Check Point Software Blade on a Security Gateway that removes malicious content from files. Acronym: TEX. blade are enabled, the Threat Extraction blade scans SMTP traffic.
Malicious Email Policy on MTA Gateways
In this section you can decide whether to block or allow an email which was found malicious.
-
Remove attachments and links - This option is selected by default. You can replace a link or an attachment found malicious with a neutralized version of the links and attachments. The neutralized email version is sent to the recipient with a customizable template.
Click "Configure" to edit the template
Malicious Attachments - Replaced by a neutralized txt file. You can customize the message which the user receives. To add more file-related information to your message, click Insert Field(for example: file name or MD5 hash).
Failed to Scan Attachments - If the scanning of the attachment fails and fail mode is set to fail-close, the attachment is replaced with a txt attachment. If fail mode is set to fail-open, the original attachment is allowed. To add more file-related information to your message, click Insert Field (for example: file name or MD5 hash).
Malicious Links - Replaced by a neutralized link. To add more link-related information to your message, for example, neutralized URL.
-
Add an X-Header to the email - Tag the email found malicious with an X-Header. The X-Header format is: "
X-Check Point-verdict: <verdict >; confidence: <confidence>".Example
"
X-Check Point-verdict: malicious; confidence: high". With this option, you can configure the MTA Next Hop to quarantine all emails with a specific X-Header. -
Add a prefix to the email subject - Adds a prefix to the subject of an email found malicious.
Example
You can add a warning message that the email is malicious. Click Configure to edit the prefix.
-
Add customized text to the email body - This option adds a section at the beginning of the email body, based on a customizable template, with an optional placeholder for the verdicts of the links and attachments found malicious or failed to be scanned. The links are given in their neutralized versions, and attachments are only given by file names. Click Configure to edit the template.
Send a copy to the following list - This option is available both if you allow or block the malicious email. With this option, the original email (with the malicious attachments and links) is attached to a new email, which contains: the verdict list with the neutralized links and attachment file names, and the SMTP envelope information. You can configure the email content on the gateway. You can use this option for research purposes.
The Check Point Incident Response Team needs to inquire the emails received in the organization for improved security and protection.
Use Case
The configuration in the Mail page lets you block or allow malicious emails. However, you do not want to configure a global decision regarding all malicious emails. You prefer to make a decision per each email separately, on a case-by-case basis. For that purpose, you need to create a system in which Threat Emulation allows the emails, but does not send them to the recipient right away. Instead, it puts them in a container where you can check them and then decide whether to block or allow them.
|
Step |
Instructions |
|---|---|
|
1 |
Enable MTA on your gateway (see Enabling MTA on the Security Gateway). |
|
2 |
Clone the Profile you wish to configure and rename it. |
|
3 |
In the new profile, go to Mail > General > Malicious Email Policy on MTA Gateways and select Allow the email. |
|
4 |
Clear Remove attachments and links. |
|
5 |
Select Add an X-Header to the email. Note - When you add an X-Header to the email, the rest of the email is kept in the email's original form. The other options: Remove attachments and links, Add a prefix to the email subject and Add customized text to the email body, change the email, and therefore must be cleared. |
|
6 |
Click OK. |
|
7 |
Install Policy. |
In the Next Hop - Configure a rule which quarantines all emails which were marked with an X-Header by the MTA.
You can now see the emails in the Next Hop in their original forms and examine them. After you examine the emails in the Next Hop, you can decide whether to allow or block them.
Exceptions
You can exclude specific email addresses from the Threat Emulation or Threat Extraction protections.
|
Step |
Instructions |
|---|---|
|
1 |
In Emulation Exceptions, click Configure. |
|
2 |
In the Recipients section, click the + button to enter one or more emails. Emails and attachments that are sent to these recipients will not be sent for emulation. |
|
3 |
In the Senders section, click the + button to enter one or more emails. Emails and attachments that are received from these senders will not be sent for emulation. Note - You can use a wildcard character to exclude more than one email address from a domain. |
|
4 |
Click OK. |
Note - If you want to do emulation on outgoing emails, make sure that you set the Protected Scope to Inspect incoming and outgoing files.
|
Step |
Instructions |
|---|---|
|
1 |
In Extraction Exclusion/Inclusion:
|
|
2 |
Click OK. |
-
A user is an object that can contain an email address with other details.
-
A group is an AD group or an LDAP group of users.
-
A recipient is an email address only.
|
|
Important - In the main SmartConsole |

Signed Email Attachments
Signed emails are not encrypted, but the mail contents are signed to authenticate the sender. If the received email differs from the email that was sent, the recipient gets a warning, and the digital signature is no longer valid.
Clean replaces the original attachment with an attachment cleaned of threats, or converts the attachment to PDF form. Both actions invalidate the digital signature. If the attachment does not include active content, the mail remains unmodified and the digital signature valid.
Allow does not change the email. The digital signature remains valid. Select this option to prevent altering digital signatures.
MIME Nesting
This is an optional configuration. In this section, you can configure the maximum number of MIME nesting levels to be scanned (A nesting level is an email within an email). These settings are the same for Anti-Virus, Threat Emulation and Threat Extraction.
-
Maximum MIME nesting is (levels) - Set the maximum number of levels in the email which the engine scans.
-
When nesting level is exceeded (action on file) - If there are more MIME nested levels than the configured amount, select to Block or Allow the email.
Configuring IPS Profile Settings
|
Step |
Instructions |
|---|---|
|
1 |
In SmartConsole, select Security Policies > Threat Prevention. |
|
2 |
From the Custom Policy Tools section, click Profiles. The Profiles page opens. |
|
3 |
Right-click the profile, and click Edit. |
|
4 |
From the navigation tree, click IPS > Additional Activation. |
|
5 |
Configure the customized protections for the profile. (See Additional Activation Fields). |
|
6 |
From the navigation tree, click IPS > Pre-R80 Settings. |
|
7 |
Configure the settings for newly downloaded IPS |
|
8 |
Note - These categories are different from the protections in the Additional Activation page. |
|
9 |
Click OK. |
|
10 |
Click Install Policy. |
Additional Activation Fields
For additional granularity, in the Additional Activation section of the Profile configuration window, you can select IPS protections to activate and to deactivate. The IPS protections are arranged into tags (categories) such as Product, Vendor, Threat Year, and others, for the ease of search. The gateways enforce activated protections, and do not enforce deactivated protections, regardless of the general profile protection settings.
-
Activate IPS protections according to the following additional properties - When selected, the categories configured on this page modify the profile's IPS protections.
-
Protections to activate - The IPS protection categories in this section are enabled on the Security Gateways that use this Threat Prevention profile.
-
Protections to deactivate - The IPS protection categories in this section are NOT enabled on the Security Gateways that use this Threat Prevention profile.
These categories only filter out or add protections that comply with the activation mode thresholds (Confidence, Severity, Performance).
For example, if a protection is inactive because of its Performance rating, it is not enabled even if its category is in Protections to activate.
-
Updates
There are numerous protections available in IPS. It takes time to become familiar with those that are relevant to your environment. Some are easily configured for basic security and can be safely activated automatically.
In the Threat Prevention profile, you can configure an updates policy for IPS protections that were newly updated. You can do this with the IPS > Updates page in the Profiles navigation tree.
-
Active - According to profile settings -Selected by default. Protections are activated according to the settings in the General page of the Profile. This is the Check Point recommended configuration.
Set activation as staging mode - Newly updated protections remain in staging mode until you change their configuration. The default action for protections in staging mode is Detect
UserCheck rule action that allows traffic and files to enter the internal network and logs them.. You can change the action manually in the IPS Protections page. (see Activating Protections).Click Configure to exclude specific protections from staging mode.
-
Inactive - Newly updated protections are not activated
|
|
Best Practice - In the beginning, allow IPS to activate protections based on the IPS policy. During this time, you can analyze the alerts that IPS generates and how it handles network traffic, while you minimize the impact on the flow of traffic. Then you can manually change the protection settings to suit your needs. |
Pre-R80 Settings
The Pre-R80 Settings are relevant for the pre-R80 gateways only.
Protections Activation
-
Client Protections - Select to activate protections that protect only clients (for example, personal computers).
-
Server Protections - Select to activate protections that protect only servers.
If a network has only clients or only servers, you can enhance gateway performance by deactivation of protections. If you select Client Protections and Server Protections, all protections are activated, except for those that are:
-
Excluded by the options selected here
-
Application Controls or Engine Settings
-
Defined as Performance Impact - Critical
-
Excluded Protections Categories
Do not activate protections of the following categories - The IPS protection categories you select here are not automatically activated. They are excluded from the Threat Prevention policy rule that has this profile in the action of the Rule Base![]() All rules configured in a given Security Policy. Synonym: Rulebase..
All rules configured in a given Security Policy. Synonym: Rulebase..
Configuring Anti-Bot Settings
Here you can configure the Anti-Bot![]() Check Point Software Blade on a Security Gateway that blocks botnet behavior and communication to Command and Control (C&C) centers. Acronyms: AB, ABOT. UserCheck Settings:
Check Point Software Blade on a Security Gateway that blocks botnet behavior and communication to Command and Control (C&C) centers. Acronyms: AB, ABOT. UserCheck Settings:
-
Prevent - Select the UserCheck
Functionality in your Security Gateway or Cluster and endpoint clients that gives users a warning when there is a potential risk of data loss or security violation. This helps users to prevent security incidents and to learn about the organizational security policy. message that opens for a Prevent action -
Ask - Select the UserCheck message that opens for an Ask action
Blocking Bots
To block bots in your organization, install this default Threat Policy rule that uses the Optimized profile, or create a new rule.
|
Protected Scope |
Action |
Track |
Install On |
|---|---|---|---|
|
*Any |
Optimized |
Log Packet Capture |
*Policy Targets |
|
Step |
Instructions |
|---|---|
|
1 |
In SmartConsole, click Gateways & Servers. |
|
2 |
Enable the Anti-Bot
|
|
3 |
Click Security Policies > Threat Prevention > Policy > Threat Prevention. You can block bots with the out-of-the-box Threat Prevention policy rule with the default Optimized Profile.
|
|
4 |
The IPS, Anti-Bot, Anti-Virus, Threat Emulation and Threat Extraction Software Blades have a dedicated Threat Prevention policy. You can install this policy separately from the policy installation of the Access Control Software Blades. Install only the Threat Prevention policy to minimize the performance impact on the Security Gateways.
|
Monitoring Bot Activity
Scenario: I want to monitor bot activity in my organization without blocking traffic at all. How can I do this?
In this example, you will create this Threat Prevention rule, and install the Threat Prevention policy.
|
Name |
Protected Scope |
Action |
Track |
Install On |
|---|---|---|---|---|
|
Monitor Bot activity |
|
A profile that has these changes relative to the Optimized profile: Go to the General Policy pane > Activation Mode section, and set all Confidence levels to Detect. |
|
|
|
Step |
Instructions |
|---|---|
|
1 |
In SmartConsole, select Security Policies > Threat Prevention. |
|
2 |
This profile detects protections that are identified as an attack with low, medium or high confidence and have a medium or lower performance impact. |
|
3 |
|
|
4 |
The IPS, Anti-Bot, Anti-Virus, Threat Emulation and Threat Extraction Software Blades have a dedicated Threat Prevention policy. You can install this policy separately from the policy installation of the Access Control Software Blades. Install only the Threat Prevention policy to minimize the performance impact on the Security Gateways.
|
Configuring Anti-Virus Settings
You can configure Threat Prevention to exclude files from inspection, such as internal emails and internal file transfers. These settings are based on the interface type (internal or external, as defined in SmartConsole) and traffic direction (incoming or outgoing).
Before you define the scope for Threat Prevention, you must make sure that your DMZ interfaces are configured correctly. To do this, follow the steps in the table below.
|
Step |
Instructions |
|---|---|
|
1 |
In SmartConsole, click Gateways & Servers and double-click the Security Gateway. The gateway window opens and shows the General Properties page. |
|
2 |
From the navigation tree, click Network Management and then double-click a DMZ interface. |
|
3 |
In the General page of the Interface window, click Modify. |
|
4 |
In the Topology Settings window, click Override and Interface leads to DMZ. |
|
5 |
Click OK and close the gateway window. Perform this procedure for each interface that goes to the DMZ. |
-
Anti-Virus UserCheck Settings:
-
Prevent - Select the UserCheck message that opens for a Prevent action.
-
Ask - Select the UserCheck message that opens for an Ask action.
-
-
Protected Scope:
-
Inspect incoming files from:
Sends only incoming files from the specified interface type for inspection. Outgoing files are not inspected. Select an interface type from the list:
-
External - Inspect incoming files from external interfaces. Files from the DMZ and internal interfaces are not inspected.
-
External and DMZ - Inspect incoming files from external and DMZ interfaces. Files from internal interfaces are not inspected.
-
All - Inspect all incoming files from all interface types.
-
-
Inspect incoming and outgoing files - Sends all incoming and outgoing files for inspection.
-
-
The Protocols that Anti-Virus scans:
-
HTTP
-
FTP
-
Mail (SMTP or POP3) - Click Mail to configure the SMTP traffic inspection. This links you to the Mail page of the Profile settings (see Configuring Mail Settings).
-
-
File Types:
- Process file types known to contain malware - Select this option to scan the files configured by default. To see the default list of files, go to Process specific file type families, and click Configure.
- Process all file types -Select Enable deep inspection scanning, if needed. Remember, it impacts performance.
- Process specific file types families
-
To configure the specific file type families:
Step
Instructions
1
Click Configure.
2
In the File Types Configuration window, for each file type, select the Anti-Virus action for the file type.
3
Click OK to close the File Types Configuration window.
- Archives - You can configure the Anti-Virus profile to enable archive scanning. (see Enabling Archive Scanning).
Enabling Archive Scanning
You can configure the Anti-Virus settings to enable archive scanning. The Anti-Virus engine unpacks archives and applies proactive heuristics. The use of this feature impacts network performance.
Select Enable Archive scanning (impacts performance) and click Configure:
|
Setting |
Description |
|---|---|
|
Stop processing archive after (seconds) |
Sets the amount in seconds to stop processing the archive. The default is 30 seconds. |
|
When maximum time is exceeded (action on file) |
Sets to block or allow the file when the time for processing the archive is exceeded. The default setting is Allow. |
Blocking Viruses
|
Step |
Instructions |
|---|---|
|
1 |
In SmartConsole, click Gateways & Servers and double-click the Security Gateway. |
|
2 |
In the General Properties page, select the Anti-Virus Software Blade |
|
3 |
Select According to the Anti-Bot and Anti-Virus policy. Click OK. |
|
4 |
Close the gateway Properties window. Publish the SmartConsole session |
|
5 |
Click Security Policies > Threat Prevention > Policy > Threat Prevention. |
|
6 |
Click Add Rule. A new rule is added to the Threat Prevention policy. The Software Blade applies the first rule that matches the traffic. |
|
7 |
|
|
8 |
The IPS, Anti-Bot, Anti-Virus, Threat Emulation and Threat Extraction Software Blades have a dedicated Threat Prevention policy. You can install this policy separately from the policy installation of the Access Control Software Blades. Install only the Threat Prevention policy to minimize the performance impact on the Security Gateways.
|
Additionally Supported Protocols for Anti-Virus
In addition to HTTP, FTP and SMTP protocols, which you can select in the SmartConsole GUI, the Anti-Virus blade also supports the IMAP, POP3, and SMB protocols:
|
Step |
Instructions |
|---|---|
|
1 |
Connect to the command line on your Security Gateway. |
|
2 |
Log in to the Expert mode. |
|
3 |
Back up this file: Run: |
|
4 |
Edit this file: Run: |
|
5 |
In the |
|
6 |
Save the changes in the file and exit the Vi editor. |
|
7 |
Install Policy. |
|
Step |
Instructions |
|---|---|
|
1 |
Connect to the command line on your Security Gateway. |
|
2 |
Log in to the Expert mode. |
|
3 |
Back up this file: Run: |
|
4 |
Edit this file: Run: |
|
5 |
In the |
|
6 |
Save the changes in the file and exit the Vi editor. |
|
7 |
Install Policy. |
|
Step |
Instructions |
|---|---|
|
1 |
Connect to the command line on the Security Gateway. |
|
2 |
Log in to the Expert mode. |
|
3 |
Back up the file: Run: |
|
4 |
Edit the file: Run: |
|
5 |
In the
|
|
6 |
Save the changes in the file, and then exit the Vi editor. |
|
7 |
Install Policy. |
Configuring Threat Emulation Settings
Before you define the scope for Threat Prevention, you must make sure that your DMZ interfaces are configured correctly.
|
Step |
Instructions |
|---|---|
|
1 |
In SmartConsole, click Gateways & Servers and double-click the Security Gateway. The gateway window opens and shows the General Properties page. |
|
2 |
From the navigation tree, click Network Management and then double-click a DMZ interface. |
|
3 |
In the General page of the Interface window, click Modify. |
|
4 |
In the Topology Settings window, click Override and Interface leads to DMZ. |
|
5 |
Click OK and close the gateway window. |
Do this procedure for each interface that goes to the DMZ.
If there is a conflict between the Threat Emulation settings in the profile and for the Security Gateway, the profile settings are used.
|
Step |
Instructions |
|---|---|
|
1 |
In SmartConsole, select Security Policies > Threat Prevention. |
|
2 |
From the Custom Policy Tools section, click Profiles. The Profiles page opens. |
|
3 |
Right-click the profile, and click Edit. |
|
4 |
From the navigation tree, go to Threat Emulation and configure these settings: |
|
5 |
Click OK and close the Threat Prevention profile window. |
|
6 |
Install the Threat Prevention policy. |
|
|
Important - To emulate a file, the Security Gateway must receive the full file. Threat Emulation does not work on a file if only a part of it was downloaded. |
Threat Emulation General Settings
On the Threat Emulation > General page, you can configure these settings:
UserCheck Settings:
-
Prevent - Select the UserCheck message that opens for a Prevent action
-
Ask - Select the UserCheck message that opens for an Ask action
Protected Scope:
-
Inspect incoming files from the following interfaces:
Sends only incoming files from the specified interface type for inspection. Outgoing files are not inspected. Select an interface type from the list:
-
External - Inspect incoming files from external interfaces. Files from the DMZ and internal interfaces are not inspected.
Example: A company's firewall is configured to inspect files received from external sources, such as emails or cloud services, while not interfering with internal file transfers.
-
External and DMZ - Inspect incoming files from external and DMZ interfaces. Files from internal interfaces are not inspected.
Example: An organization's perimeter security system inspects files entering through both external connections and the Demilitarized Zone (DMZ), ensuring a thorough evaluation of potential threats.
-
All - Inspect all incoming files from all interface types.
Example: A highly secure environment demands inspection of files from all possible interfaces, including both external and internal sources, to maintain a comprehensive defense against any potential malicious activity.
-
-
Inspect incoming and outgoing files - Sends all incoming and outgoing files for inspection.
Example: In a scenario where bidirectional traffic monitoring is crucial, a network security system is configured to inspect both incoming and outgoing files, ensuring end-to-end protection against potential threats.
Protocols
-
HTTP
-
FTP
-
Mail (SMTP/POP3) - Click Mail to configure the SMTP traffic inspection by the Threat Emulation blade. This links you to the Mail page of the Profile settings (see Configuring Mail Settings).
File Types
Here you can configure the Threat Emulation Action and Emulation Location for each file type scanned by the Threat Emulation blade.
-
Process all enabled file types - This option is selected by default. Click the blue link to see the list of supported file types. Out of the supported file types, select the files to be scanned by the Threat Emulation blade.
Note - You can find this list of supported file types also in Manage & Settings view > Blades > Threat Prevention > Advanced Settings > Threat Emulation > File Type Support.
-
Process specific file type families - Click Configure to change the action or emulation location for the scanned file types.
To change the emulation action for a file type, click the applicable action in the Action column and select one of these options:
-
Inspect - The Threat Emulation blade scans these files.
-
Bypass - Files of this type are considered safe and the Software Blade does not do emulation for them.
To change the emulation location for a file type, click Emulation Location and select one of these options:
-
According to gateway - The Emulation Location is according to the settings defined in the Gateway Properties window of each gateway.
-
Locally - Emulation for these file types is done on the gateway. This option is not supported for R80.40.
-
ThreatCloud
The cyber intelligence center of all of Check Point products. Dynamically updated based on an innovative global network of threat sensors and invites organizations to share threat data and collaborate in the fight against modern malware. - These file types are sent to the ThreatCloud for emulation.

Note - If the emulation location selected in the profile is different than the emulation location configured on the Security Gateway, then the profile settings override.
-
Archives
Block archives containing these prohibited file types. Click Configure to select the prohibited file types. If a prohibited file type is in an archive, the gateway drops the archive.
Emulation Environment
You can use the Emulation Environment window to configure the emulation location and images that are used for this profile:
-
The Analysis Locations section lets you select: where the emulation is done.
-
To use the Security Gateway settings for the location of the virtual environment, click According to the gateway.
-
To configure the profile to use a different location of the virtual environment, click Specify and select the applicable option.
-
-
The Environments section lets you select the operating system images on which the emulation is run. If the images defined in the profile and the Security Gateway or Threat Emulation appliance are different, the profile settings are used.
These are the options to select the emulation images:
-
To use the emulation environments recommended by Check Point security analysts, click Use Check Point recommended emulation environments.
-
To select other images for emulation, that are closest to the operating systems for the computers in your organization, click Use the following emulation environments.
-
Advanced Threat Emulation Settings
- Emulation Connection Handling Mode lets you configure Threat Emulation to allow or block a connection while it finishes the analysis of a file. You can also specify a different mode for SMTP and HTTP services. See the The Threat Emulation Solution chapter for details.
-
Static Analysis optimizes file analysis by doing an initial analysis on files. If the analysis finds that the file is simple and cannot contain malicious code, the file is sent to the destination without additional emulation. Static analysis significantly reduces the number of files that are sent for emulation. If you disable it, you increase the percentage of files that are sent for full emulation. The Security Gateways do static analysis by default, and you have the option to disable it.
-
Logging lets you configure the system to generate logs for each file after emulation is complete. If Log every file scanned is enabled, then every file that is selected in Threat Emulation > General > File Types is logged, even if no operation is performed on it. If Log every file scanned is disabled, malicious files are still logged.
Additionally Supported Protocols for Threat Emulation
In addition to HTTP, FTP and SMTP protocols, which you can select in the SmartConsole GUI, the Threat Emulation blade also supports the IMAP and SMB protocols:
|
Step |
Instructions |
|---|---|
|
1 |
Connect to the command line on your Security Gateway. |
|
2 |
Log in to the Expert mode. |
|
3 |
Back up this file: Run: |
|
4 |
Edit this file: Run: |
|
5 |
In the |
|
6 |
Save the changes in the file and exit the Vi editor. |
|
7 |
Install Policy. |
|
Step |
Instructions |
|---|---|
|
1 |
Connect to the command line on your Security Gateway. |
|
2 |
Log in to the Expert mode. |
|
3 |
Back up this file: Run: |
|
4 |
Edit this file: Run: |
|
5 |
In the |
|
6 |
Save the changes in the file and exit the Vi editor. |
|
7 |
Install Policy. |
Threat Emulation Use Case
Configuring Threat Emulation location
Corp X is located in Threatland. The Threatland law does not allow you to send sensitive documents to cloud services which are outside of the country. The system administrator of Corp X has to configure the location for the Threat Emulation analysis, so that it is not done outside of the country.
|
Step |
Instructions |
|---|---|
|
1 |
In the Gateways & Servers view, double-click a gateway, go to Threat Emulation > Analysis Location. |
|
2 |
Select:
OR
|
|
3 |
Click OK. |
|
|
Note - You can also configure Threat Emulation analysis location in the profile settings. Go to Security Policies > Threat Prevention > Profiles > double-click a profile > Threat Emulation > Emulation Environment > Analysis Location > Specify. |
|
Step |
Instructions |
|---|---|
|
1 |
Connect to the command line on the Security Gateway. |
|
2 |
Log in to the Expert mode. |
|
3 |
Back up the file: Run: |
|
4 |
Edit the file: Run: |
|
5 |
In the |
|
6 |
Save the changes in the file, and then exit the Vi editor. |
|
7 |
Install Policy. |
Configuring Threat Extraction Settings
|
Step |
Instructions |
|---|---|
|
1 |
In the Security Policies view > Custom Policy Tools section, click Profiles. |
|
2 |
Right-click a profile and select Edit. The Profiles properties window opens. |
|
3 |
On the General Policy page in the Blade Activation area, select Threat Extraction. |
|
4 |
Configure these Threat Extraction Settings: |
|
5 |
Click OK. |
|
|
Note - You can configure some of the Threat Extraction features in a configuration file, in addition to the CLI and GUI. See sk114613. |
Threat Extraction General Settings
On the Threat Extraction > General page, you can configure these settings:
-
Allow the user to access the original file
-
Allow access to original files that are not malicious according to Threat Emulation
Note - This option is only configurable when the Threat Emulation blade is activated in the General Properties pane of the profile.
-
UserCheck Message
You can create or edit UserCheck messages on the UserCheck page. (see ).
Select a message to show the user when the user receives the clean file. In this message, the user selects if they want to download the original file or not.
To select the success or cancellation messages of the file download
Step
Instructions
1
Go to Manage & Settings.
2
Select Blades > Threat Prevention.
3
Choose Advanced Settings > UserCheck (see ).
You can customize a UserCheck message only for SMTP files. For HTTP files (supported on R80.30 gateways and above), the message which the user gets is not customizable in SmartConsole. You can only customize it on the gateway.
-
Optional
To give the user access to the original email, you can add the Send Original Mail field in the Threat Extraction Success Page.
Step
Instructions
1
Go to Threat Prevention.
2
Select Custom Policy Tools > UserCheck > Threat Extraction > Success Page.
3
Right-click > Clone.
4
Click inside the message > Insert Field, and then select Send Original Mail. The Send Original Mail is added to the message body.
-
Protocol
-
Web (HTTP/HTTPS) - Supported from R80.30 gateways and above. To allow web support, enable HTTPS Inspection
Feature on a Security Gateway that inspects traffic encrypted by the Secure Sockets Layer (SSL) protocol for malware or suspicious patterns. Synonym: SSL Inspection. Acronyms: HTTPSI, HTTPSi. (see HTTPS Inspection). By default, Threat Extraction web support works on these standard ports: HTTP - Port 80, HTTPS - Port 443, HTTPS Proxy - 8080.To enable web support on other ports, create a new TCP service. In General > Protocol select HTTP, and in Match By, select Customize and enter the required port number.
Notes:
-
After a file is scanned by the Threat Extraction blade, the user receives a message on the action that was done on the file. To customize the message, see sk142852.
-
Threat Extraction web support applies to web downloads, but not web uploads.
-
-
Mail (SMTP) - Click Mail to configure the SMTP traffic inspection by the Threat Extraction blade. This links you to the Mail page of the Profile settings (see Configuring Mail Settings).
For information on storage of the original files, see Storage of Original Files.
Extraction Method:
-
Extract potentially malicious parts from files - Selected by default
Click Configure to select which malicious parts the blade extracts. For example, macros, JavaScript, images and so on.
-
Convert to PDF - Converts the file to PDF, and keeps text and formatting.

Best Practice - If you use PDFs in right-to-left languages or Asian fonts, preferably select Extract files from potential malicious parts to make sure that these files are processed correctly.
Extraction Settings
-
Process all files - selected by default
-
Process malicious files when the confidence level is:
Set a low, medium or high confidence level. This option is only configurable when the Threat Emulation blade is activated in the General Properties pane of the profile.
File Types
-
Process all enabled file types - This option is selected by default. Click the blue link to see the list of supported file types. Out of the supported file types, select the files to be scanned by the Threat Extraction blade.
Note - You can find this list of supported file types also in Manage & Settings view > Blades > Threat Prevention > Advanced Settings > Threat Extraction > Configure File Type Support.
-
Process specific file type families -
Here you can configure a different extraction method for certain file types. Click Configure to see the list of enabled file types and their extraction methods. To change the extraction method for a file type, right-click the file type and select: bypass, clean or convert to PDF. You can select a different extraction method for Mail and Web.
|
|
Notes:
|
Protected Scope
Threat Extraction protects incoming files from external interfaces and DMZ. The user cannot configure the protected scope.
Threat Extraction Advanced Settings
On the Threat Extraction > Advanced page, you can configure these settings:
-
Logging
-
Log only those files from which threats were extracted - Logs only files on which an operation was performed (clean or convert).
-
Log every file -Every file that is selected in Threat Extraction > General > File Types is logged, even if no operation was performed on them.
-
-
Threat Extraction Exceptions
-
Corrupted files
Block or Allow corrupted files attached to the email or downloaded from the web. Corrupted files are files the blade fails to process, possibly because the format is incorrect. Despite the incorrect format, the related application (Word, Adobe Reader) can sometimes show the content.
Block removes the corrupted file and sends the recipient a text which describes how the file contained potentially malicious content. You can block corrupt files if they are malicious according to Threat Emulation. If the action is block, you can deny access to the original corrupted file.
Allow lets the recipient receive the corrupted file.
-
Encrypted files
Block or Allow encrypted files attached to the email or downloaded from the web.
Block removes the encrypted file and sends the recipient a text file which describes how the file contained potentially malicious content.
If the action is block, you can also deny access to the original encrypted file.
Allow lets the recipient receive the encrypted file.
-
Threat Extraction Use Cases
Scenario 1: Excluding senders from scanning
Scanning takes time and resources, so if you know a source is safe, you may want to stop scanning the reports from this source.
Example:
-
Control and Monitoring systems that send daily reports to IT departments.
-
Reports sent by a Mail Relay server about spam emails that it stopped.
To exclude a sender from the Threat Extraction scanning:
|
Step |
Instructions |
|---|---|
|
1 |
Go to Security Policies > Threat Prevention > Profiles. |
|
2 |
Right-click the profile name and select Clone. The Clone Object window opens. |
|
3 |
Enter a name for the cloned profile. |
|
4 |
Click OK. |
|
5 |
In the new profile, go to Mail > Exceptions > Extraction Exclusion/Inclusion > Scan all emails, and click Exceptions. The Exclude/Include Users window opens. |
|
6 |
In the Senders section, click the + sign to add the senders to exclude from the Threat Extraction scan. |
Scenario 2: Allowing digitally signed emails without scanning
The attorneys at the legal department in Corp X send and receive contracts and other legal documents signed with a digital signature. According to Corp X's Security Policy![]() Collection of rules that control network traffic and enforce organization guidelines for data protection and access to resources with packet inspection., the Threat Extraction blade scans all files received by the legal department. A digital signature must show the authenticity of a document. If the Threat Extraction blade scans the document, the digital signature can no longer prove the document's authenticity. The configuration, therefore, must allow digitally signed emails.
Collection of rules that control network traffic and enforce organization guidelines for data protection and access to resources with packet inspection., the Threat Extraction blade scans all files received by the legal department. A digital signature must show the authenticity of a document. If the Threat Extraction blade scans the document, the digital signature can no longer prove the document's authenticity. The configuration, therefore, must allow digitally signed emails.
In the profile settings > Mail > Exceptions > Threat Extraction Exceptions > Signed email attachments, the default option is Allow. This configuration makes sure that when you receive a digitally signed email, it will be allowed with no scanning, so the form of the email does not change.
Scenario 4:
For security reasons, the IT department in Corp X changed the default extraction method in the Threat Prevention profile from Extract potentially malicious parts from files to Convert to PDF.
The economists in the Finance Department in Corp X receive certain files by email in excel formats, or download excel files from the Web, and must work on them in the files' original format. To keep the excel files in their original formats you must set the Threat Extraction to clean the files and not convert them to PDF.
|
Step |
Instructions |
|---|---|
|
1 |
Go to File Types, select Process specific file type families and click Configure. The Threat Extraction Supported File Types window opens. |
|
2 |
Go to the |
Configuring a Malware DNS Trap
The Malware DNS trap works by configuring the Security Gateway to return a false (bogus) IP address for known malicious hosts and domains. You can use the Security Gateway external IP address as the DNS trap address but:
-
Do not use a gateway address that leads to the internal network.
-
Do not use the gateway internal management address.
-
If the gateway external IP address is also the management address, select a different address for the DNS trap.
You can also add internal DNS servers to better identify the origin of malicious DNS requests.
Using the Malware DNS Trap you can detect compromised clients by checking logs with connection attempts to the false IP address.
At the Security Gateway level, you can configure the DNS Trap according to the profile settings or as a specific IP address for all profiles on the specific gateway.
|
Step |
Instructions |
|---|---|
|
1 |
In SmartConsole, select Security Policies > Threat Prevention. |
|
2 |
From the Custom Policy Tools section, click Profiles. The Profiles page opens. |
|
3 |
Right-click the profile, and click Edit. |
|
4 |
From the navigation tree, click Malware DNS Trap. |
|
5 |
Click Activate DNS Trap. |
|
6 |
Enter the IP address for the DNS trap. |
|
7 |
Optional: Add Internal DNS Servers to identify the origin of malicious DNS requests. |
|
8 |
Click OK and close the Threat Prevention profile window. |
|
9 |
Install the Threat Prevention policy. |
|
Step |
Instructions |
|---|---|
|
1 |
In SmartConsole, click Gateways & Servers and double-click the Security Gateway. The gateway window opens and shows the General Properties page. |
|
2 |
From the navigation tree, select Anti-Bot and Anti-Virus. |
|
3 |
In the Malicious DNS Trap section, select one of these options:
|
|
4 |
Click OK. |
|
5 |
Install the policy. |
Exception Rules
If necessary, you can add an exception directly to a rule. An exception sets a different Action to an object in the Protected Scope from the Action specified Threat Prevention rule. In general, exceptions are designed to give you the option to reduce the level of enforcement of a specific protection and not to increase it.
For example:
The Research and Development (R&D) network protections are included in a profile with the Prevent action. You can define an exception which sets the specific R&D network to Detect. For some Anti-Bot and IPS signatures only, you can define exceptions which are stricter than the profile action.
You can add one or more exceptions to a rule. The exception is added as a shaded row below the rule in the Rule Base. It is identified in the No column with the rule's number plus the letter E and a digit that represents the exception number. For example, if you add two exceptions to rule number 1, two lines will be added and show in the Rule Base as E-1.1 and E-1.2.
You can use exception groups to group exceptions that you want to use in more than one rule. See the Exceptions Groups Pane.
You can expand or collapse the rule exceptions by clicking on the minus or plus sign next to the rule number in the No. column.
|
Step |
Instructions |
|---|---|
|
1 |
In the Policy pane, select the rule to which you want to add an exception. |
|
2 |
Click Add Exception. |
|
3 |
Select the Above, Below, or Bottom option according to where you want to place the exception. |
|
4 |
Enter values for the columns. Including these:
|
|
5 |
Install Policy. |
|
|
Note - You cannot set an exception rule to an inactive protection or an inactive blade. |
Disabling a Protection on One Server
Scenario: The protection Backdoor.Win32.Agent.AH blocks malware on windows servers. How can I change this protection todetectfor one server only?
In this example, create this Threat Prevention rule, and install the Threat Prevention policy:
|
Step |
Instructions |
||
|---|---|---|---|
|
1 |
In SmartConsole, click Threat Prevention > Policy > Layer. |
||
|
2 |
Click the rule that contains the scope of Server_1. |
||
|
3 |
Click the Add Exception toolbar button to add the exception to the rule. The gateway applies the first exception matched. |
||
|
4 |
Right-click the rule and select New Exception. |
||
|
5 |
|
||
|
6 |
In SmartConsole, install the policy. |
Blade Exceptions
You can also configure an exception for an entire blade.
|
Step |
Instructions |
|---|---|
|
1 |
In the Policy, select the Layer rule to which you want to add an exception. |
|
2 |
Click Add Exception. |
|
3 |
Select the Above, Below, or Bottom option according to where you want to place the exception. |
|
4 |
In the Protection/Site column, select Blades from the drop-down menu. |
|
5 |
Select the blade you want to exclude. |
|
6 |
In SmartConsole, install the policy. |
-
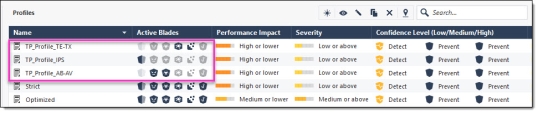
Create a separate layer with a separate profile for each blade or a pair of blades (for example: Anti-Virus and Anti-Bot, or Threat Emulation and Threat Extraction):

-
Create a separate profile for each layer and enable only the specific blade:
-
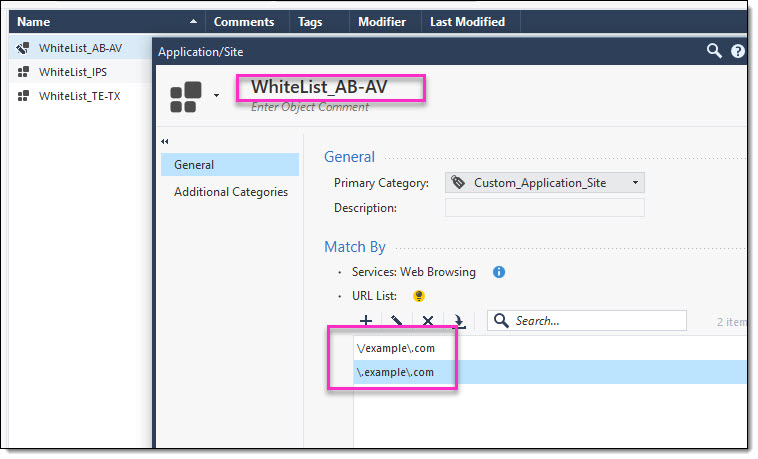
Create a custom Application/Site for each layer. For instructions, refer to sk165094:

-
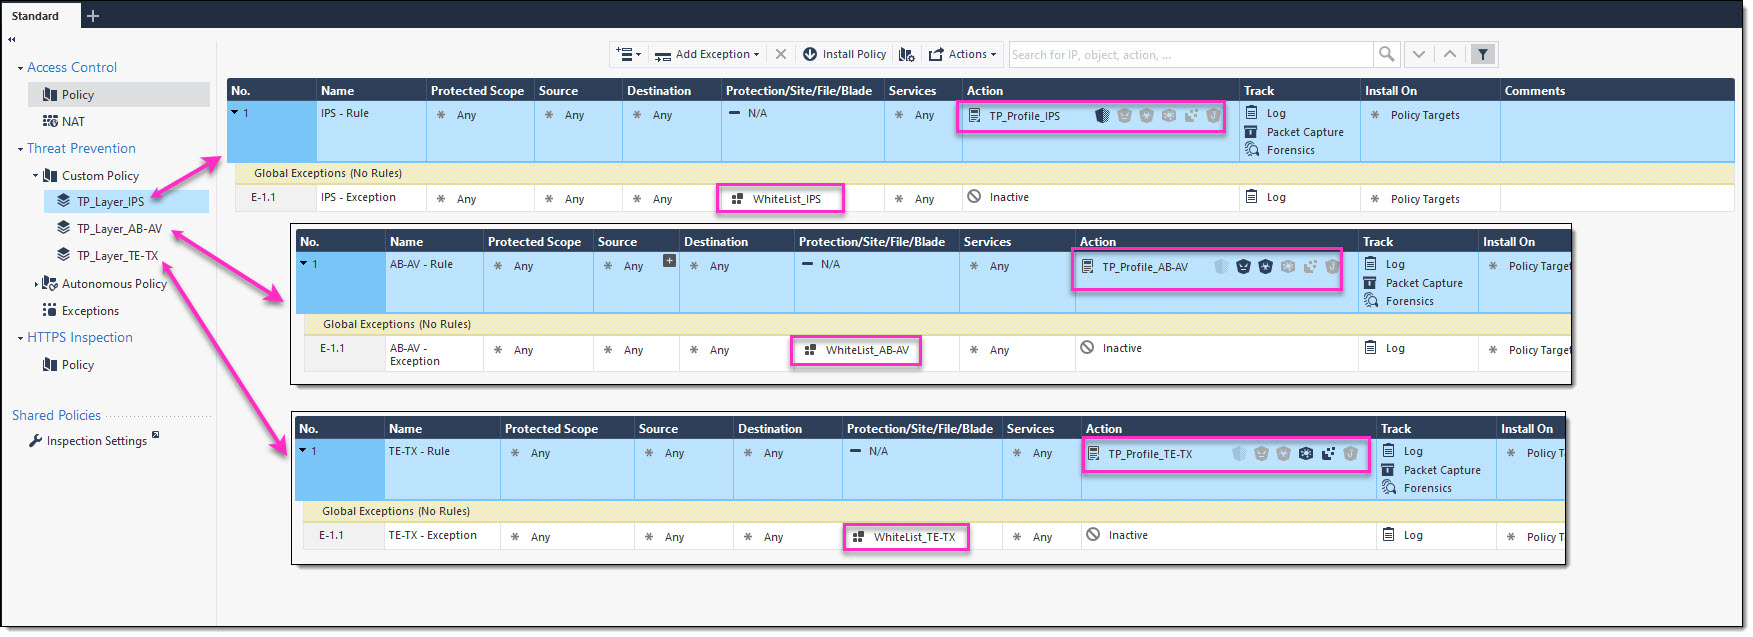
Create a Rule Base for each layer, and a different exception rule with the created Custom Application/Site in Protection/Site/File/Blade:

-
In the Action column, select Detect or Inactive to disable the applicable Threat Prevention Blade for the applicable websites/URLs.


|
|
Notes:
|
Creating Exceptions from IPS Protections
|
Step |
Instructions |
|---|---|
|
1 |
Go to Security Policies > Threat Prevention > Policy > IPS Protections. |
|
2 |
Right-click a protection and select Add Exception. |
|
3 |
Configure the exception rule. |
|
4 |
Click OK. |
|
5 |
Install Policy. |
Creating Exceptions from Logs or Events
In some cases, after evaluating a log or an event in the Logs & Monitor view, it may be necessary to update a rule exception in the SmartConsoleRule Base. You can do this directly from within the Logs & Monitor view. You can apply the exception to a specified rule or apply the exception to all rules that show under Global Exceptions.
|
Step |
Instructions |
|---|---|
|
1 |
Click Logs & Monitor > Logs tab. |
|
2 |
Right-click the log and select Add Exception. |
|
3 |
Configure the settings for the exception. |
|
4 |
Configure the settings for the exception. |
|
5 |
In the New Exception Rule window:
|
|
6 |
Install Policy. |
Exception Groups
The Exception Groups pane shows a list of exception groups that were created, the rules that use them, and any comments related to the defined group.
|
Option |
Meaning |
|---|---|
|
New |
Creates a new exception group. |
|
Edit |
Modifies an existing exception group. |
|
Delete |
Deletes an exception group. |
|
Search |
Search for an exception group. |
Global Exceptions
The system comes with a predefined group named Global Exceptions. Exceptions that you define in the Global Exceptions group are automatically added to every rule in the Rule Base. For other exception groups, you can decide to which rules to add them.
Exception Groups in the Rule Base
Global exceptions and other exception groups are added as shaded rows below the rule in the Rule Base. Each exception group is labeled with a tab that shows the exception group's name. The exceptions within a group are identified in the No column using the syntax: E - <rule number>.<exception number>, where E identifies the line as an exception.
If there is a Global Exceptions group that contains two exceptions, all rules show the exception rows in the Rule BaseNo column as E-1.1 and E-1.2. Note - that the numbering of exception varies when you move the exceptions within a rule.
To view exception groups in the Rule Base:
Click the plus or minus sign next to the rule number in the No. column to expand or collapse the rule exceptions and exception groups.
Creating Exception Groups
When you create an exception group, you create a container for one or more exceptions. After you create the group, add exceptions to them. You can then add the group to rules that require the exception group in the Threat PreventionRule Base.
|
Step |
Instructions |
|---|---|
|
1 |
In SmartConsole, select Security Policies > Threat Prevention > Exceptions. |
|
2 |
In the Exceptions section, click New. |
|
3 |
|
|
4 |
Click OK. |
|
5 |
Install the Threat Prevention policies. |
Adding Exceptions to Exception Groups
To use exception groups, you must add exception rules to them
|
Step |
Instructions |
|---|---|
|
1 |
In SmartConsole, select Security Policies > Threat Prevention > Exceptions. |
|
2 |
In the Exceptions section, click the exception group to which you want to add an exception. |
|
3 |
Click Add Exception Rule. |
|
4 |
Configure the settings for the new exception rule. |
|
5 |
Install the Threat Prevention policy. |
Adding Exception Groups to the Rule Base
You can add exception groups to Threat Prevention rules. This only applies to exception groups that are configured to Manually attach to a rule.
|
Step |
Instructions |
|---|---|
|
1 |
Click Security Policies > Threat Prevention > Policy. |
|
2 |
Right-click the rule and select Add Exception Group > <group name>. |
|
3 |
Install the Threat Prevention policies. |