Connecting UserCheck Client to the Security Gateway
Connecting UserCheck Client
If UserCheck for DLP is enabled on the Security Gateway![]() Dedicated Check Point server that runs Check Point software to inspect traffic and enforce Security Policies for connected network resources., users must enter their username and password after the client installs.
Dedicated Check Point server that runs Check Point software to inspect traffic and enforce Security Policies for connected network resources., users must enter their username and password after the client installs.
When the UserCheck Client is first installed, the UserCheck Client tray icon indicates that it is not connected.
When the UserCheck Client connects to the Security Gateway, the UserCheck Client tray icon shows that the client is active.
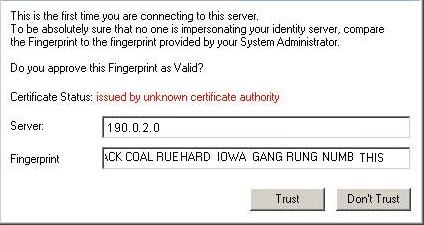
The first time that the UserCheck Client connects to the Security Gateway, it asks user to approve of the Security Gateway fingerprint.
Example:
|
|
Best Practices:
|

Example of message to users about the UserCheck Client installation (for DLP):
Dear Users, Our company has implemented a Data Loss Prevention automation to protect our confidential data from unintentional leakage. Soon you will be asked to verify the connection between a small client that we will install on your computer and the computer that will send you notifications.This client will pop up notifications if you try to send a message that contains protected data. It might let you to send the data anyway, if you are sure that it does not violate our data-security guidelines. When the client is installed, you will see a window that asks if you trust the DLP server. Check that the server is SERVER NAME and then click Trust.In the next window, enter your username and password, and then click OK. |
|
|
Note - If the UserCheck Client is not connected to the Security Gateway, the behavior is as if the client was never installed. Email notifications are sent for SMTP incidents and the Gaia Portal |

UserCheck and Check Point Password Authentication
To enable Check Point password authentication:
-
-
From the top, click Objects > Object Explorer.
-
In the left pane, select only Users/Identities.
-
Configure the required settings:
 If the required User object already exists
-
Double-click the applicable User object.
-
From the left, click General.
-
In the General properties section, make sure to configure a valid email address.
-
Click OK.
If the required User object does not exist yet
-
Make sure the applicable User Template object exists.
If it does not, from the top toolbar, click New > Users/Identity > User Template > configure the required settings > click OK.
-
From the top toolbar, click New > Users/Identity > User.
-
Select the required User Template and click OK.
-
Configure the required settings:
-
At the top, configure the object name
-
On General page, in the General properties section, make sure to configure a valid email address.
-
On Authentication page, in the Authentication Method section, select Check Point Password > click Set new password > enter the password > click OK.
-
-
Click OK.
-
-
Close the Object Explorer window.
-
-
UserCheck Client Configuration:
-
On the endpoint computer, right-click the UserCheck Client icon in the Notification Area (next to the system clock).
-
Click Settings.
-
Click Advanced.
-
Select Authentication with Check Point user accounts defined internally in SmartConsole.
-