


|
|
|
Best practice - Configure anti-spoofing on the Check Point gateway interfaces.
It is not necessary to Configure a rule that specifies which port to open and which endpoint can talk. The gateway automatically gets this information from the signaling. For a given H.323 signaling rule (with RAS and/or H.323 services), the gateway automatically opens ports for the H.245 connections and RTP/RTCP media stream connections.
For example, if the Connect message identifies port 80 as the H.245 port, the port will not be opened.
The Check Point Security Gateway window shows.
Note - Rematch connections is selected by default.
Note – The old policy rules are still intact for calls already in-progress and they will not be dropped.
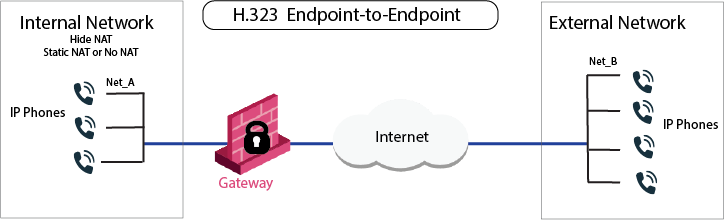
The IP Phones communicate directly, without a Gatekeeper or an H.323 gateway. Static NAT can be configured for the phones on the internal side of the gateway.
An endpoint-to-endpoint topology is shown in the image, with Net_A and Net_B on opposite sides of the gateway. This procedure explains:
No incoming calls can be made when Hide NAT is configured for the internal phones.
VoIP rule for this scenario:
Source |
Destination |
Services & Applications |
Action |
|---|---|---|---|
Net_A Net_B |
Net_B Net_A |
H323 |
Accept |
To Configure an H.323 rule for endpoint-to-endpoint topology:
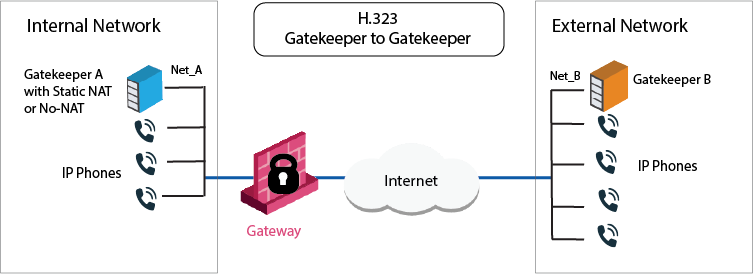
Each Gatekeeper or H.323 gateway controls a separate endpoint domain. Static NAT can be configured for the Internal Gatekeeper. For the internal phones, Hide NAT or Static NAT can be configured.
The illustration shows a Gatekeeper-to-Gatekeeper or Gateway topology, with Net_A and Net_B on opposite sides of the gateway. This procedure shows you how to:
VoIP Access Control rule for this scenario
Source |
Destination |
Service |
Action |
Comment |
|---|---|---|---|---|
GK_A GK_B GW_A GW_B |
GK_B GK_A GW_B GW_A |
H323 H323_ras |
Accept |
Bidirectional calls |
To define an H.323 rule for Gatekeeper-to-Gatekeeper topology:
OR
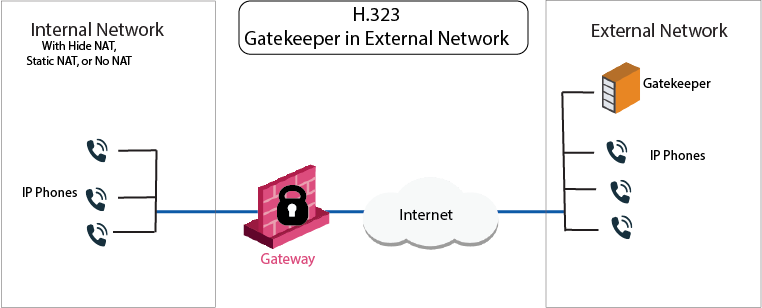
The IP phones use the services of a Gatekeeper or H.323 gateway on the external side of the gateway. This topology enables the use of the services of a Gatekeeper or an H.323 gateway that is maintained by another organization. It is possible to configure Hide NAT or Static NAT (or No-NAT) for the phones on the internal side of the gateway.
The image shows an H.323 topology with a Gateway, with Net_A and Net_B on opposite sides of the gateway. This procedure shows you how to:
VoIP Access Control rule for this scenario:
Source |
Destination |
Services & Applications |
Action |
Comment |
|---|---|---|---|---|
Net_A Net_B GK_B |
GK_B Net_A |
H323_ras |
Accept |
Bidirectional calls. |
To configure an H.323 rule for a Gatekeeper in the external network:
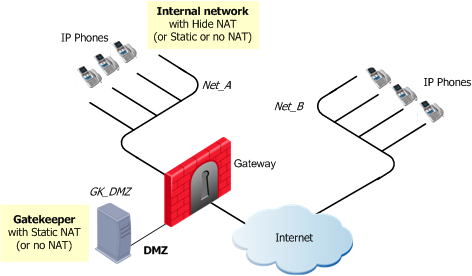
The image shows an H.323-based VoIP topology where a Gatekeeper is installed in the DMZ. This procedure explains how to:
VoIP rule for this scenario:
Source |
Destination |
Services & Applications |
Action |
Comments |
|---|---|---|---|---|
GK_DMZ Net_A Net_B |
Net_A Net_B GK_DMZ |
H323 H323_ras |
Accept |
Bidirectional calls. |
Static NAT rules for the Gatekeeper in the DMZ:
Original |
Translated |
Comments |
||||
|---|---|---|---|---|---|---|
Source |
Destination |
Services & Applications |
Source |
Destination |
Services & Applications |
|
GK_DMZ |
Net_B |
*Any |
GK_DMZ: |
= |
= |
Outgoing calls |
Net_B |
GK_DMZ_NATed |
*Any |
= |
GK_DMZ: |
= |
Incoming calls |
To define an H.323 rule for a Gatekeeper in the DMZ:
In the image, these are Net_A and Net_B.
To define Hide NAT or Static NAT for the phones in the internal network, edit the network object for Net_A.
If you select Hide NAT:
You must associate the translated IP address with the MAC address of the gateway interface that is on the same network as the translated addresses. Use the arp command in UNIX or the local.arp file in Windows.
The command fw ctl arp displays the ARP proxy table on gateways that run on Windows. On UNIX, use the arp -a command.
H323_ras service greater or equal to the Gatekeeper registration time-out. The Inspection Settings window opens.

