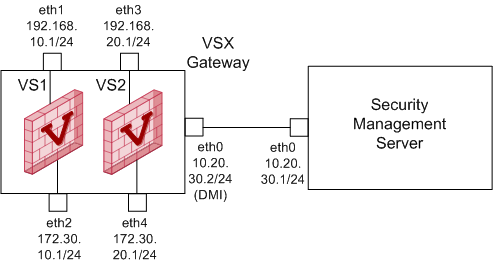
Example 1: VSX Gateway managed by Security Management Server
This example shows:
- One VSX Gateway with DMI management connection
- Two Virtual Systems:
- Each Virtual System connects directly to available physical interfaces on the VSX Gateway
- One Virtual System is configured with the IPsec VPN Software Blade
- One Virtual System is configured with the Mobile Access Software Blade
- One Security Management Server manages both the VSX Gateway and the two Virtual Systems.
Related documentation:
Topology
Action Plan
- Install the Security Management Server.
- Install the VSX Gateway.
- Create the VSX Gateway object in SmartConsole.
- Configure the VSX Gateway object in SmartConsole.
- Create the first Virtual System object in SmartConsole.
- Configure the first Virtual System object in SmartConsole.
- Create the second Virtual System object in SmartConsole.
- Configure the second Virtual System object in SmartConsole.
Step 1: Install the Security Management Server
Step
|
Description
|
1
|
Install a Check Point appliance or Open Server.
|
2
|
Install Gaia OS.
|
3
|
Run the Gaia First Time Configuration Wizard.
These settings are specific to the Security Management Server:
- On the page, select the applicable interface and configure the applicable IPv4 address.
In our example: eth0, 10.20.30.1/24
- On the page, select .
- On the page, select .
|
4
|
Install the applicable licenses.
|
5
|
Configure the Security Management Server:
- Connect with SmartConsole to the Security Management Server.
- Configure the applicable Management Software Blades and settings:
- Publish the session.
|
Step 2: Install the VSX Gateway
Step
|
Description
|
1
|
Install a Check Point appliance or Open Server.
|
2
|
Install Gaia OS.
|
3
|
Run the Gaia First Time Configuration Wizard.
These settings are specific to the VSX Gateway:
- On the page, select the interface for the DMI management connection and configure the applicable IPv4 address.
In our example: eth0, 10.20.30.2/24
- On the page, do not configure IP addresses on physical interfaces, to which your Virtual Systems connect directly.
- On the page, select .
- On the page, select .
- On the page, select .
|
4
|
Make sure to enable the applicable physical interfaces:
To enable a physical interface in Gaia Portal
- Connect to the Gaia Portal in your web browser.
In our example: https://10.20.30.2
- Click .
- In the upper left corner, click the lock icon to obtain the configuration lock.
- Select the applicable physical interface > click .
- Select .
- Click .
To enable a physical interface in Gaia Clish, run:
set interface <Name of Physical Interface> state onsave config
|
5
|
Install the applicable licenses.
|
Step 3: Create the VSX Gateway object in SmartConsole
See Configuring VSX Gateways.
Step
|
Description
|
1
|
At the top, click .
|
2
|
On the page:
- In the field, enter the desired name for this object.
In our example: MyVsxGw
- In the field, enter the same IPv4 address you configured during the First Time Configuration Wizard of the VSX Gateway on the page.
In our example: 10.20.30.1/24
- In the field, enter the same IPv6 address you configured during the First Time Configuration Wizard of the VSX Gateway on the page.
- In the field, select the Check Point version.
In our example: R80.20
- Click .
|
3
|
On the page:
- Select the applicable template.
- Click .
|
4
|
On the page:
- In the field, enter the same Activation Key you entered during the First Time Configuration Wizard of the VSX Gateway.
- In the field, enter the same Activation Key again.
- Click .
- Click .
|
|
If the field does not show , perform these steps:
- Connect to the command line on the VSX Gateway.
- Make sure there is a physical connectivity between the VSX Gateway and the Management Server (for example, pings can pass).
- Run:
cpconfig - Enter the number of this option:
Secure Internal Communication - Follow the instructions on the screen to change the Activation Key.
- On the page, click .
- Enter the same Activation Key you entered in the
cpconfig menu. - Click .
|
5
|
On the page:
- Examine the list of the interfaces - it must show all the physical interfaces on the VSX Gateway.
- If you plan to connect more than one Virtual System directly to same physical interface, you must select for that physical interface.
- Click .
|
6
|
On the page:
- You can select and configure the first desired Virtual Network Device at this time (we recommend to do this later) - Virtual Switch or Virtual Router.
- Click .
|
7
|
On the page:
- Examine the default access rules.
- Select the applicable default access rules.
- Configure the applicable source objects, if needed.
- Click .
Important - These access rules apply only to the VSX Gateway (context of VS0), which is not intended to pass any "production" traffic.
|
8
|
On the page:
- Click and wait for the operation to finish.
- Click for more information.
- Click .
|
9
|
Examine the VSX configuration:
- Connect to the command line on the VSX Gateway.
- Log in to Gaia Clish, or Expert mode.
- Run:
vsx stat -v
|
Step 4: Configure the VSX Gateway object in SmartConsole
See Working with VSX Gateways.
Step
|
Description
|
1
|
From the left navigation toolbar, click .
|
2
|
Open the VSX Gateway object.
In our example: MyVsxGw
|
3
|
Enable the applicable Software Blades.
Refer to:
|
4
|
Configure other applicable settings.
|
5
|
Click to push the updated VSX Configuration.
Click for more information.
|
6
|
Install policy on the VSX Gateway object:
- Click .
The window opens.
- In the field, select the default policy for this VSX Gateway object.
This policy is called: <Name of VSX Gateway object>_VSX.
In our example: MyVsxGw_VSX
- Click .
|
7
|
Examine the VSX configuration:
- Connect to the command line on the VSX Gateway.
- Log in to Gaia Clish, or Expert mode.
- Run:
vsx stat -v
|
Step 5: Create the first Virtual System object in SmartConsole
See Creating a New Virtual System.
Step
|
Description
|
1
|
At the top, click .
|
2
|
On the page:
- In the field, enter the desired name for this object.
In our example: MyVs1
- In the field, select the applicable VSX Gateway object.
In our example: MyVsxGw
- You can select , if you need to override the creation template that was used for the initial configuration of the VSX Gateway.
- Click .
|
3
|
On the page:
In our example, this Virtual System connects directly to two physical interfaces on the VSX Gateway.
In the section, add the "external" interface:
- Click .
- In the field, select the applicable physical interface.
In our example: eth1
- In the section, enter the applicable and .
In our example: 192.168.10.1/24
You can select to "advertise" this Virtual System to neighboring Virtual Devices. This enables IPv4 connectivity between neighboring Virtual Devices.
- In the section, enter the applicable and .
You can select to "advertise" this Virtual System to neighboring Virtual Devices. This enables IPv6 connectivity between the neighboring Virtual Devices.
- Click .
|
|
In the section, add the "internal" interface:
- Click .
- In the field, select the applicable physical interface - this is the "internal" interface.
In our example: eth2
- In the section, enter the applicable and .
In our example: 172.30.10.1/24
You can select to "advertise" this Virtual System to neighboring Virtual Devices. This enables IPv4 connectivity between the neighboring Virtual Devices.
- In the section, enter the applicable and .
You can select to "advertise" this Virtual System to neighboring Virtual Devices. This enables IPv6 connectivity between the neighboring Virtual Devices.
- Click .
In the section, click to configure the applicable static routes and the Default Route.
Click .
|
4
|
On the page:
- Click and wait for the operation to finish.
- Click for more information.
- Click .
|
5
|
Examine the VSX configuration:
- Connect to the command line on the VSX Gateway.
- Log in to Gaia Clish, or Expert mode.
- Run:
vsx stat -v
|
Step 6: Configure the first Virtual System object in SmartConsole
See Modifying a Virtual System.
Step
|
Description
|
1
|
From the left navigation toolbar, click .
|
2
|
Open the first Virtual System object.
In our example: MyVs1
|
3
|
Enable the applicable Software Blades.
In our example: IPsec VPN blade
Refer to:
|
4
|
Configure other applicable settings.
|
5
|
Click to push the updated VSX Configuration.
|
6
|
Configure and install the applicable policy on the first Virtual System object.
|
7
|
Examine the VSX configuration:
- Connect to the command line on the VSX Gateway.
- Log in to Gaia Clish, or Expert mode.
- Run:
vsx stat -v
|
Step 7: Create the second Virtual System object in SmartConsole
See Creating a New Virtual System.
Step
|
Description
|
1
|
At the top, click .
|
2
|
On the page:
- In the field, enter the desired name for this object.
In our example: MyVs2
- In the field, select the applicable VSX Gateway object.
In our example: MyVsxGw
- You can select , if you need to override the creation template that was used for the initial configuration of the VSX Gateway.
- Click .
|
3
|
On the page:
In our example, this Virtual System connects directly to two physical interfaces on the VSX Gateway.
In the section, add the "external" interface:
- Click .
- In the field, select the applicable physical interface.
In our example: eth1
- In the section, enter the applicable and .
In our example: 192.168.20.1/24
You can select to "advertise" this Virtual System to neighboring Virtual Devices. This enables IPv4 connectivity between Virtual Devices.
- In the section, enter the applicable and .
You can select to "advertise" this Virtual System to neighboring Virtual Devices. This enables IPv6 connectivity between Virtual Devices.
- Click .
|
|
In the section, add the "internal" interface:
- Click .
- In the field, select the applicable physical interface - this is the "internal" interface.
In our example: eth2
- In the section, enter the applicable and .
In our example: 172.30.20.1/24
You can select to "advertise" this Virtual System to neighboring Virtual Devices. This enables IPv4 connectivity between the neighboring Virtual Devices.
- In the section, enter the applicable and .
You can select to "advertise" this Virtual System to neighboring Virtual Devices. This enables IPv6 connectivity between the neighboring Virtual Devices.
- Click .
In the section, click to configure the applicable static routes and the Default Route.
Click .
|
4
|
On the page:
- Click and wait for the operation to finish.
- Click for more information.
- Click .
|
5
|
Examine the VSX configuration:
- Connect to the command line on the VSX Gateway.
- Log in to Gaia Clish, or Expert mode.
- Run:
vsx stat -v
|
Step 8: Configure the second Virtual System object in SmartConsole
See Modifying a Virtual System.
Step
|
Description
|
1
|
From the left navigation toolbar, click .
|
2
|
Open the second Virtual System object.
In our example: MyVs2
|
3
|
Enable the applicable Software Blades.
In our example: Mobile Access blade
Refer to:
|
4
|
Configure other applicable settings.
|
5
|
Click to push the updated VSX Configuration.
|
6
|
Configure and install the applicable policy on the second Virtual System object.
|
7
|
Examine the VSX configuration:
- Connect to the command line on the VSX Gateway.
- Log in to Gaia Clish, or Expert mode.
- Run:
vsx stat -v
|


