


|
|
|
This section describes how to define and configure a Virtual Router. As with physical routers, each Virtual Router maintains a routing table containing entries that describe known networks and directions on how to reach them.
You can define Virtual Routers for both external and internal communications. A Virtual Router that connects to external networks, including a DMZ and the Internet, are referred to as an external Virtual Router. A Virtual Router that connects to internal, protected networks is known as an internal Virtual Router.
Item |
Description |
|
Item |
Description |
|---|---|---|---|---|
1 |
Internet |
|
6 |
External Virtual Router |
2 |
Router |
|
7 |
Virtual Systems |
3 |
Security Management Server |
|
|
VLAN Interface |
4 |
VSX Gateway |
|
|
VLAN Trunk |
5 |
VLAN switch |
|
|
Warp Link |
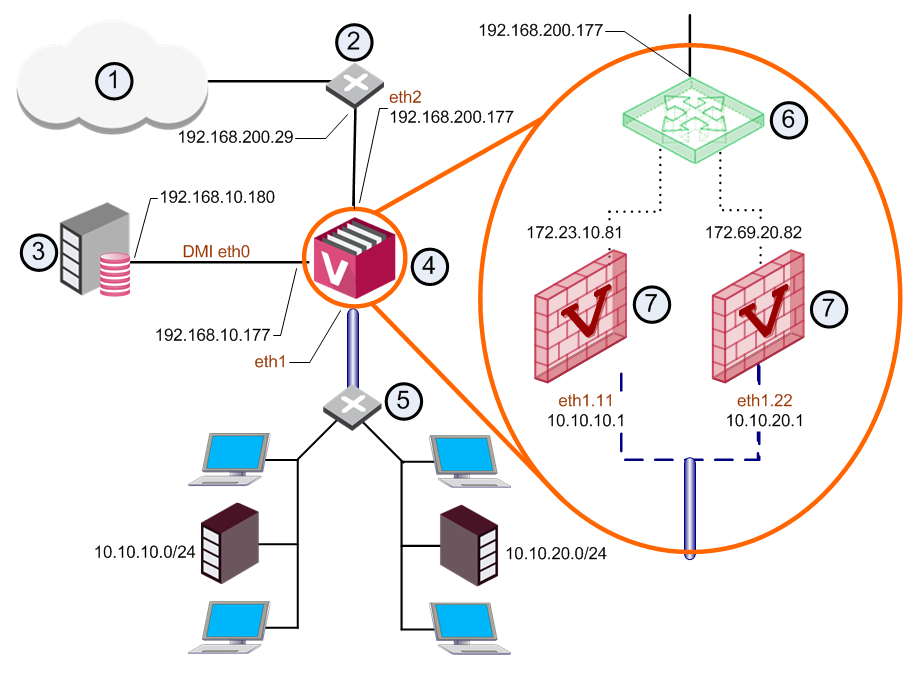
An external Virtual Router functions as the external gateway for Virtual Systems, allowing them to share a single secure physical interface leading to external networks and the Internet.
Item |
Description |
|
Item |
Description |
|---|---|---|---|---|
1 |
Internet |
|
7 |
Unnumbered |
2 |
Router |
|
8 |
Virtual Systems |
3 |
Security Management Server |
|
9 |
Internal Virtual Router |
4 |
VSX Gateway |
|
|
VLAN Interface |
5 |
Switch |
|
|
VLAN Truck |
6 |
External Virtual Router |
|
|
Warp link |
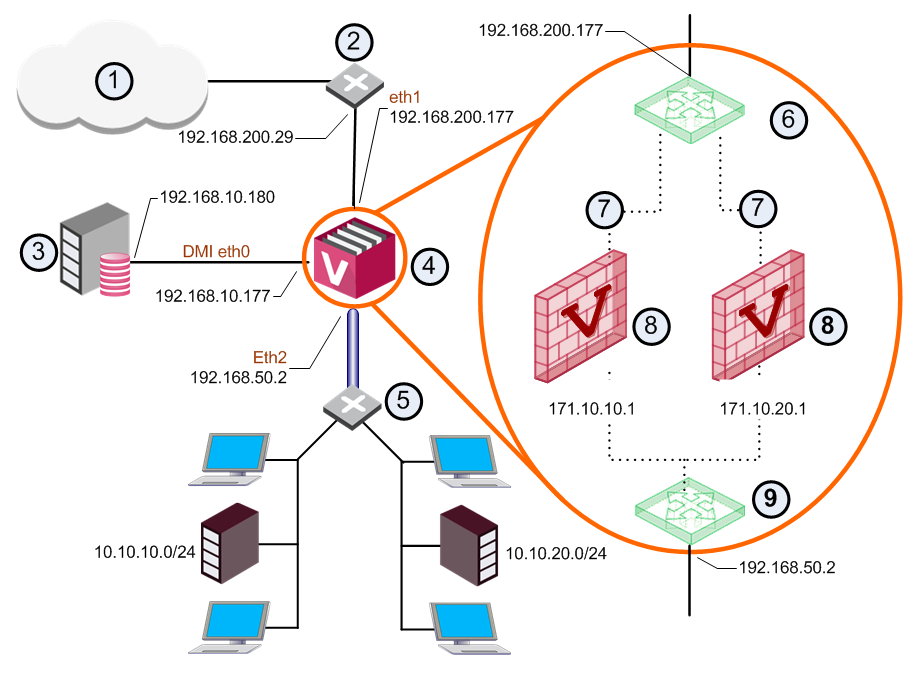
In this scenario, VSX creates Warp interfaces between the Virtual Systems and both Virtual Routers. Note that the external Virtual System interfaces are defined as unnumbered interfaces.
An internal Virtual Router typically connects with one interface leading to internal networks through a switch with additional Warp Links leading to other Virtual Systems located in the VSX Gateway.
After you create a new Virtual Router, add new interfaces to the Virtual Systems to connect to the Virtual Router.
Use the Virtual Router Wizard to create a new Virtual Router. You can modify the initial definition and configure advanced options after you complete the wizard.
On interfaces and routes, you can select the Propagate route to adjacent Virtual Devices option to broadcast the IP address to neighboring Virtual Devices. This option enables connectivity with these Virtual Devices.
To create a Virtual Router:
The Virtual Router Wizard opens.
The General Properties page enables you change the Virtual Router IP address as well as to add comments and change the icon color as displayed in SmartConsole.
The Virtual Router Network Configuration page defines the network topology for the Virtual Router. For an external interface, you define one or more shared external interfaces and a default gateway.
Topology is defined by these properties:
To add an interface, click New. The Interface Properties window opens. Select an interface from the list and define the IP address, net mask and other properties.

