


|
|
The Zero Touch Web Portal allows administrators to manage the initial configurations of hundreds or thousands of Small Office and Gaia Gateways with settings from the Zero Touch Cloud Service. These gateway settings include Time Zones, administrator passwords, and network information.
Gaia Gateway administrators can save time with Gaia image installations on multiple remote gateways with Blink (Gaia Fast Deployment).
Zero Touch connects to the Check Point User Center for inventory information about the users' Account IDs and their purchased gateways.
The Zero Touch Web Portal allows administrators to accomplish these tasks:
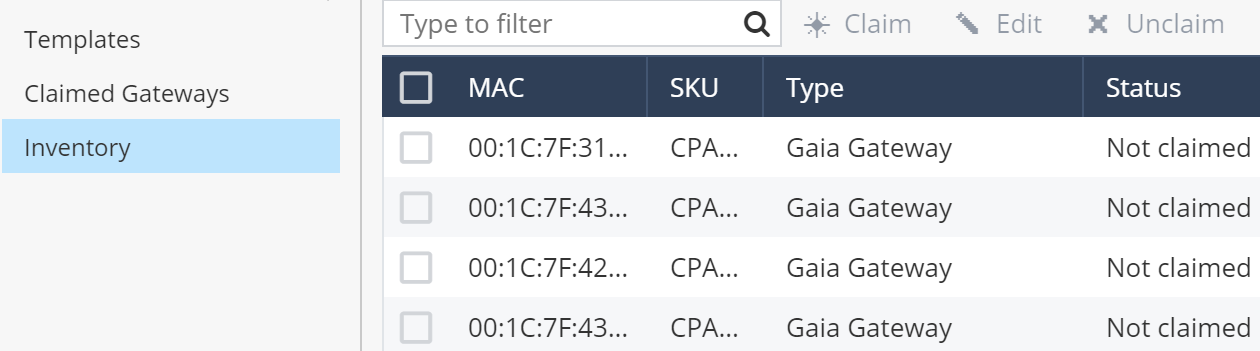
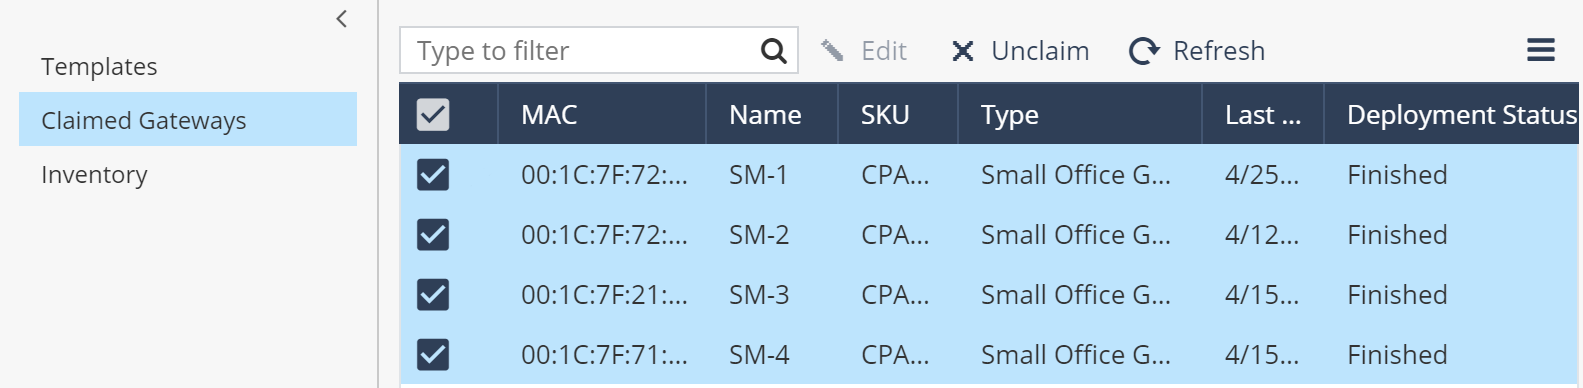
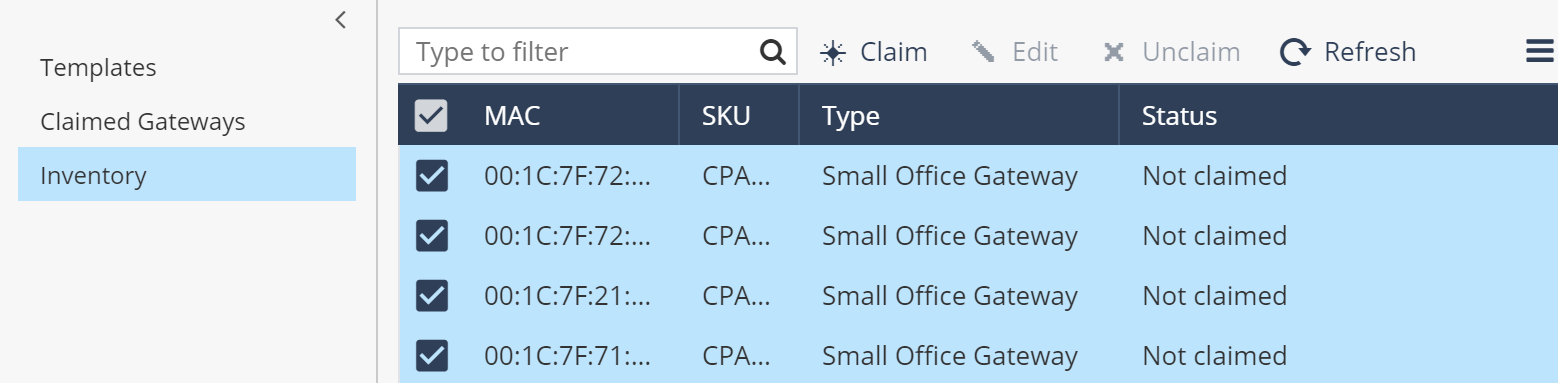
The Zero Touch Web Portal's Inventory window shows Account IDs and their gateways. The window has several ways to sort the gateways on the list to help find and identify individual devices.
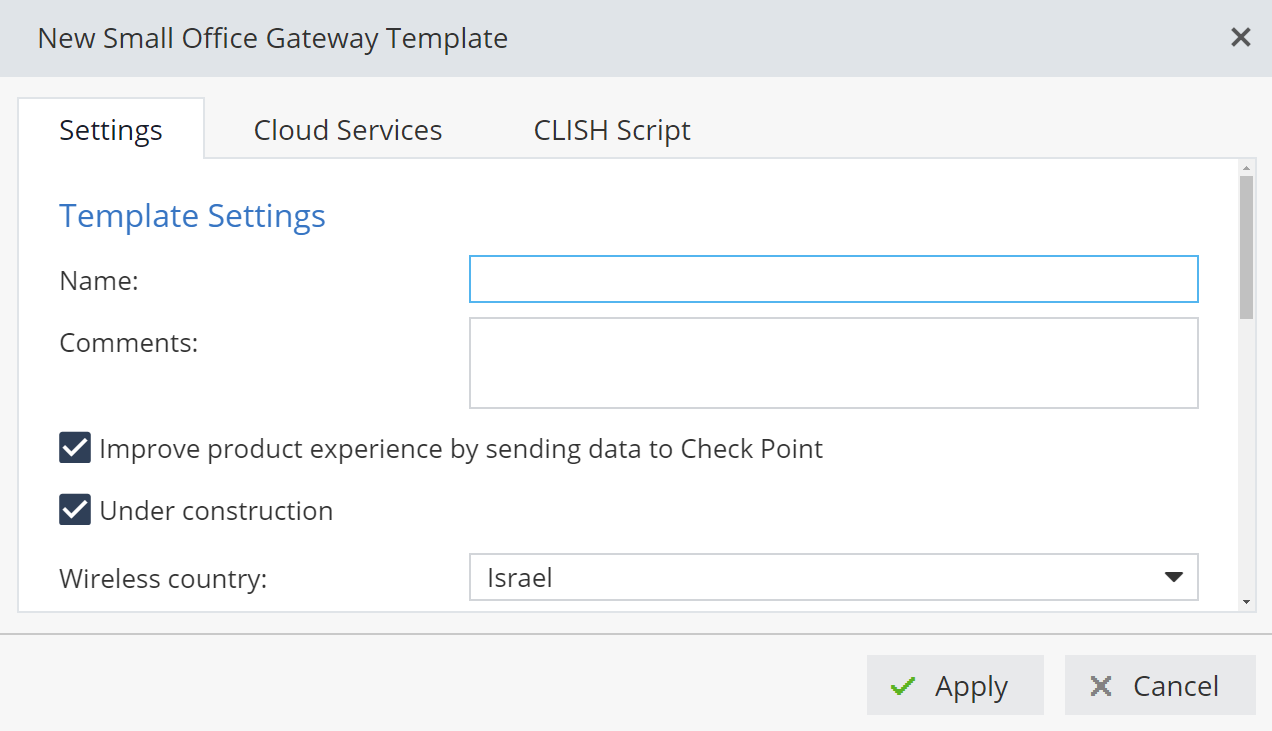
Gateway templates supply required settings for gateway deployments. If a suitable template isn't available for the Account ID from previous deployments, a new template is necessary. Check the Under Construction on the template forms to prevent downloads from the Zero Touch Cloud Service until the settings choices are final.
The Claim operation loads template configuration settings into gateways on the Zero Touch Web Portal. Claimed gateways are eligible for deployment.
When gateways are ready for deployment with the final settings choices, the Unmark as Under Construction option allows and initiates the downloads to the gateways.
Deployment status messages show that the deployment is in progress and then complete. Detailed progress information is available for Gaia Gateways with the Deployment Progress option.
Starting Zero Touch:
The gateways to configure are contained within your Account IDs on Zero Touch. The gateways must be new or they must have factory default resets to use Zero Touch for their initial configurations.
Note - You must be an Administrator (not a Viewer) for the Account ID that owns the gateways you want to configure.
Navigating the Web Portal:

Administrator tasks to configure gateways:
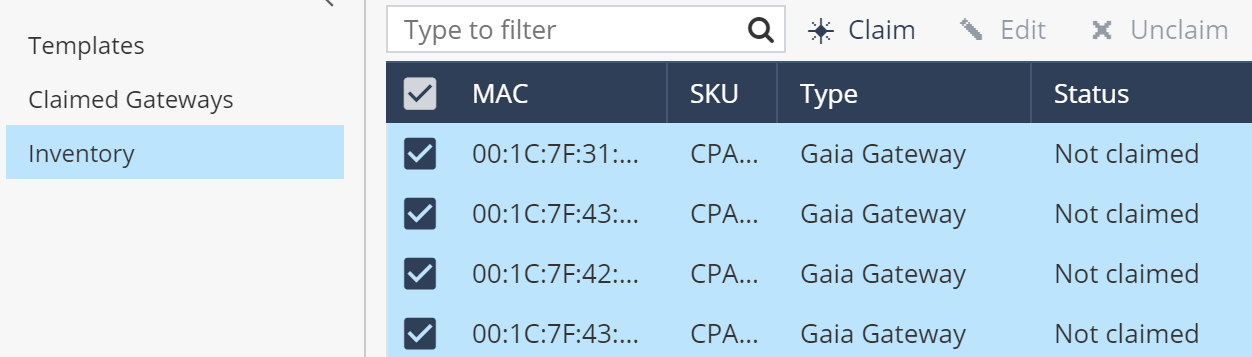
Identify gateways to deploy.
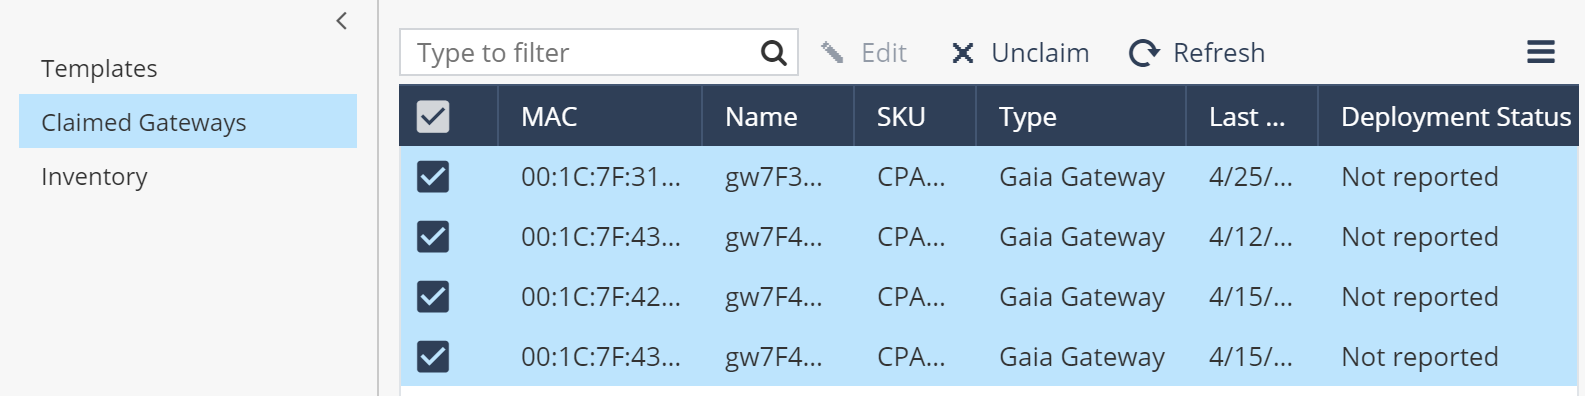
The Inventory window shows the User Center Account IDs and their gateways. Each column heading on the inventory list sorts the gateways to help identify specific devices. Every MAC address is unique.

Create gateway templates.
Two template forms are available: Small Office Gateway and Gaia Gateway. The Templates window shows the current Account ID's templates. Each deployment (for one gateway or multiple gateways) must have a completed gateway template.

A check mark on the template's Under Construction box delays gateway downloads until other configuration and deployment choices are final. The Under Construction check boxes on the gateway templates are unchecked by default.
Note - On Gaia Gateways, two passwords are set on the template: The Gateway Administrator password and the Zero Touch Identification Key. The Secure Internal Communication (SIC) activation key is entered.
On Small Office Gateways, the Gateway Administrator password is set and the Security Management Portal (SMP) registration key is entered.
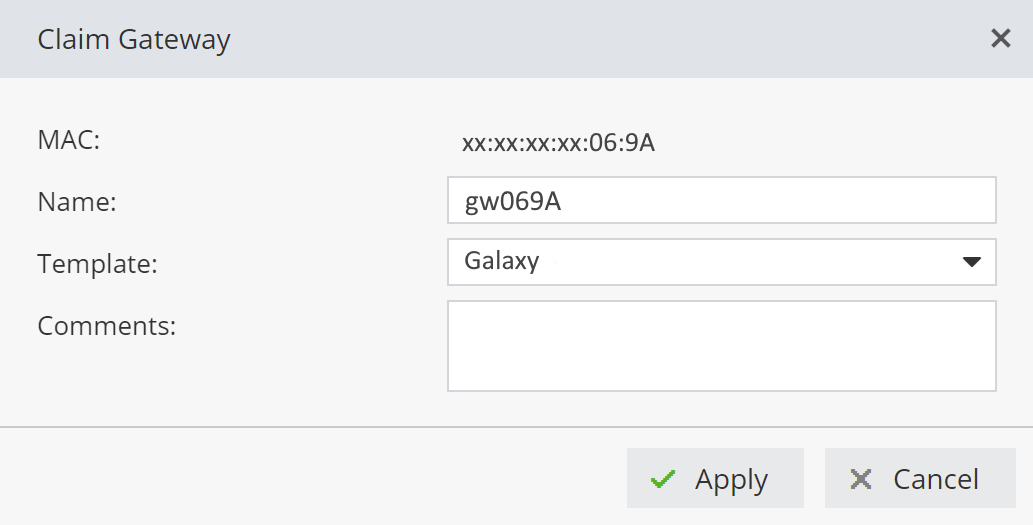
Claim gateways.
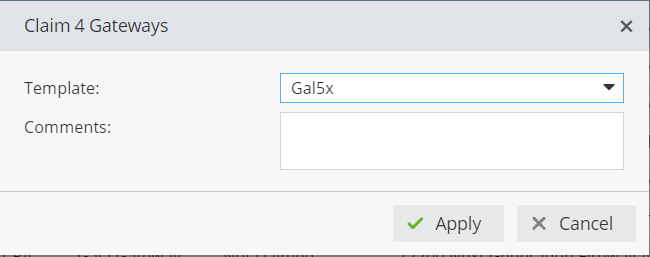
When the gateway template is complete, selections on the Inventory window enable the Claim option. A click on the Claim option opens a Claim Gateway popup window.

The popup window has choices for the gateway name and the template.
Enable gateways to fetch settings.
After all the decisions and initial settings on the gateways are complete, a click on the gateway enables the Actions option on the Claimed Gateways window. A click on Actions > Unmark as Under Construction allows the downloads to begin.

View deployment status and completion messages.
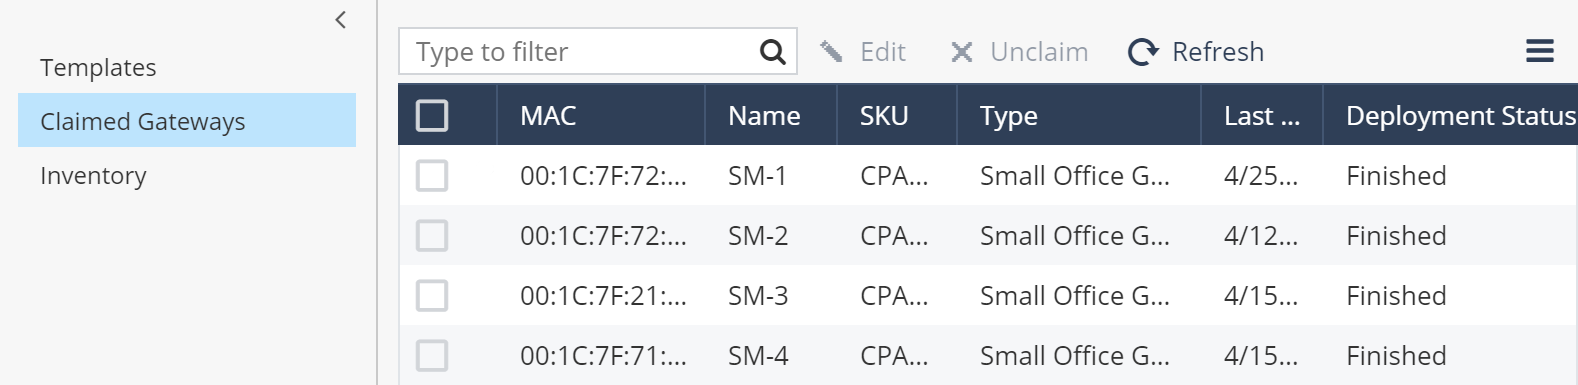
The Deployment Status for gateways on the Claimed Gateways window shows stages during new deployments. When a deployment completes, the status changes to Finished.
The Claimed Gateways window also has a Deployment Progress option for individually selected Gaia Gateways.

On the Templates window, click New > Small Office Gateway to find this form:
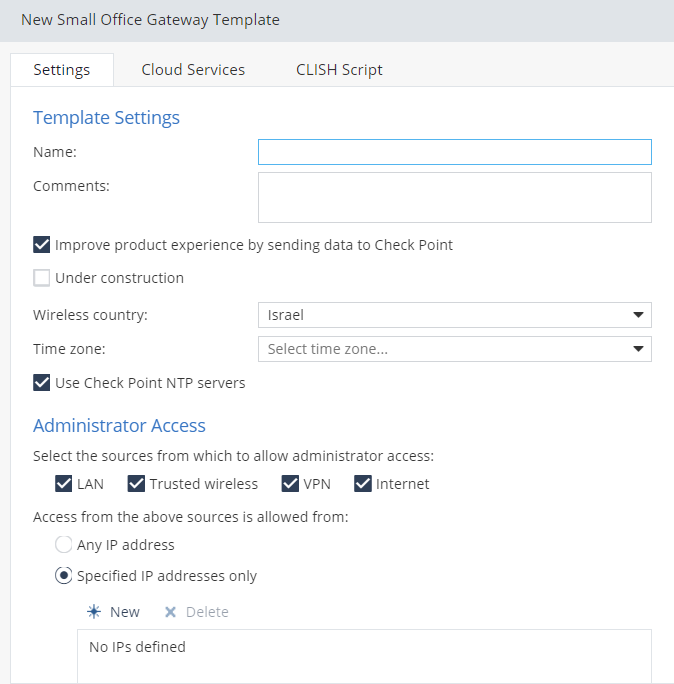
Template Settings |
Description |
|---|---|
Name |
A string for the name of the template. |
Comments |
General comments. (Optional.) |
Improve product experience by sending data to Check Point |
Default. |
Under Construction |
Check the Under Construction boxes on gateway templates to prevent downloads until the final configuration and deployment decisions are complete. |
Wireless Country |
The gateway's location. |
Time Zone |
The gateway's Time Zone. |
Use Check Point NTP servers |
Default. |
Administrator Access |
Description |
|---|---|
Select the sources from which to allow administrator access:
|
All four sources are the defaults. |
Access from the above sources is allowed from:
|
Specified IP addresses only is the default. |
Administrator password |
Enter Administrator password. |
Confirm password |
Confirm Administrator password. |
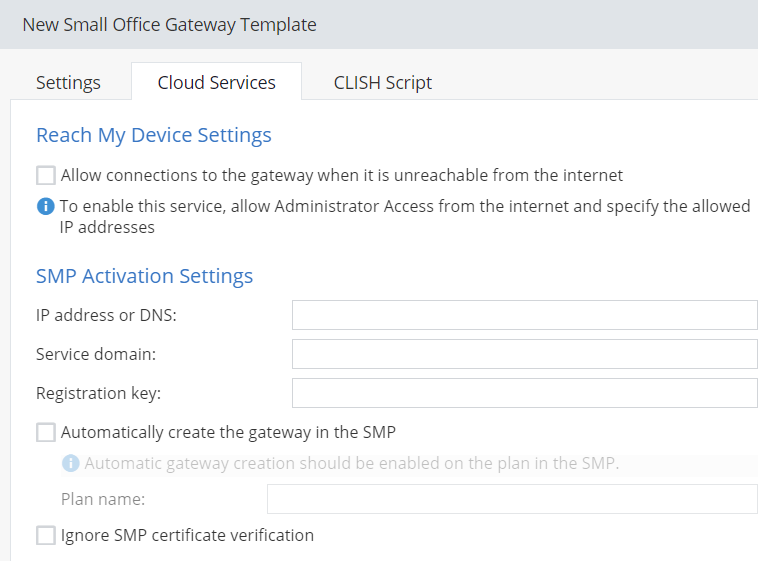
Reach My Device Settings |
Description |
|---|---|
Allow connections to the gateway when it is unreachable from the internet. |
Check this box to connect to a gateway when it is behind NAT. (See Terms.) |
To enable this service, allow Administrator Access from the internet and specify the allowed IP addresses. |
These settings are in the Administrator Access section. |
SMP Activation Settings |
Description |
|---|---|
IP address or DNS name |
IP address or DNS name of this gateway. |
Service domain |
Service domain name for the SMP server. |
Registration key |
Available on the gateway page in the SMP server. |
Automatically create the gateway in the SMP. |
To use this feature in the SMP, select this box and enter the SMP Plan name. |
Ignore SMP certificate verification |
Select this box if the SMP has a certificate from a Certificate Authority that is not known to the gateway. |
Note - To manage a gateway from the SMP, this information is necessary for cloud activations.
CLISH Script Area (Commands that execute after all the other settings.)
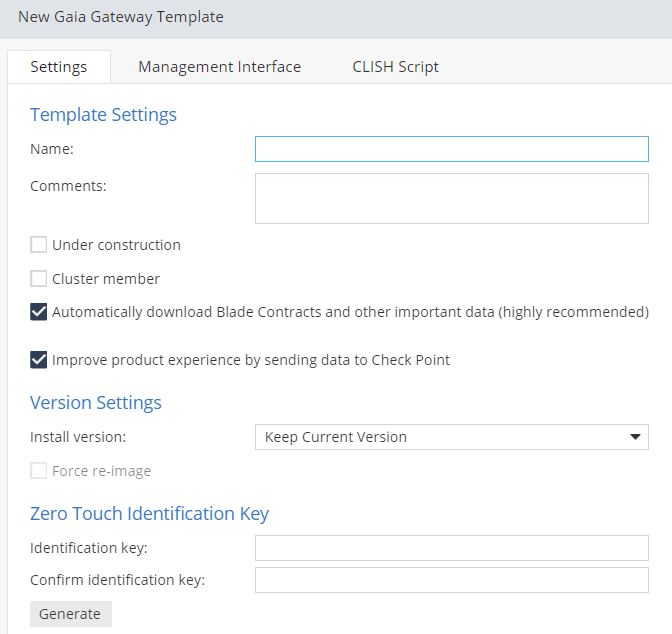
On the Templates window, click New > Gaia Gateway to find this form:
Template Settings |
Description |
|---|---|
Name |
A string for the name of the template. |
Comments |
General comments. (Optional.) |
Under Construction |
Check the Under Construction boxes on gateway templates to prevent downloads until the final configuration and deployment decisions are complete. |
Cluster Member |
Check the box if the gateway is a member of a cluster. |
Automatically download Blade Contracts and other important data (Highly recommended) |
Default. |
Improve product experience by sending data to Check Point |
Default. |
Version Settings |
Description |
|---|---|
Install version |
Drop-down list for Blink images to select. |
Force re-image |
Check the box to force a re-image of the machine even if the selected image version is already installed. |
Zero Touch Identification Key |
Description |
|---|---|
Identification key |
String set at command line interface: |
Confirm identification key |
Confirm the command line interface Identification Key string. |
Generate |
Create an Identification Key here. It will display in both fields above. |
Administrator Access |
Description |
|---|---|
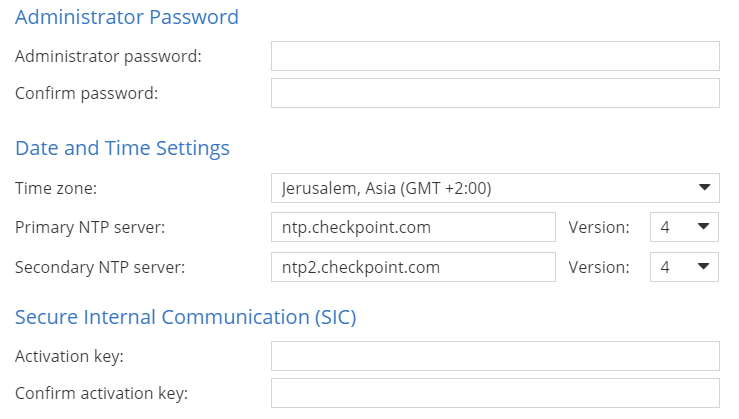
Administrator password |
Enter the password. |
Confirm password |
Confirm the password. |
Date and Time Settings |
Description |
|---|---|
Time zone |
Drop-down list for the time zone of the gateway. |
Primary NTP server
|
Default. |
Secondary NTP server
|
Default. |
Secure Internal Communication |
Description |
|---|---|
Activation key |
Enter key. |
Confirm activation key |
Confirm key. |
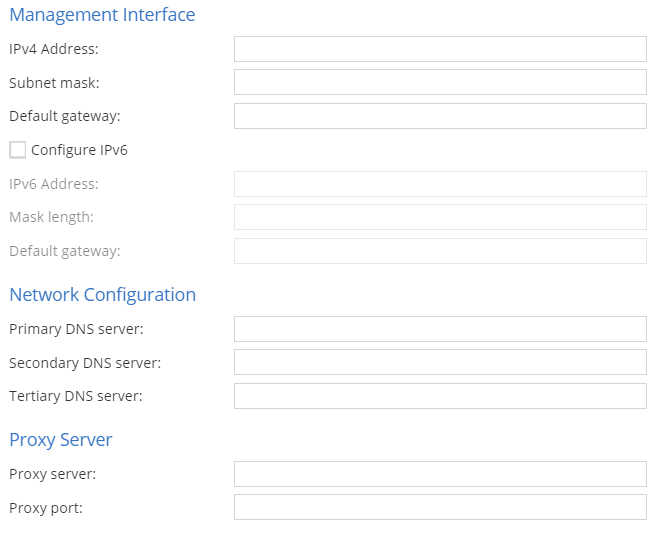
Management Interface |
Description |
|---|---|
IPv4 Address
|
If you enter the IPv4 address, you must enter the subnet mask and default gateway. |
Configure IPv6
|
If you check the IPv6 box, you must enter the IPv6 address, mask length, and the default gateway. |
Network Configuration |
Description |
|---|---|
Primary DNS server |
Enter primary DNS server. |
Secondary DNS server |
Enter secondary DNS server. |
Tertiary DNS server |
Enter tertiary DNS server. |
Proxy Server |
Description |
|---|---|
Proxy server |
Enter the IP address if you have a proxy server. |
Proxy port |
Enter the number after the ":" for your proxy IP address. |
CLISH Script Area (Commands that execute after all the other settings.)
A customer with five Gaia Gateways needs to redeploy one of them. The Gaia Gateway has factory default settings in a new location.
Use the Zero Touch Web Portal to fetch settings for one Gaia Gateway.
To redeploy one Gaia Gateway:


Note - Make sure to create or generate a Zero Touch Identification Key and set it on the gateway's command line:
set cloud-config identification-key <key_string>


Note - When Blink images and CLISH scripts are not used, the Deployment Progress list shows the First Time Wizard, Reboot, and the CLISH script (even if the script is empty).
The Deployment Status for the gateway on the Claimed Gateways window shows Finished when the configuration is complete.
A customer with four new Gaia Gateways at multiple locations wants to deploy them.
Use the Zero Touch Web Portal to configure multiple Gaia Gateways.
To deploy four new Gaia Gateways:

Note - Make sure to create or generate a Zero Touch Identification Key for the four gateways and set it with this command on each gateway's command line:
set cloud-config identification-key <key_string>

The Deployment Status column shows stages, such as Installing and Rebooting, for each gateway.
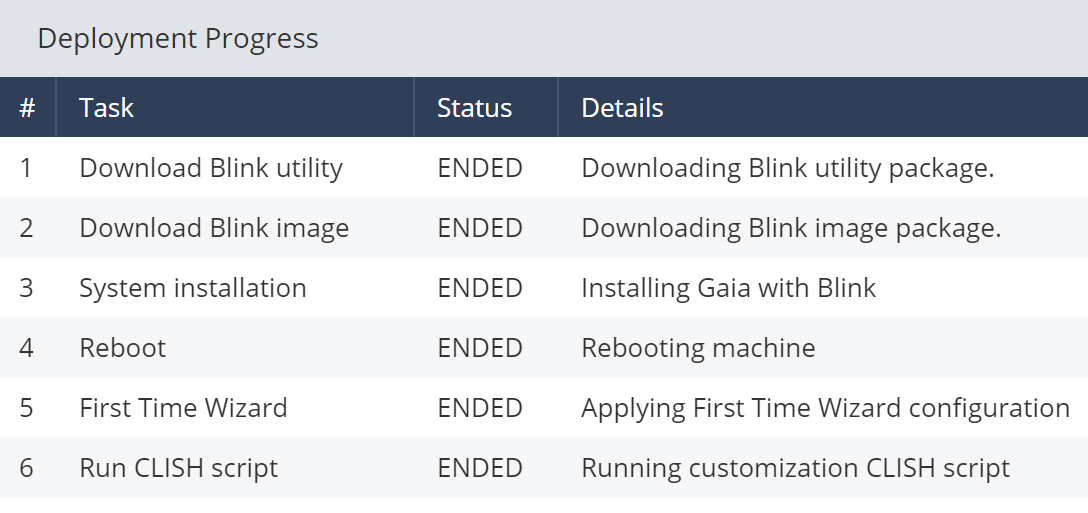
Note - When Blink images and CLISH scripts are not used, the Deployment Progress list shows the First Time Wizard, Reboot, and the CLISH script (even if the script is empty).
The Deployment Status for the four gateways on the Claimed Gateways window shows Finished when the configurations are complete.
Use the Zero Touch Web Portal to fetch settings for four previously claimed and deployed Small Office Gateways. The gateways still have the status of being claimed.
To redeploy four Small Office Gateways:

Note - If Gaia Gateways are also on the Inventory window list, use the Type option to select Small Office Gateways only.
Note - The gateways show the Deployment Status as Finished from the previous deployment.
This prevents automatic downloads from their previous template when the gateways return to factory default settings.
Note - The four gateways now show wrench symbols.


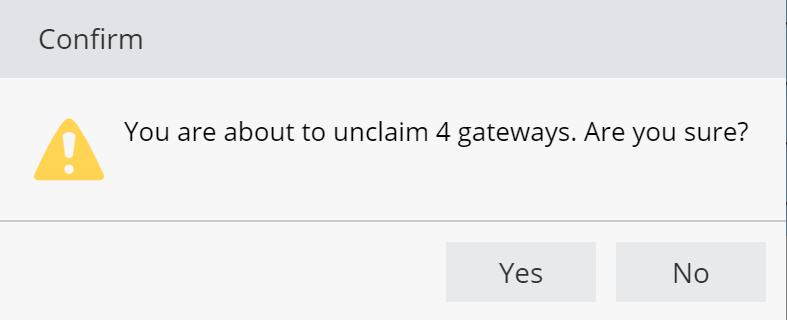
Note - You can unclaim and then claim gateways to change to a different template.


The Deployment Status fields for the gateways on the Claimed Gateways window show stages during the new deployment, such as Installing and Rebooting, for each gateway.
The Deployment Status fields show Finished for complete configurations.
Web Portal Top:
Templates Window:
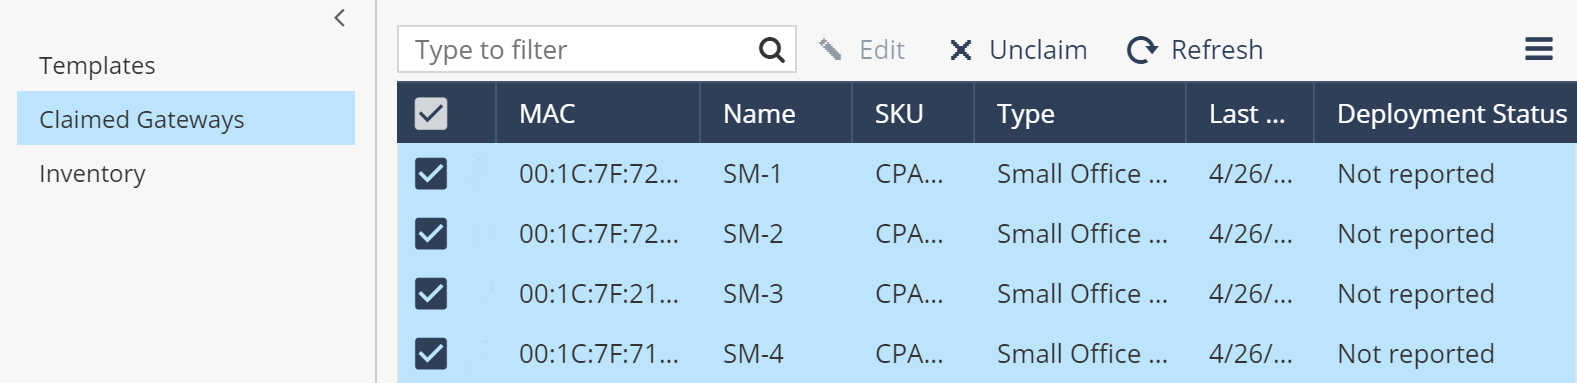
Claimed Gateways Window:
Inventory Window:
