Working with Virtual Switches
|
|
Important:
|

Virtual Switches provide Layer-2 connectivity between Virtual Systems and internal or external networks. This section describes how to define and configure a Virtual Switch![]() Virtual Device on a VSX Gateway or VSX Cluster Member that functions as a physical switch. Acronym: VSW.. As with physical switches, each Virtual Switch maintains a forwarding table containing entries that describe known networks and directions for reaching them.
Virtual Device on a VSX Gateway or VSX Cluster Member that functions as a physical switch. Acronym: VSW.. As with physical switches, each Virtual Switch maintains a forwarding table containing entries that describe known networks and directions for reaching them.
You can define Virtual Switches for external and internal communications.
|
Item |
Description |
|
Item |
Description |
|---|---|---|---|---|
|
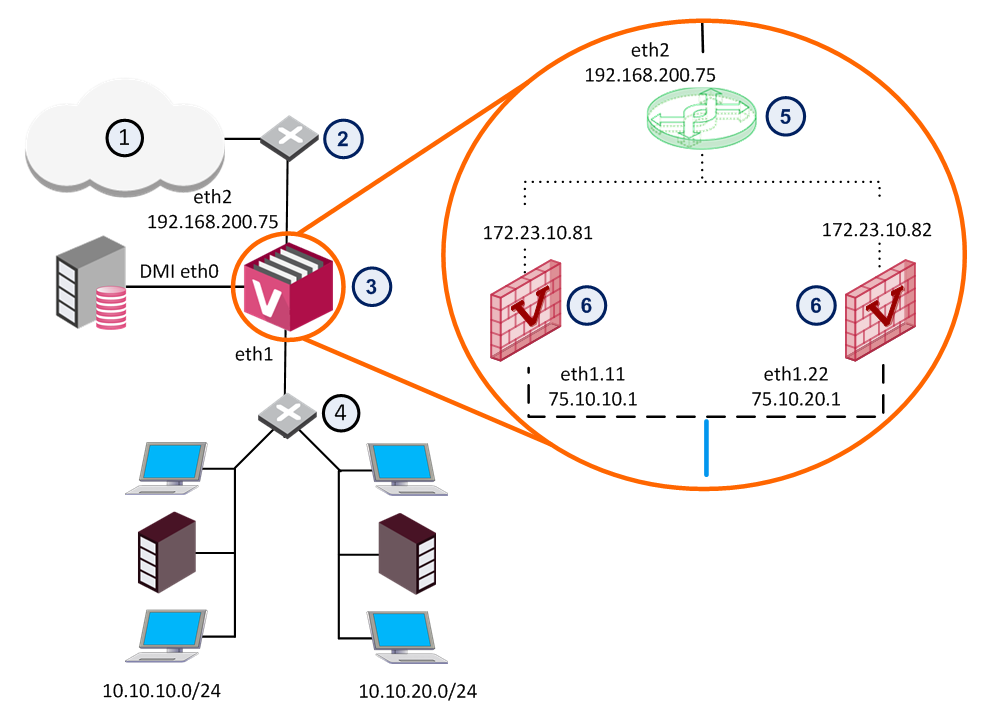
1 |
Internet |
|
6 |
Virtual Systems |
|
2 |
Router |
|
|
VLAN Interface |
|
3 |
|
|
VLAN Trunk |
|
|
4 |
VLAN Switch |
|
|
|
|
5 |
Virtual Switch |
|
|
|


The figure shows a typical deployment using a Virtual Switch for external connections and a VLAN trunk leading to the internal, protected network.
Creating a New Virtual Switch
Use the Virtual Switch Wizard to create a new Virtual Switch. You can modify the initial definition and configure advanced options after completing the wizard.
To create a new Virtual Switch:
-
Connect with SmartConsole
 Check Point GUI application used to manage a Check Point environment - configure Security Policies, configure devices, monitor products and events, install updates, and so on. to the Security Management Server Dedicated Check Point server that runs Check Point software to manage the objects and policies in a Check Point environment within a single management Domain. Synonym: Single-Domain Security Management Server. or Target Domain Management Server Check Point Single-Domain Security Management Server or a Multi-Domain Security Management Server. used to manage the new Virtual System Virtual Device on a VSX Gateway or VSX Cluster Member that implements the functionality of a Security Gateway. Acronym: VS..
 -
From the left navigation panel, click Gateways & Servers.
-
Create a new Virtual Switch object in one of these ways:
-
From the top toolbar, click the New (
 ) > VSX > New Virtual Switch.
 -
In the top left corner, click Objects menu > More object types > Network Object > Gateways and Servers > VSX > New Virtual Switch.
-
In the top right corner, click Objects Pane > New > More > Network Object > Gateways and Servers > VSX > Virtual Switch.
The Virtual Switch Wizard opens.
-
-
In the Name field, enter the name for the new Virtual Switch.
-
In the VSX Gateway / Cluster field, select the applicable VSX
Virtual System Extension. Check Point virtual networking solution, hosted on a computer or cluster with virtual abstractions of Check Point Security Gateways and other network devices. These Virtual Devices provide the same functionality as their physical counterparts. Gateway or VSX Cluster Two or more Security Gateways that work together in a redundant configuration - High Availability, or Load Sharing.. -
Click Next.
-
In the Interfaces section, click Addto add the interface, to which the Virtual Switch connects.
-
Click Next.
-
Click Finish.
Modifying a Virtual Switch
-
Connect with SmartConsole to the Security Management Server or Target Domain Management Server used to manage the Virtual Switch.
-
From the Gateways & Servers view or Object Explorer, double-click the Virtual Switch object.
Virtual Switch - General Properties
The General Properties page allows you to add comments and change the icon color as displayed in SmartConsole.
Virtual Switch - Topology
The Topologypage defines Virtual Switch interfaces. You can only modify the one defined interface. You cannot change the settings for Warp interfaces in this window.
To add an interface:
-
Click New.
The Interface Properties window opens.
-
Select an interface from the list and define the IP address, net mask and other properties.
-
Optional: Click Actions > Copy to Clipboard to copy the Interfaces table in the CSV format.