Open Frames Download Complete PDF Send Feedback Print This Page

Previous

Next

Replacing the CMM

Use this procedure to install a replacement CMM that you received with the Return Merchandise Authorization (RMA) process. This procedure assumes that you have a Dual Chassis environment.

The procedure to replace the CMM has these steps:

  1. Install the CMM to Standby Chassis.
  2. CMM firmware validation - Make sure that the same firmware version is installed on all CMM units in your system.
  3. Chassis Type validation - Make sure that the same Chassis type is configured on all CMM units in your system.
  4. Chassis ID validation - Make sure that the Chassis ID configured on the replacement CMM matches to the Chassis it is plugged into.

    Note - You can find the CMM configuration information on the label on the outside of the CMM packaging box.

Note - The replacement CMM must be on the standby Chassis.

To replace the CMM:

  1. Install the replacement CMM to the Standby Chassis.
  2. Make sure that all CMMs in environment have the same firmware version:

    > asg_version -i

    +-------------------------------------------------------------------+

    | Hardware Versions |

    +-------------------------------------------------------------------+

    | Component | Type | Configuration | Firmware |

    +-------------------------------------------------------------------+

    | Chassis 1 |

    +-------------------------------------------------------------------+

    | SSM1 | SSM160 | N/A | 2.4.C9 |

    | SSM2 | SSM160 | N/A | 2.4.C9 |

    | CMM(active) | N/A | N/A | 2.83 |

    | CMM(standby) | N/A | N/A | 2.83 |

    +-------------------------------------------------------------------+

    +-------------------------------------------------------------------+

    | Hardware Versions |

    +-------------------------------------------------------------------+

    | Component | Type | Configuration | Firmware |

    +-------------------------------------------------------------------+

    | Chassis 2 |

    +-------------------------------------------------------------------+

    | SSM1 | SSM160 | N/A | 2.4.C9 |

    | SSM2 | SSM160 | N/A | 2.4.C9 |

    | CMM(active) | N/A | N/A | 2.83 |

    | CMM(standby) | N/A | N/A | 2.83 |

    +-------------------------------------------------------------------+

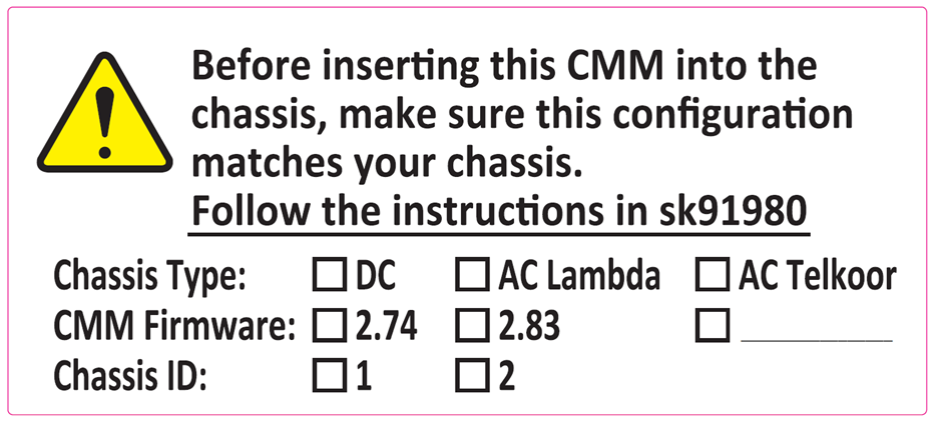
    • Make sure that the firmware version is the same as the firmware version on the label on the outside of the CMM packaging box.
    • If the firmware versions are not the same, do the Upgrading CMM Firmware procedure as necessary.

Validating the Chassis Type

Make sure that the Chassis type on the label on the outside of the CMM packaging box is the same as on your Chassis.

The supported Chassis types for the 61000 Security System are:

  • DC Chassis
  • AC Telkoor: The AC Chassis has two rows of three Telkoor power supplies in each row.
  • AC Lambda: The AC Chassis has one row of five Lambda power supplies

The supported Chassis Types for the 41000 Security System are:

  • AC Telkoor: Three Telkoor power supplies
  • DC Chassis

If your Chassis Type is not the same as the Chassis Type on the label on the outside of the CMM packaging box:

Do this procedure on the Standby Chassis:

  1. Put the Chassis in Standby state:

    > asg chassis_admin -c <Chassis_id> down

  2. Remove all CMMs from the Chassis.
  3. Insert the replacement CMM into the Chassis.
  4. Open a console connection to the CMM:
    1. Connect one end of a serial cable to the serial port on the CMM front panel.
    2. Connect the other end of the serial cable to a computer.
    3. Open a console window. Use the default serial connection parameters: 9600, 8, N, 1.
  5. Start the installation:

    # install.sh

  6. For the 61000 Security System, select the applicable Chassis type.

    The menu can be different according to CMM firmware. This menu is displayed when firmware 2.74 is installed.

    -----------------------------------------------------------------
    | Select one of following options. |
    | 1: Press 1 for 13U chassis (Telkoor PSU). |
    | 2: Press 2 for 14U chassis (Telkoor PSU). |
    | 3: Press 3 for 14U chassis (Lambda PSU). |
    | Q: Press Q for to skipp. |
    -----------------------------------------------------------------

    • If the Chassis type is AC Telkoor PSU or a DC Chassis, enter: 2
    • If the Chassis type is AC Lambda, enter: 3
  7. Insert the second CMM.
  8. For the 41000 Security System: When presented with the option to upgrade EEprom – select option 1.

    ------------------------------------------------------

    | EEprom upgrading |

    | 1: Press 1 for EEProm upgrading. |

    | 2. Press 2 to skip. |

    ------------------------------------------------------

  9. Return the Chassis to the Standby state:

    > asg chassis_admin –c <chassis_id> u

Validating Chassis ID

Make sure that the Chassis ID on the label on the outside of the CMM packaging box is the same as the label on the Chassis. If the Standby Chassis ID is different from the RMA CMM Chassis ID, change the RMA CMM Chassis ID. To learn how to change the Chassis ID, see Setting the Chassis ID.

 
Top of Page ©2014 Check Point Software Technologies Ltd. All rights reserved. Download Complete PDF Send Feedback Print