Instructions for Specific SIEM Applications
This section describes how to configure SIEM applications to receive logs optimally.
|
|
Note - The instructions below are provided as a best effort only. For technical assistance, contact the Technical Support of the specific SIEM application. |
Rsyslog
By default, Rsyslog is not configured to use the RFC 5424 timestamp format.
Therefore, you should manually change the Rsyslog setting for it to be compliant with the Log Exporter output format.
On the Rsyslog server:
-
Edit this file:
/etc/rsyslog.conf -
Comment out this line (add the # character in the beginning), if it is not commented out already:
#"$ActionFileDefaultTemplate RSYSLOG_TraditionalFileFormat" -
Add this line in the file:
$ActionFileDefaultTemplate RSYSLOG_SyslogProtocol23Format
Note - You can create and use a custom file with your required format.
You can remove the DNS lookup configuration from this predefined format file.
-
Save the change in the file and close it.
-
Restart the Rsyslog service:
service rsyslog restart
ArcSight
ArcSight recommends to name the server certificate file as 'syslog-ng'.
-
Convert the key to the P12 format:
openssl pkcs12 -inkey syslogServer.key -in syslogServer.crt -export -out syslog-ng.p12 -name "syslogng-alias" -password pass:changeit -
Make sure the value of the environment variable
ARCSIGHT_HOMEis the path to the connector installation directory. -
Run the certificate manager on the Linux KDE console:
$ARCSIGHT_HOME/current/bin/arcsight agent keytoolgui -
From the File menu, open the keystore:
$ARCSIGHT_HOME/current/jre/lib/security/cacertsThe password is:
changeit -
From the menu, select Import Trusted Certificate
-
From the file dialog, select
ca.pemand save it. -
Save and close the certificate manager.
-
Edit the
agent.propertiesfile to enable the mutual authentication:vi $ARCSIGHT_HOME//current/user/agent/agent.properties -
For the '
syslogng.mutual.auth.enabled' parameter, configure the value 'true':syslogng.mutual.auth.enabled=true -
Add these lines at the bottom of the
agent.propertiesfile:syslogng.tls.keystore.file=user/agent/syslog-ng.p12syslogng.tls.keystore.alias=syslogng-alias -
Save the change in the file and close it.
-
Restart the service:
/etc/init.d/arc_connector_name restart
Splunk
We recommend to use Check Point App for Splunk when exporting logs to a Splunk server.
For more information about installation and deployment, see the Check Point App for Splunk User Guide.
In addition, to configure an encrypted connection:
-
Generate the server PEM file according to the Splunk TLS Documentation:
cat syslogServer.crt syslogServer.key RootCA.pem > splunk.pem -
Edit the '
inputs.conf' file on the Splunk server:vi /opt/splunk/etc/apps/<Name of the app, where the configuration is saved>/local/inputs.conf -
Update the file to use TLS:
[SSL]
serverCert = <Full Path to Server's PEM File>
sslPassword = <Challenge Password>
requireClientCert = true
[tcp-ssl://<port>]
index = <Index>
-
Save the change in the file and close it.
-
Edit the '
server.conf' file on the Splunk server:vi /opt/splunk/etc/system/local/server.conf -
Update the file to use the relevant Certificate Authority PEM file:
[sslConfig]
sslRootCAPath = <Full Path to CA PEM File>

[SSL]
cipherSuite = TLSv1+HIGH:TLSv1.2+HIGH:@STRENGTH
-
Save the change in the file and close it.
-
Restart the Splunk daemon:
/opt/splunk/bin/splunk restart
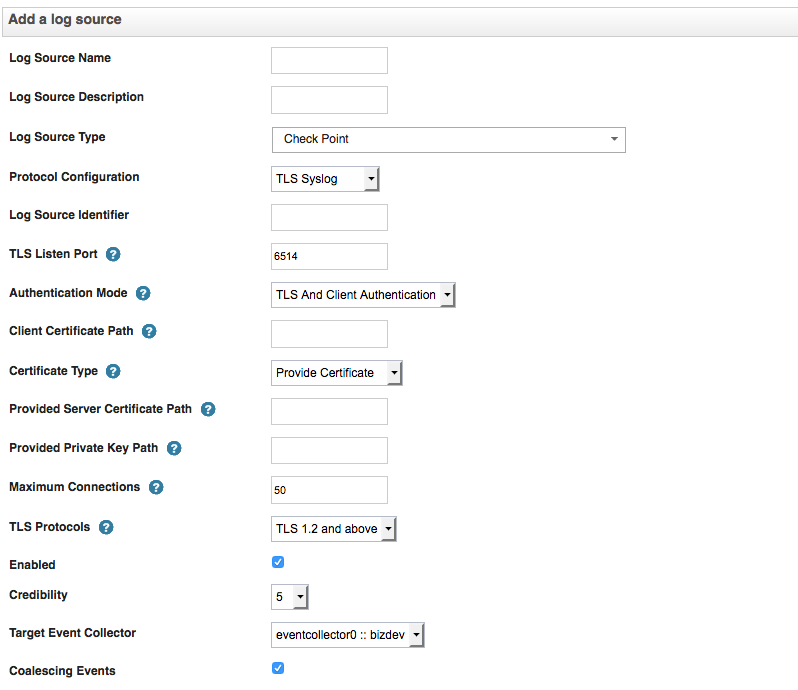
QRadar
-
In the Authentication Mode field, select TLS And Client Authentication.
-
Upload the Check Point certificate and private key to QRadar to the same directory.
-
Provide the absolute path the uploaded files in the Provide Certificate option.
|
|
Notes:
|