Replacing Check Point Security Appliance Expansion Line Cards

|
Important - Before installing, uninstalling, or replacing an Expansion Line Card, a ground strap must be used. Without proper grounding with a wrist strap, ESD (electrostatic discharge) can damage the Security Appliance. |
Supported Check Point Security Appliances
This document applies to these Check Point Security Appliances:
-
4000 Series
-
5000 Series
-
6000 Series
-
12000 Series
-
13000 Series
-
15000 Series
-
16000 Series
-
23000 Series
-
26000 Series
-
Smart-1 3050/3150
-
TE Security Appliances - TE250, TE1000
-
TE Security Appliances - TE100X, TE250X, TE1000X, TE2000X
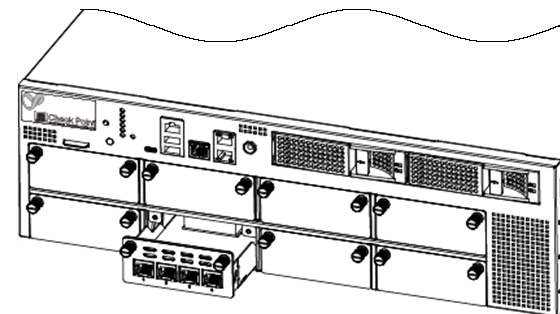
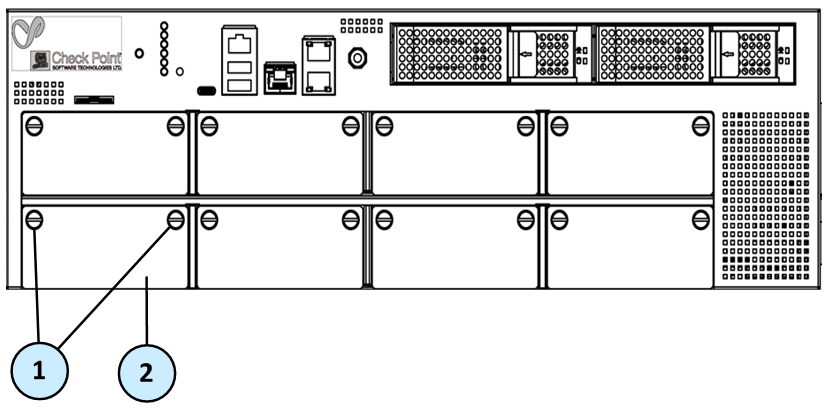
Refer to this illustration when you install, remove, or replace Expansion Line Cards in Check Point Security Appliances.
|
Item |
Description |
|---|---|
|
1 |
Captive screws |
|
2 |
Dummy panel for the expansion slot |
Supported Expansion Line Cards
These Expansion Line Cards are available for Check Point Security Appliances:
-
1 Gb Ethernet
-
10 Gb Ethernet
-
40 Gb Ethernet
-
100/25 Gb Ethernet
Each Security Appliance series has its own supported Expansion Line Cards.
For a list of supported Expansion Line Cards for each Security Appliance, see:
-
5000, 6000, 15000, 16000, 23000, and 26000 Series Security Appliances
-
TE250, TE1000, 4000, 12000, and 13000 Series Security Appliances
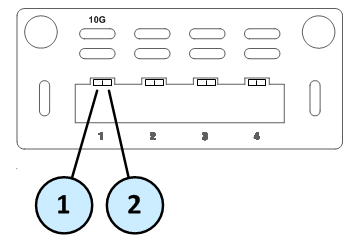
1 Gb Ethernet Expansion Line Cards
| Line Card | Description |
SKU |
|---|---|---|
|
|
4 x 1 GbE SFP |
CPAC-4-1F CPAC-4-1F-B CPAC-4-1F-C |
|
|
2 x 1 GbE SFP |
CPAC-2-1F |
|
|
4 x 1 GbE SFP SR-Bypass 4 x 1 GbE SFP LR-Bypass
|
CPAC-4-1FSR-BP CPAC-4-1FLR-BP |
|
|
4 x 1 GbE RJ45 |
CPAC-4-1C |
|
|
4 x 1 GbE RJ45 Bypass |
CPAC-4-1C-BP CPAC-4-1C-BP-B |
|
|
8 x 1 GbE RJ45 |
CPAC-8-1C CPAC-8-1C-B CPAC-8-1C-TE CPAC-8-1C-C |
|
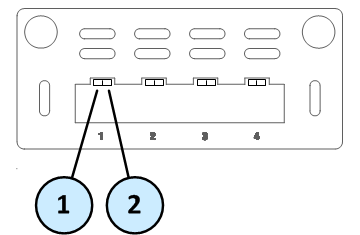
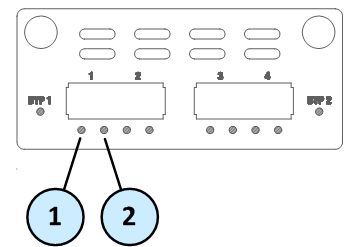
Item |
Component |
Description |
|---|---|---|
|
1 |
Port activity LED |
|
|
2 |
Link speed LED |
For RJ45 ports:
For SFP ports:
|
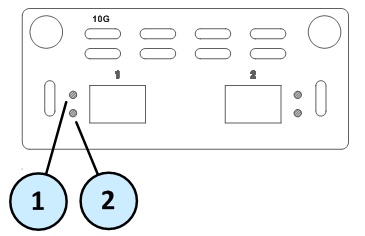
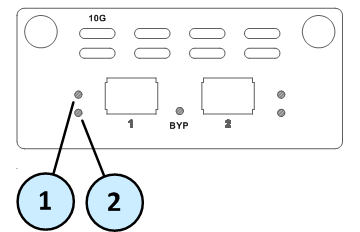
10 Gb Ethernet Expansion Line Cards
| Line Card | Description |
SKU |
|---|---|---|
|
|
2 x 10 GbE SFP+ |
CPAC-2-10F
|
|
|
2 x 10 GbE SFP+ SR-Bypass |
CPAC-2-10FSR-BP CPAC-2-10FSR-BP-B |
|
2 x 10 GbE SFP+ LR-Bypass |
CPAC-2-10FLR-BP |
|
|
|
4 x 10 GbE SFP+ |
CPAC-4-10F
|
|
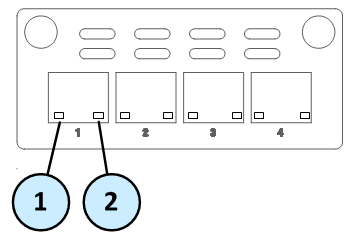
Item |
Component |
Description |
|---|---|---|
|
1 |
Port activity LED |
|
|
2 |
Link speed LED |
|
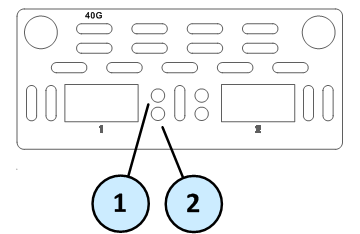
40 Gb Ethernet Expansion Line Card
| Line Card | Description |
SKU |
|---|---|---|
|
|
2 x 40 GbE QSFP+ |
CPAC-2-40F-B CPAC-2-40F-C |
|
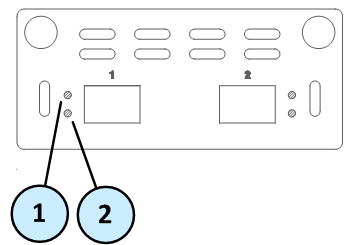
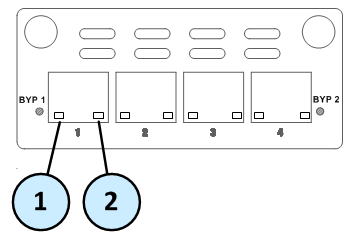
Item |
Component |
Description |
|---|---|---|
|
1 |
Link speed LED |
|
|
2 |
Port activity LED |
|
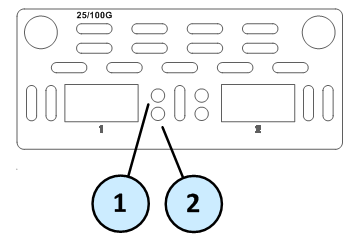
100/25 Gb Ethernet Expansion Line Card
| Line Card | Description |
SKU |
|---|---|---|
|
|
2 x 100/25 GbE QSFP28 |
CPAC-2-100/25F-B CPAC-2-100/25F |
|
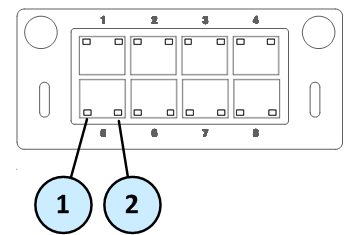
Item |
Component |
Description |
|---|---|---|
|
1 |
Link speed LED |
|
|
2 |
Port activity LED |
|
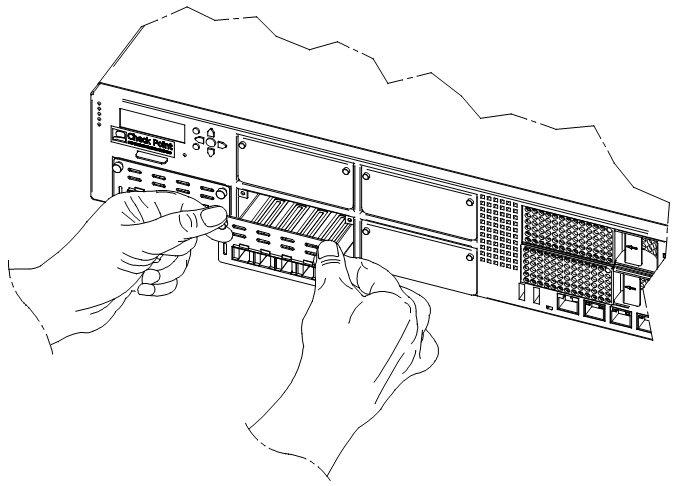
Installing Expansion Line Cards
To install an Expansion Line Card:
-
Turn off the Security Appliance.
-
Remove the power cords from the Power Supply Units.
-
Loosen the screws on the dummy panel on the front of the Security Appliance.
-
Remove the dummy panel.
-
Insert the Expansion Line Card into the expansion slot.
-
Push until the card clicks into position.
Note - Make sure the card is firmly inserted on all sides and that the NIC panel is flat against the appliance's front panel.
-
Tighten the screws on the Expansion Line Card.
Removing Expansion Line Cards
To remove an Expansion Line Card:
-
Turn off the Security Appliance.
-
Remove the power cords from the Power Supply Units.
-
Loosen the captive screws on the Expansion Line Card.
-
Holding the screws, pull the Expansion Line Card out of the expansion slot.
-
Put the dummy panel on the expansion slot.
-
Tighten the screws on the dummy panel.
Configuring a Bypass Expansion Line Card
To install and configure a Bypass Expansion Line Card in a Security Appliance, refer to the instructions in sk85560.