Microsoft SCCM Integration with TEM
Overview
Microsoft System Center Configuration Manager (SCCM) is an enterprise systems management platform that enables organizations to deploy software, manage updates, monitor device compliance, and enforce configuration policies across their endpoints. It provides centralized visibility and control to help maintain operational consistency and strengthen IT hygiene.
When integrated with Check Point Threat Exposure Management (TEM), SCCM becomes a security-driven enforcement tool. The integration automates IoC sharing, detects configuration gaps, and improves operating system hardening. This combined workflow enables faster detection, prioritized remediation, and consistent policy enforcement across all managed devices enhancing both security posture and operational efficiency.
The integration includes Operating System Hardening, enabling TEM to surface misconfigurations and exposure risks, while SCCM enforces corrective policies across managed devices. This combined capability improves configuration integrity, minimizes attack vectors, and enhances endpoint resilience.
Integrating Microsoft SCCM with TEM
Prerequisites
Active Directory user created for TEM integration
Step 1 - Creating a TEM Integration User
-
Log in to the Azure Portal.
-
Create a dedicated TEM user account in Active Directory.
-
Add the created user to the local Administrators group on the Configuration Manager server:
-
Open Computer Management.
-
Navigate to Local Users and Groups > Groups.
-
Open the Administrators group and click Add.
-
Enter the newly created TEM username.
-
Click OK.
-
Click Apply.
-
Click OK.
-
Step 2 - Creating SCCM Security Roles
Create three new Security roles:
-
ScriptRunners
-
ScriptAuthors
-
ScriptApprovers
For each role, do these:
-
Open Configuration Manager.
-
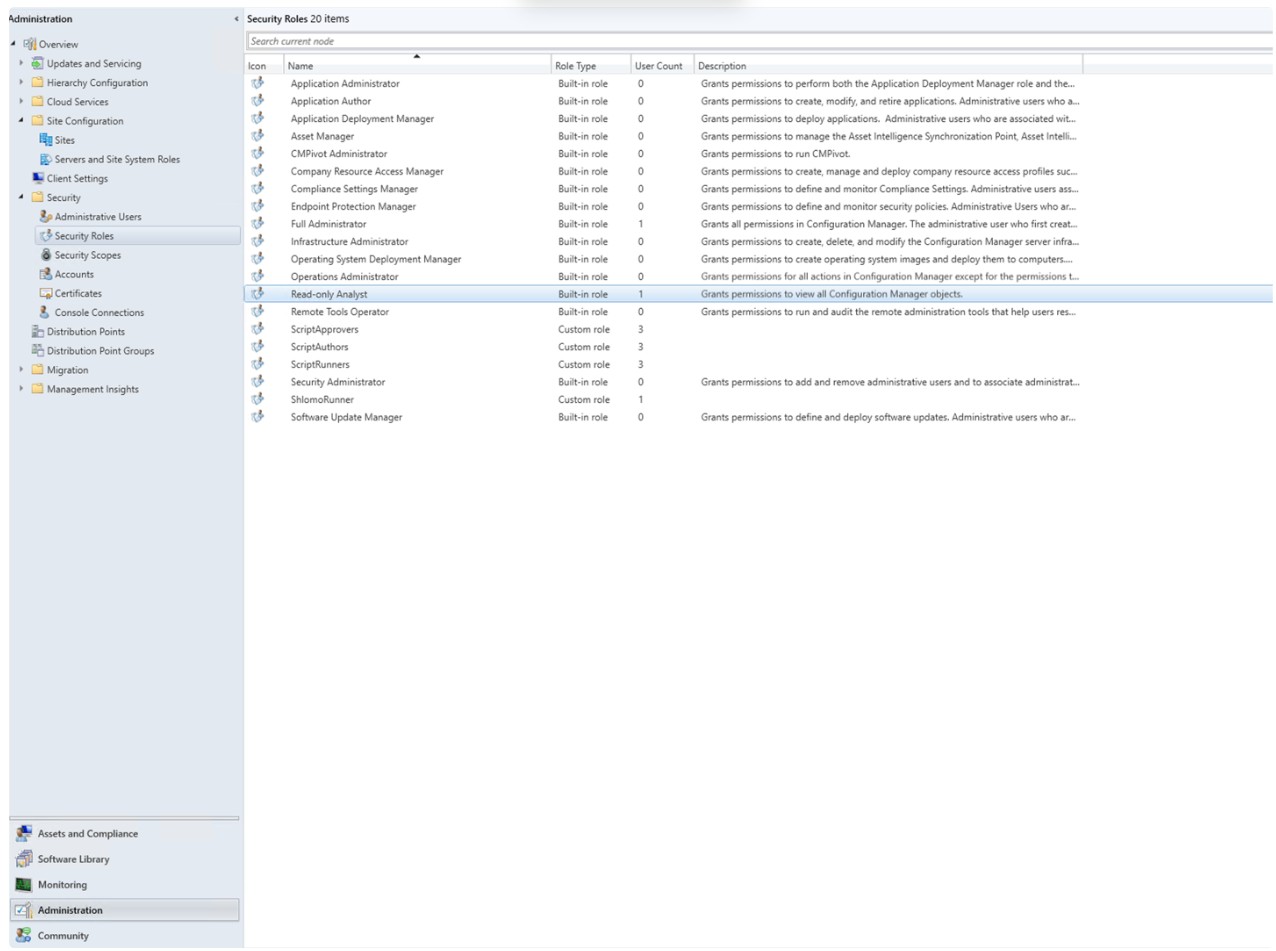
Go to Administration > Security > Security Roles.
-
Right-click the Read-only Analyst role and select Copy.

Note - It is mandatory to select the Read-only Analyst role.
-
Enter one of these relevant names for the role.
-
ScriptRunners
-
ScriptAuthors
-
ScriptApprovers
-
-
Apply these permissions:
-
For ScriptRunners
Category
Permission
State
Collection
Run Script
Yes
Site
Read
Yes
SMS Scripts
Read
Yes
-
For ScriptAuthors
Category
Permission
State
Collection Run Script No Site
Read
Yes
SMS Scripts
Create
Yes
SMS Scripts
Read
Yes
SMS Scripts
Delete
Yes
SMS Scripts
Modify
Yes
-
For ScriptApprovers
Category
Permission
State
Collection Run Script No Site
Read
Yes
SMS Scripts
Read
Yes
SMS Scripts
Approve
Yes
SMS Scripts
Modify
Yes
-
Step 3 - Assigning Roles to the TEM User
-
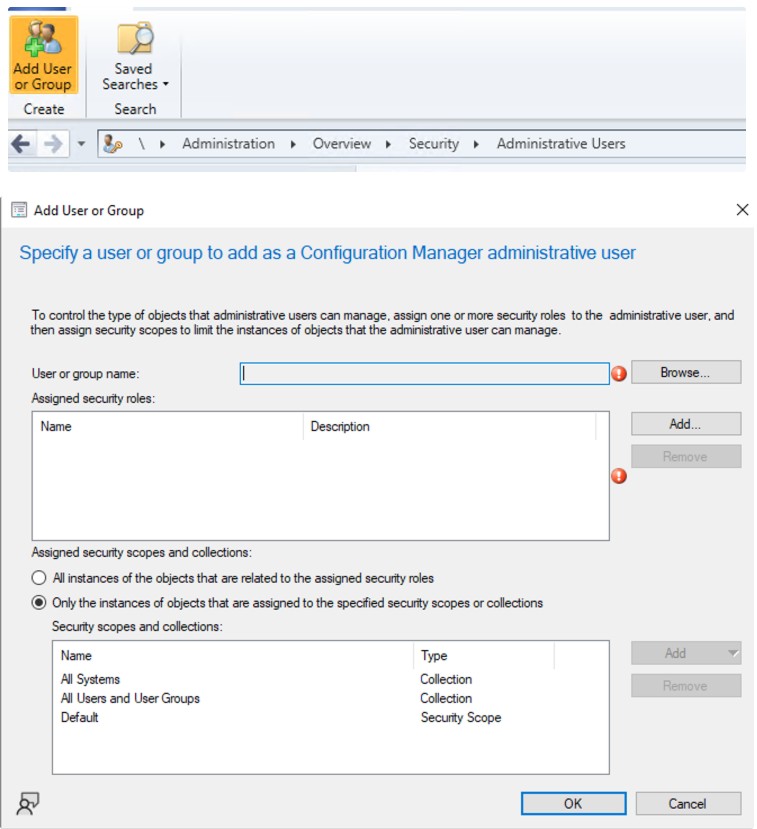
Navigate to Administration > Security > Administrative Users.
-
Click Add.
-
Select the TEM user created in Step 1 - Creating a TEM Integration User.
-
Assign the following three security roles:
-
ScriptRunners
-
ScriptAuthors
-
ScriptApprovers
-
-
Click OK to apply the assignment.
Step 4 - Allowing Script Authors to Approve Their Own Scripts
-
Navigate to Administration.
-
Go to Site Configuration > Sites.
-
Select the site and click Hierarchy Settings from the Home tab.

-
In the General tab, disable the Script authors require additional script approver checkbox.
-
Click OK to save.
Step 5 - Configuring Database Access
-
Open Microsoft SQL Server Management Studio.
-
Connect to the SQL instance hosting SCCM.
- Go to Security > Logins.
-
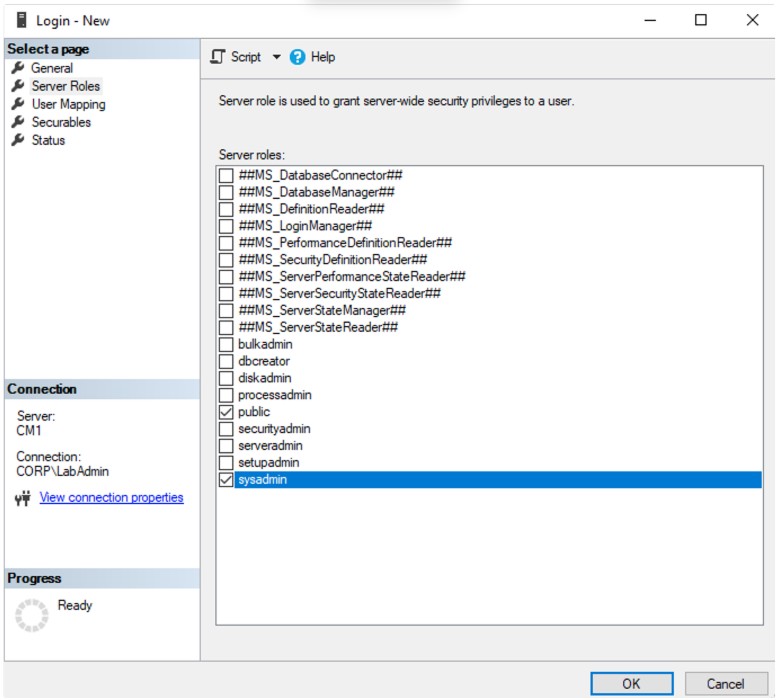
Right-click on Logins and select New Login.

-
Search and add the TEM user.
-
Assign permissions:
-
For Server Roles, select public, sysadmin
-
For User Mapping,
-
In the upper section, select the SCCM database
-
Enable public and db_datareader.

-
-
-
Click OK.
Step 6 - Validating AdminService Connectivity
-
Open a browser in Private/Incognito mode and access the AdminService using this URL:
https://<CM Host IP or Hostname>/AdminService/wmi/SMS_Site
-
Log in using the Veriti user credentials.
If the response displays valid WMI output, communication and permissions are functioning correctly. If an HTTP 404 error appears, the permission assignment is incorrect.
Step 7 - Configuring the TEM Portal
-
Log in to the TEM portal.
-
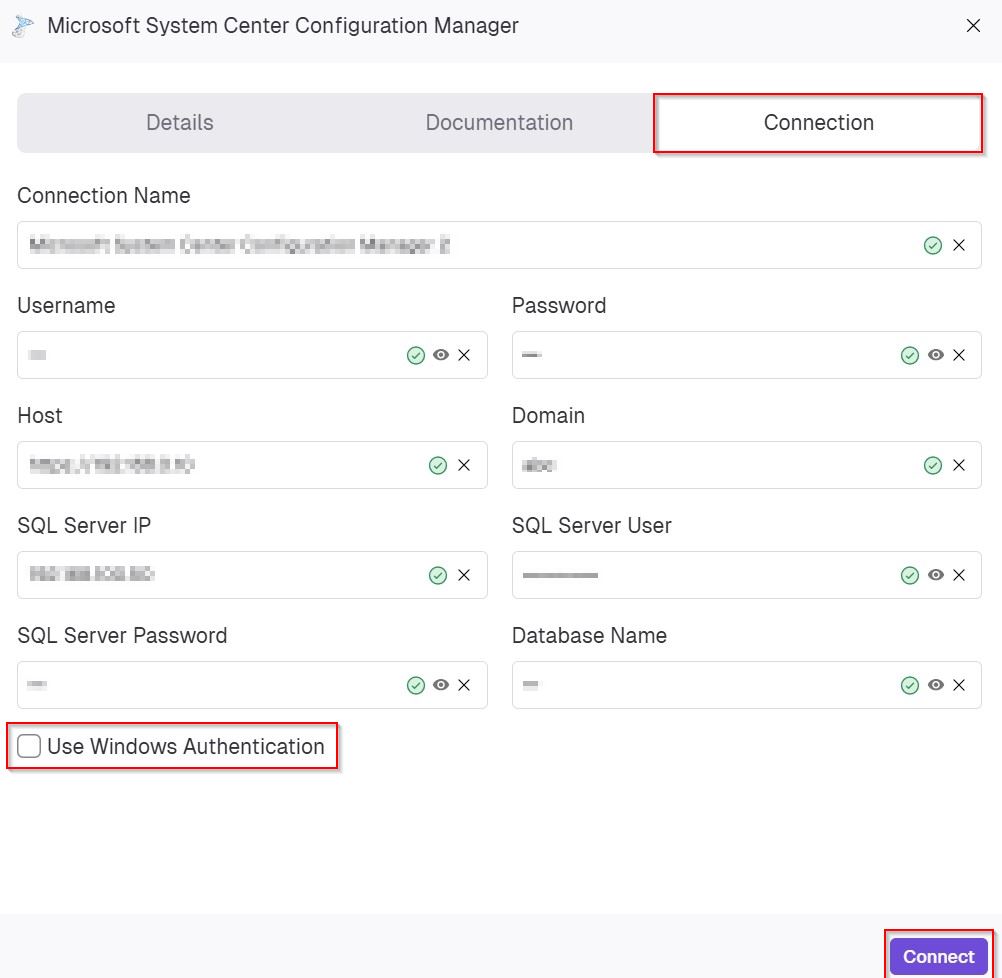
Go to Settings> Integrations > Catalog and select Microsoft System Center Configuration Manager.

-
In the Connection tab, enter the following details to establish integration with SCCM:
-
In the Connection Name field, enter a name for this integration instance.
-
In the Username field, enter the SCCM integration user created previously.
-
In the Password field, enter a password for the SCCM integration user.
-
In the Host field, enter the FQDN or IP address of the Configuration Manager server.
-
In the Domain field, specify the domain for the SCCM integration user account.
-
In the SQL Server IP field, enter the IP address of the SQL server hosting the SCCM database.
-
In the SQL Server User field, enter the SQL login configured with the required permissions.
-
In the SQL Server Password field, enter the password for the SQL database user.
-
In the Database Name field, enter the name of the SCCM database mapped during configuration.
-
(Optional) Enable the Use Windows Authentication if authentication is performed using Windows credentials instead of SQL authentication.
-
Click Connect to validate the connection and complete the configuration.
-