FortiGate - Self-Managed Environment Integration with TEM
Overview
In a Self-Managed FortiGate deployment, Threat Exposure Management (TEM) delivers comprehensive traffic-based insights by using Intrusion Prevention System (IPS) and Indicators of Compromise (IoC) security logs directly from individual FortiGate devices. These logs provide the data required for Machine Learning (ML) analysis to detect business-disrupting events, identify threats, harden security controls, and generate actionable intelligence, without relying on centralized management platforms such as FortiManager or FortiAnalyzer.
Access Policy Rules for TEM – For All Supported Fortinet Deployments
|
Source |
Destination |
Port |
Protocol |
Purpose |
|---|---|---|---|---|
|
TEM VM |
FortiGates / FortiClusters |
TCP/443 |
HTTPS |
Configuration fetch and remediation |
|
TEM VM |
FortiAnalyzer |
TCP/443 |
HTTPS |
Historic Logs Fetch |
|
FortiAnalyzer |
TEM VM |
TCP/30030 |
TCP |
Logs Fetch |
|
FortiGates / FortiClusters |
TEM VM |
TCP/30003 |
TCP |
IoC pull |
|
TEM VM |
FortiGates / FortiClusters |
UDP/161 |
SNMP |
Monitoring fetch |
Prerequisites
-
To ensure effective integration, administrators must enable IoC detection and IPS enforcement and configure local logging on each FortiGate device.
-
A dedicated REST API user must be explicitly created for TEM.
-
A dedicated user account must be created for TEM with permission to access all necessary capabilities specified in the section Creating a Dedicated TEM User on FortiManager.
-
IoC Enforcement
FortiGate enforces IoC feeds differently depending on the type of indicator.
-
IP Address IoCs
To block malicious IPs from TEM feeds:
-
Create two firewall policies:
-
Policy 1: Source - IP Address Threat Feed, Destination - All, Action - Deny
-
Policy 2: Source - All, Destination -IP Address Threat Feed, Action - Deny
-
-
Place both policies at the top of the policy list.
This setup blocks all traffic involving feed IPs, regardless of direction. It uses FortiGate’s early-stage processing for fast enforcement without deep inspection.
-
-
Domain and Malware Hash IoCs
-
Domains and URLs are inspected at Level 7 (Application Layer).
-
File hashes are detected through deep content inspection.
These indicators are not available during the initial rule lookup, so enforcement occurs after a policy match.
To block domain and hash-based threats:
-
Apply TEM's security profiles to existing allow policies.
-
These profiles perform Layer 7 checks and block traffic if a domain or file hash matches an IoC.
-
-
-
IPS Enforcement
Fortinet enforces IPS policies through deep packet inspection and signature-based threat detection:
Traffic-Based Insights
-
IPS logs capture real-time threat activity, including intrusion attempts, exploit signatures, and suspicious payloads.
-
TEM uses these logs to correlate traffic patterns and surface risk-based exposures.
Log Requirements
-
IPS must be enabled, and events must be actively logged.
-
Logs should be retained for at least 7 days and accessible to TEM for continuous analysis.
To set the log retention rate for TEM, see Setting the Log Retention Rate for TEM.
-
-
SNMP
The firewall interfaces must be configured to use the Simple Network Management Protocol (SNMP) to enable centralized monitoring and management. This allows external systems to collect real-time performance metrics, interface statistics, and device status.
Supported Functions
TEM supports the following functions as part of its integration with a Self-Managed FortiGate:
-
Protection Hardening - This capability focuses on strengthening the security posture of the FortiGate device by recommending and enforcing best-practice configurations. It helps reduce vulnerabilities by ensuring that security policies, firmware, and settings are up-to-date and properly configured.
-
Attack Analysis - Attack Analysis provides insights into detected threats and attack attempts. It analyzes logs and events to identify attack patterns, sources, and methods, helping security teams understand and respond to incidents more effectively.
-
Security Hygiene - Security Hygiene ensures that the FortiGate environment maintains a baseline level of security. It involves regular checks for misconfiguration, outdated signatures, weak passwords, and other common issues that could expose the network to risk.
-
Business Disruption Detection - This capability monitors activities or threats that could disrupt business operations, such as denial-of-service attacks or malware outbreaks. It helps organizations quickly detect and mitigate incidents that could impact productivity or service availability.
-
Indicators - Indicators refer to signs or evidence of compromise, such as suspicious IP addresses, domains, or file hashes. TEM collects and correlates these indicators to help identify ongoing or potential threats within the network.

Note - Supported indicator types include IP Addresses, File Hashes, and Domains.
-
Custom Protections - Custom Protections allow you to define and implement tailored security rules or signatures specific to your environment. This enables organizations to address unique threats or compliance requirements not covered by default protections.
Note - This capability is enabled by default. No additional configuration or user action is required.
Integrating Self-Managed Environment with TEM
Step 1 - Creating a Dedicated REST API User on FortiGate
To create a dedicated REST API user for TEM:
-
Log in to the FortiGate/FortiCluster GUI.
-
Navigate to System Settings.
-
From the left navigation panel, click System > Administrators.
-
Click Create New and choose REST API Admin.

-
In the Create New Administrator pop-up, enter the following details:
-
In the Username field, enter an admin name.
-
Click on the + icon to create an Administrator Profile and enter the following details:
-
In the Username field, enter an admin name.
-
(Optional) In the Comments field, add relevant comments.
The Access Control Permissions section allows you to assign specific access levels to various system components or features.
Type
Read/Write
Read
None
Custom
Security Fabric


FortiView
User & Device
Firewall
Log & Report
Network
System
Security Profile
VPN
WAN Opt & Cache
WiFi & Switch
Note - The initial integration with FortiGate or FortiCluster can be performed using a REST API user with limited permissions by setting Security Profiles to Read access.
While this allows the integration to proceed, it will disable remediation capabilities and prevent any remediation attempts from succeeding.
-
Enable the Permit usage of CLI diagnostic commands toggle.
-
In the Scope field, choose Global.
Note - If the Scope option is unavailable in the user interface, you must manually assign the necessary permissions via SSH.
Connect to the device and execute the following commands to grant the admin profile access to global VDOMs:
-
config global -
config system accprofile -
edit <Admin Profile Name> -
set scope global -
end
-
-
Disable the Override idle Timeout toggle.
-
Click OK to save.
-
-
Virtual Domains - All
-
Click OK to save.
Copy the generated API Key and save it for later use.
-
|
|
Note - Starting from version 7.4.5, API requests no longer support passing the access_token as a URL parameter by default. |
While a permanent solution is being addressed, you can apply the following workaround by running these commands via SSH:
-
config system global -
set rest-api-key-url-query enable -
end
Step 2 - Creating a Dedicated TEM User on FortiManager
To create a dedicated TEM user in FortiManager:
-
Log in to the FortiAnalyzer GUI.
-
Navigate to System Settings.
-
From the left navigation panel, click System Settings > Administrators.
-
Click Create New and choose Administrator.
-
In the Create New Administrator pop-up, enter the following details:
-
In the Username field, enter an admin name.
-
From the Admin Type dropdown, select LOCAL.
-
Enter a secure password for the administrator in the New Password field.
Re-enter the password in the Confirm Password field to confirm it.
-
In the Administrative Domain field, click All ADOMs.
-
-
Click the + icon to create a new Admin Profile by entering the following details:
-
In the Profile Name field, enter a profile name.
-
In the Permissions field, enable the relevant permissions.
Type
Read-Write
Read-Only
None
System Settings
Administrative Domain
Device Manager
Log View/FortiView
Incidents & Events
Create & Update Incidents
Triage Event
Execute Playbook
Reports
Run Report
Fabric View
-
Disable the Privacy Masking toggle.
-
Click OK to save the New Profile settings.
-
-
Click OK to save the New Administrator settings.
Step 3 - Configuring IP Address Threat Feed
To configure the IP Address threat feed, you must make these configuration changes in the FortiManager GUI.
Step 1: Creating an IP Address Threat Feed
-
Log in to the FortiManager GUI.
-
If the ADOM feature is enabled, select an ADOM.
-
Navigate to Security Fabric > External Connectors.
-
Click Create New and select IP Address as the threat feed type.
-
Configure the External Feed settings:
-
In the Name field, enter a feed name.
-
In the URI of external resource field, copy and paste the URI from TEM Feed Manager.
-
Disable the HTTP basic authentication toggle.
-
-
Click OK.
Step 2: Creating Firewall Policies
-
Go to Policy & Objects > Policy Packages.
-
Select the required firewall policy and create a new rule:
-
In the Source field, select the name configured in Step 1: Creating an IP Address Threat Feed.
-
In the Destination section, select all.
-
Action: Deny
-
-
Click OK.
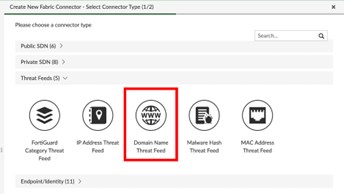
Step 4 - Configuring Domain Name Threat Feed
Step 1: Creating a Domain Name Threat Feed
-
Log in to FortiManager GUI.
-
Select an ADOM if the feature is enabled.
-
Navigate to Security Fabric > External Connectors.
-
Click Create New and select Domain Name as the feed type.
-
Configure the External Feed settings:
-
In the Name field, enter the name of the connector.
-
In the URI of external resource field, enter the IP Address Threat Feed URI.
-
Disable the HTTP basic authentication toggle.
-
-
Click OK to save.
Step 2: Creating and Applying DNS Filtering
-
Navigate to Policy & Objects > Security Profiles > DNS Filter.
-
Click Create New.
-
Select DNS Filter and enter the following details.
-
In the Name field, select the DNS Profile.
-
Navigate to FortiGuard Category Based Filter > Remote Categories.
-
Select the feed name created in Step 1: Creating a Domain Name Threat Feed and set Action to Redirect to Block Portal.
-
-
Click OK to save.
-
Verify that DNS traffic to malicious domains is redirected to the Block Portal.
Step 3: Creating Firewall Policies
-
Go to Policy & Objects > Policy Packages.
-
Select the required firewall policy and create a new rule:
-
In the Source field, select the name configured in Step 1: Creating a Domain Name Threat Feed.
-
In the Destination section, select all.
-
Action: Deny
-
In the DNS Filter field, select the profile.
-
Click OK to save.
-
Step 5 - Configuring Malware Hash Threat Feed
Step 1: Creating a Malware Hash Threat Feed
-
Log in to the FortiManager GUI.
-
Select an ADOM if the feature is enabled.
-
Navigate to Security Fabric > External Connectors.
-
Click Create New and select Malware Hash as the feed type.

-
Configure the External Feed settings:
-
In the Name field, enter the name of the connector.
-
In the URI of external resource field, enter the IP Address Threat Feed URI.
-
Disable the HTTP basic authentication toggle.
-
-
Click OK to save.
Step 2: Creating an Anti-Virus Profile
-
Navigate to Policy & Objects > Security Profiles > Antivirus.
-
Click Create New.
-
Under Virus Outbreak Prevention:
-
In the Name field, enter the name of the profile.
-
Select the Malware Hash feed created in Step 1: Creating a Malware Hash Threat Feed
-
Enable Use External Malware Block List toggle.
-
-
Click OK to save.
Step 3: Applying Anti-Virus Protection
-
Navigate to Policy & Objects > Policy Packages > Firewall Policy.
-
Select the required firewall policy and create a new rule:
-
In the Source field, select the name configured in Step 1: Creating a Malware Hash Threat Feed.
-
In the Destination section, select all.
-
Action: Deny
-
Navigate to Security Profiles > Antivirus and select the profile.
-
-
Click OK to save.
Limitations
-
Due to Fortinet API constraints, remediation actions related to Global VDOMs are currently not supported.
-
HA architecture is not supported in FortiAnalyzer.
-
IPv6 is not supported in the current configuration.
-
ADOMs are not supported in FortiAnalyzer.
-
SNMP configuration is not supported for secondary cluster members.
Setting the Log Retention Rate for TEM
-
Log in to the FortiGate Portal.
-
From the left navigation panel, click Logs View.
-
In the search bar:
-
Set the time range to Last 7 Days.
-
Enter subtype=ips
-
|
|
Important - If IPS logs are unavailable, create a dedicated IPS profile set to Detect mode only. This allows TEM to collect traffic data and generate insights without blocking traffic, ensuring complete visibility into potential exposures while maintaining uninterrupted business operations. |
