Silver Peak Integration with Orchestrator Versions earlier than 8.8.3
Adding a New Site in Harmony Connect
You can add, manage, and delete the sites in your organization and view all your site locations.
To connect a branch office and manage its security, you have to create a site that represents this branch office SD-WAN office device, and then route its traffic to the network through Harmony Connect.

|
Note - Every site on the Sites page represents the device in your branch office that connects you to the internet. |
To add a new site:
-
Log in to the Check Point Infinity Portal and navigate to Harmony Connect > Assets > Branches & Datacenters.
-
Click Add.
The Add Site window appears.
-
Enter this information in the General screen and then click Next:
-
Name - A name for the site.
-
Comments - Optional description for the site.
-
Branch Office Gateway Type - Select Silver Peak from the list.
-
Number of users (Estimation) - The expected number of users.
-
-
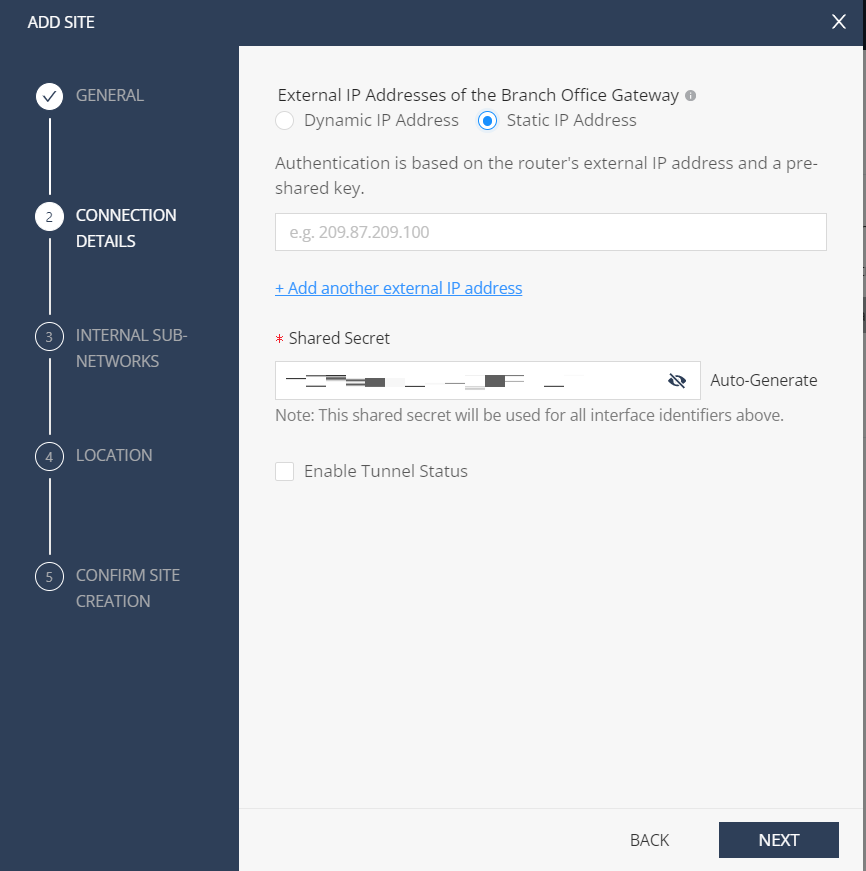
Enter this information in the Connection Details screen and click Next:
-
External IP Addresses - One or more IP addresses of your branch office gateway.

Notes:
-
You can select Dynamic IP Address or Static IP Address.
-
If you have more than one external network interface, use Add another external IP address or Add another Interface Identifier. Check Point recommends to add all your external IP addresses to secure all the traffic.
-
-
Copy and save the Shared Secret.
-
Select Enable Tunnel Status.
-
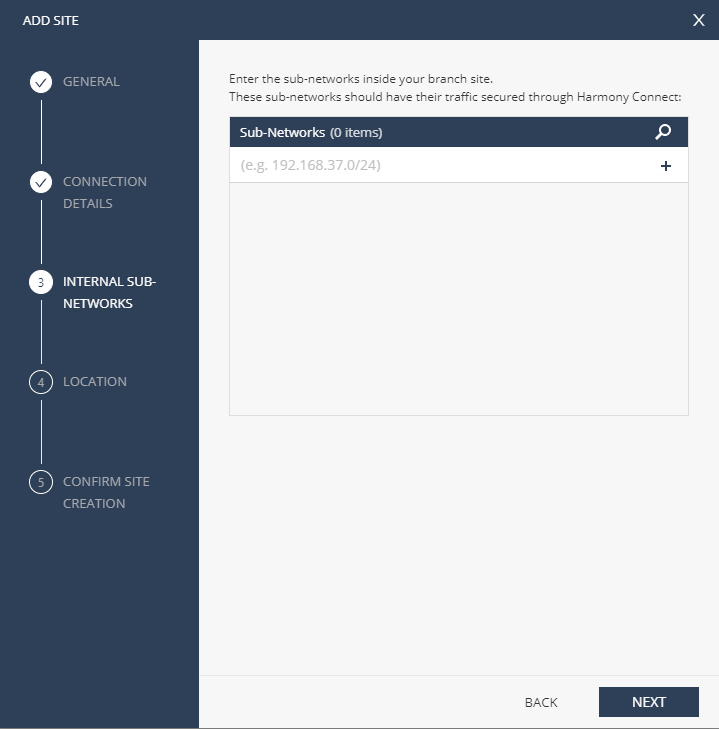
In the Internal Sub-networks screen, enter the subnet addresses of your internal networks in the branch office site.
Check Point Harmony Connect applies its cybersecurity features on all traffic coming from these network addresses.
-
Click Next.
-
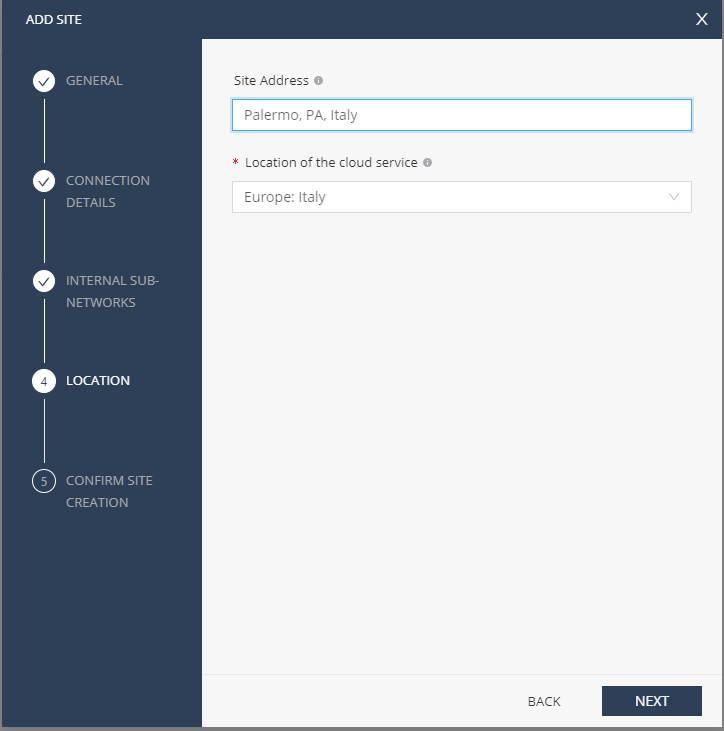
In the Location screen, enter this information:
-
Site Address - (Optional) Physical location of the branch office. It shows your site on the world map.
-
Location of the cloud service - Select a closer location for the cloud service.

Best Practice - Harmony Connect inspects traffic from your branch office to internet through a cloud service that is closest to your site location. For some regions, such as South America or the Middle East, the location for the cloud service must have a strong cross-country internet link.
-
-
Click Next.
-
Confirm Site Creation and review site details.
-
Click Finish and Create Site.

Note - It takes Check Point several minutes to create the new site.
When the new site is ready, it appears in the list of sites, with Generating Site as status.
The status changes to Waiting for Traffic when the site is ready.
Configuring the SD-WAN Device
When you create a branch site in Check PointHarmony Connect, you must configure your branch office to route the traffic through Harmony Connect.
Check Point creates the back-end architecture to tunnel the traffic from the branch device to the internet.
To configure your branch SD-WAN device:
-
Log in to the Check Point Infinity Portal and navigate to Harmony Connect > Assets > Branches & Datacenters.
-
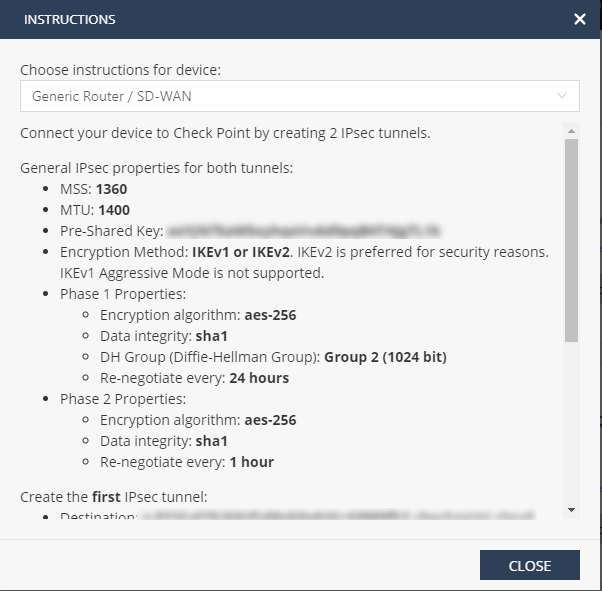
Click Configure branch device from your applicable branch device.
The Instructions window appears.
-
Select Generic Router / SD-WAN.
-
Copy the tunnel properties with two tunnel destinations and other parameters.
-
Click Close.
Creating a Deployment Profile
-
In the Silver Peak Orchestrator, right-click the applicable device and select Deployment.
The Deployment window appears.
-
Create your LAN and WAN interfaces. For example, lan0, wan0, and wan1.
-
From the FW Mode list, select the applicable firewall.
-
Enter the Bandwidth and Next Hop IP addresses.
-
Click Apply.

Configuring the BIO Policy
Specify labels for traffic that passes through the IPsec tunnels to Check Point.
Check Point protection automatically secures all edge devices with the labels. BIO policies specify how to handle traffic with particular characteristics within the network.
To configure BIO policy:
-
In the Silver Peak Orchestrator, click Configuration > Overlays >Business Intent Overlay.
The Business Intent Overlay window opens.
-
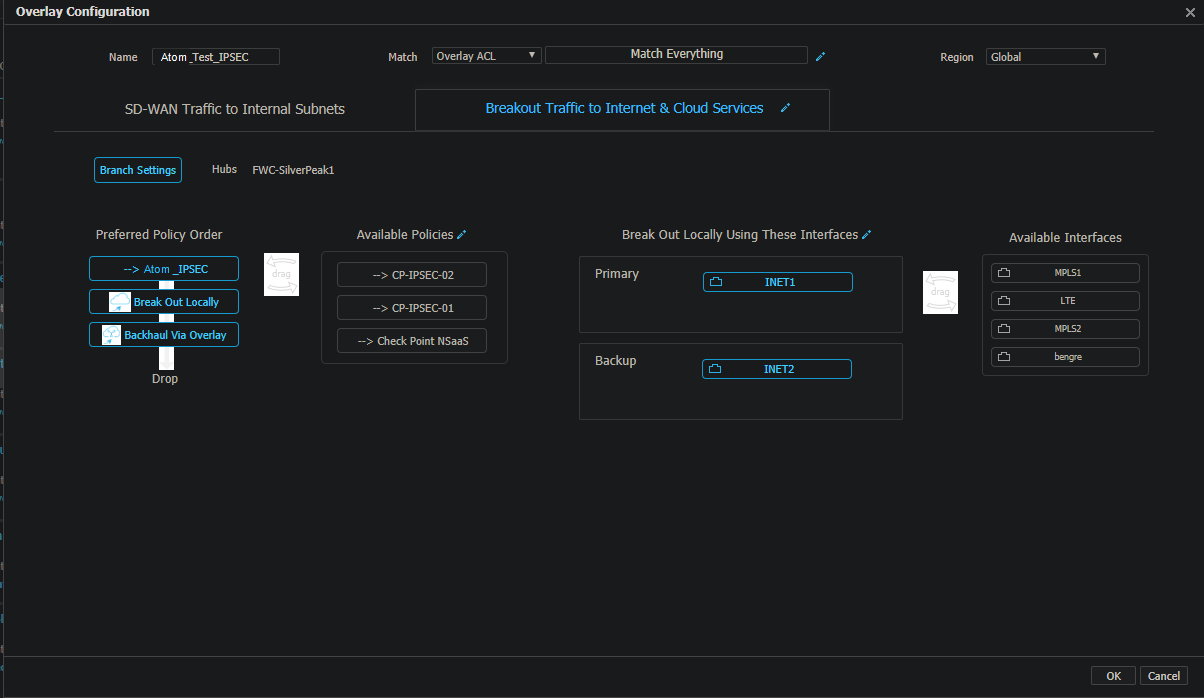
On the Overlay Configuration window, enter Atom_Test_IPSEC in the Name field.
-
Click Breakout Traffic to Internet & Cloud Services, under Branch Settings, click
 to edit Available Policies.
-
In the Service Name field, add a new service object and enter its name (Atom_IPSEC).
-
Click Add.
-
Click Close.
-
-
In the Breakout Traffic to Internet & Cloud Services window, move the Atom_IPSEC service to Preferred Policy Order and place it above other policies.

Note - When the Check Point service is on top of the list, all the internet-bound traffic passes through the Check Point IPsec tunnel. If the IPsec tunnel is down, the traffic breaks up locally. If this fails, the traffic backhauls with the overlay.
-
Click Save.
-
In the Silver Peak Orchestrator, click Configurations > Overlays > Apply Overlays.
-
In the left pane, select the applicable device.
-
Under Apply Overlays, select Atom_Test_IPSEC as overlay.
-
Click Apply.

