Azure Active Directory (SCIM)
Registering Application through the Microsoft Azure Portal
-
Log in to your Microsoft Azure Portal.
-
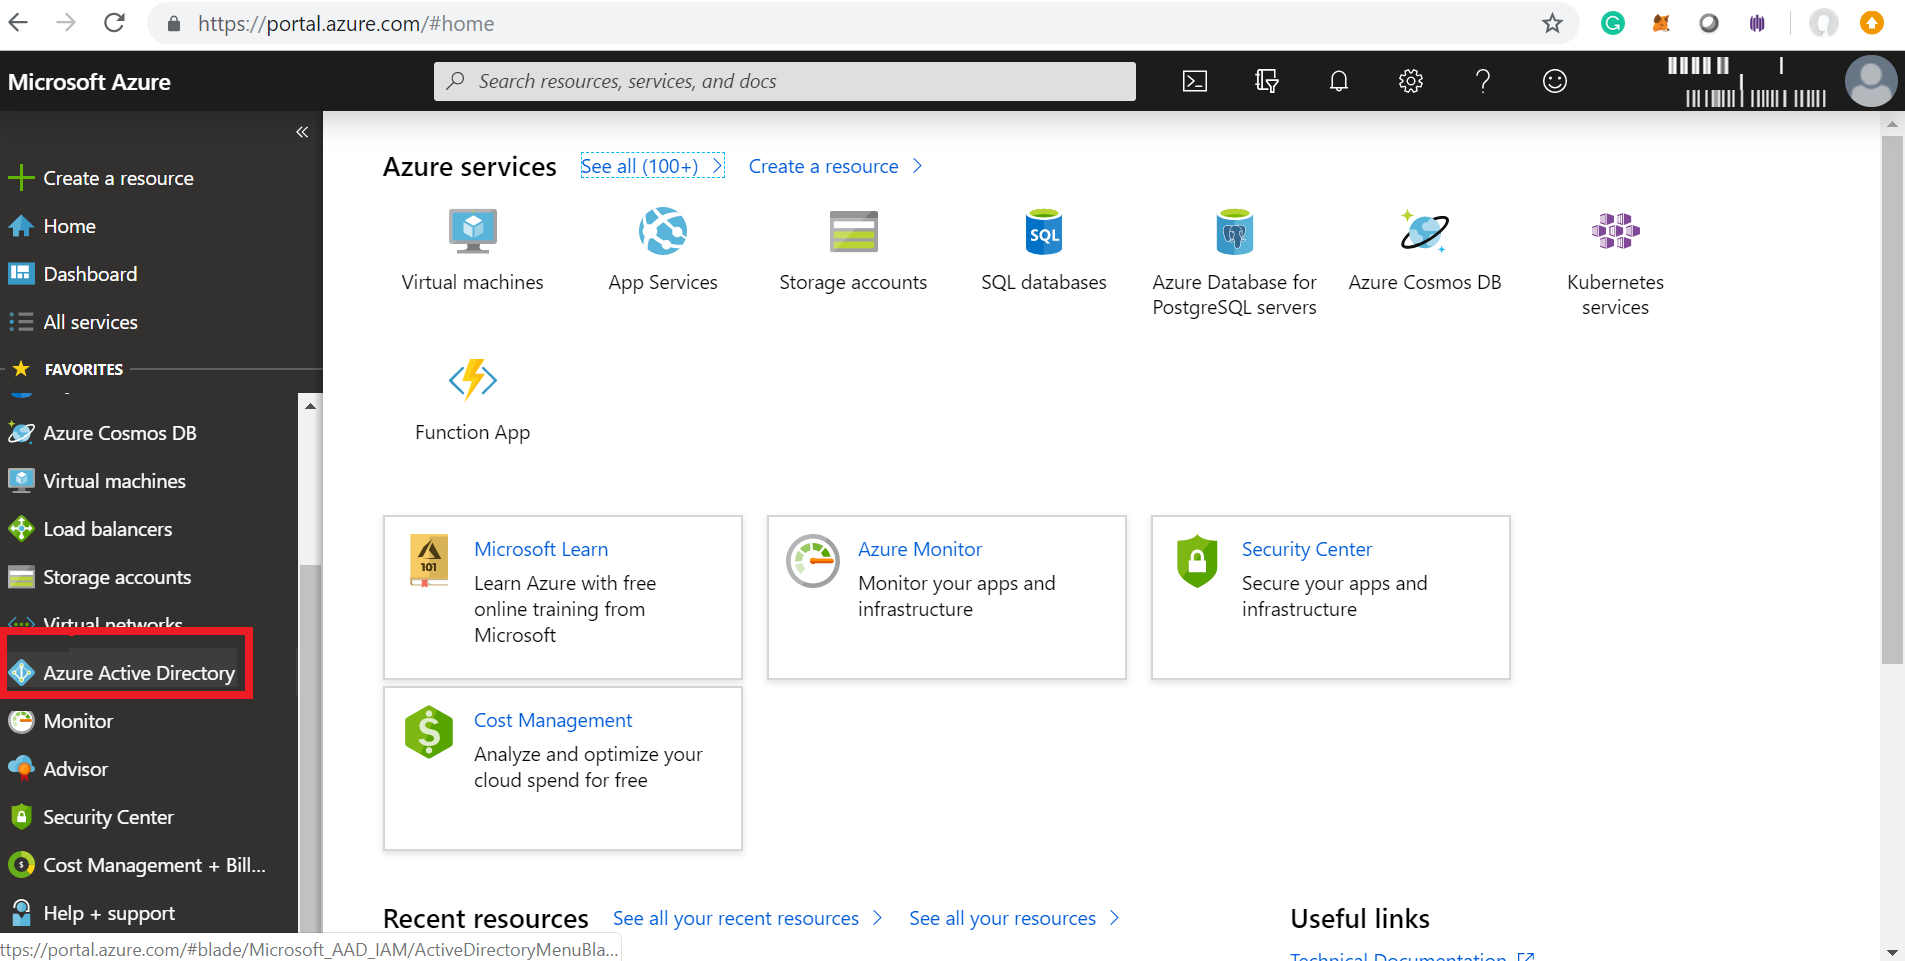
Navigate to Azure Active Directory in the left pane.
-
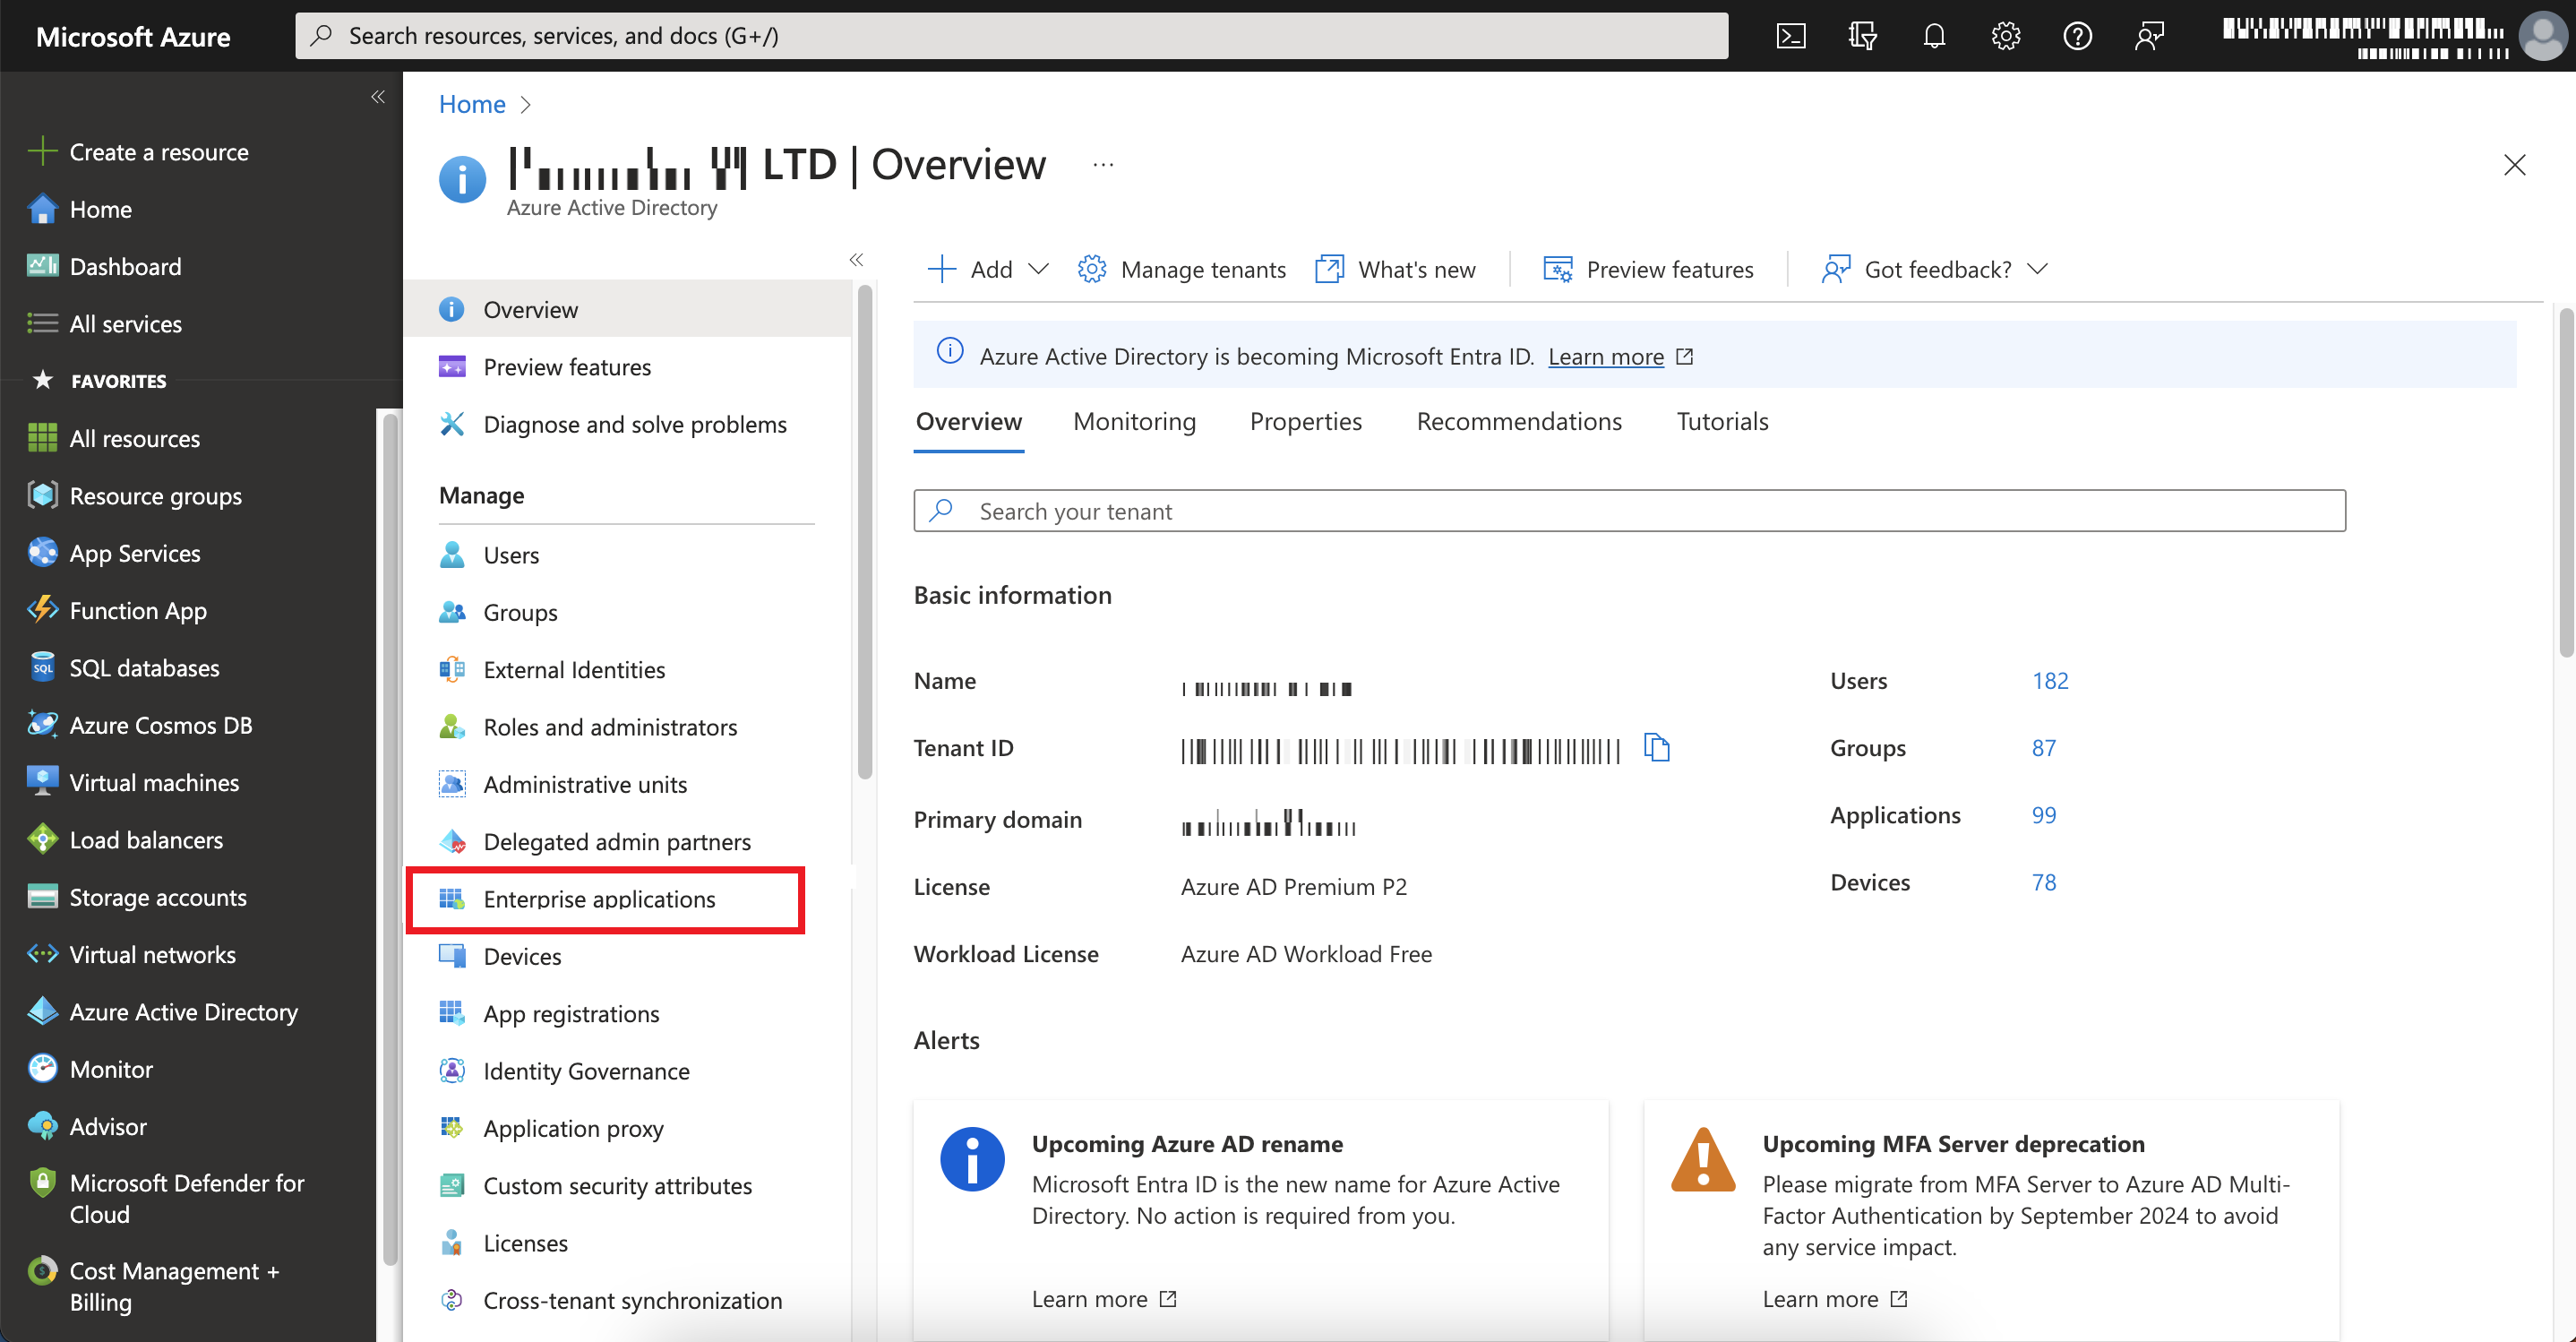
Go to Manage > Enterprise applications.
-
Click New application.

-
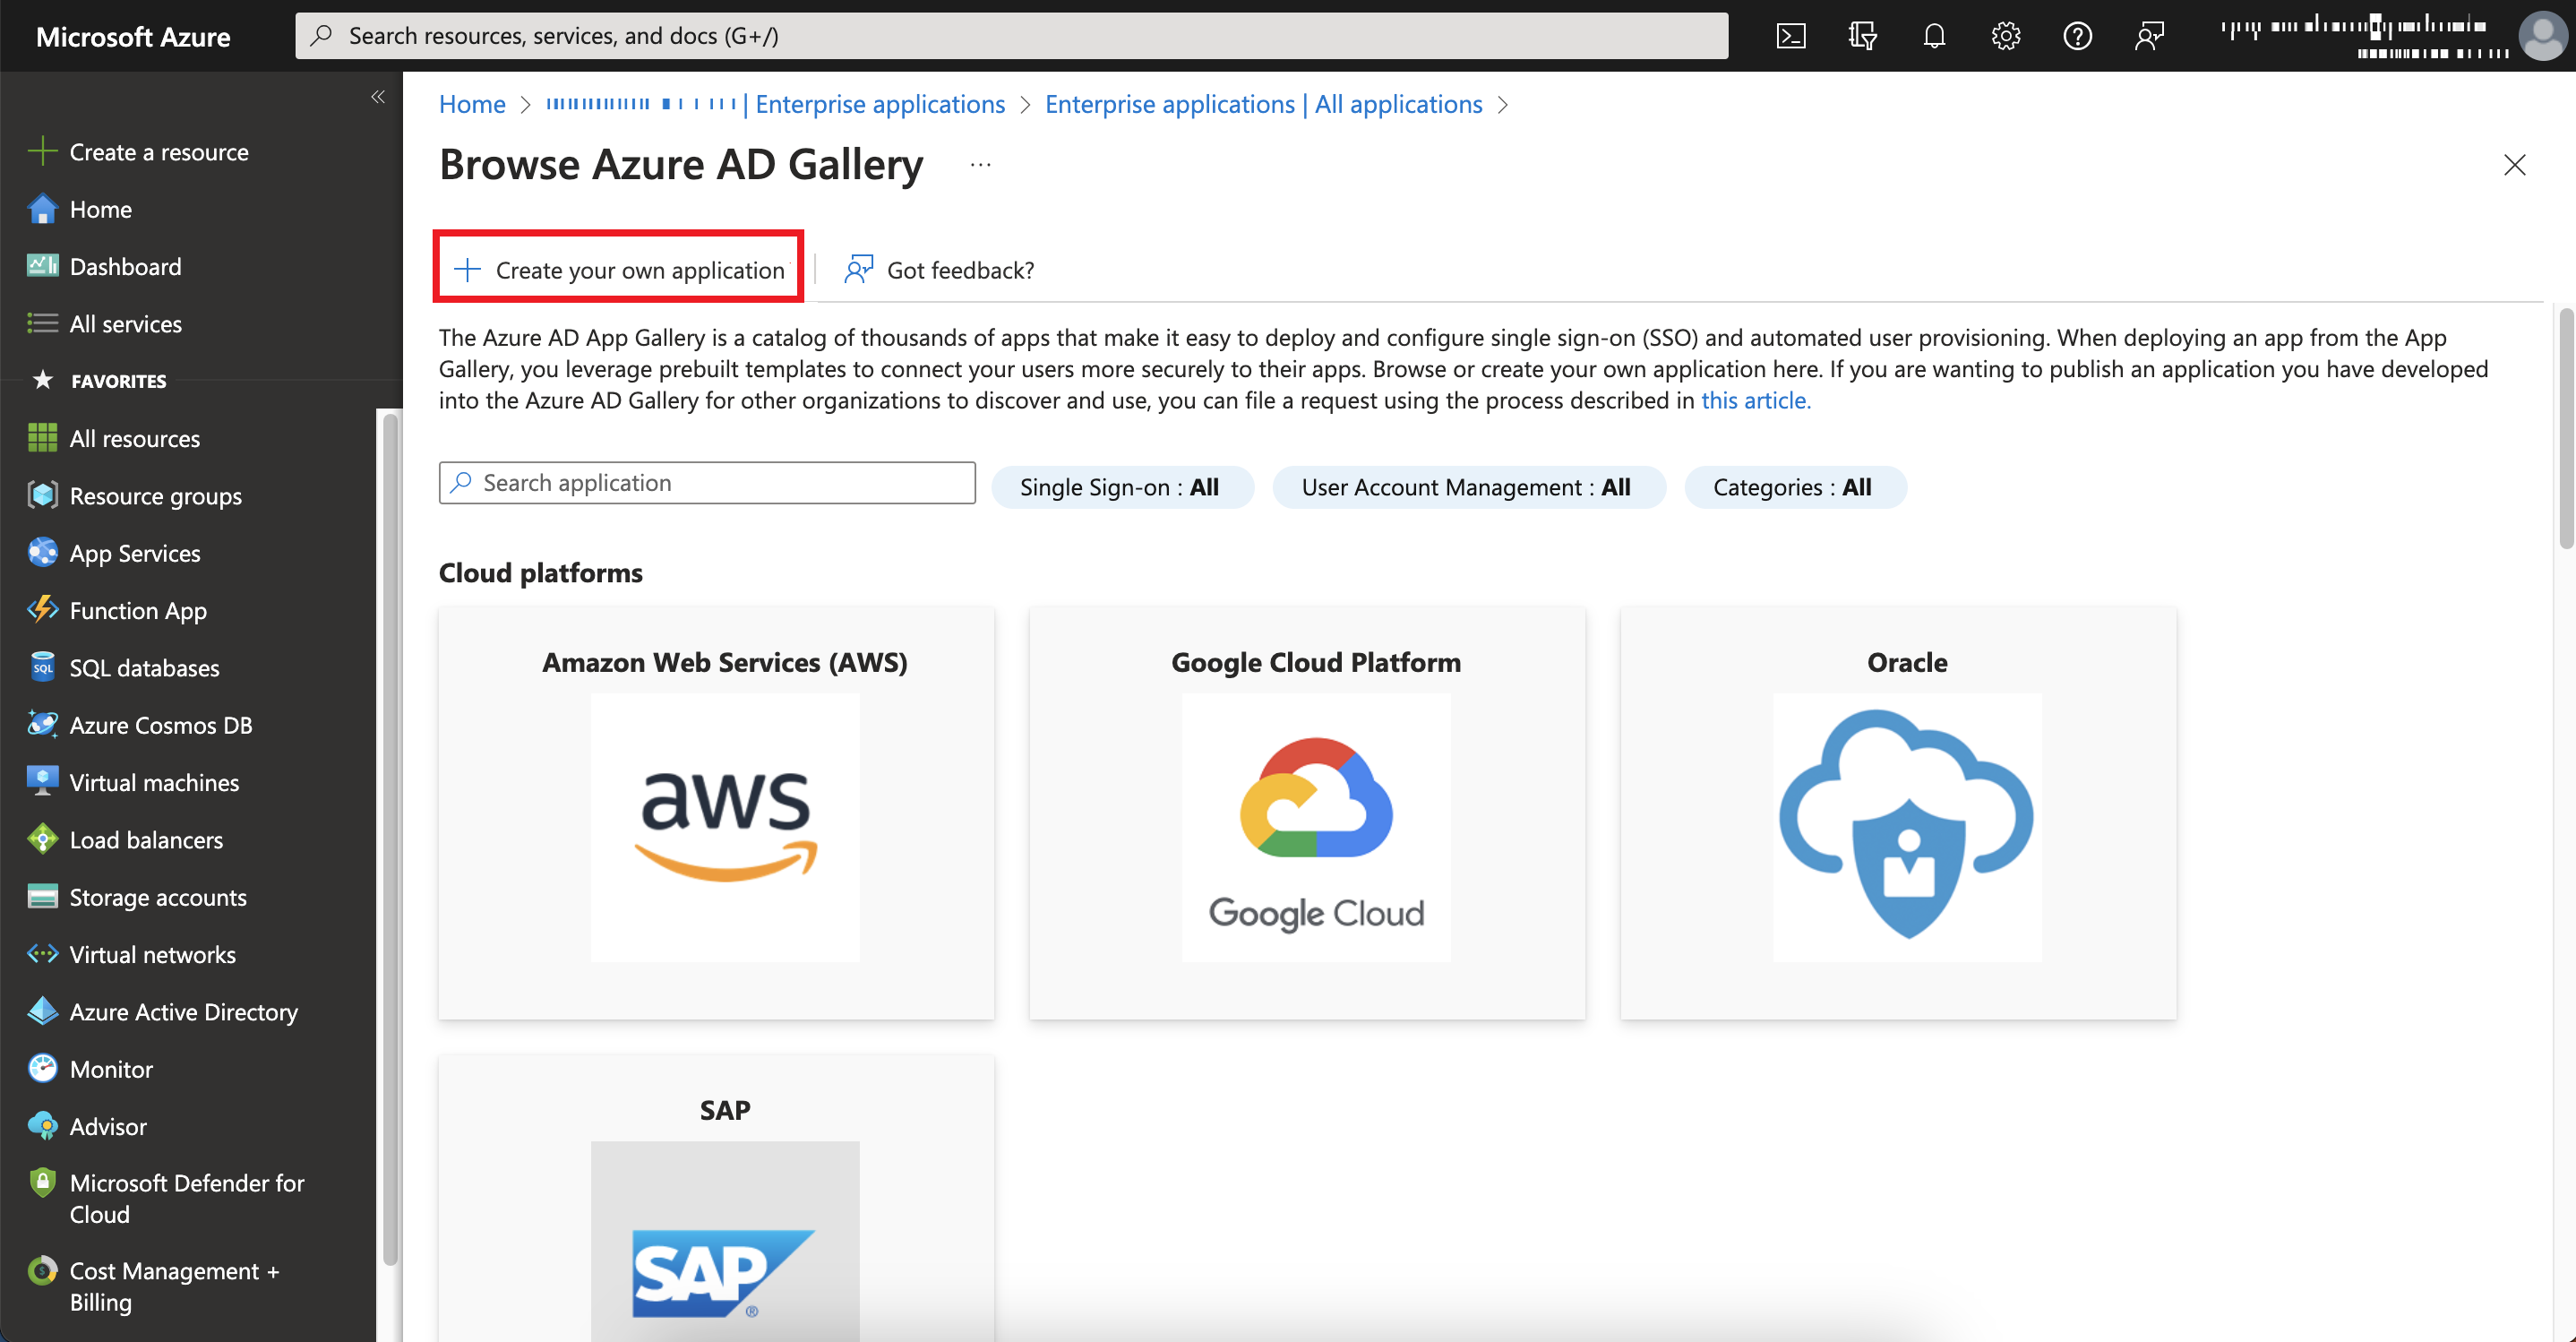
Click Create your own application.
-
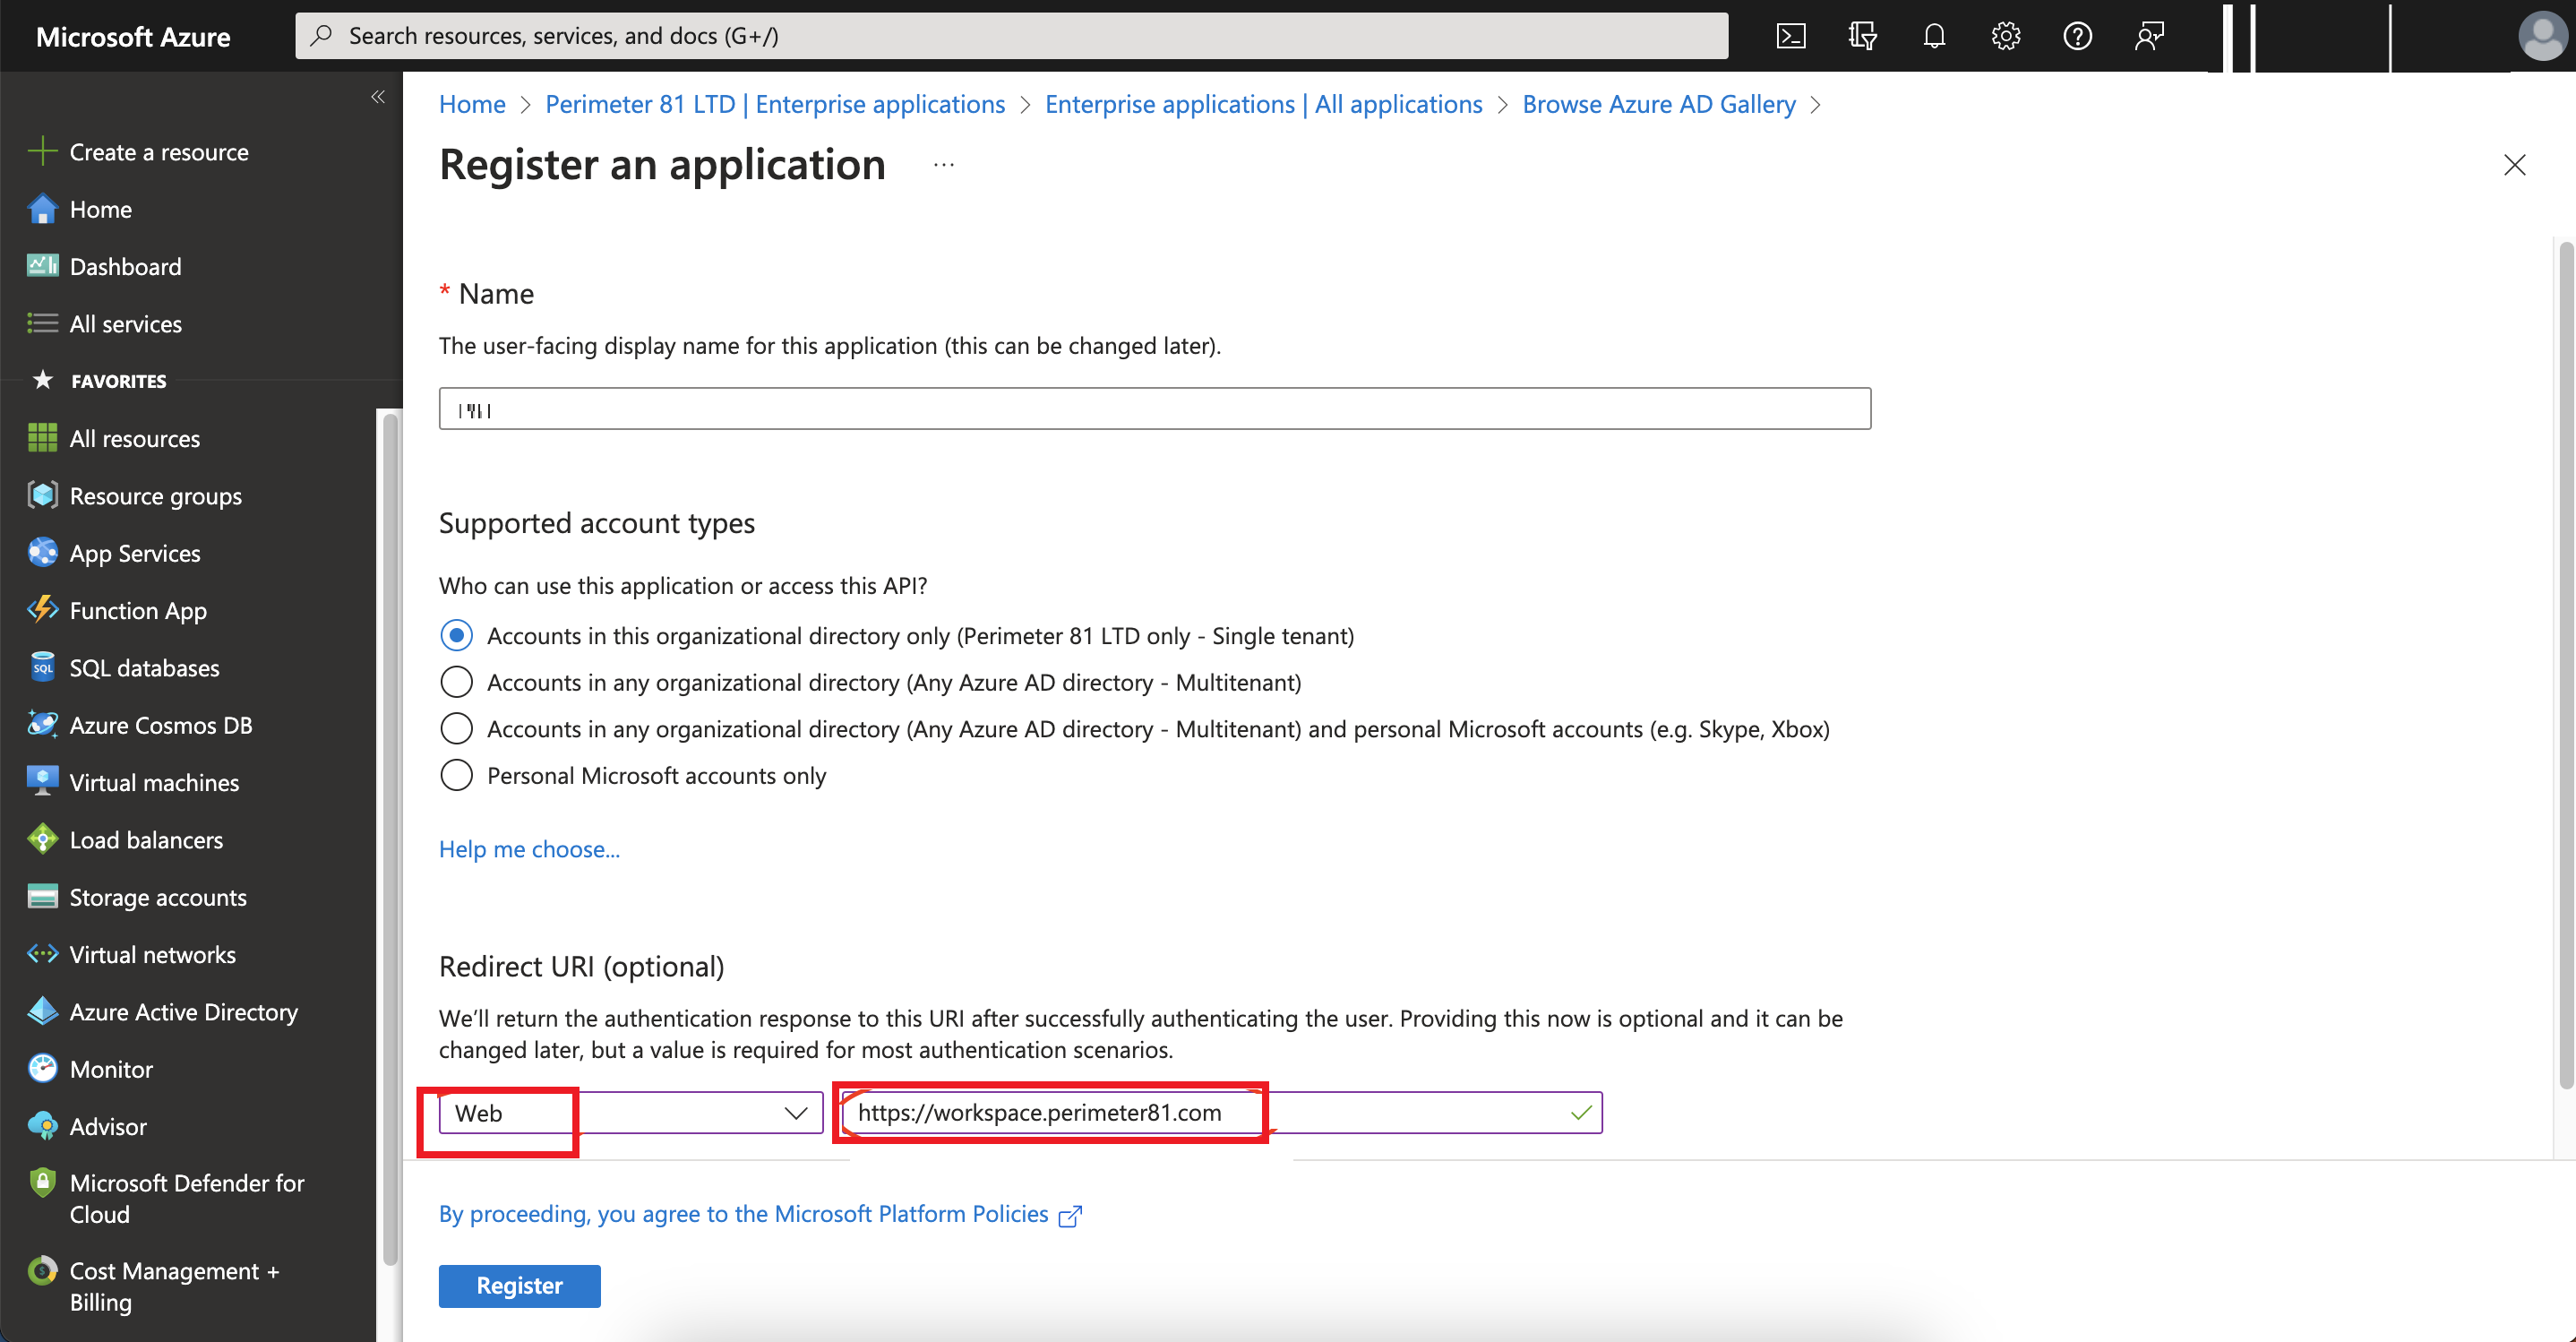
In the What's the name of your app filed, enter a name for your application.
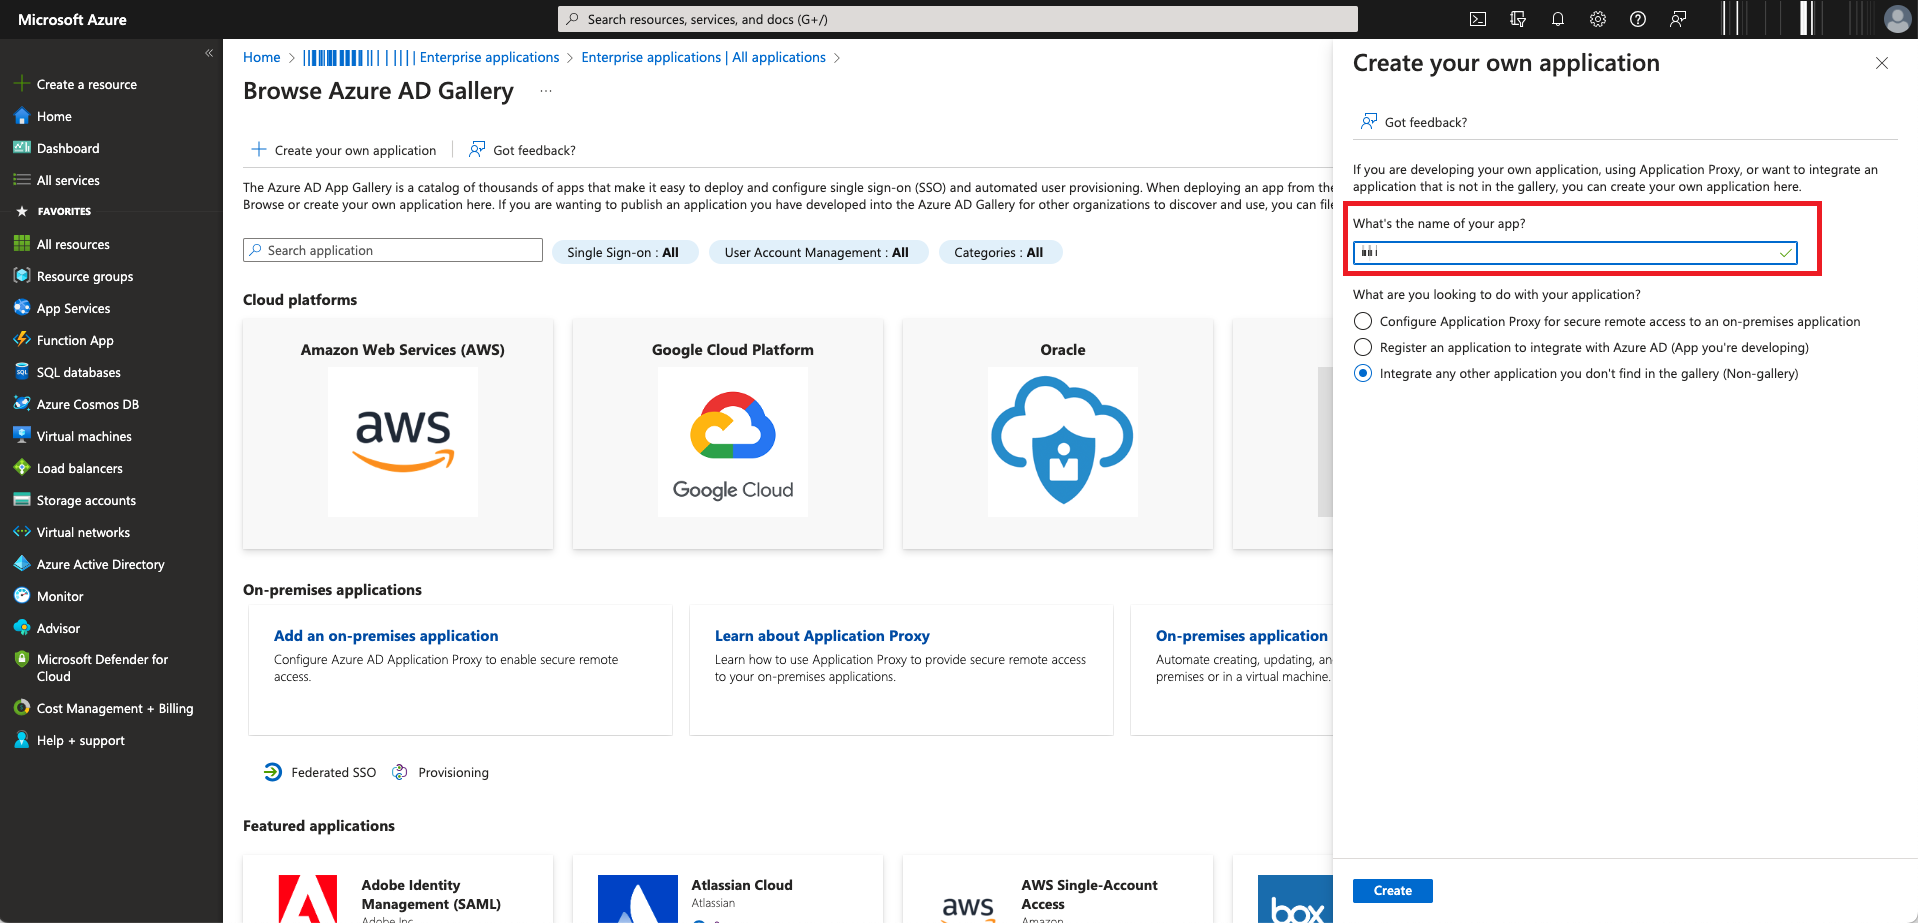

Note - Do not change the default setting.
-
Click Create.
The Microsoft Azure application is created.
-
Browse to App registrations, locate and select your application.
-
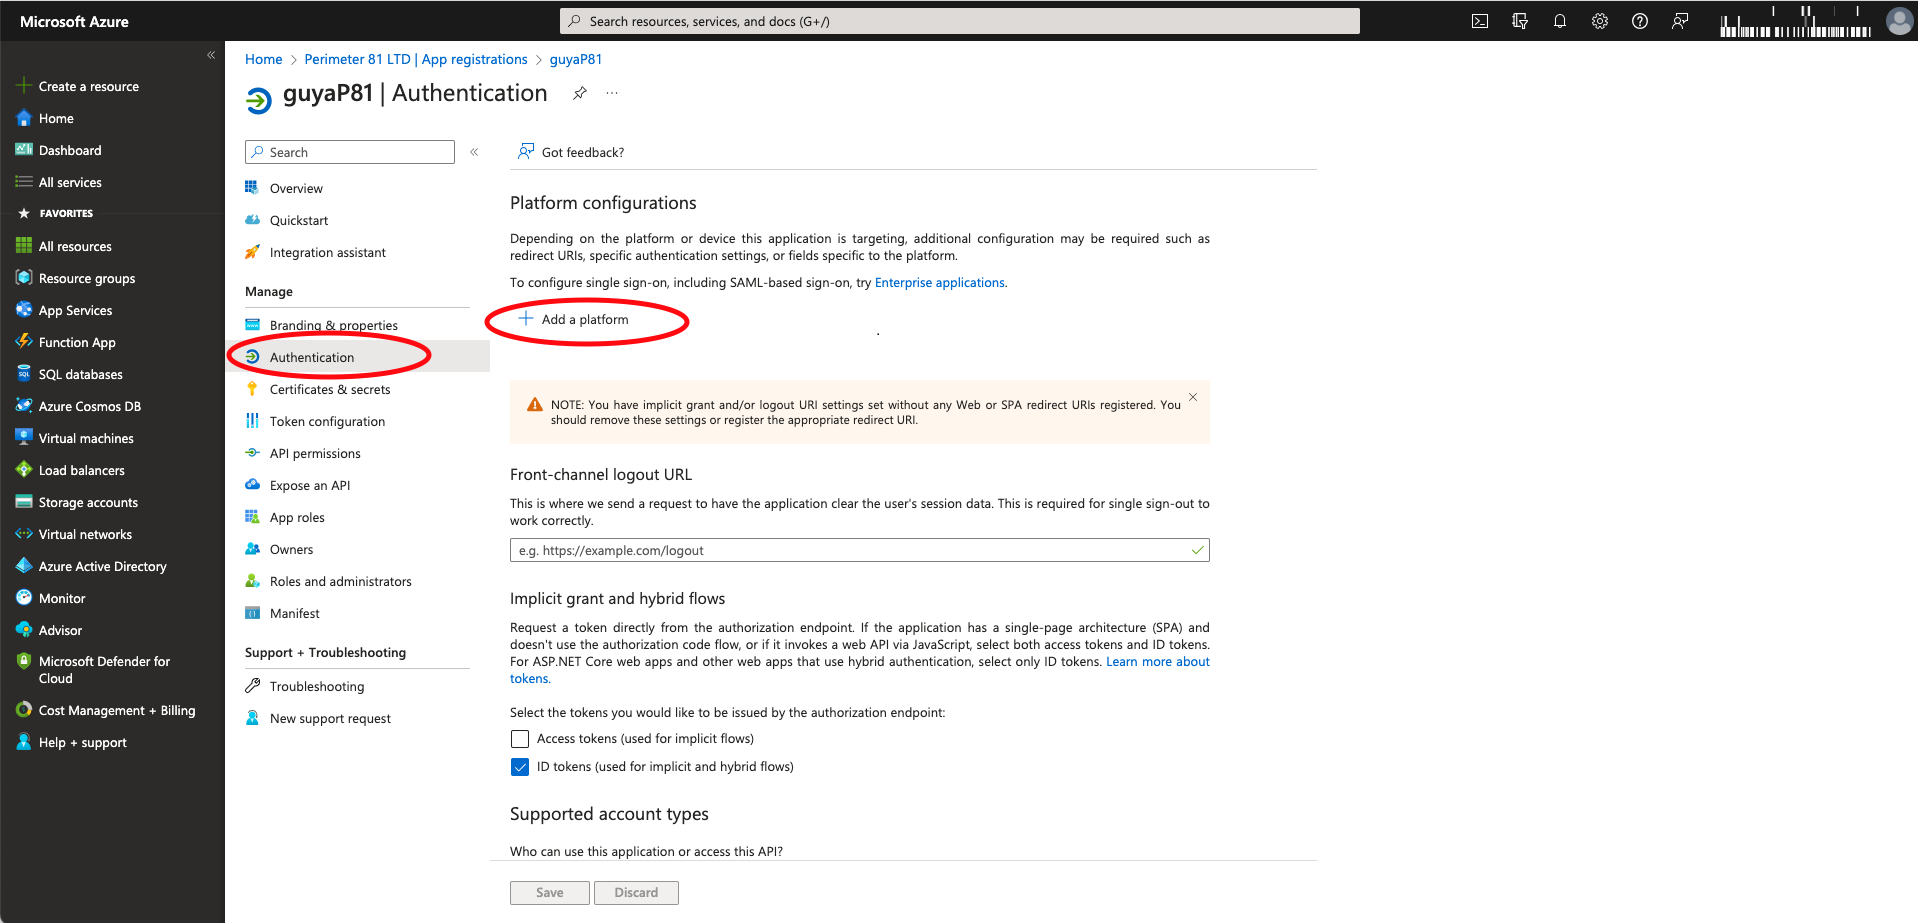
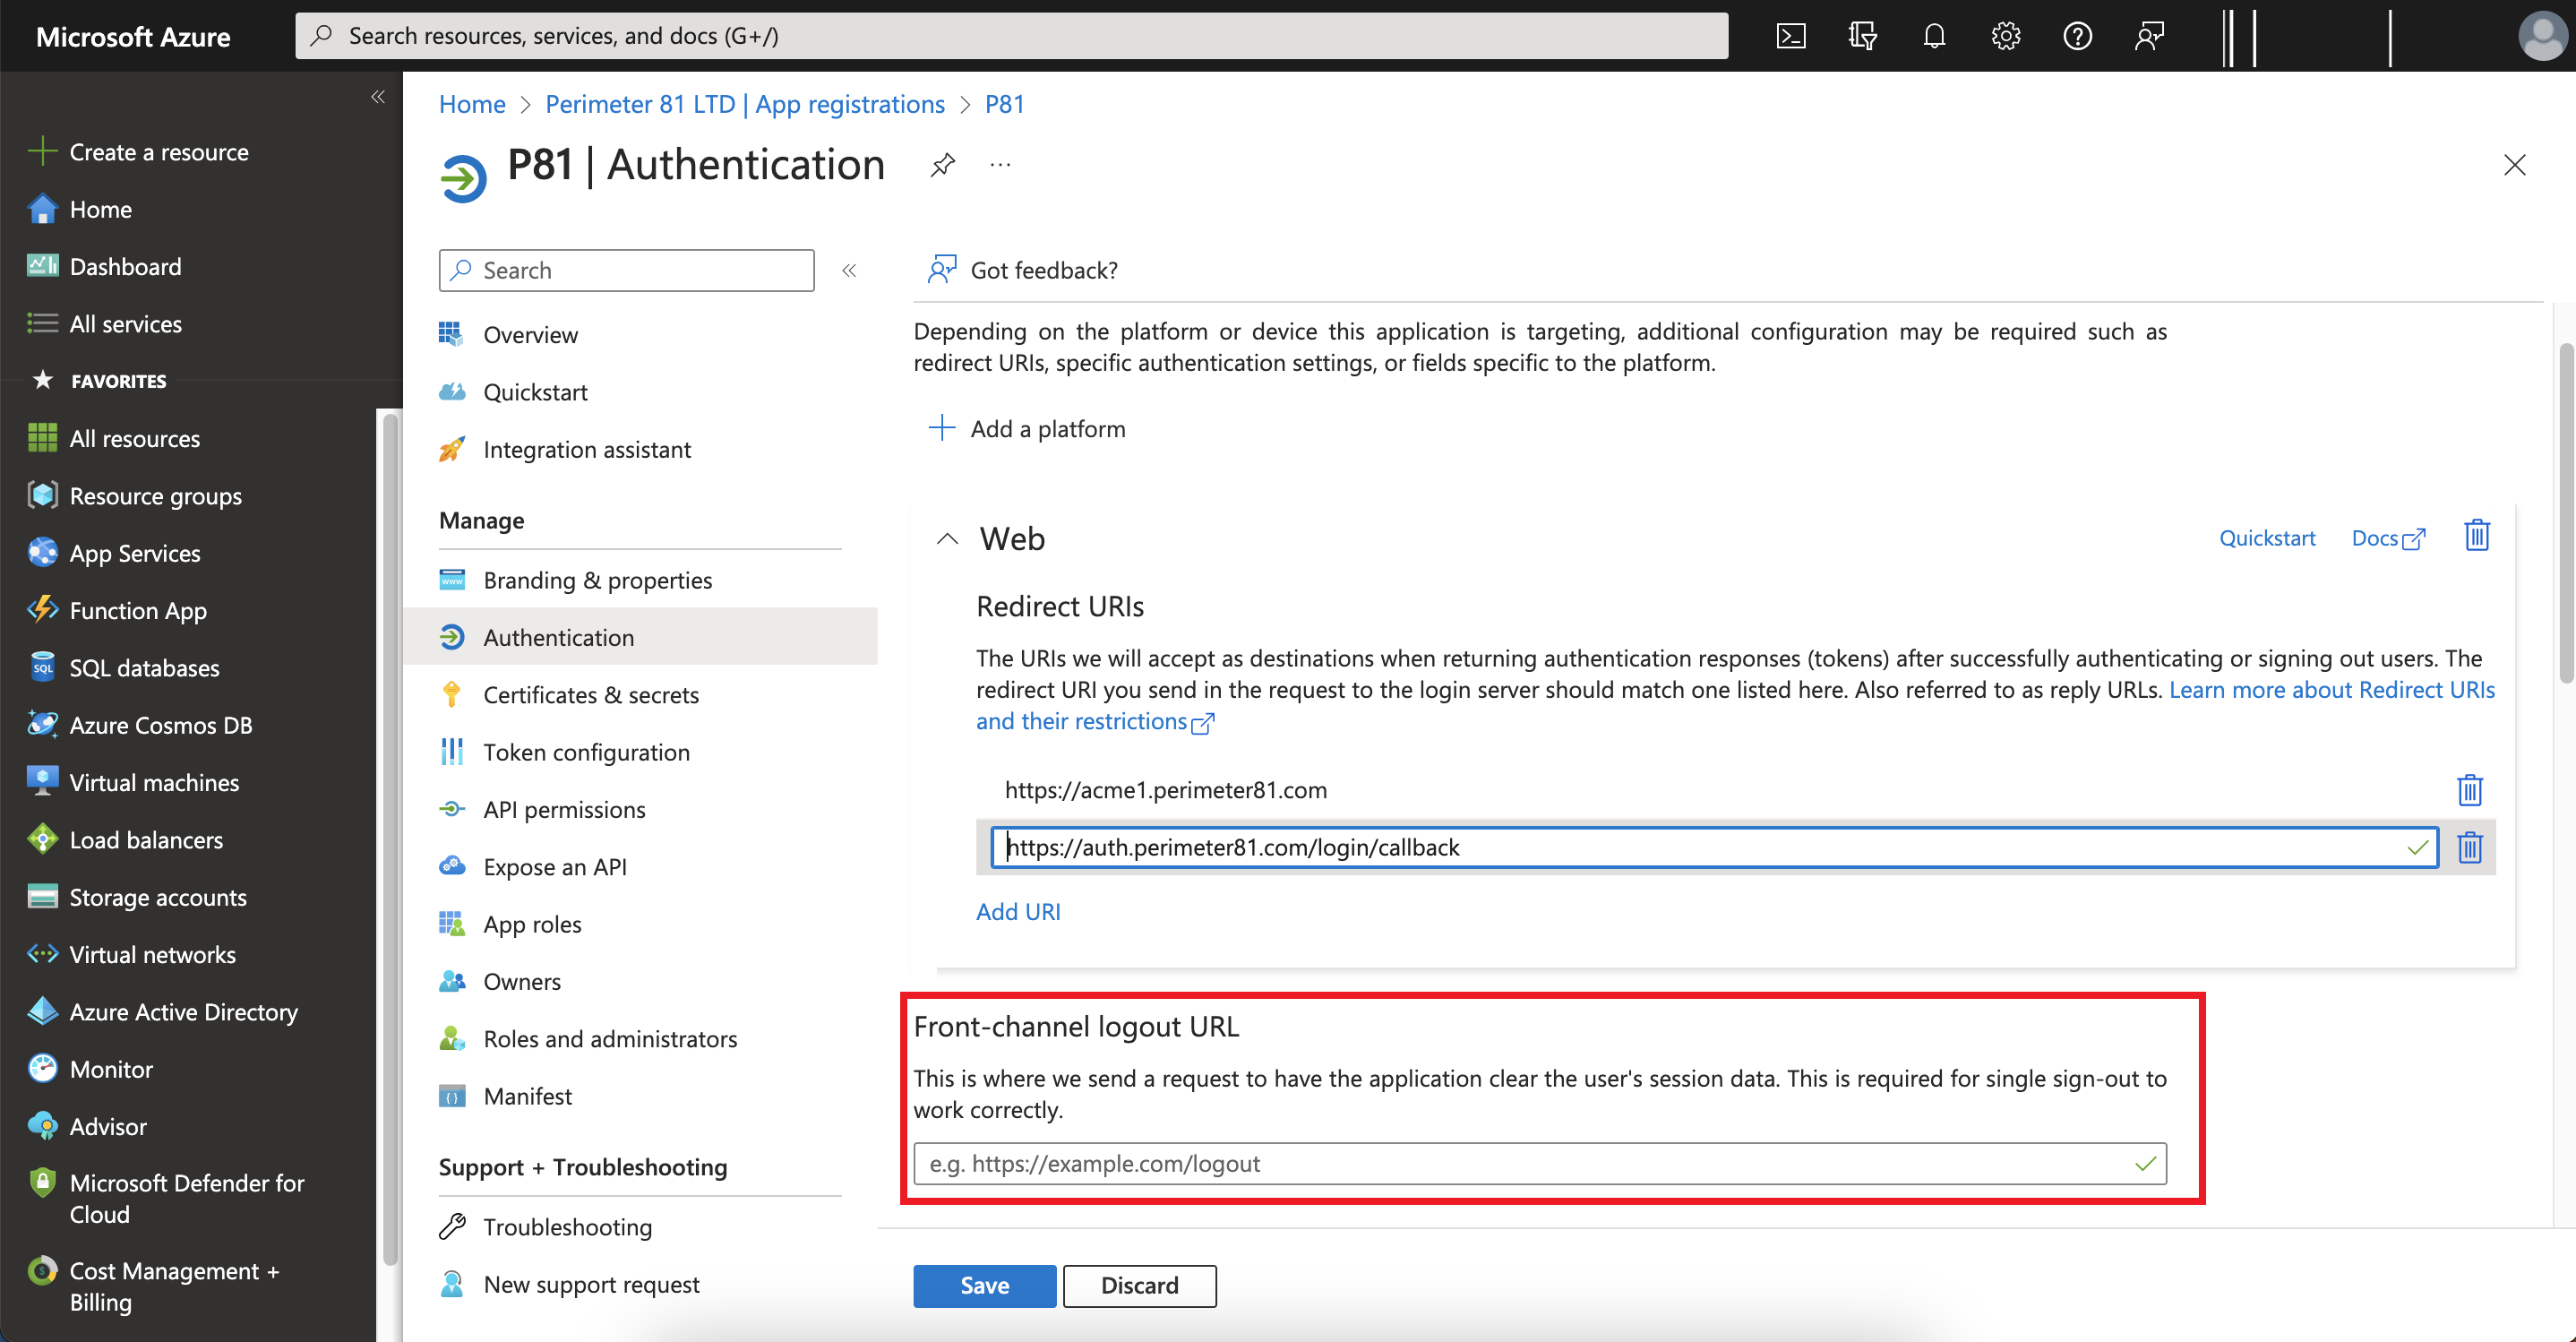
Click Manage > Authentication > Add a platform.
The Configure platforms window appears.
-
Select Web.

-
In the Redirect URI (Optional) field, select Web from the type of application list and enter the relevant URI where the access token is sent to:
-
For US data residency -
https://workspace.perimeter81.com -
For EU data residency -
https://workspace.eu.sase.checkpoint.com -
For AU data residency -
https://workspace.au.sase.checkpoint.com -
For IN data residency -
https://workspace.in.sase.checkpoint.com
-
-
Click Configure.
-
In the Redirect URIs section, enter:
-
For US data residency -
https://auth.perimeter81.com/login/callback -
For EU data residency -
https://auth.eu.sase.checkpoint.com/login/callback -
For AU data residency -
https://auth.au.sase.checkpoint.com/login/callback -
For IN data residency -
https://auth.in.sase.checkpoint.com/login/callback
-
-
In the Front-channel logout URL section, enter your workspace name:
-
For US data residency -
https://{{WORKSPACE}}.perimeter81.com -
For EU data residency -
https://{{WORKSPACE}}.eu.sase.checkpoint.com -
For AU data residency -
https://{{WORKSPACE}}.au.sase.checkpoint.com -
For IN data residency -
https://{{WORKSPACE}}.in.sase.checkpoint.com
where{{WORKSPACE}}refers to your Check Point SASE workspace name.
-
-
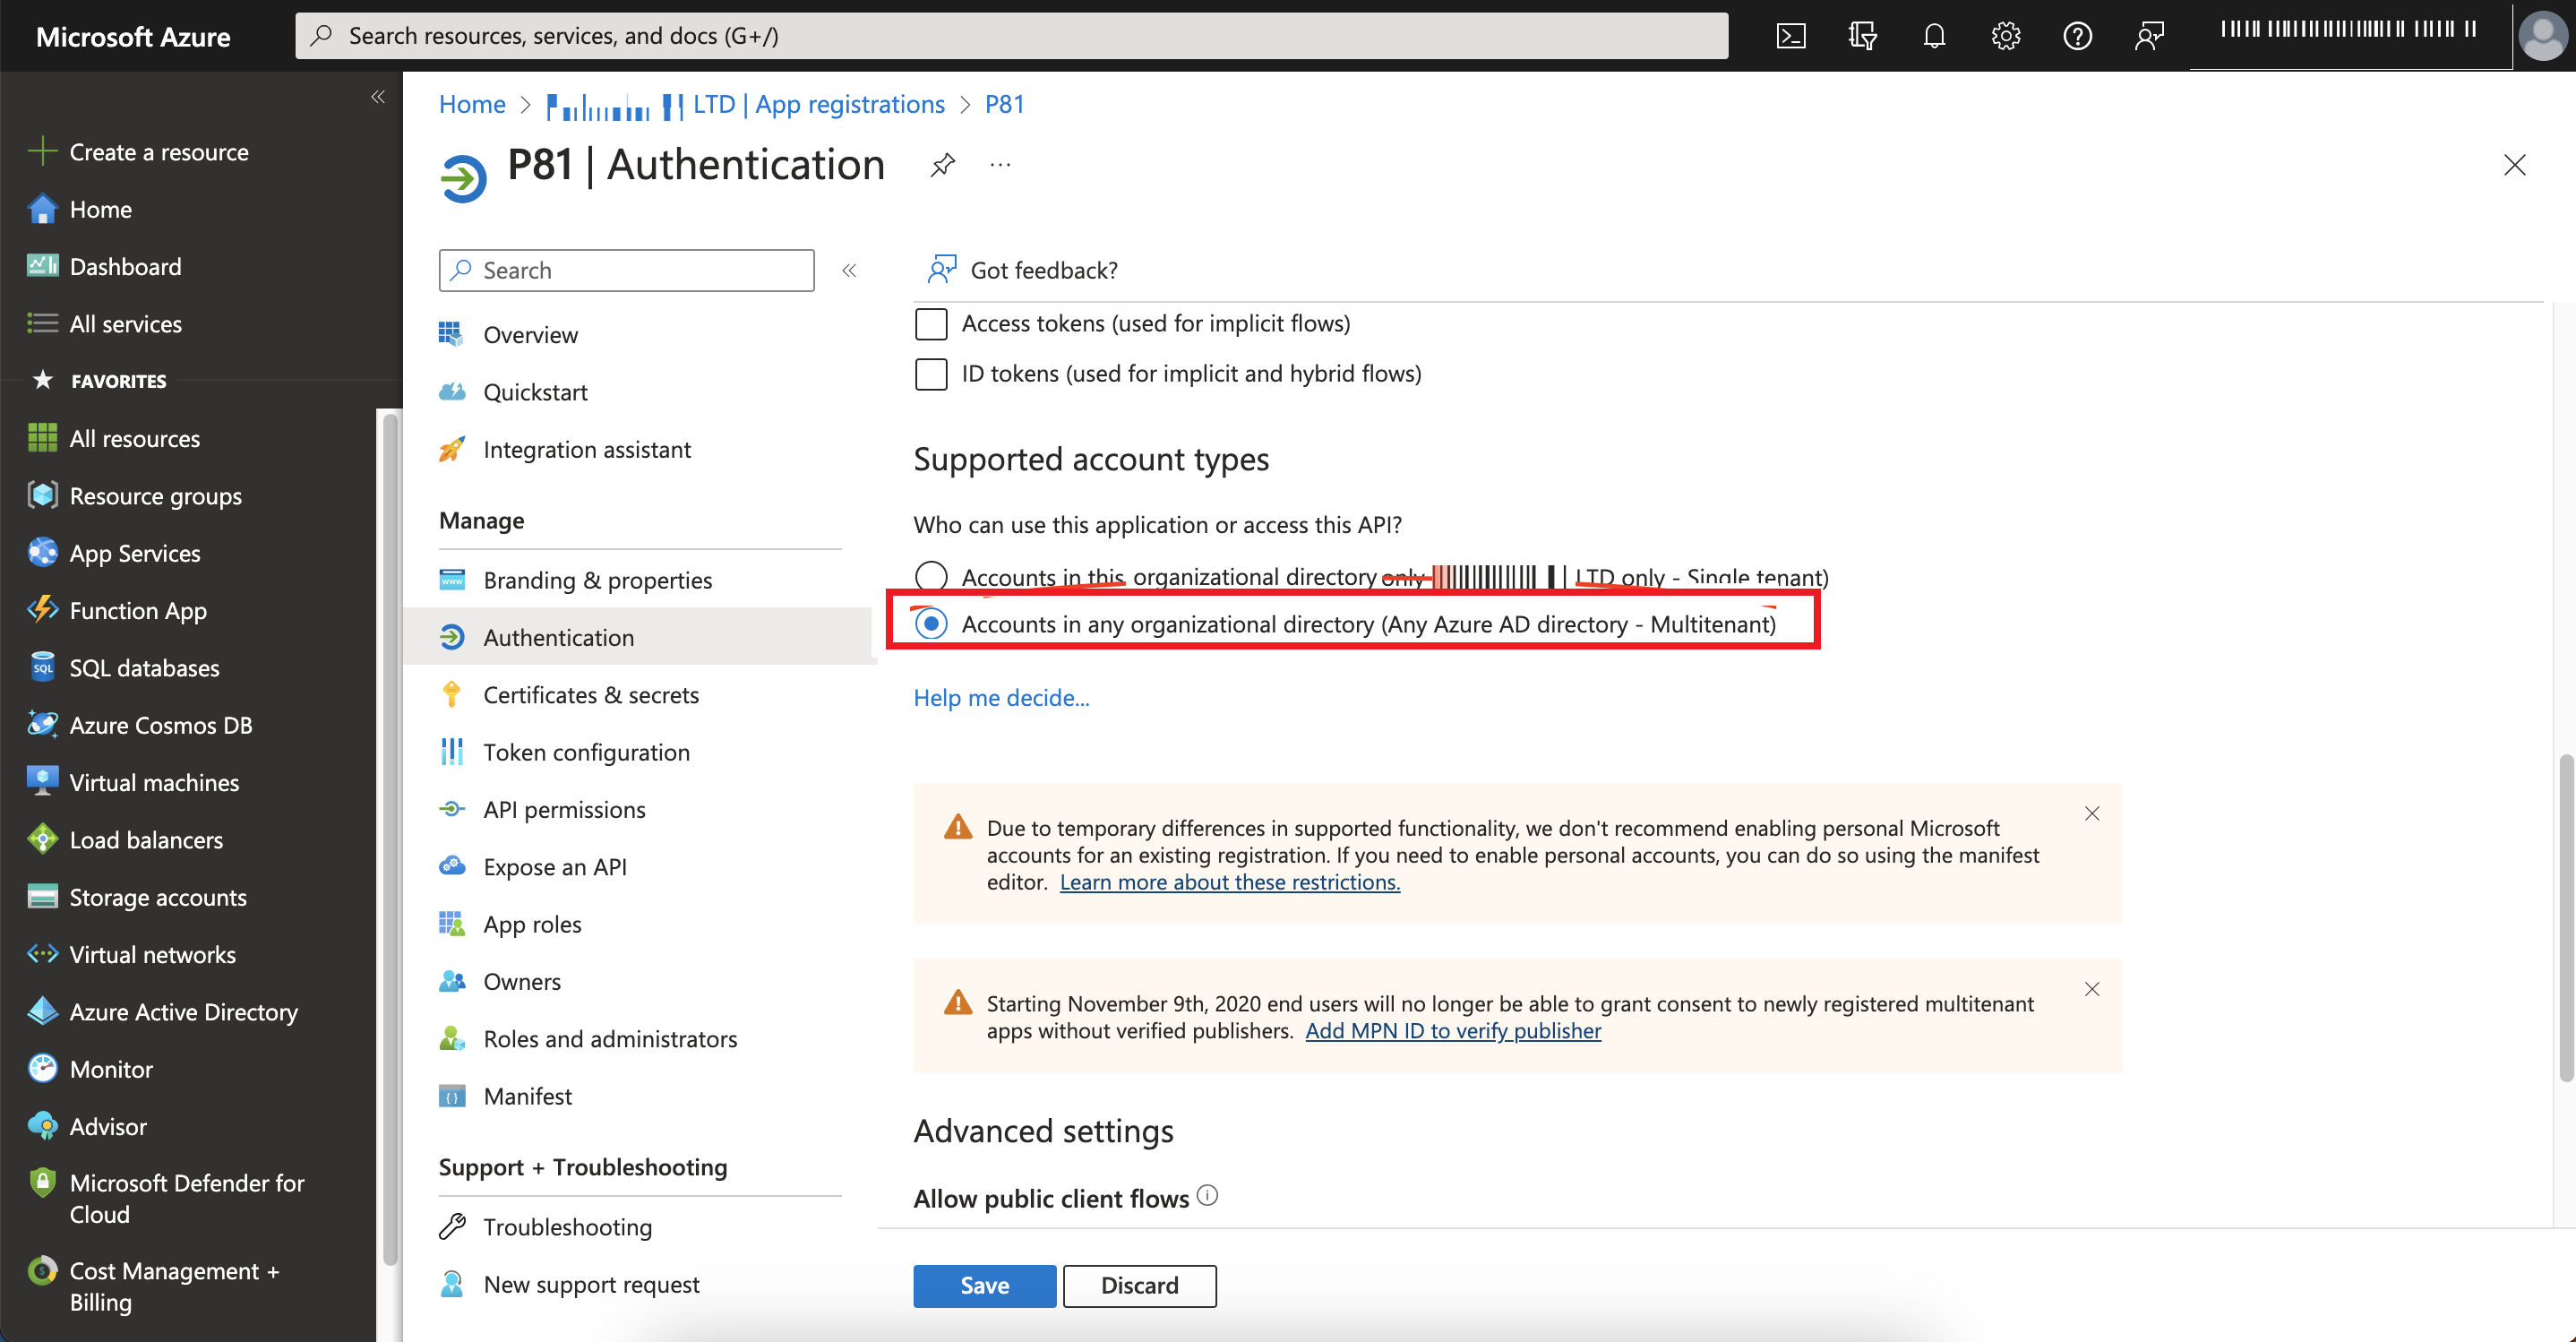
To allow access from external organizations, in the Supported account types section, select Accounts in any organizational directory (Any Azure AD directory - Multitenant).
-
Click Save.
Configuring the Permissions for the Application
To configure the permissions for the application:
-
Log in to your Microsoft Azure Portal.
-
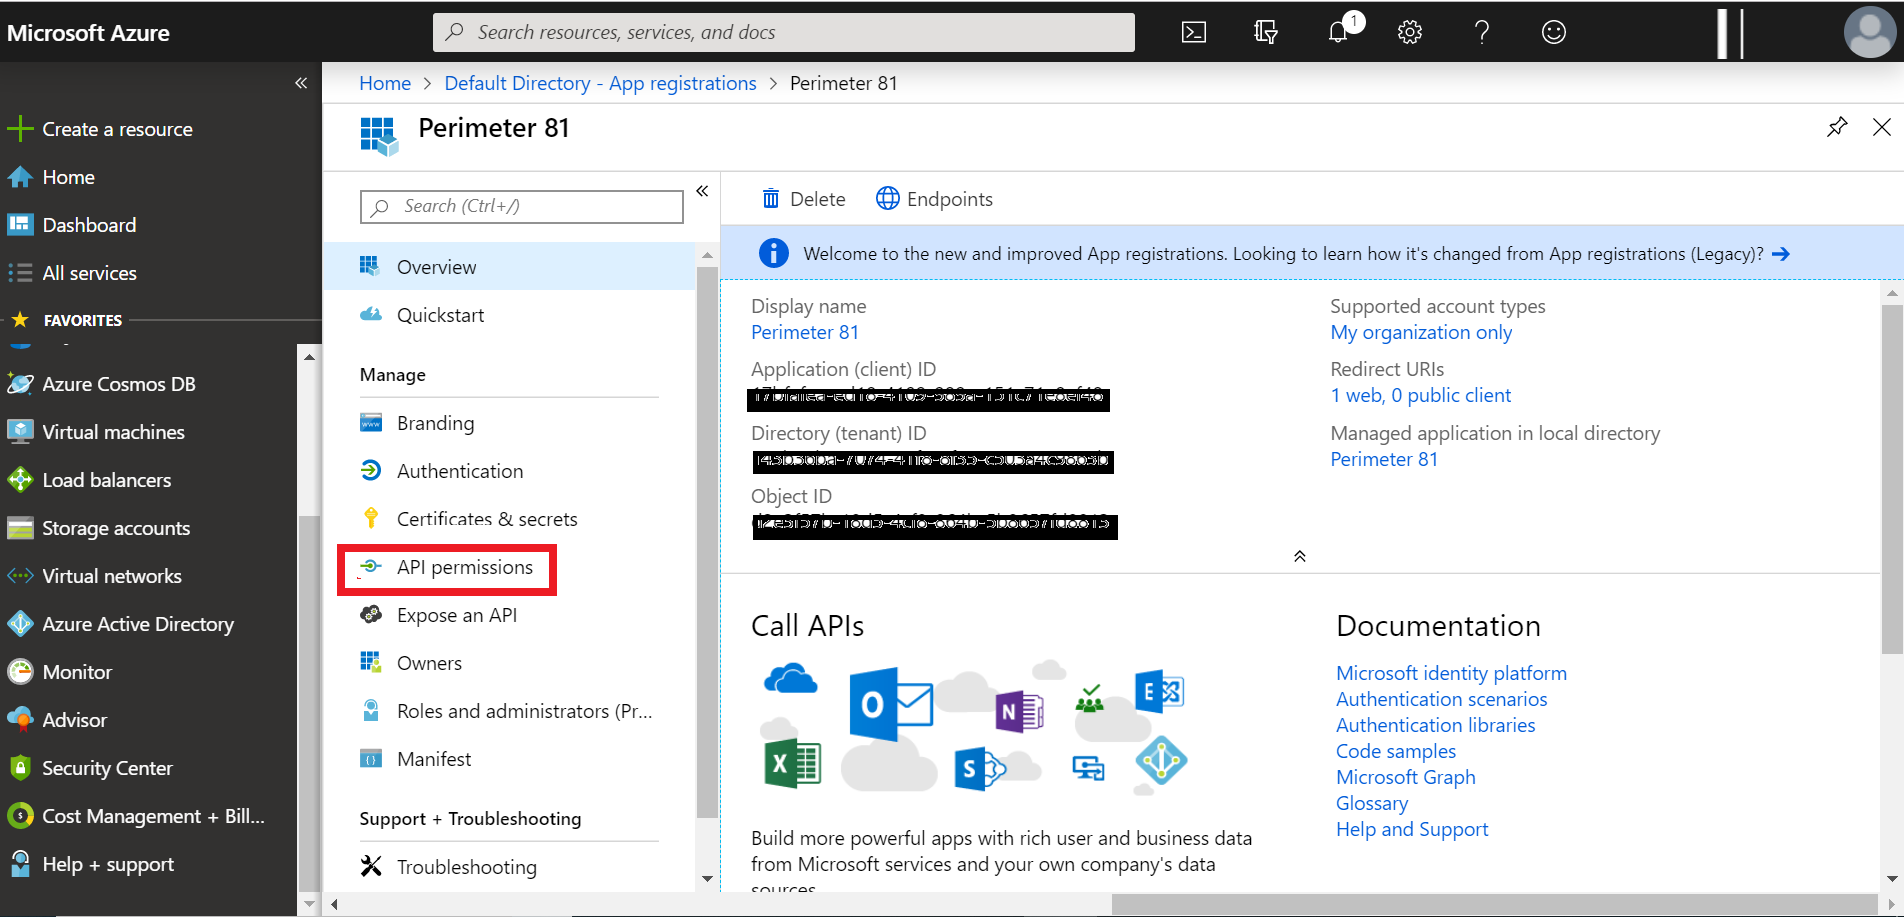
Click Identity > Applications > App registrations > All applications.
-
Select your application.
-
Click Overview > Manage > API Permissions.
-
Click Add a permission.
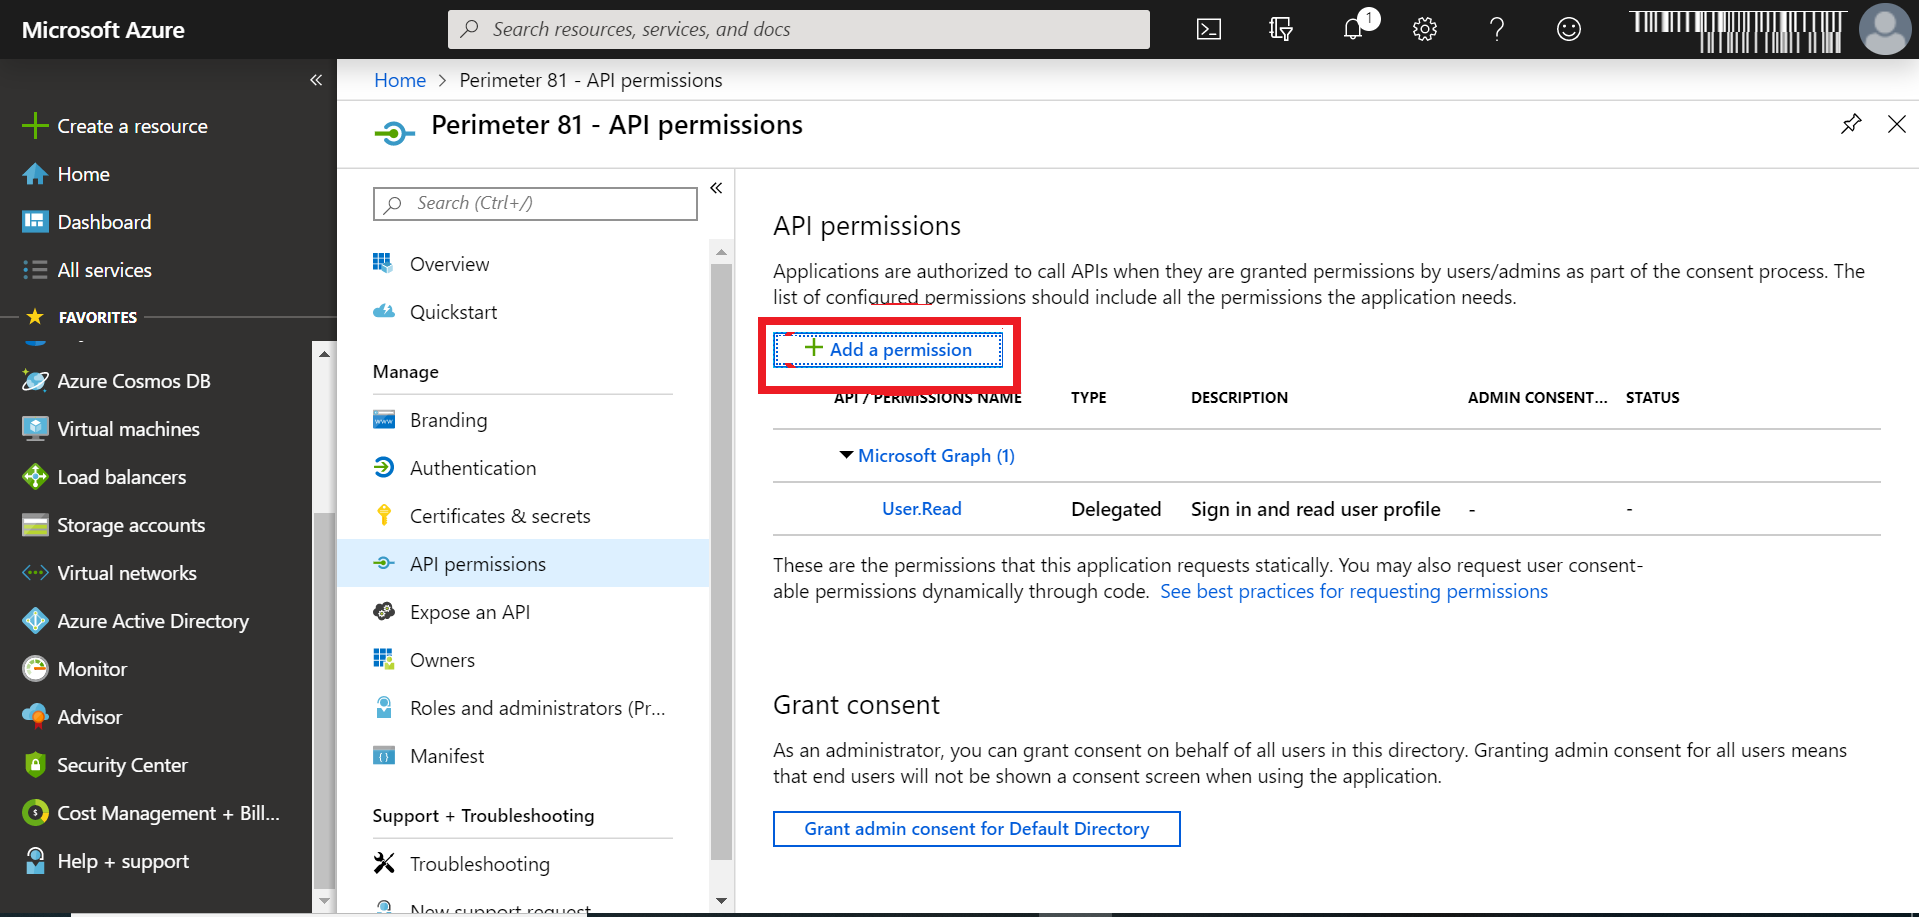
The Request API permissions page appears.
-
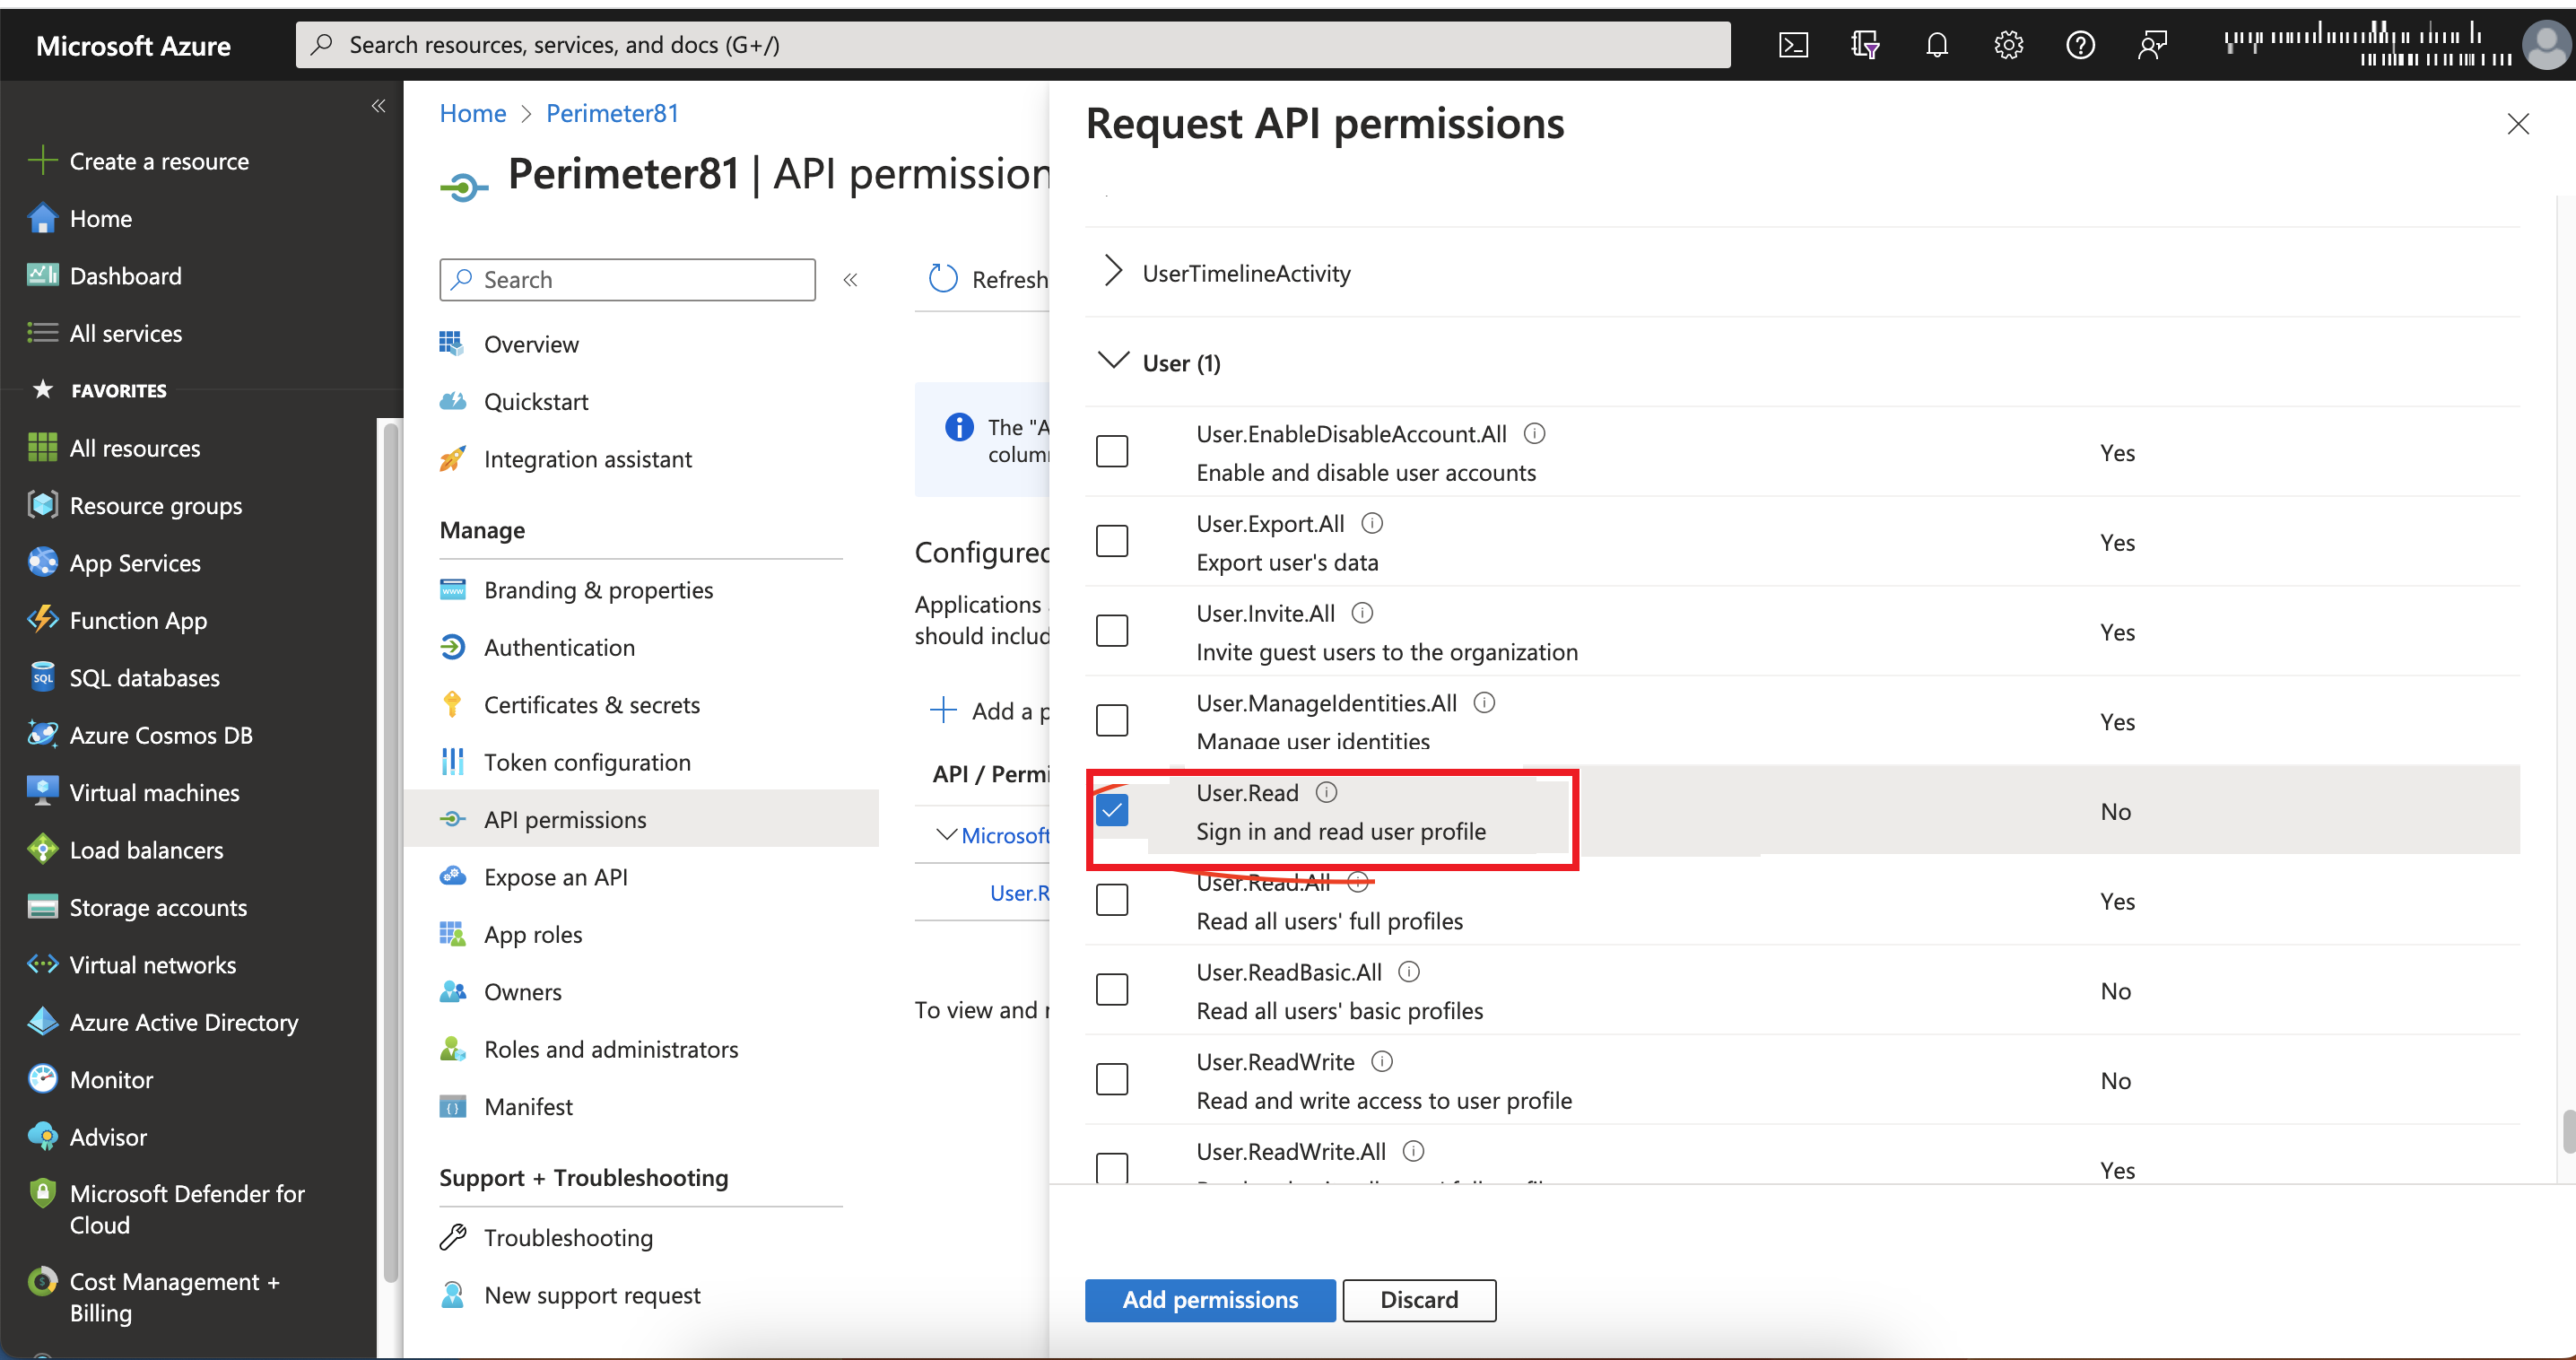
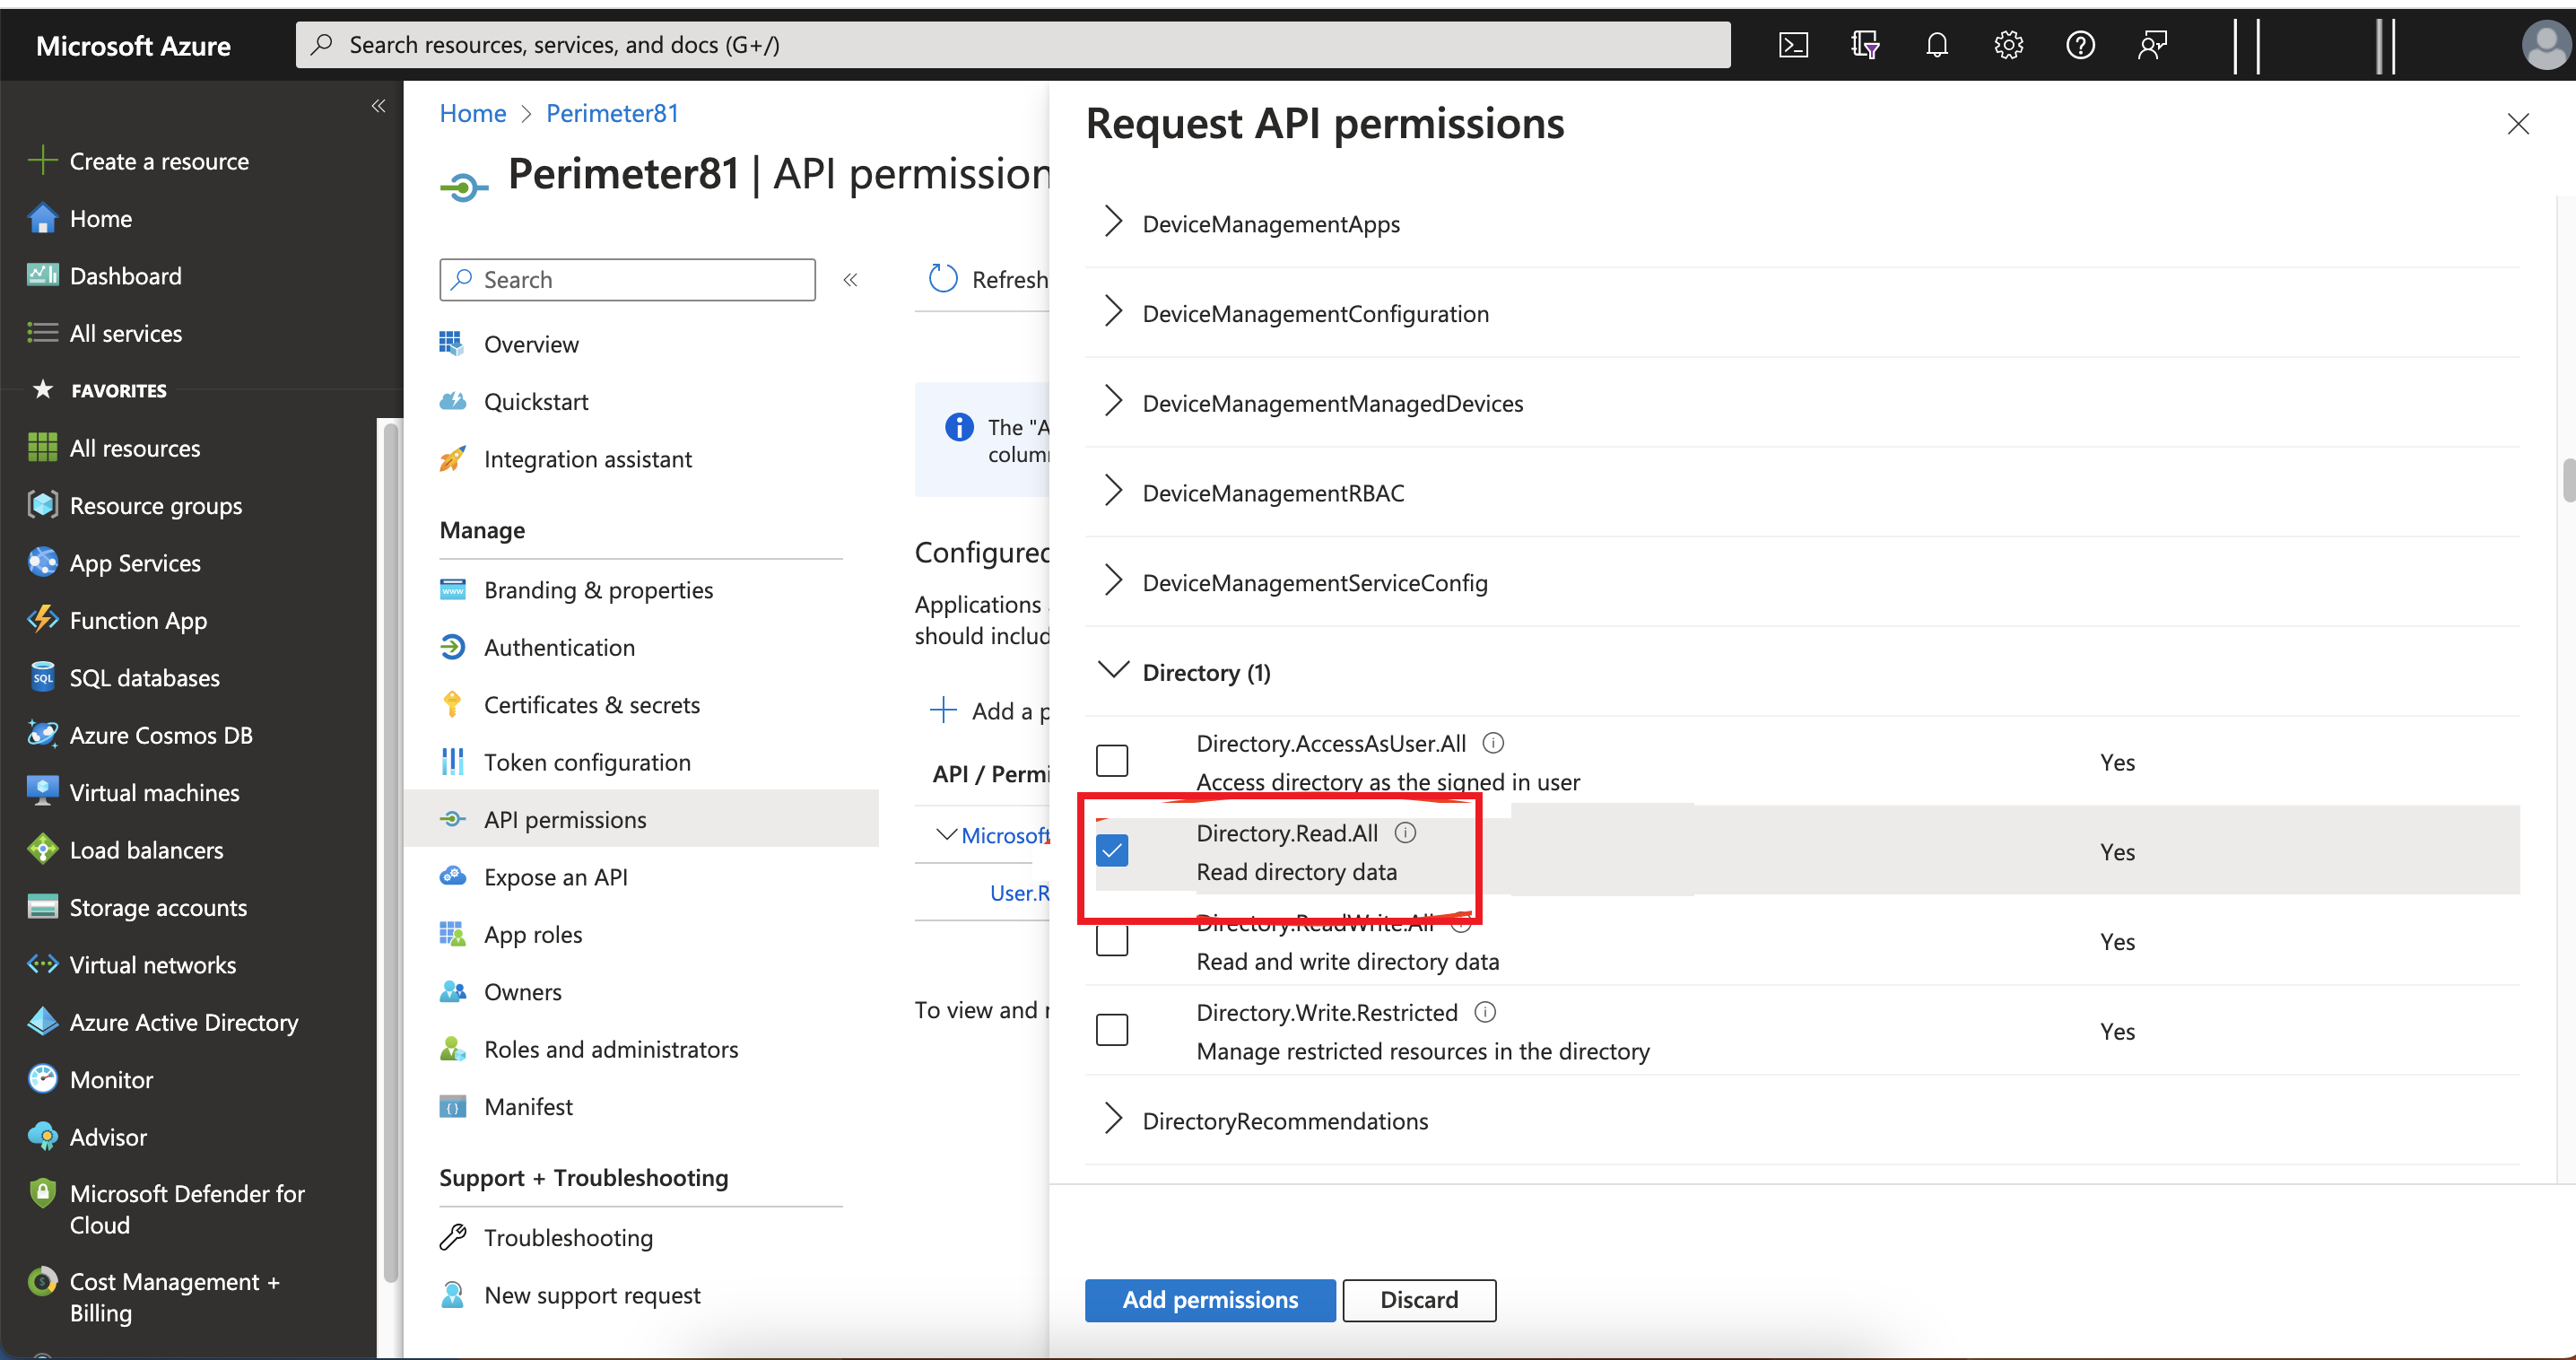
Click Microsoft APIs and select Microsoft Graph from the list of available APIs to change the access level.

-
Click Delegated permissions.
-
Select the User.Read and Directory.Read.All checkbox to modify the permissions so your application can read the directory..
-
Click Add permissions > Configured permissions > Grant admin consent for approval of your app API permissions.
-
Click Yes.
Your application gets the granted permissions.
-
To enable user group support, enable:
-
Application Permissions: Read directory data.
-
Delegated permissions: Access the directory as the signed in user.
-
-
Click Save to save the changes.
-
To remove the Windows Azure Active Directory API permission, see Appendix A - Removing Microsoft Entra ID (formerly Azure AD) API Permissions.
Configuring the Key
-
Log in to your Microsoft Azure Portal.
-
Go to Identity > Applications > App registrations > All applications.
-
Browse to App registrations, locate and select your application.
-
Go to Manage > Certificates & secrets.
-
Click New client secret.
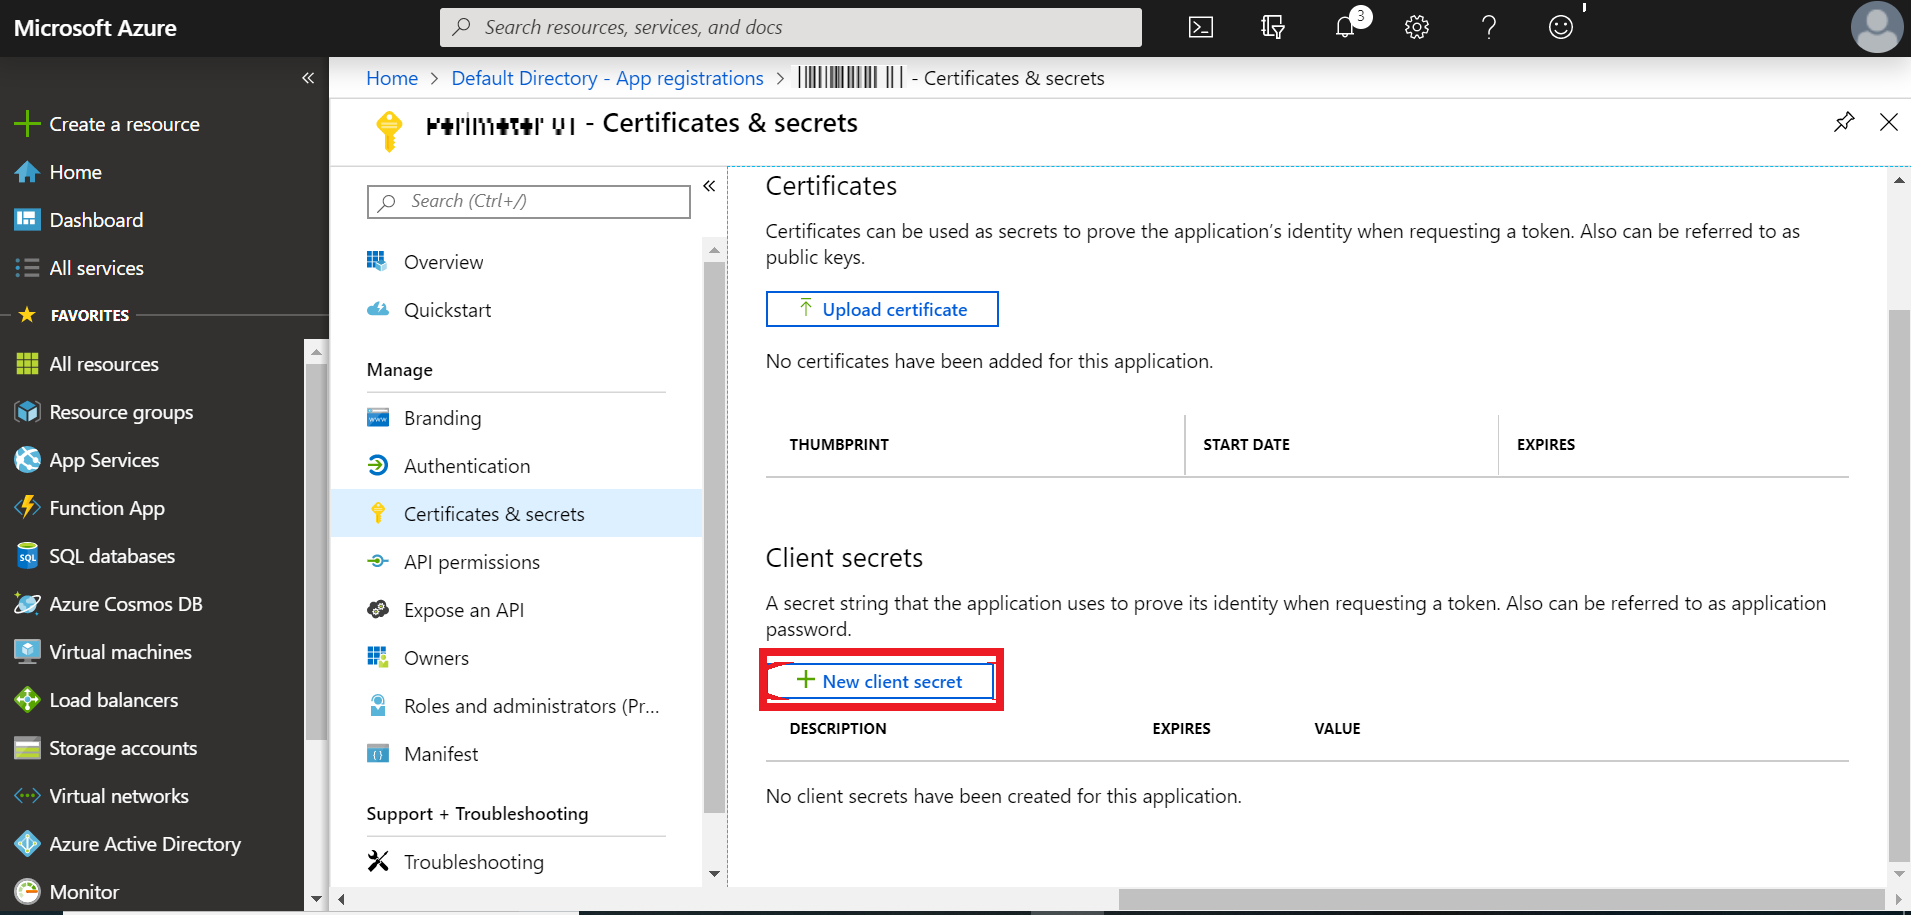
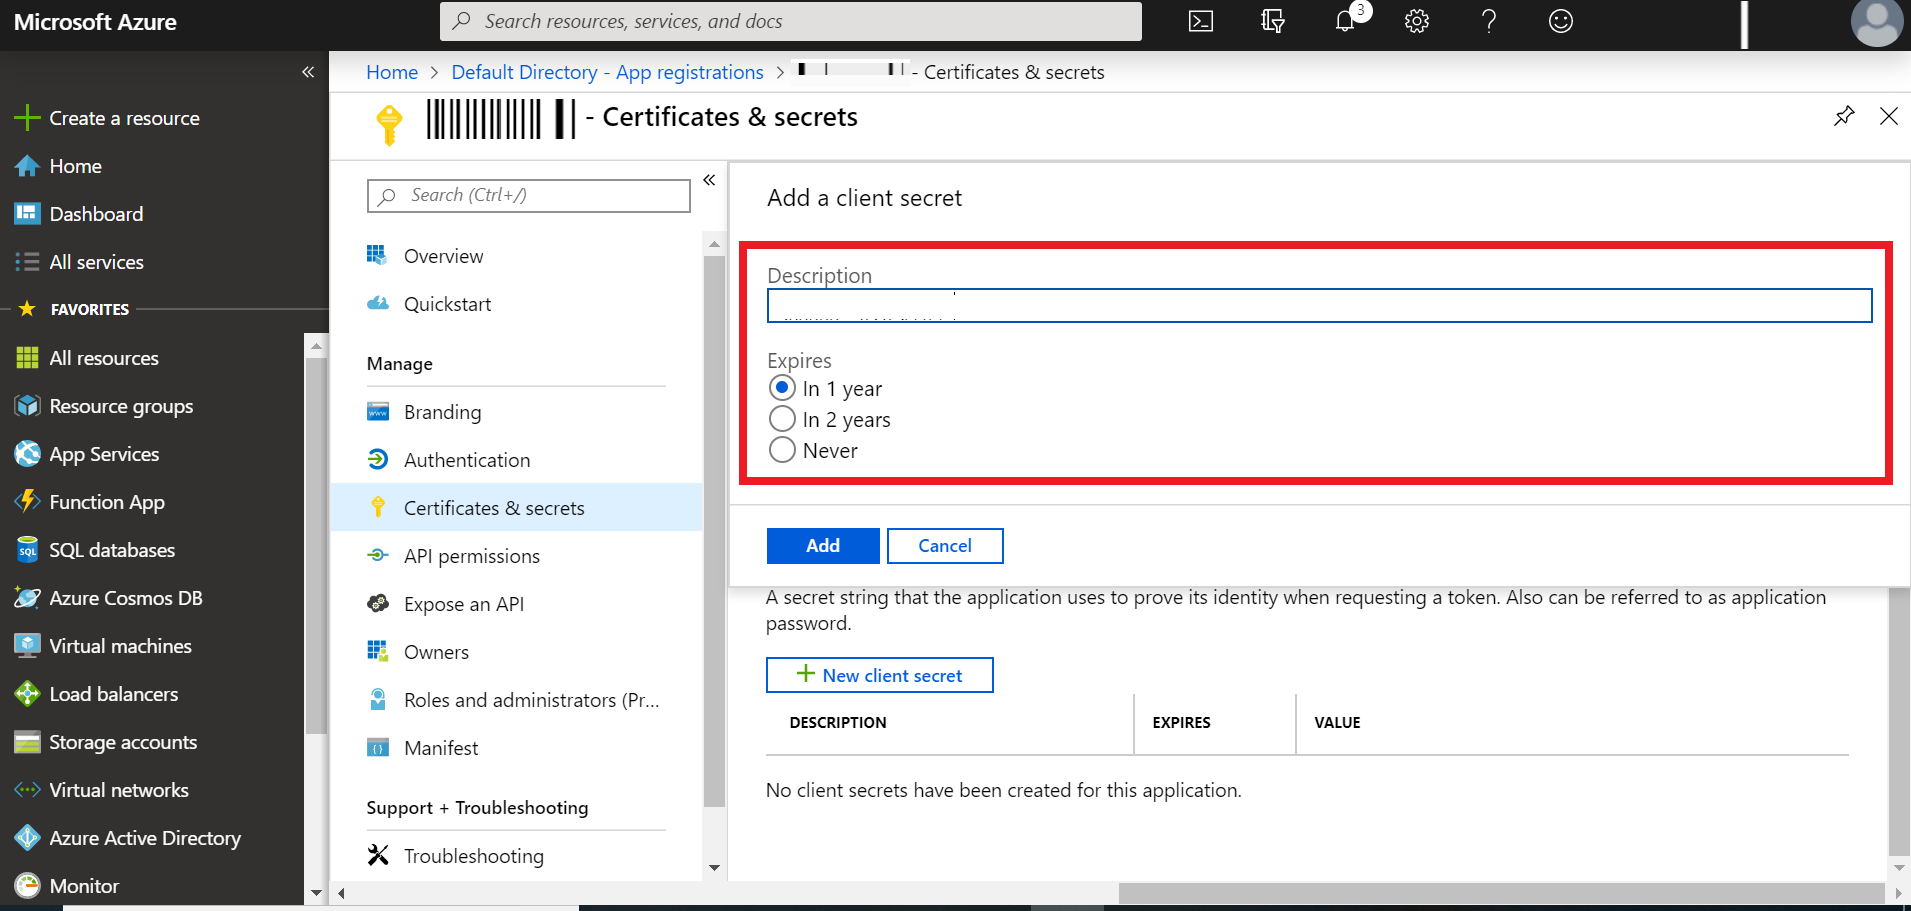
The Add a Client secret window appears.
-
In the Description filed, enter a name for the key.
-
In the Expires field, select the expiry:
-
In 1 year
-
In 2 years
-
Never
-
-
Click Add.
The new key is added.
-
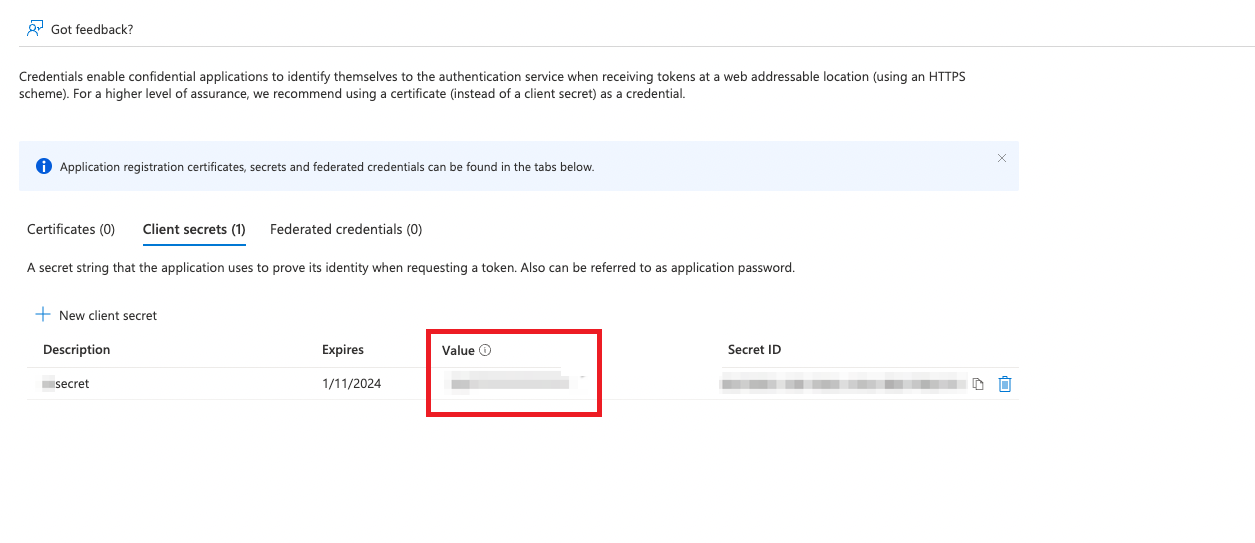
To get the secret value of the key, go to the Client secrets tab and copy the secret Value.
This value is the Client Secret in SASE Admin console. .
Note - The Secret value of the key need to be copied before you close the screen. If not, you need to create a new key.
Configuring SCIM Integration within SASE Administrator Portal
-
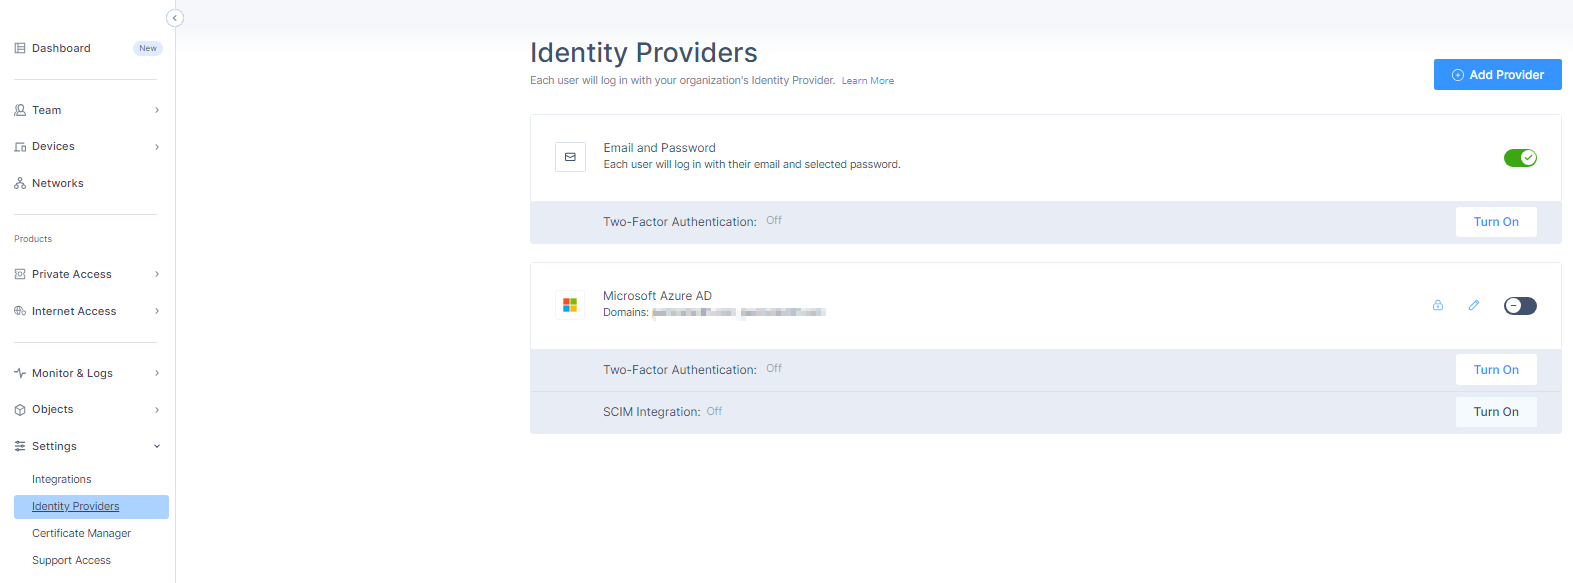
Access the SASE Administrator Portal and click Settings > Identity Providers.
The Identity Providers page appears.
-
Click Add Provider.
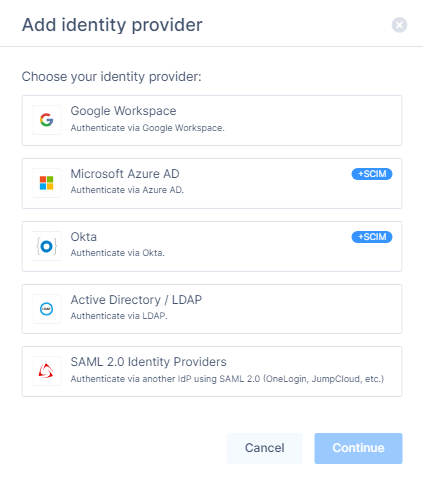
The Add identity provider window appears.
-
Select Microsoft Azure AD.
-
Click Continue.
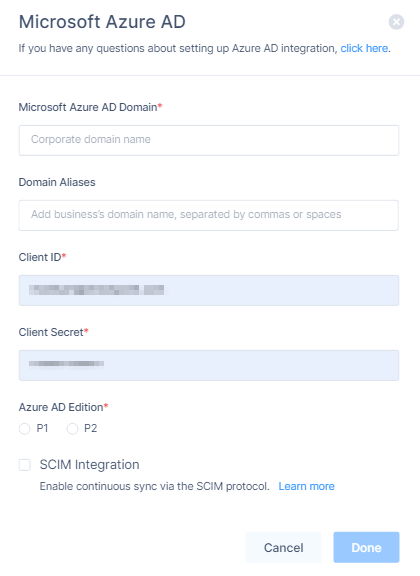
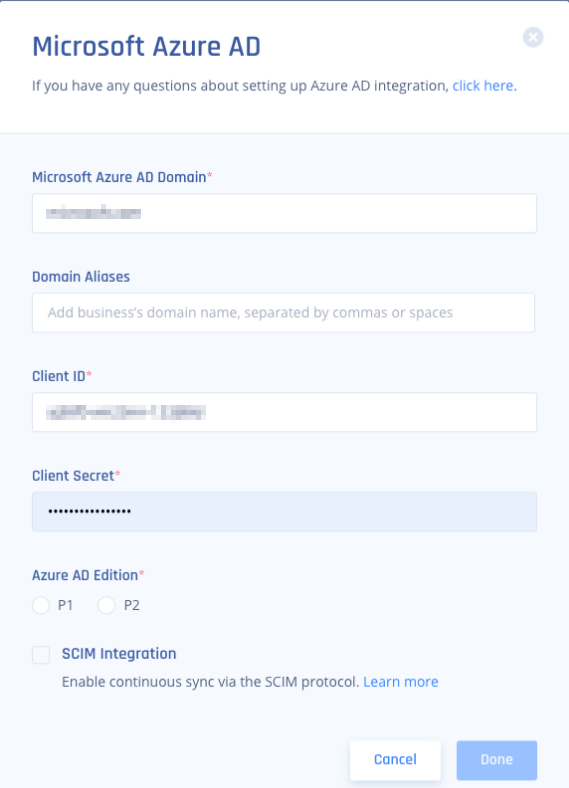
The Microsoft Azure AD page appears.
-
In the Microsoft Azure AD Domain field, enter the domain name.
-
In the Domain Aliases field, enter the email ID(s) separated by commas or spaces.
-
In the Client ID field, enter the Application (client) ID in Microsoft Azure AD:
-
Log in to your Microsoft Azure Portal.
-
Go to Identity > Applications > App registrations > All applications.
-
Browse to App registrations, locate and select your application.
-
Go to Overview > Application (client) ID.

-
Copy the Application (client) ID value.
-
-
In the Client Secret field, enter the secret value.
-
In the Azure AD Edition, select either:
-
PI
-
P2
-
-
Select the SCIM Integration checkbox to enable continuous sync through the SCIM protocol.
-
Click Done.
-
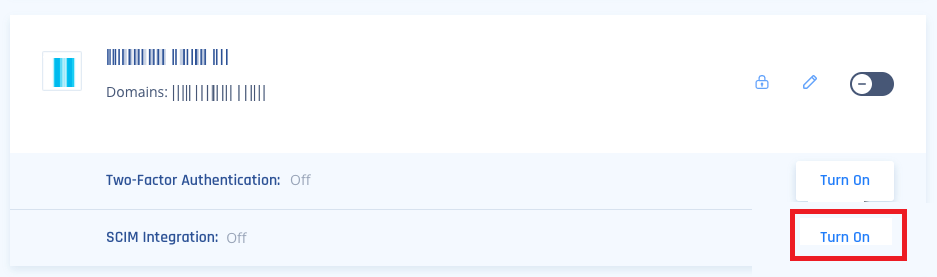
Click Turn On in the SCIM Integration section if you are editing an existing Azure configuration.
-
To get the tenant URL and secret token, click Settings in the SCIM Integration section.

-
Click Copy to copy the URL.

This is the Tenant URL that is required when configuring SCIM Integration within Azure AD.
-
Click Generate Token.
The secret token is generated.
-
Click Copy Token.
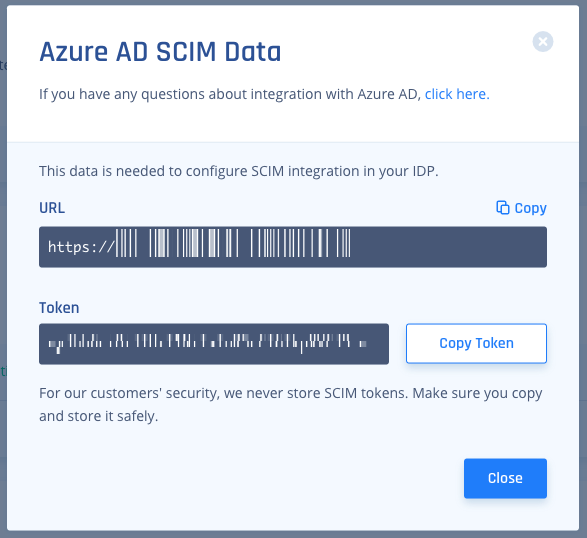
This is the Secret Token that is required when configuring SCIM Integration within Azure AD.
-
Click Close.
Configuring SCIM Integration within Azure AD Management Portal
-
Access the Microsoft Azure Portal using administrator credentials.
-
Go to Microsoft Entra ID > Enterprise Applications and locate the application previously created in Step 1 - Creating an application in Entra ID.
-
Click the application name to open the configuration.
-
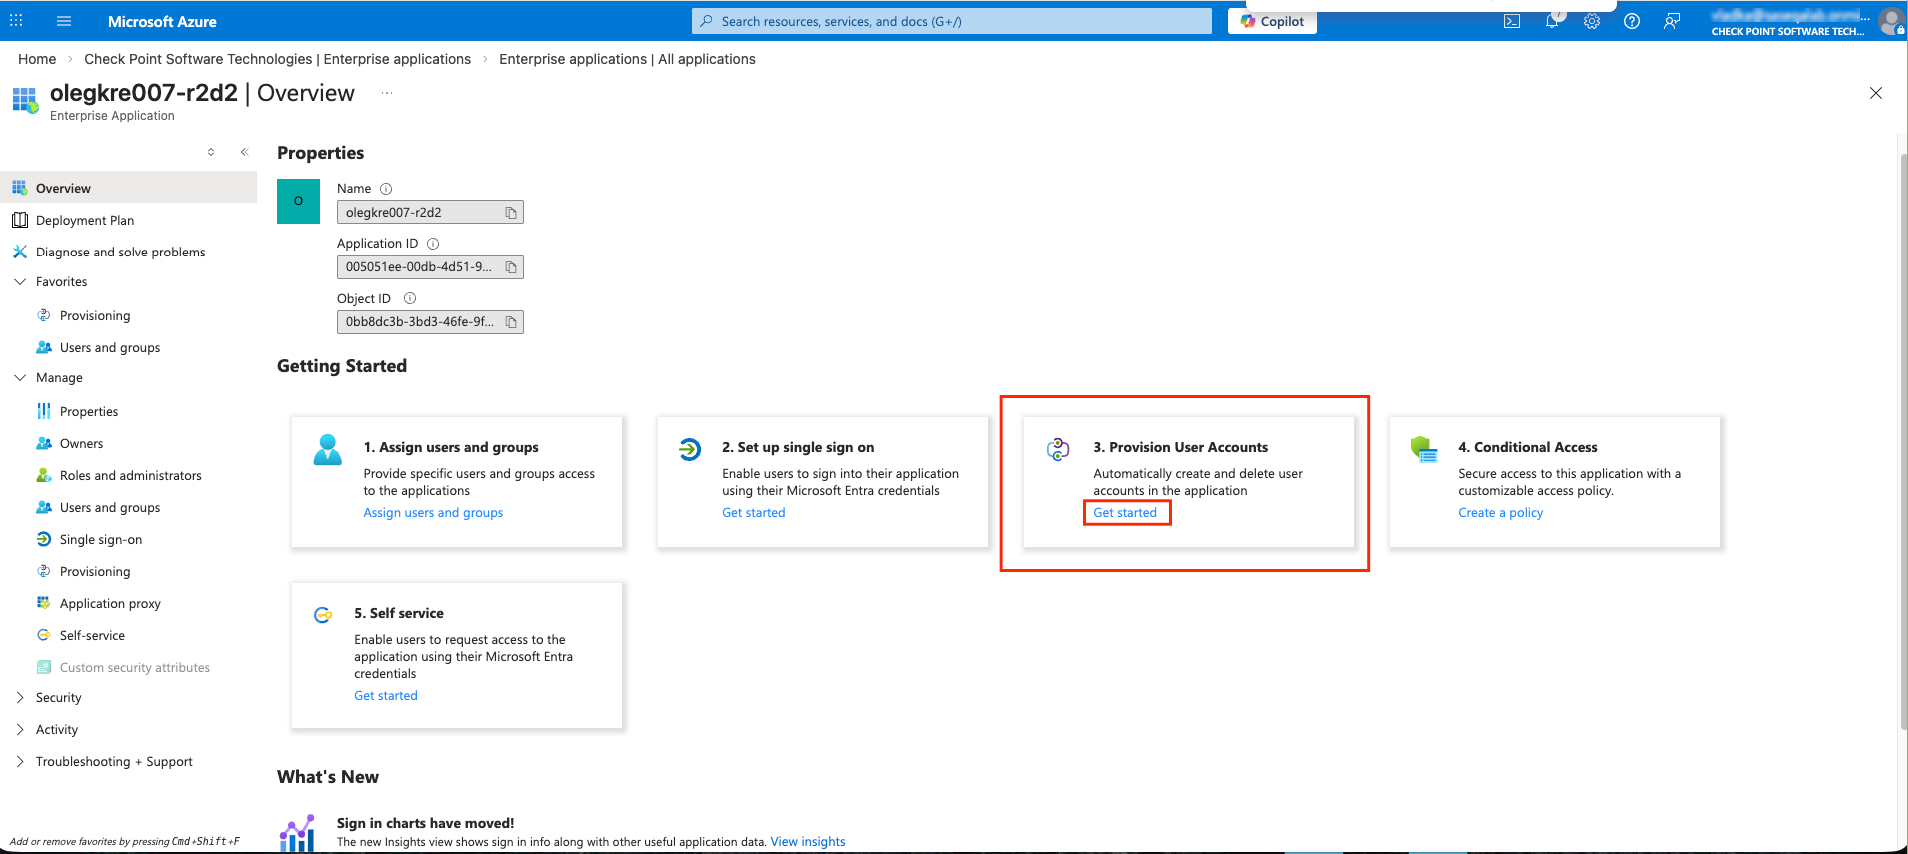
Click Get Started in the Provision User Accounts tile.
-
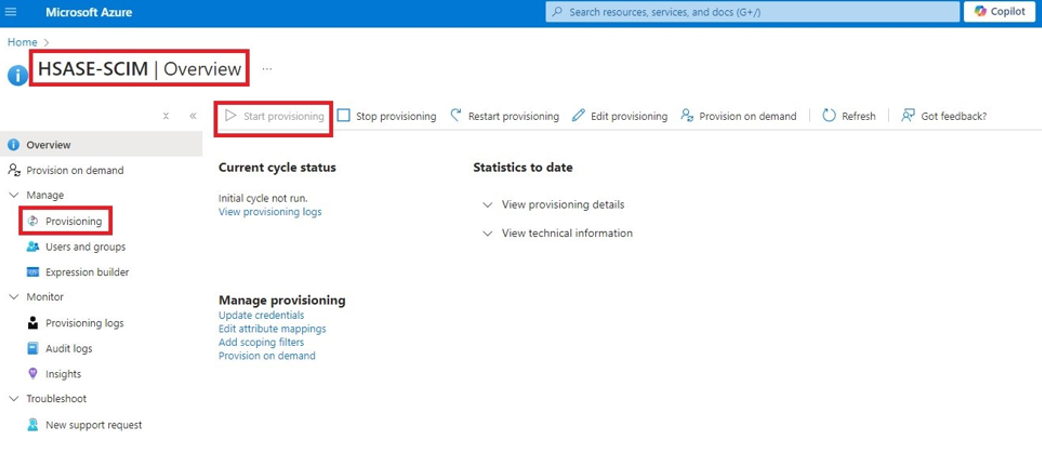
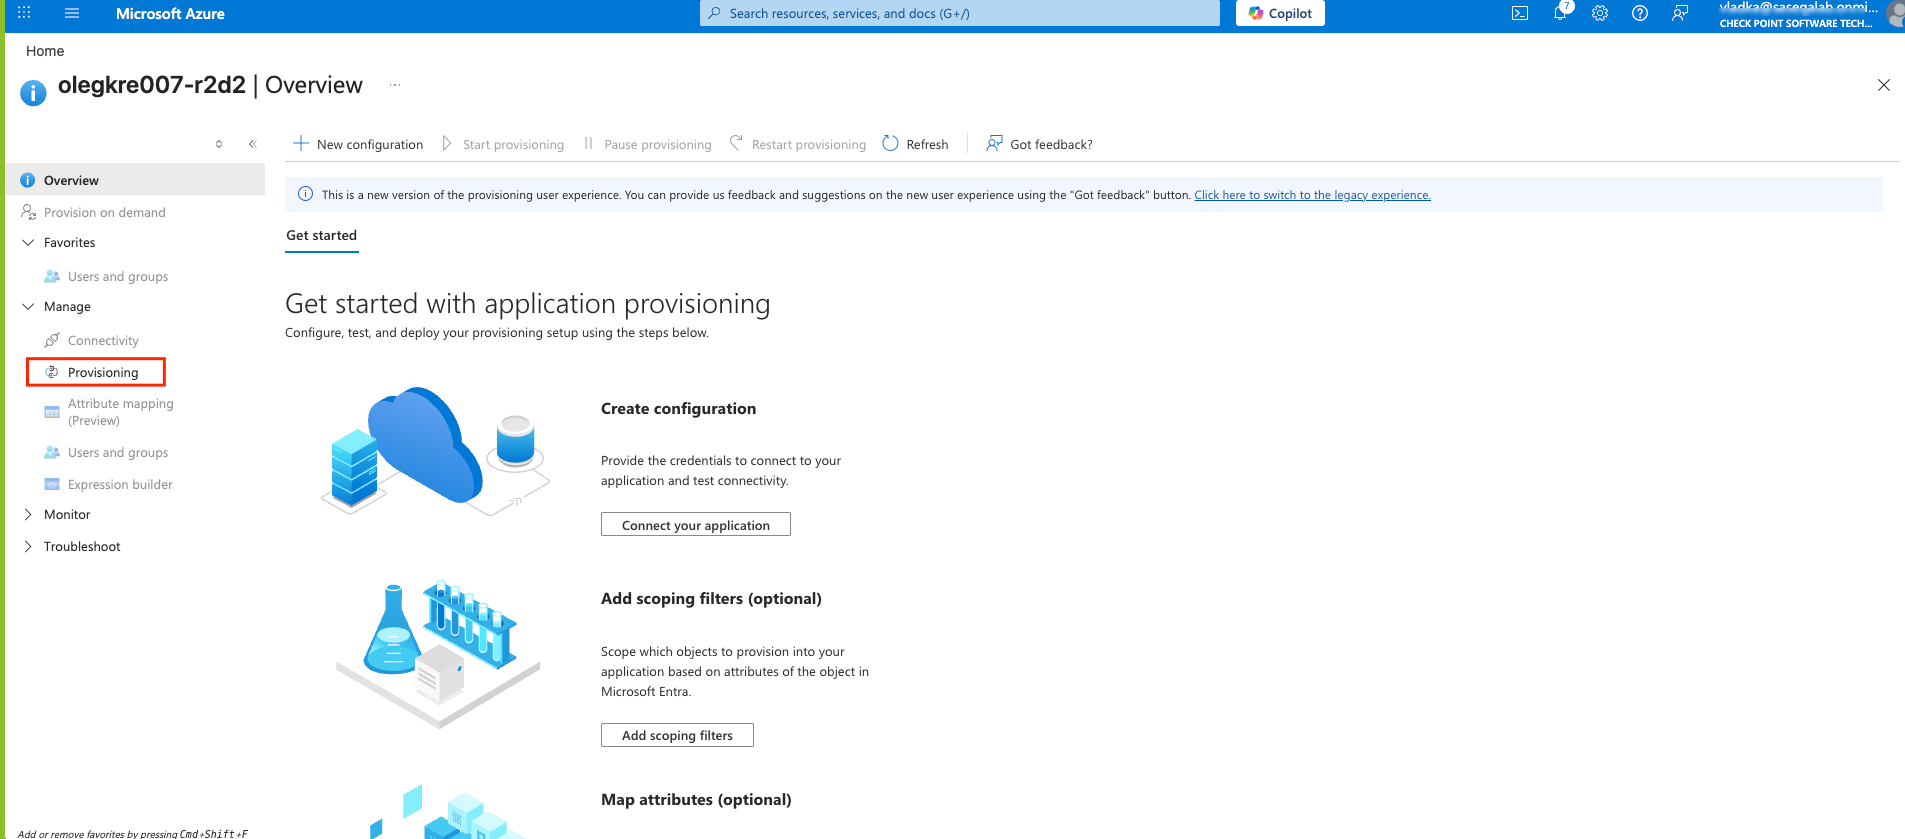
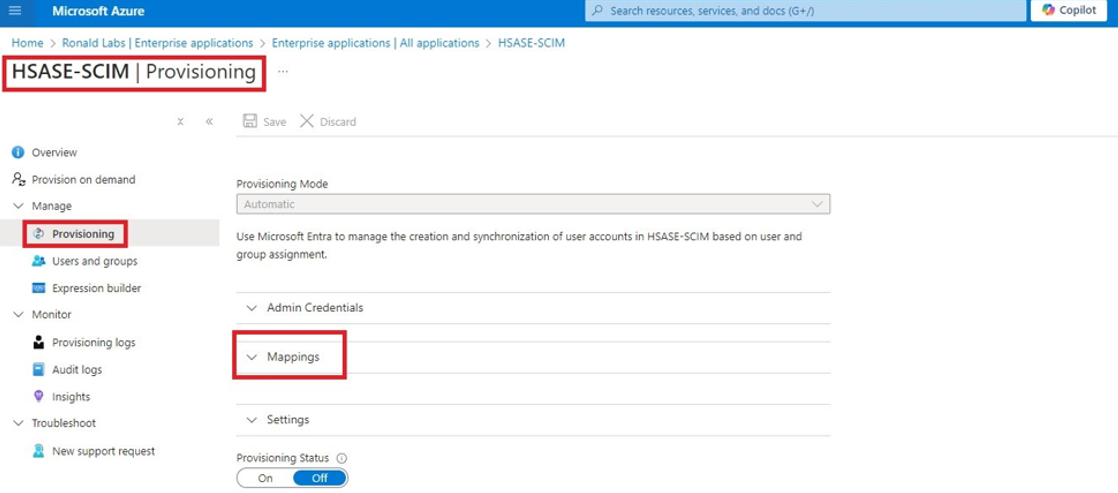
Click Provisioning.
-
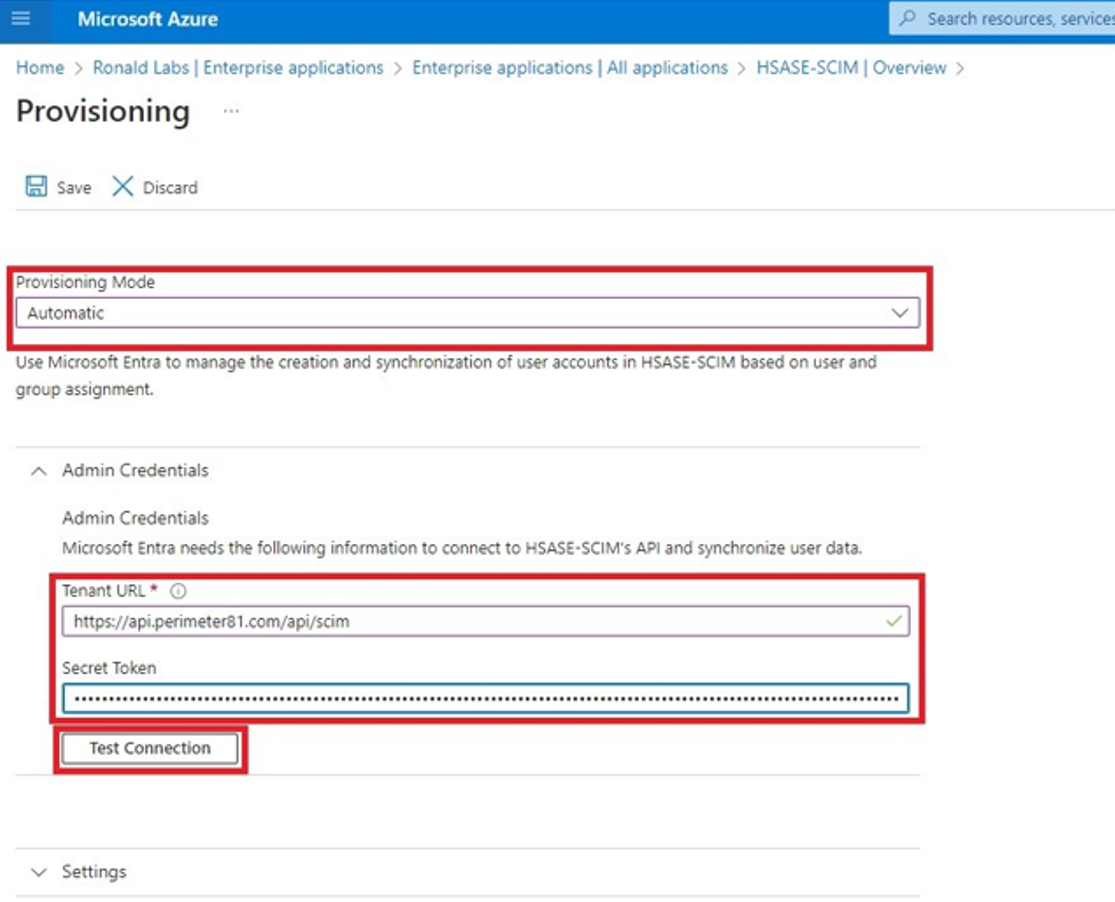
From the Provisioning Mode list, select Automatic.
-
Expand Admin Credentials.
-
In the Tenant URL field, enter the SCIM URL.
-
For US based platform - https://api.perimeter81.com/api/scim
-
For EU based platform - https://api.eu.sase.checkpoint.com/api/scim
-
For AU based platform - https://api.au.sase.checkpoint.com/api/scim
-
For IN based platform - https://api.in.sase.checkpoint.com/api/scim
-
In the Secret Token field, paste the token you copied in Part 2: Configuring SASE IDP section step 11.
-
Click Test Connection.
-
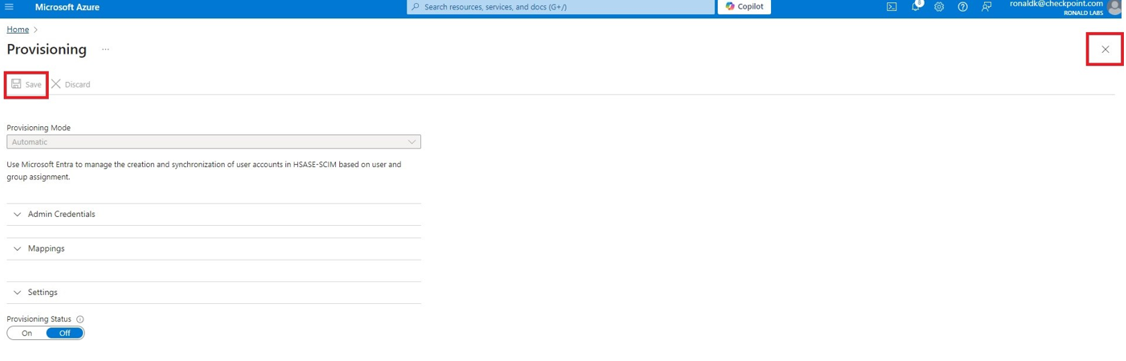
Click Save at the top left corner.
-
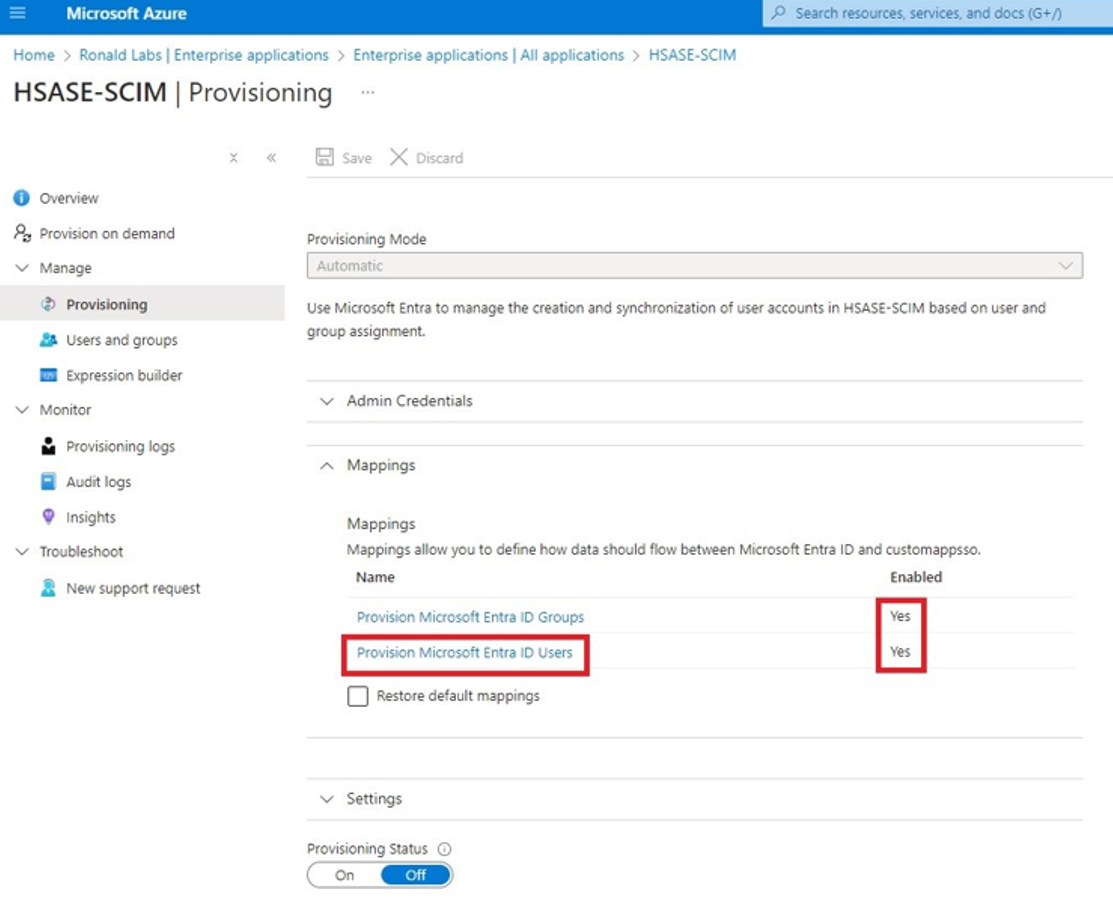
Expand Mappings.
-
Make sure that these options are enabled:
-
Provision Microsoft Entra ID Groups
-
Provision Microsoft Entra ID Users
-
-
Click Provision Microsoft Entra ID Users.
-
In the Attribute Mappings section, for userName, click Edit.

-
From the Source attribute list, select mail.
-
From the Match precedence list, select 2.
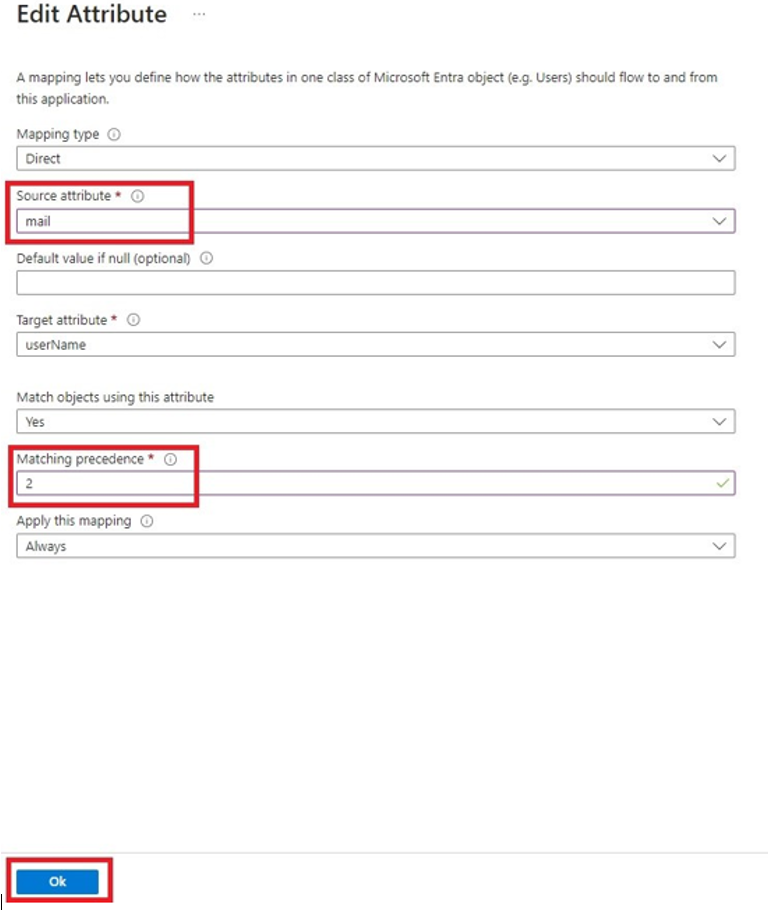
-
Click OK.
-
Locate the
emails[type eq “work”].valueattribute and click Edit. -
From the Source attribute list, select userPrincipalName.
-
From the Match objects using this attribute list, select Yes.
-
From the Matching precedence list, select 3.
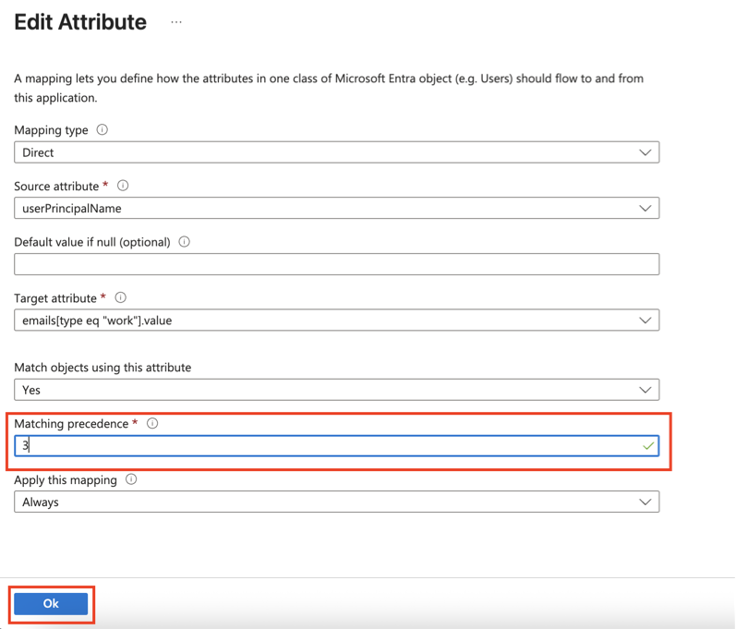
-
Click OK.
-
Go back to Attribute Mappings section and click Add New Mapping.
-
From the Source attribute list, select objectId.
-
From the Target attribute list, select nickName.
-
From the Match objects using this attribute list, select Yes.
-
From Matching precedence list, select 1.
-
From the Apply this mapping list, select Only during object creation.

-
Click OK.
-
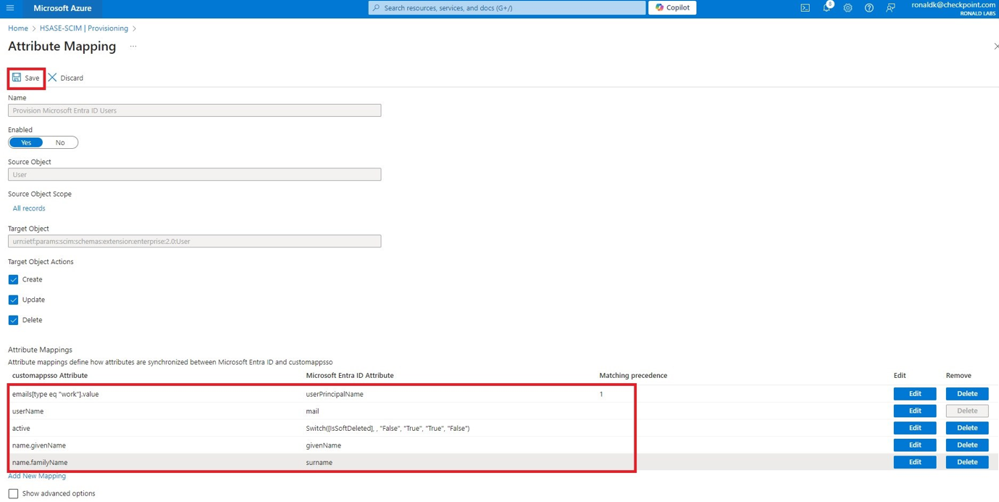
Retain these attributes and delete other attributes:
-
nickName -
emails[type eq “work”].value -
userNamemail -
active -
name.givenName -
name.familyNamesurname
-
-
Click Save.
-
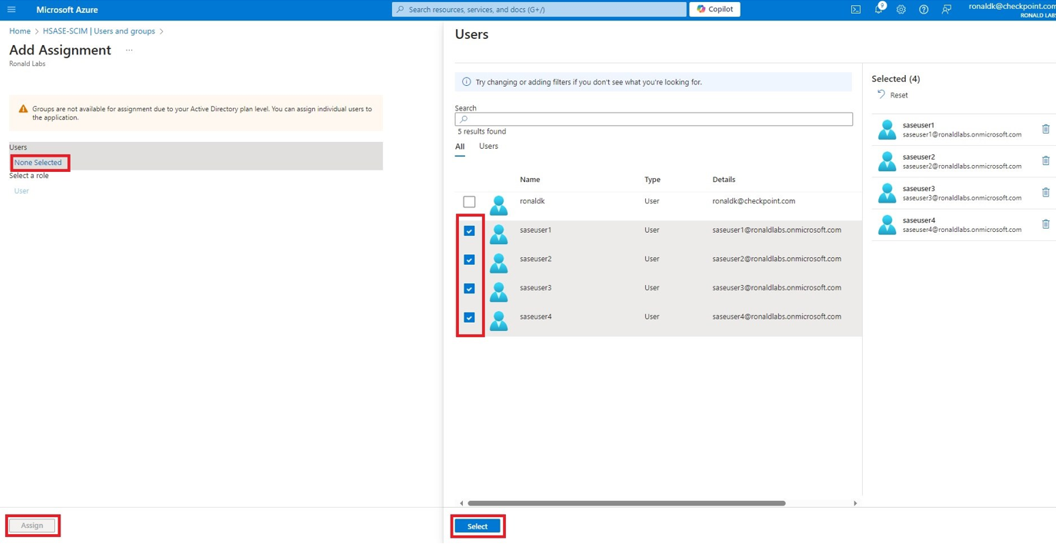
Go to SCIM Application and select Users and groups.
-
Click Add users/group.
-
In the Users section, click None Selected.
-
Select the user(s).
-
Click Select and then click Assign.
-
Go to the SCIM application.
-
Go to Overview.
-
Click Start provisioning.