Google Applications with SAML 2.0
Prerequisites
-
Administrator access to the Check Point SASE Administrator Portal.
-
Administrator account with the Identity Provider Management Portal.
Step 1 - Configuring the Application in the Google Admin Console
-
Log in to the Google Admin Console with a administrator account.
-
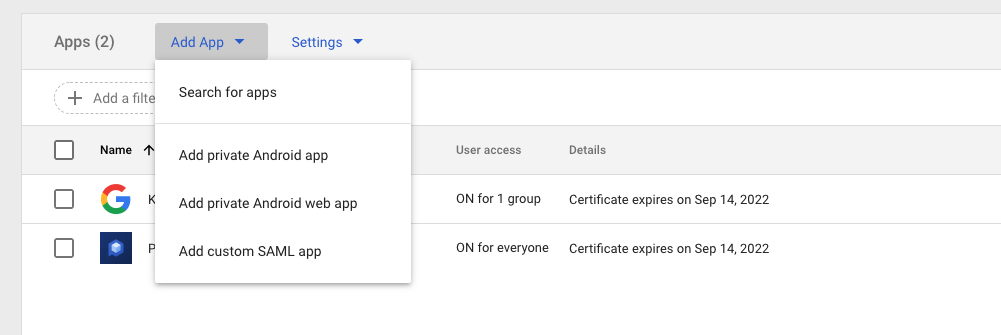
Go to Apps.

-
Click Add App and select Add custom SAML app.
-
In the Application Name field, enter a name for the application.

-
(Optional) In the Description field, enter a description about the application.
-
(Optional) To add a logo to the application, click Upload Logo and select the file.
-
Click Next.
-
Copy the SSO URL.

-
Copy the certificate or click the download icon to download it.
-
Click Next.
-
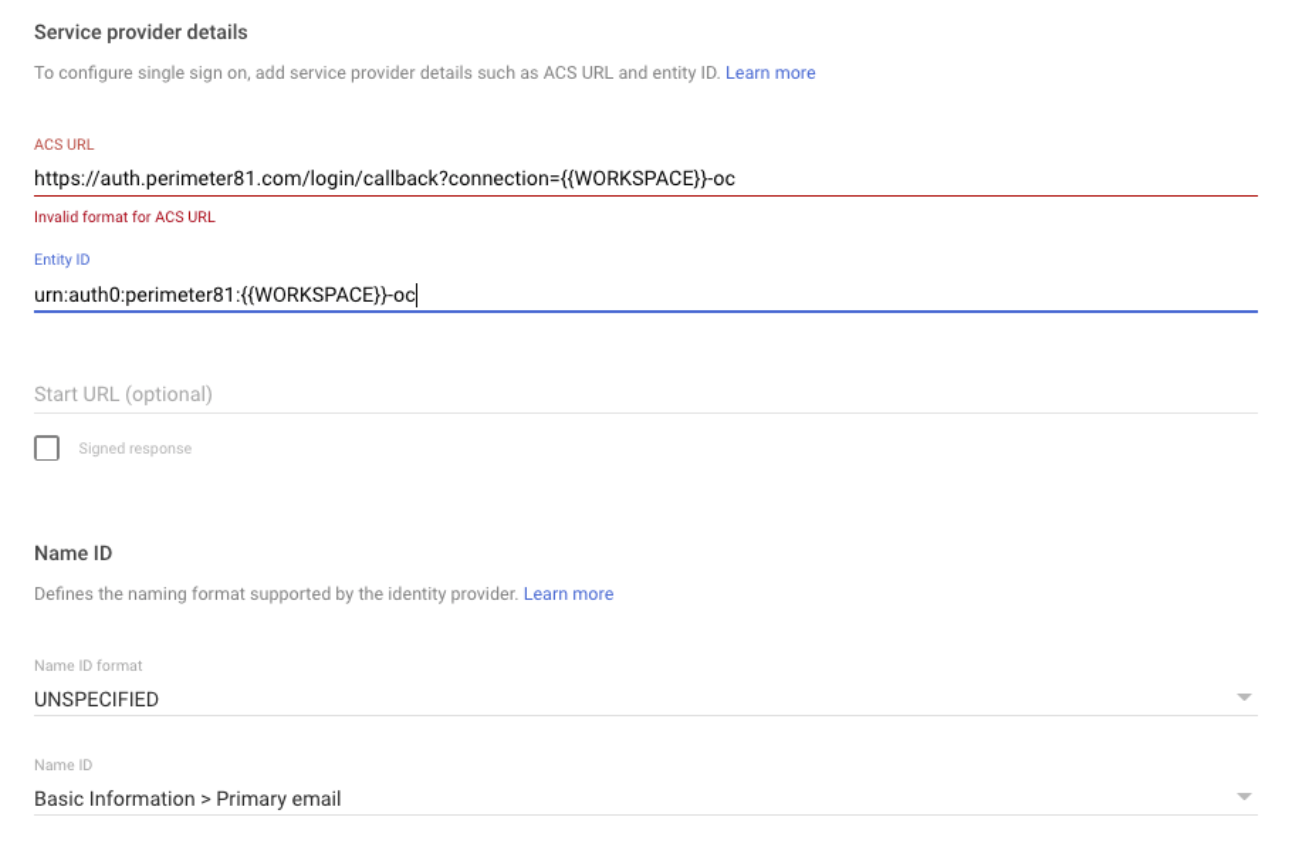
In the Service provider details section:
-
ACS URL : Enter US-based platform:
https://auth.perimeter81.com/login/callback?connection={{WORKSPACE}}-ocEU-based platform:https://auth.eu.sase.checkpoint.com/login/callback?connection={{WORKSPACE}}-ocAU-based platform:https://auth.au.sase.checkpoint.com/login/callback?connection={{WORKSPACE}}-ocIN-based platform:https://auth.in.sase.checkpoint.com/login/callback?connection={{WORKSPACE}}-oc -
Entity ID : Enter US-based platform:
urn:auth0:perimeter81:{{WORKSPACE}}-ocEU-based platform:urn:auth0:eu-sase-checkpoint:{{WORKSPACE}}-ocAU-based platform:urn:auth0:au-sase-checkpoint:{{WORKSPACE}}-ocIN-based platform:urn:auth0:in-sase-checkpoint:{{WORKSPACE}}-ocFor example:acme.perimeter81.comworkspace should translate tourn:auth0:perimeter81:acme-oc -
Name ID: Select Basic Information > Primary Email
-
Name ID Format: Select UNSPECIFIED
-
-
Click Add mapping and enter these attribute / value pairs in separate rows:
Attribute
value
Basic Information > Primary email
email
Basic Information > Last Name
family_name
Basic Information > First Name
given_name
Employee Details > Department
groups
The system creates the application.
-
Click Status and select Turn on for everyone.

Step 2 - Configure the Check Point SASE Administrator Portal
-
Log in to the SASE Administrator Portal with a administrator account.
-
Go to Settings > Identity Providers.
-
Click Add Provider.
The Add identity provider pop-up appears.
-
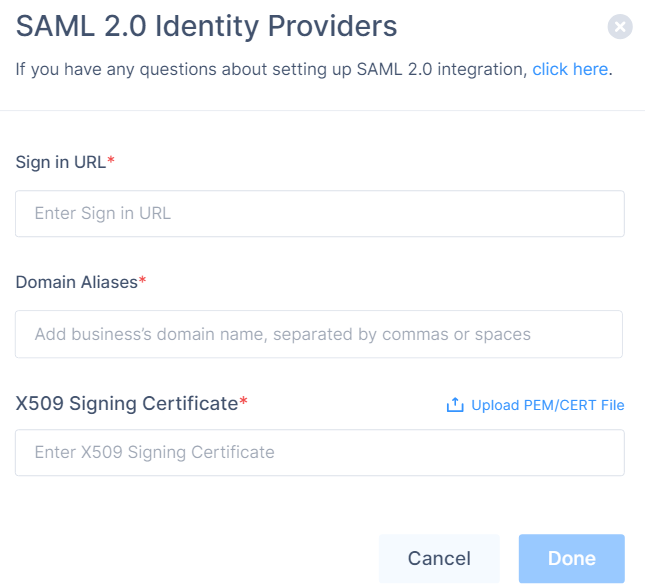
Select SAML 2.0 Identity Providers and click Continue.
-
In the Sign in URL field, enter the Identity Provider Sign-in URL from your SAML Identity Provider.
Identity Provider
Sign in URL
Generic SAML
Identity Provider Sign in URL
Active Directory Federation Services (AD FS)
https://{{Your ADFS Domain}}/adfs/lsAuth0
Auth0 login URL
OneLogin
SAML 2.0 Endpoint (HTTP) value
PingOne
https://sso.connect.pingidentity.com/sso/idp/SSO.saml2?idpid={{idpid}}PingFederate
https://sso.{{Your PingFederate Domain}}.com/idp/SSO.saml2Rippling
Rippling IdP Sign-in URL.
JumpCloud
JumpCloud IDP URL
Okta
Okta Sign on URL
Google Applications
SSO URL
-
In the Domain Aliases field, enter the business domain names separated by commas or space.
-
In the X509 Signing Certificate field, enter the X.509 signing certificate for the application from the SAML Identity Provider.
If you have the signing certificate as PEM/CERT file, click Upload PEM/CERT File and select the file.
-
Click Done.
|
|
Note - After the first successful authentication of a member with SAML, Check Point SASE does this:
|
