Azure Virtual Network Gateway
Prerequisites
-
An active Check Point SASE Administrator Portal account and network.
-
Make sure you have installed the Check Point SASE Agent on your devices.
-
Administrator account in the Firewall/ Router/ Cloud Management Portal.
Step 1 - Configurations in the Azure Management Portal
Creating a Gateway Subnet
-
Access the Azure Management Portal and go to Virtual networks.
-
Click the virtual network to which you wan to create the gateway and click Subnets.
-
Click + Gateway subnet. The system populates the subnet name as Gateway subnet by default.

-
(Optional) Adjust the auto-filled Address range values. This subnet is used for the Virtual Gateway only.
If this range is not auto-filled:
-
Go to address space and click +Add.
-
Select a random /27 bit mask subnet space. For example, 10.1.255.0/27.
-
Creating a Virtual Network Gateway
-
Access the Azure Management Portal and click +Create a resource.
-
Search for Virtual Network Gateway and click it in the search results.
-
Click Create.
-
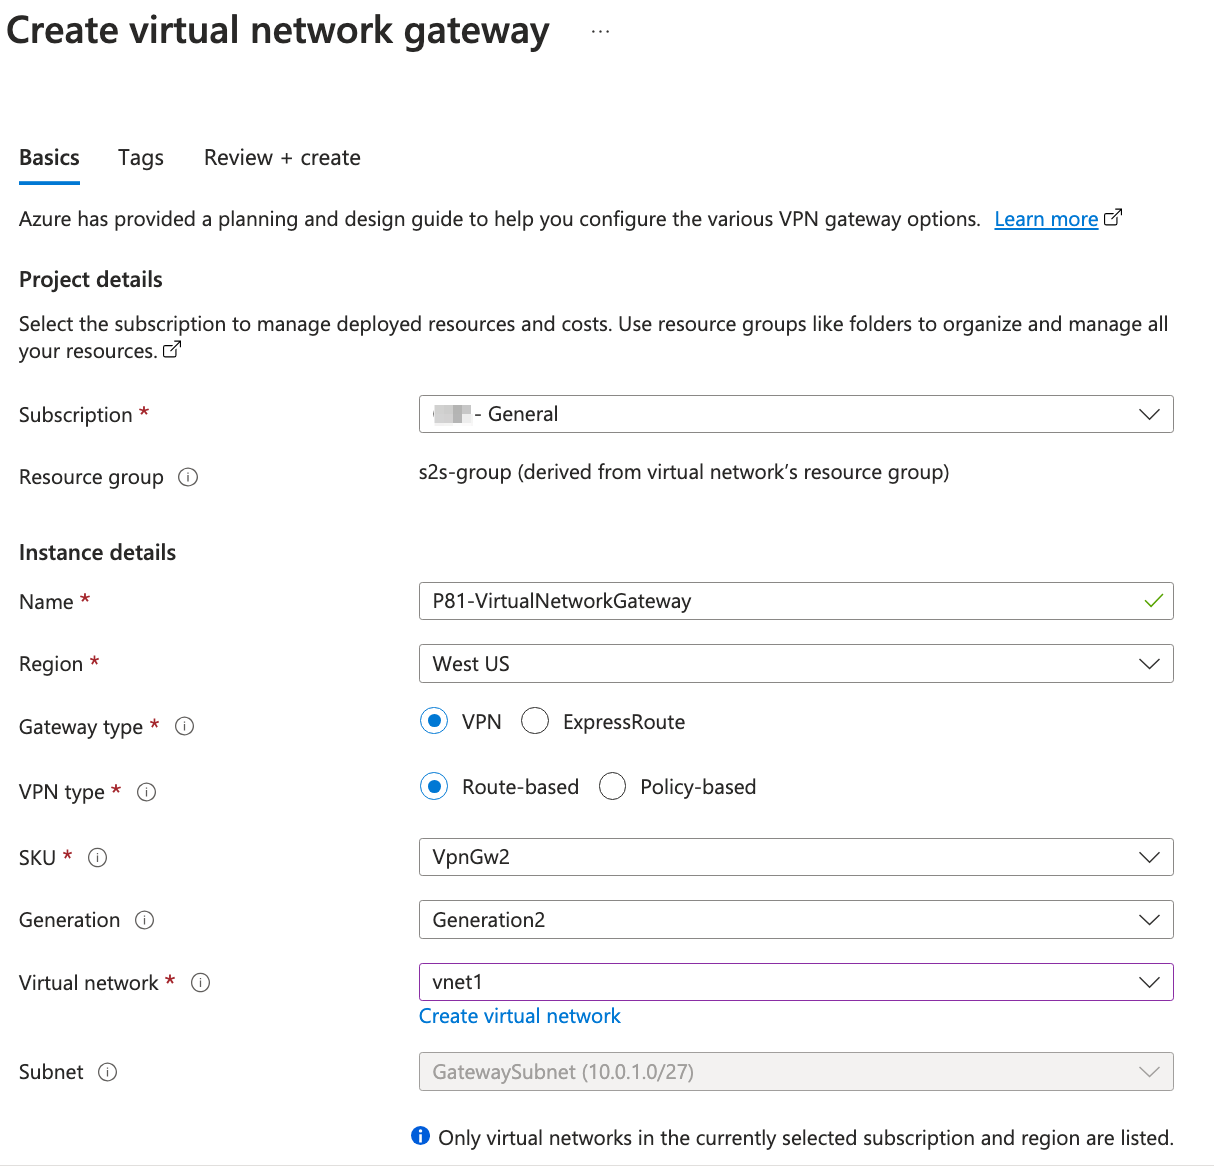
The Create virtual network gateway window appears.
-
Enter these:
-
Name - Name of the gateway.
-
Region - Region where your resources are located.
-
Gateway type - VPN.
-
SKU - Select the gateway SKU from the list. The SKUs listed depends on the selected VPN.
-
Virtual network - The Virtual network that contains the resources you want to reach through the tunnel.
The Choose a virtual network page appears.

Note - If you do not see your VNet, make sure your virtual network is located in the selected Region.
-
Subnet - Subnet range for your virtual network.
This setting appears only when you create a gateway subnet for your virtual network for the first time.
-
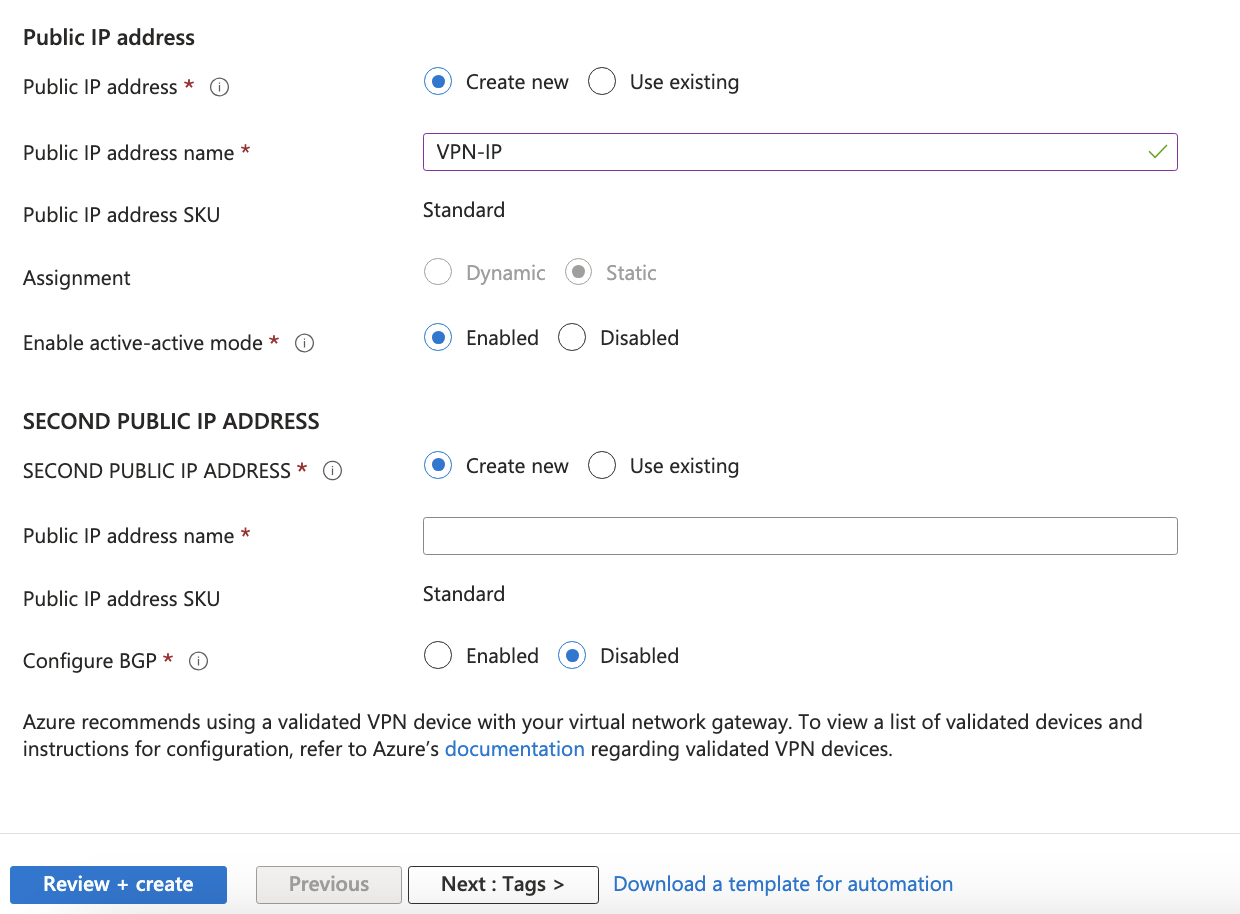
Public IP address - Click Create New or choose an existing IP used by your organization.
-
Enable active-active mode - Disabled.
-
Configure BGP - Disabled.
-
Click Review+create.
The system starts to create the VPN gateway and it may take up to 45 minutes to complete.
-
Creating a Local Network Gateway
-
Access the Azure Management Portal and click +Create a resource.
-
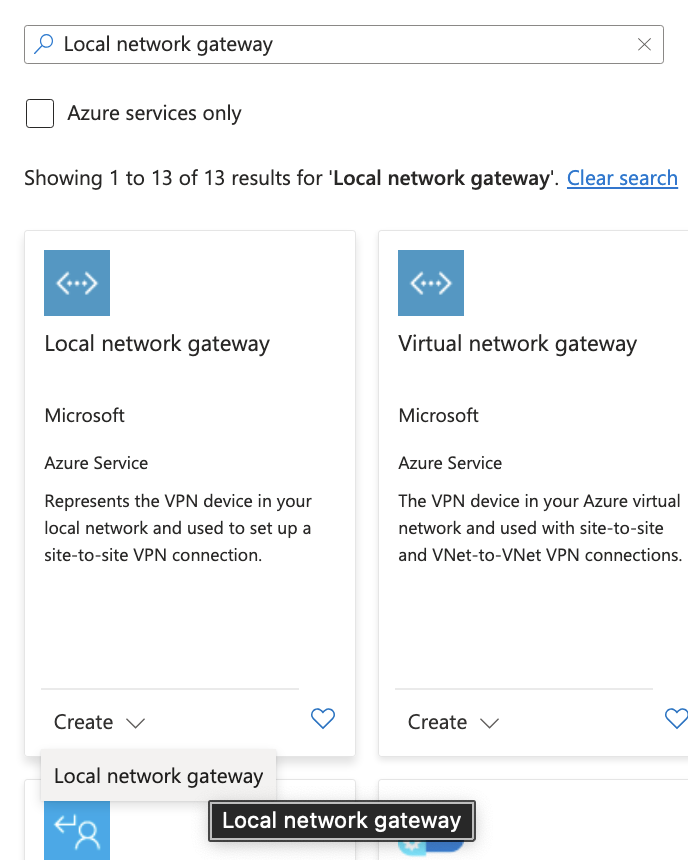
Search for Local network gateway and click it in the search results.
-
Click Create.

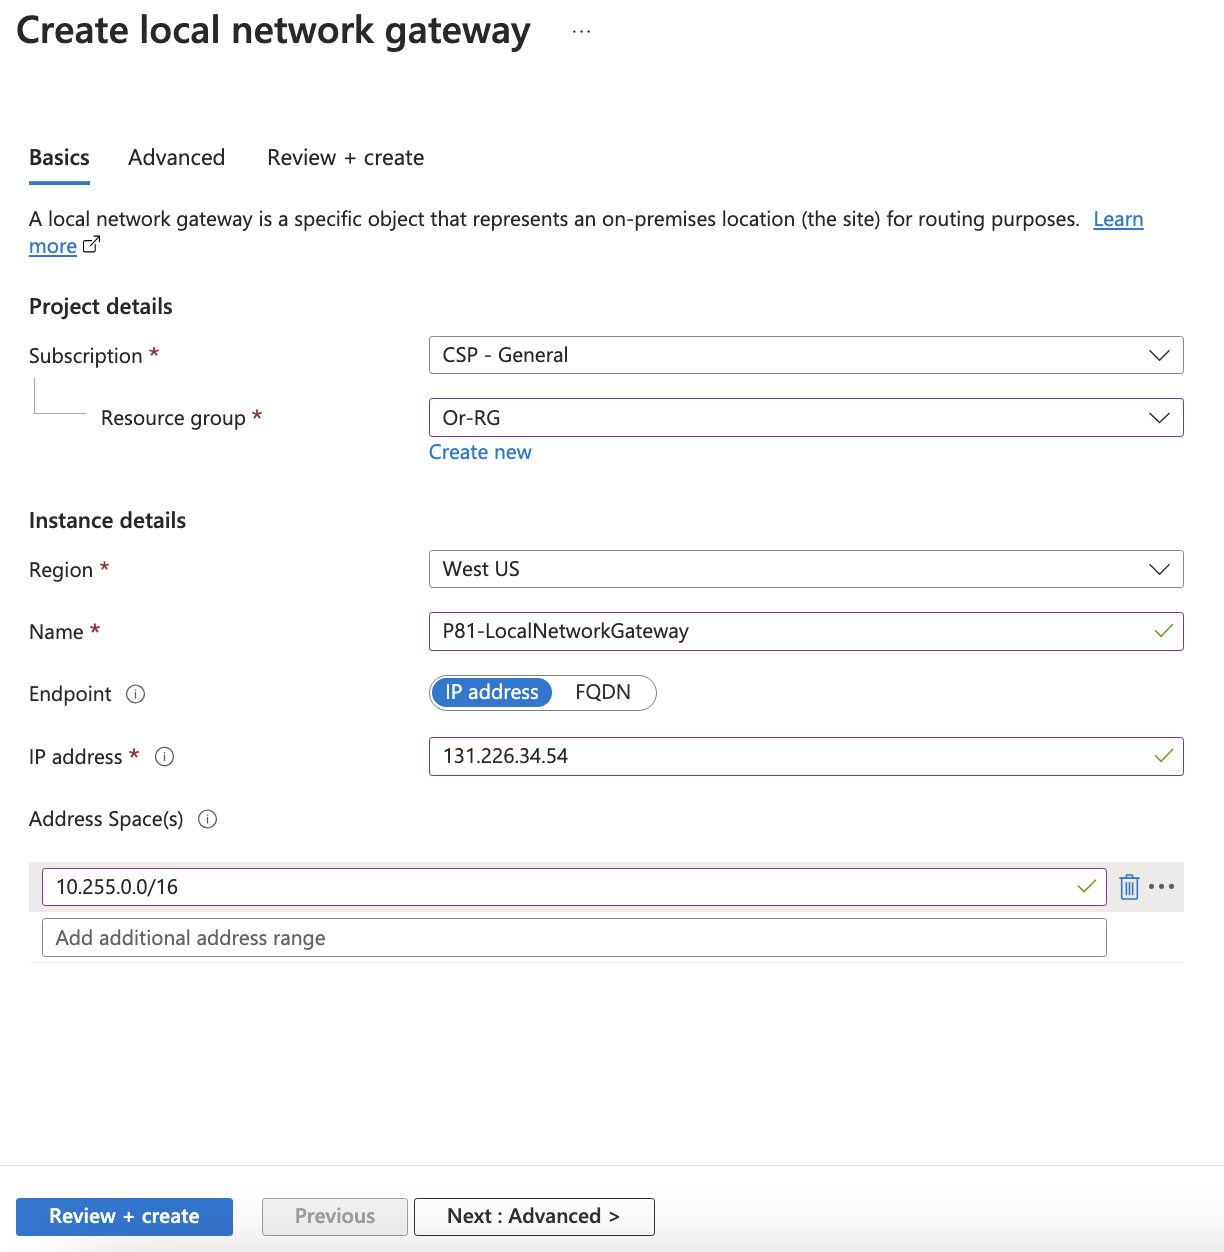
The Create local network gateway page appears.
-
Enter these:
-
Name - Name of your gateway.
-
IP address - IP address of your Check Point SASE gateway.
-
Address Space - Check Point SASE subnet.
Make sure that these ranges do not overlap with other networks' ranges that you want to connect to.
-
Subscription - Verify that the value is correct.
-
Resource Group - Select the resource group that you want to use. Create a new resource group or select one that you have already created.
-
Location - Select the location where this object is created.
(Optional) Select the location in which your Virtual Network resides.
-
SKU - Select the gateway SKU from the list. The SKUs listed depends on the selected VPN.
-
-
Click Create.
Creating the IPSecTunnel Connection
-
Access the Azure Management Portal and go to your Virtual Network Gateway page.
-
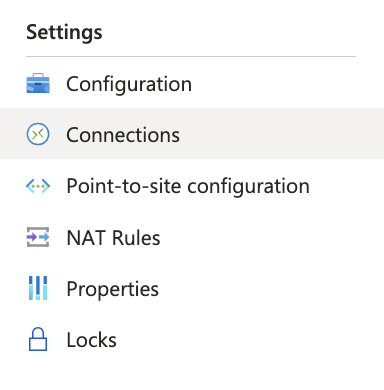
Go to Settings and click Connections.

-
Click +Add.
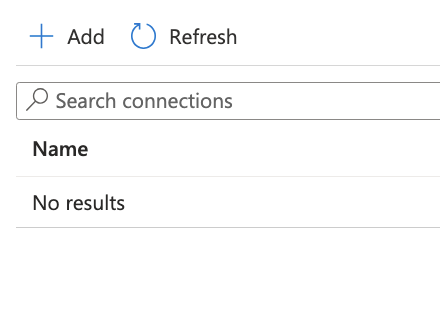
The Create connection window appears.
-
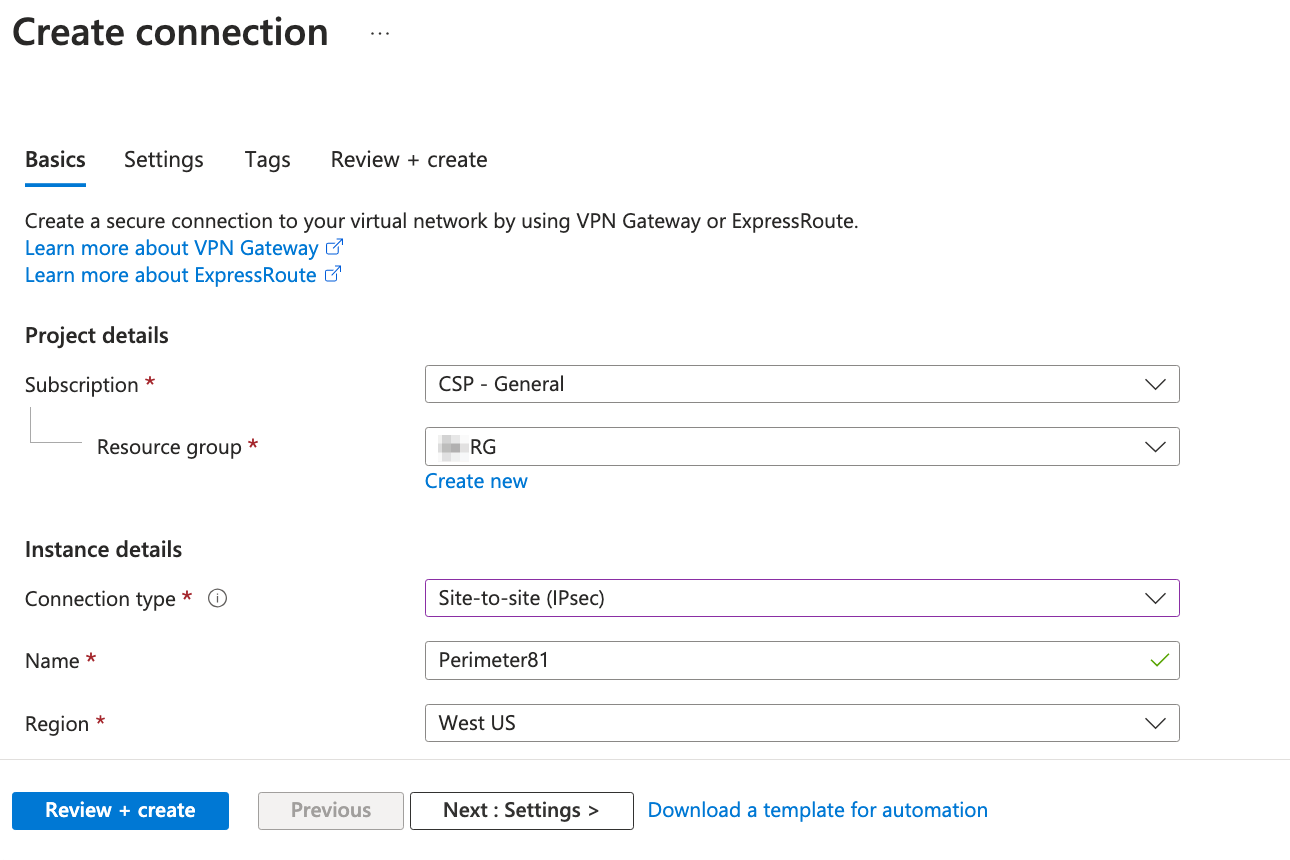
In the Basics tab, enter these:
- Connection type - Site-to-site (IPSec).
-
Name - Name of the connection.
-
Click Next: Settings >.
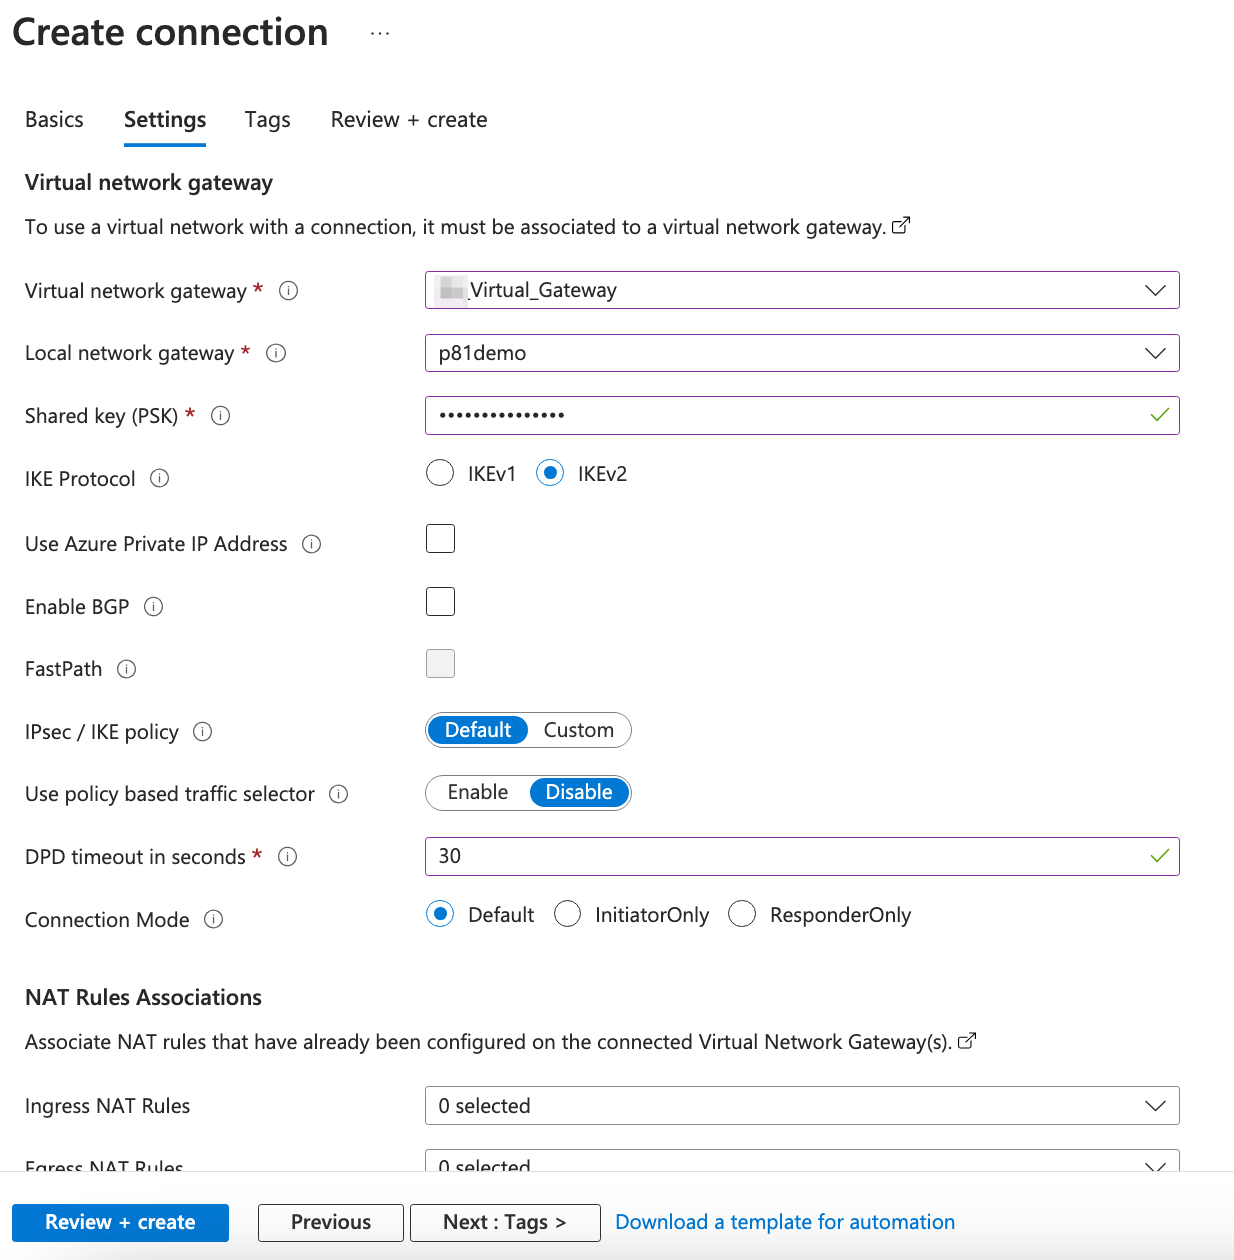
The Settings tab appears.
-
Enter these:
-
Virtual network gateway - IP address you receive from Azure. The value is static.
-
Local network gateway - Local network gateway (your Check Point SASE network address) which you have created. The value is static.
-
Shared Key (PSK) - Create a unique key value. This must match with the key value used for the Check Point SASE tunnel.
-
IKE Protocol - IKev2.
-
DPD timeout in seconds - 30
-
-
Click Review + Create to create your connection.
-
Select the connection you just created and click configuration.
The Configuration window appears.
-
Enter these:
-
IPsec / IKE policy - Select Custom and use these values to align with the values set in Check Point SASE tunnel settings.
-
Encryption - AES256
-
Integrity/PRF - SHA1
-
DH Group - DHGroup2
-
IPsec Encryption - AES256
-
IPsec Integrity - SHA1
-
PFS Group - PFS2
-
IPsec SA lifetime in KiloBytes - 102400000
-
IPsec SA lifetime in seconds - 27000
-
-
-
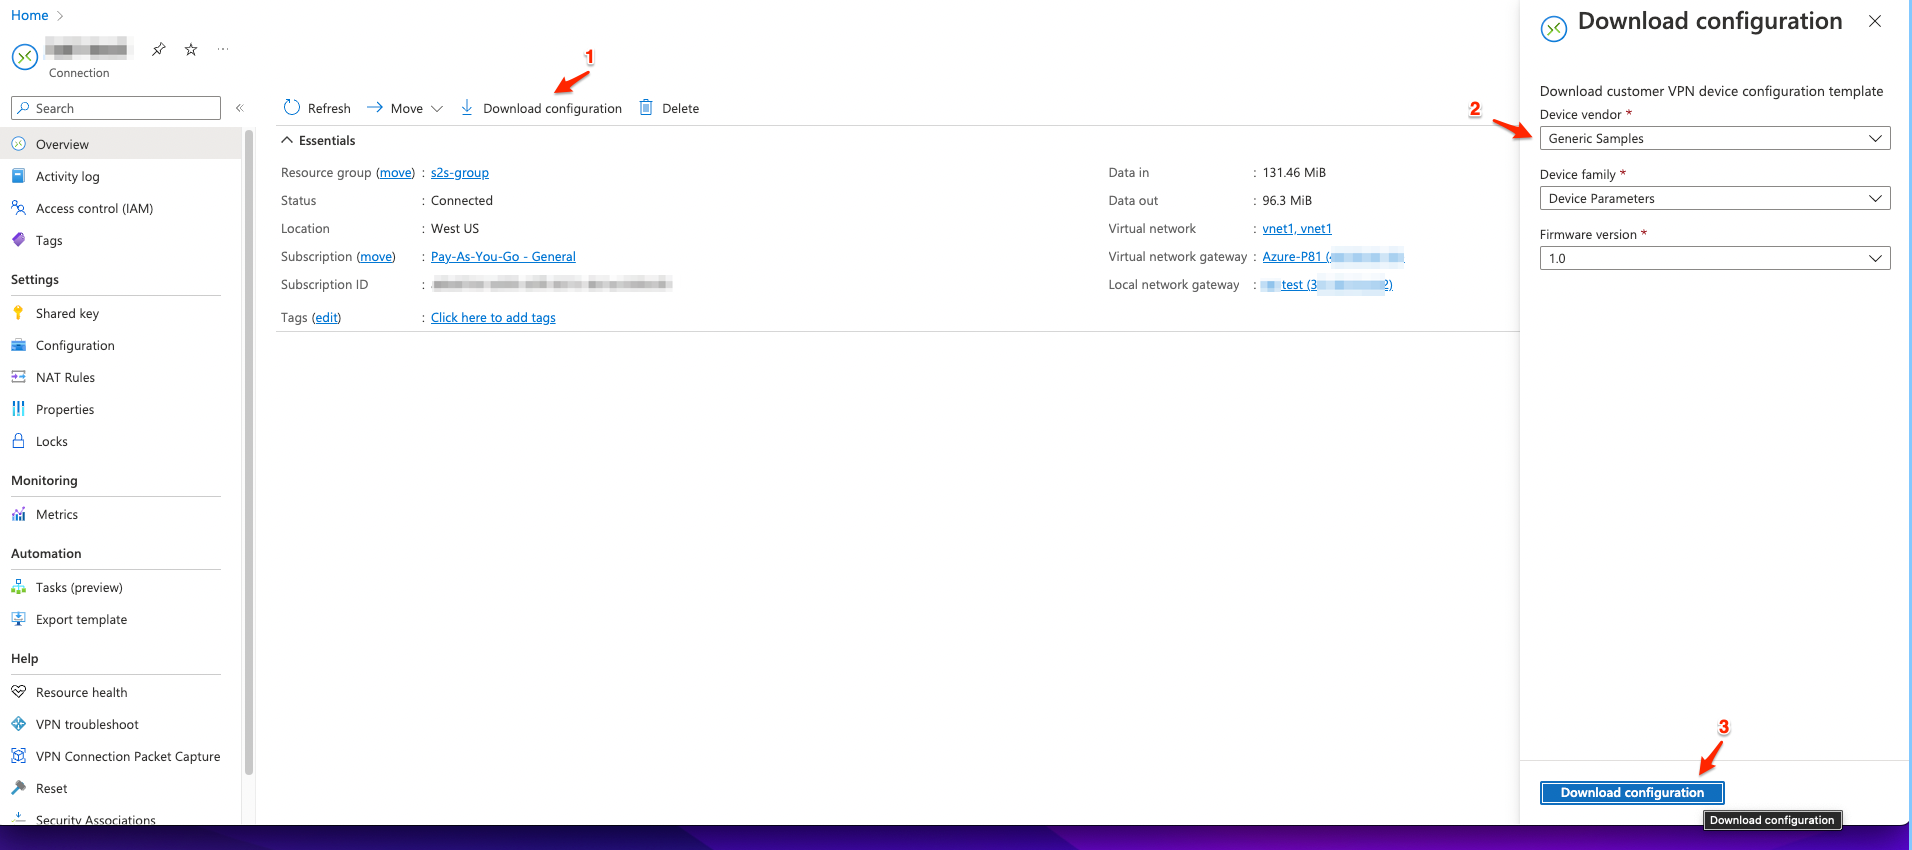
Go to Overview > Download configuration.
-
Enter these:
- Device vendor - Generic Samples
-
Device family - Device Parameters
-
Firmware version - 1.0
-
Click Download Configuration.
The system downloads the configuration file.
Step 2 - Creating the Tunnel in the Check Point SASE Administrator Portal
-
Access the Check Point SASE Administrator Portal and click Networks.
- Click the network where you want to create the tunnel.
-
In the required gateway, click
 > Add Tunnel.
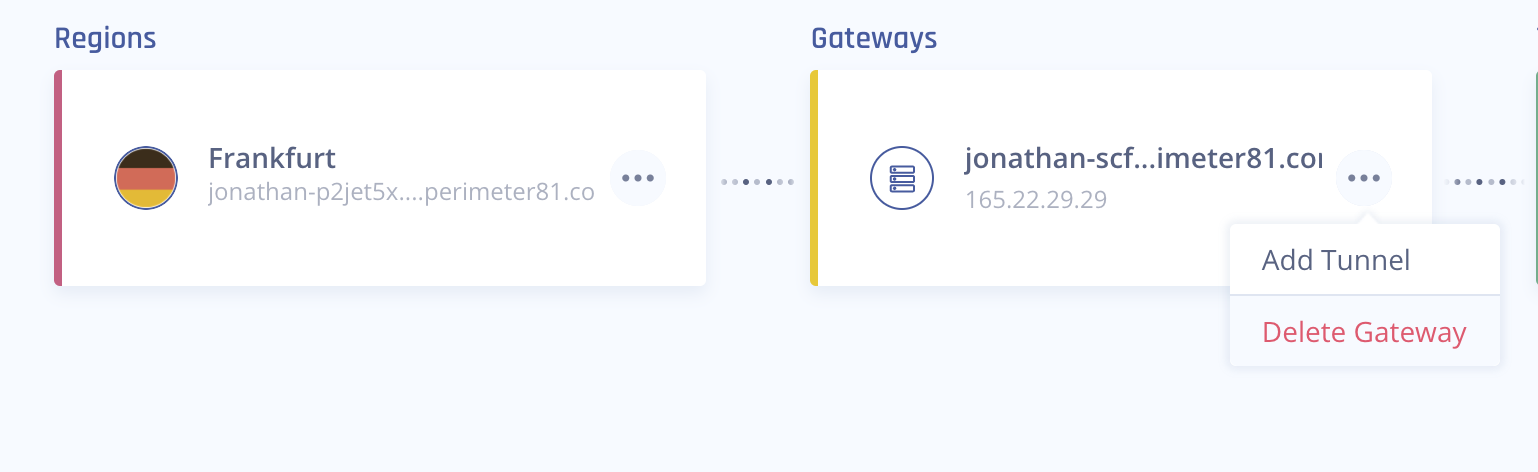
-
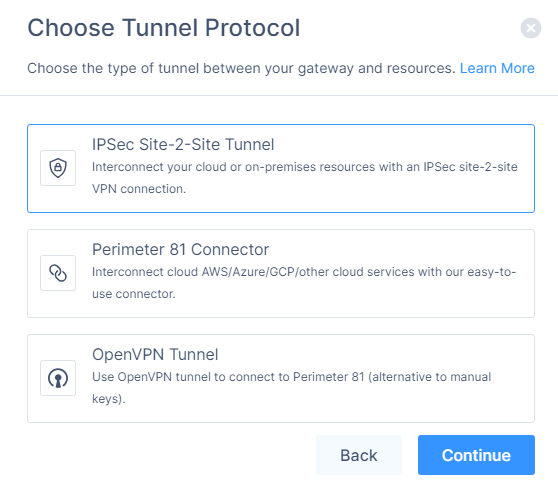
Click IPSec Site-2-Site Tunnel and click Continue.
-
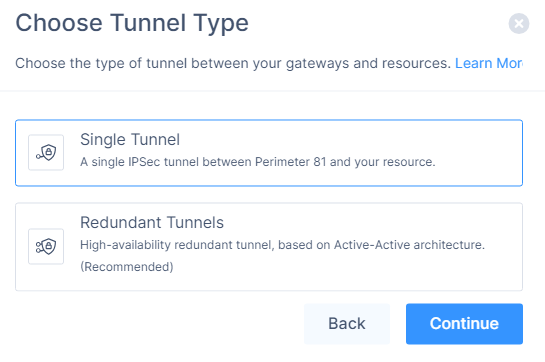
Click Single Tunnel and click Continue.
The IPSec Site-2-Site Tunnel window appears.
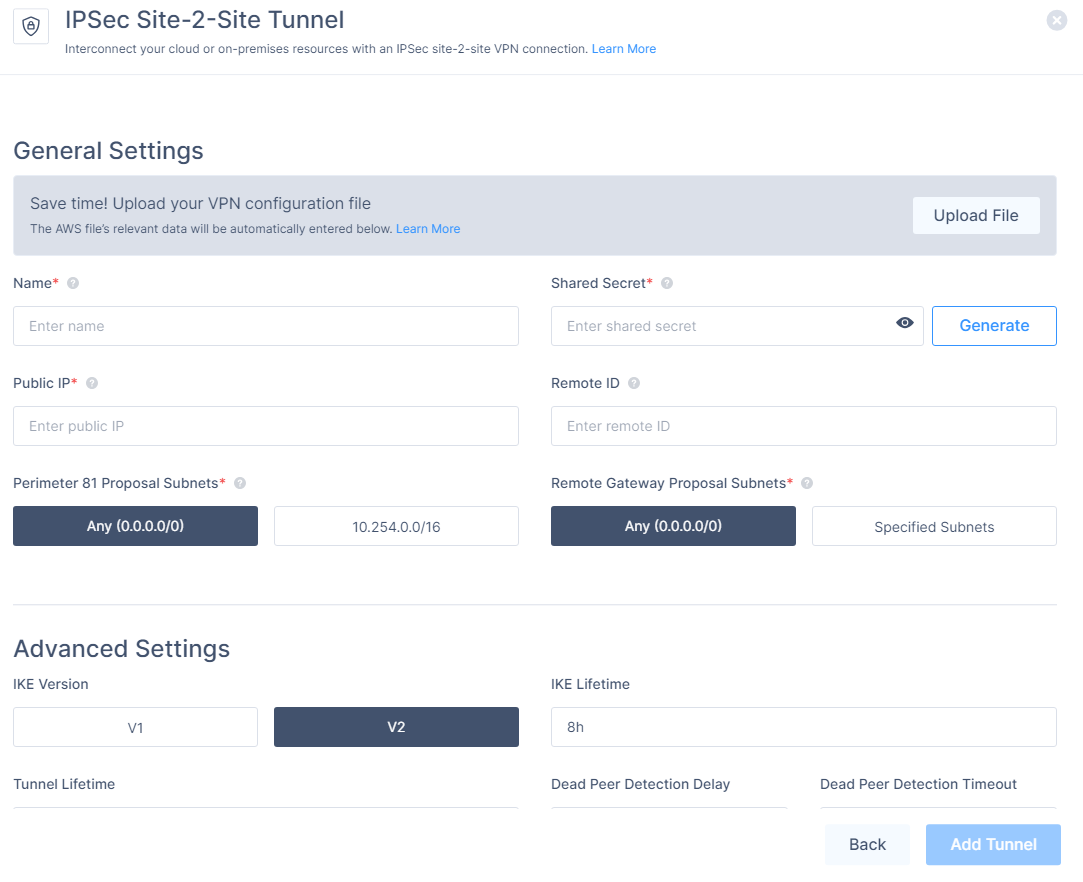
-
To automatically populate the tunnel configuration values, in the General Settings section, click Upload File and upload the configuration file downloaded from the Azure Management Portal.
-
For manual configuration, in the General Settings section, enter these:
-
Name - Name of the tunnel.
-
Shared Secret - Shared secret you set in the Azure Management Portal.
-
Public IP - Public IP address of the Azure Virtual network gateway.
-
Remote ID - Remote ID of Azure Virtual network gateway.
-
Perimeter 81 Gateway Proposal Subnets - Any (0.0.0.0/0).
-
Remote Gateway Proposal Subnets - Any (0.0.0.0/).
-
-
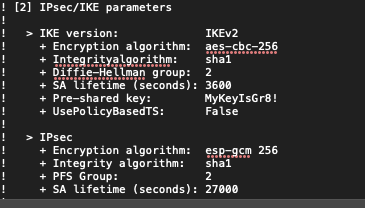
To enter the details in Advanced Settings section, open the configuration file downloaded from the Azure Management Portal and refer the
[2] IPsec/IKE parameters.
-
Enter the information for your tunnel type:
Field
IKE Version
IKE Lifetime
Tunnel Lifetime
Dead Peer Detection Delay
Dead Peer Detection Timeout
Encryption (Phase 1)
Encryption (Phase 2)
Integrity (Phase 1)
Integrity (Phase 2)
Diffie Hellman Groups (Phase 1)
Diffie Hellman Groups (Phase 2)
Cloud Vendor
Amazon AWS
Single Tunnel - AWS Virtual Gateway V2 8h 1h 10s 30s aes256 aes256 sha512 sha512 ecp521 ecp521 Single Tunnel - AWS Transit Gateway V2 8h 1h 10s 30s aes256 aes256 sha512 sha512 ecp521 ecp521 Redundant Tunnels - AWS Virtual Private Gateway V2 8h 1h 10s 30s aes256 aes256 sha512 sha512 ecp521 ecp521 Redundant Tunnels - AWS Transit Gateway V2 8h 1h 10s 30s aes256 aes256 sha512 sha512 ecp521 ecp521 Google Cloud Platform
Single Tunnel 1 V2 8h 1h 10s 30s aes256 aes256 sha512 sha512 ecp521 ecp521 Redundant Tunnels
V2 8h 1h 10s 30s aes256 aes256 sha512 sha512 ecp521 ecp521 Microsoft Azure Single Tunnel -
Azure Virtual Network Gateway
V2
3600s
27000s
10s
45s
aes256 aes256 sha1 sha1 modp1024 modp1024 Redundant Tunnels - Virtual Network Gateway
V2
9h
9h
10s 30s aes256 aes256 sha1 sha1 modp1024 modp1024 Redundant Tunnels - Virtual WAN
V2
8h
1h 10s 30s aes256 aes256 sha256
sha256
modp2048 modp2048 Other tunnel types
Alibaba Cloud V1 8h 1h 10s 30s aes256 aes256 sha1 sha1 modp1024 modp1024 IBM Cloud
V1
8h 1h 10s 30s aes256 aes256 sha256
sha256
ecp521 ecp521 1 Suggested values. For other supported ciphers, see this Google article.
-
Click Add Tunnel.
Verifying the VPN Connection in the Azure Management Portal
-
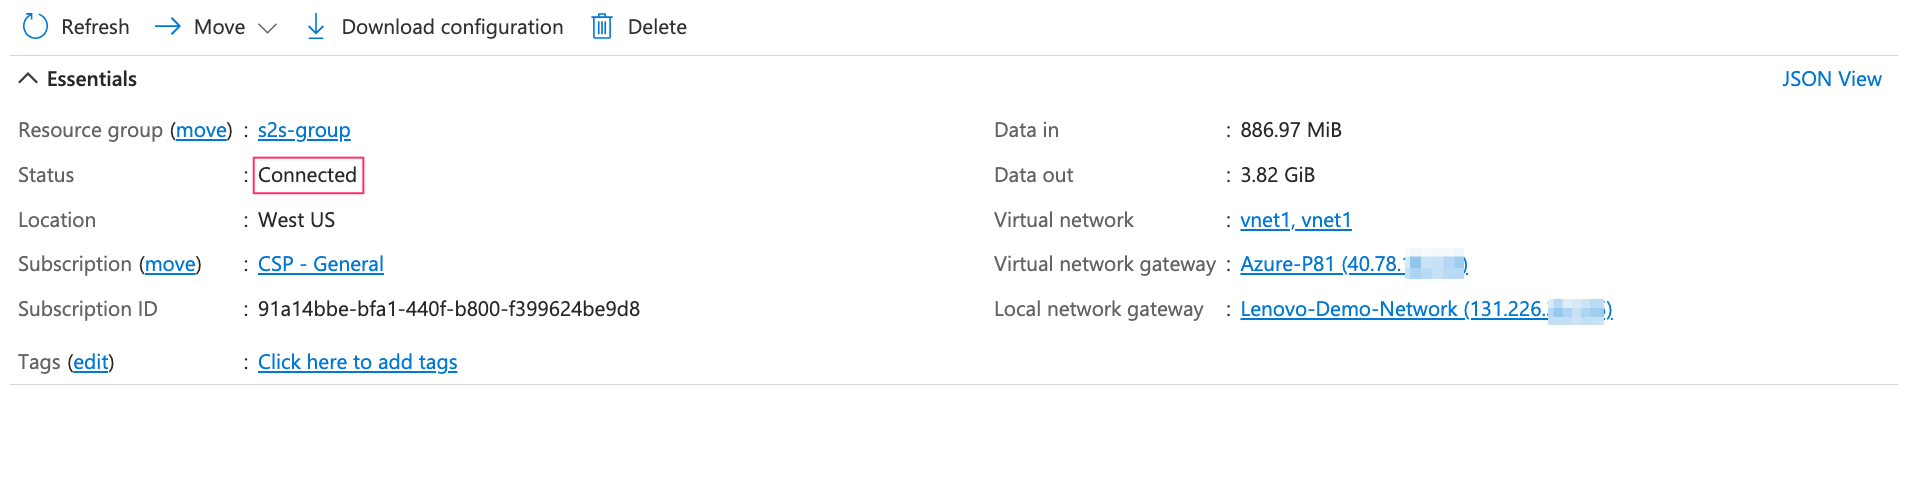
Access the Azure Management Portal and go to your Virtual Network Gateway page.
-
Go to Settings and click Connections.
-
In the connection you created, click the Overview tab.
Make sure that the Status is Connected and that there is data coming in (Data in) and going out (Data out).