Managing a Network
Editing a Network
-
Access the Check Point SASE Administrator Portal and click Networks.
-
Select the network.
-
Click
 and then click Edit Network.
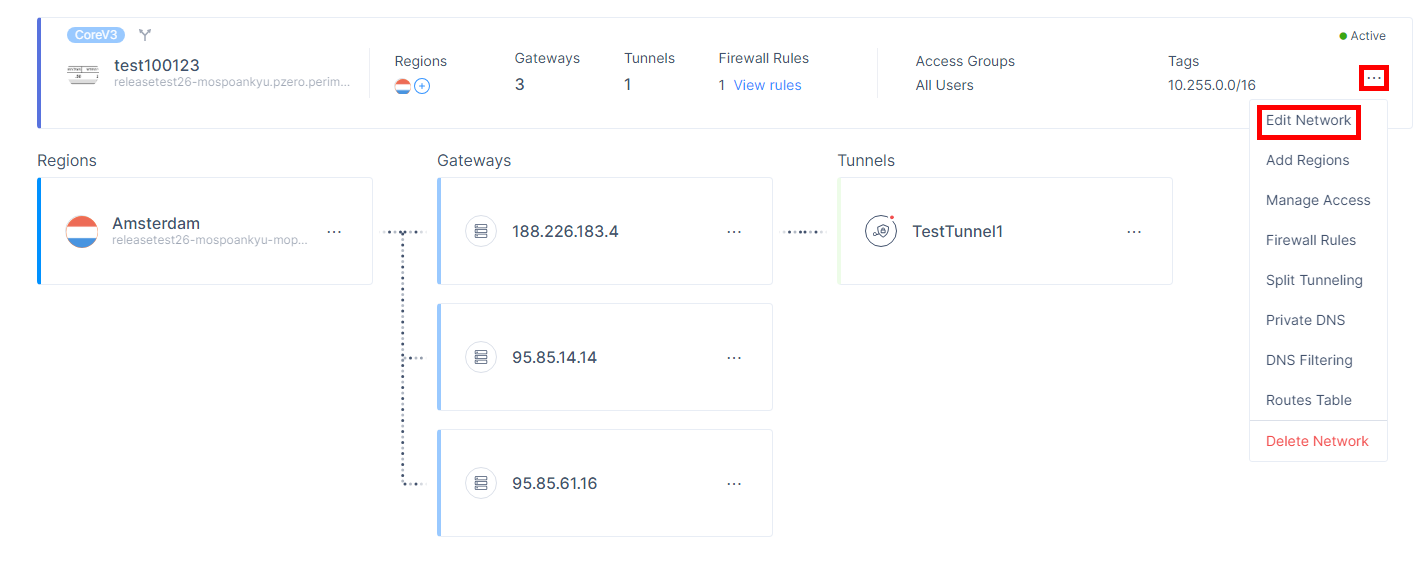
The Edit Network window appears.

-
Make the required changes and click Save.
Adding Regions
-
Access the Check Point SASE Administrator Portal and click Networks.
-
Select the network.
-
Click
and then click Add Regions.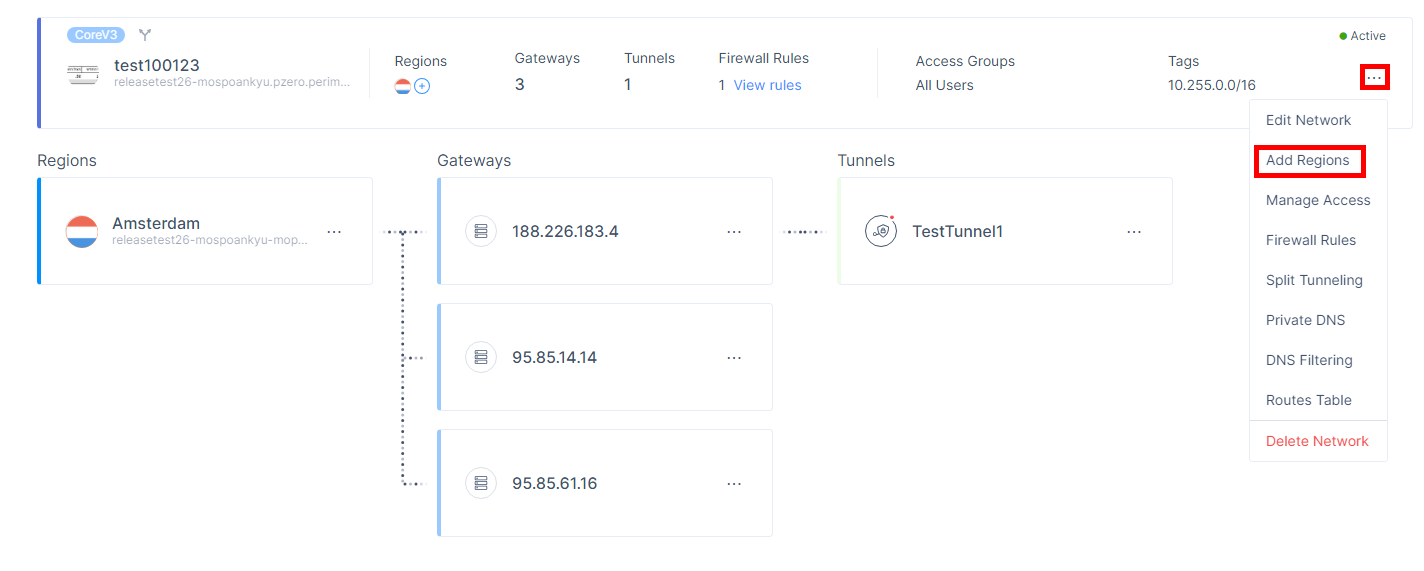
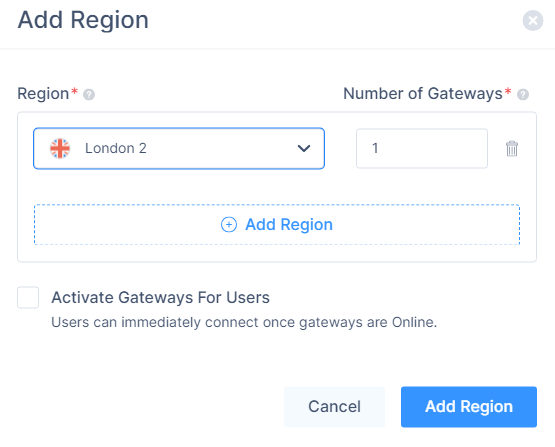
The Add Region window appears.
-
From the Region list, select the region to deploy the Check Point SASE gateway.
-
In the Number of Gateways field, enter the number of private gateways you want to deploy in the region.
-
To add another region, click Add Region and repeat steps 4 and 5.
-
To activate the gateway for users, select the Activate Gateways For Users checkbox.
-
Click Add Region.
Managing Access
Manage Access allows you to select the member groups who can access the network.
To manage access to a network:
-
Access the Check Point SASE Administrator Portal and click Networks.
-
Select the network.
-
Click
and then click Manage Access.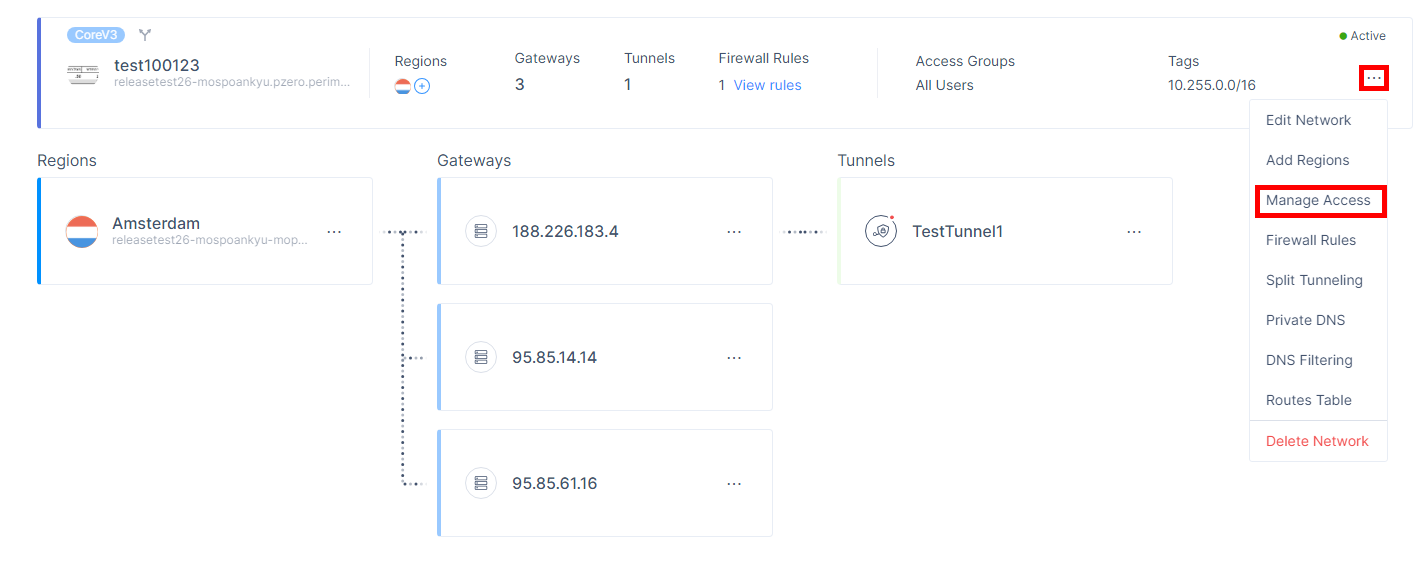
The Manage Access window appears.
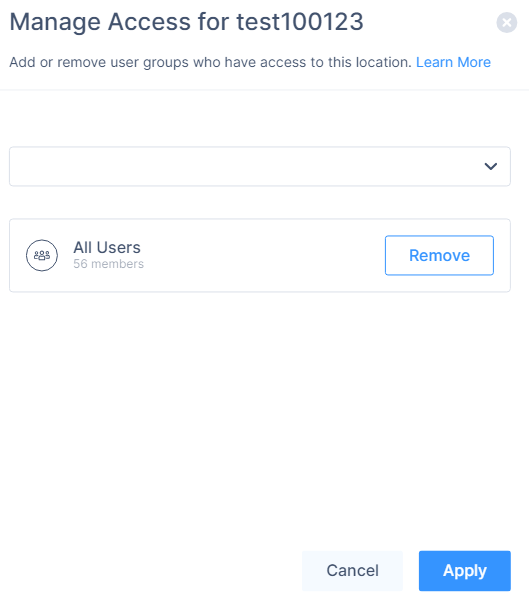
-
From the list, select the member groups who can access the network.
-
To remove a member group, click Remove.
-
Click Apply.
Firewall Rules
Firewall Rules allows you to set the firewall access rules for your network.
To set the rules, see Creating a Firewall Access Rule.
Split Tunneling
Split tunneling allows you to choose which traffic passes through the tunnel and which traffic bypasses the tunnel and accesses the resource directly.
Private network traffic is always tunneled through the cloud, based on your network tunnels and routing table settings.
You can specify additional destinations to route through the Check Point SASE cloud (for example, public resources that require inspection) or to bypass the tunnel.
|
|
Notes:
|
To configure split tunneling for a network:
-
Access the Check Point SASE Administrator Portal and click Networks.
-
Select your network.
-
Click
and then click Split Tunneling.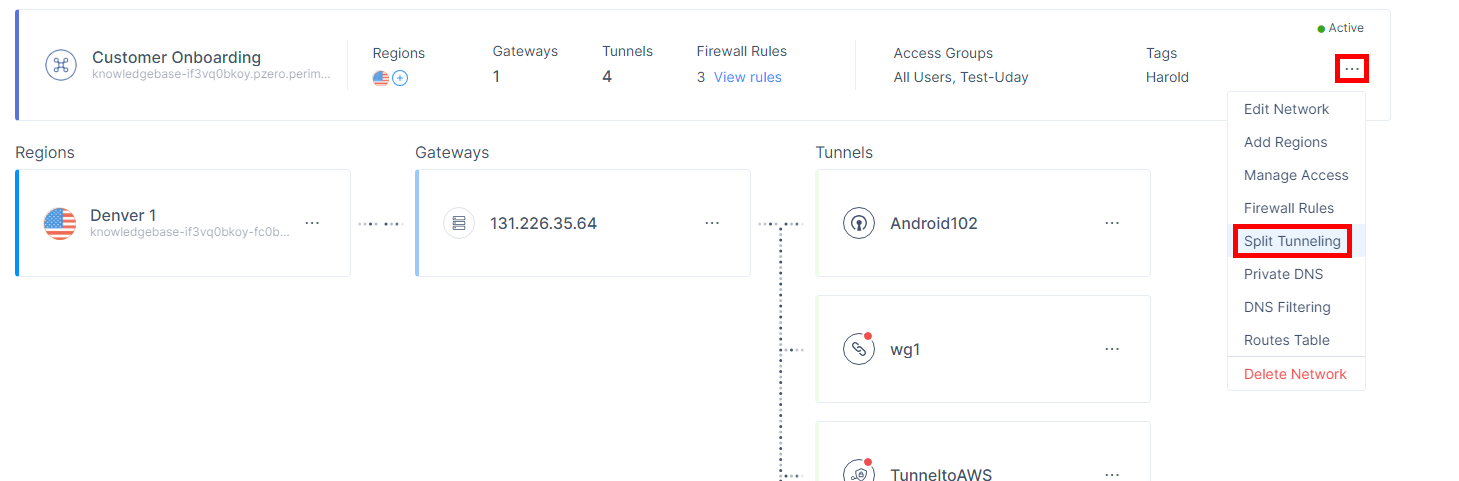
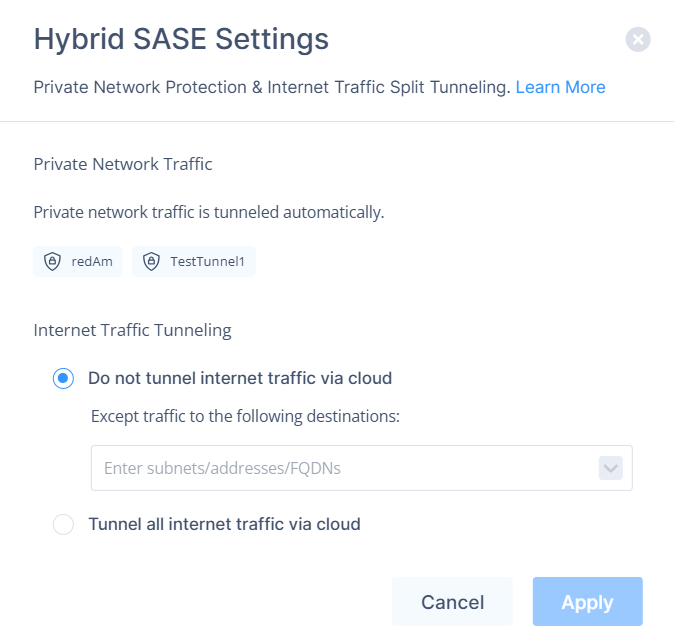
The Hybrid SASE Settings window appears.
-
Select one of these:
-
Tunnel all internet traffic: Routes all internet traffic through SASE, except the destinations you specify. These destinations bypass the tunnel
-
Do not tunnel any traffic: Routes only private network traffic through SASE. Internet traffic is sent directly to the internet, except the destinations you specify. These destinations are tunneled.
-
-
In the Except for the Following Destinations, search for objects.
-
In All Exceptions, select the required objects:
-
Assigned: Displays the objects currently selected for this network.
-
Subnet: Select subnet-based destination objects.
When Do not tunnel internet traffic is selected, you can choose: -
Included – Routes the selected subnets through the tunnel
-
Excluded – Routes the selected subnets outside the tunnel


Note -
-
The system validates excluded subnets against the included subnets list.
-
Excluded subnets must be part of the included subnets.
-
An administrator cannot add excluded subnets that are not included.
-
The Included and Excluded options are available only for subnet-based destinations. In Tunnel all internet traffic, all specified destinations are automatically excluded.
-
-
IP: Select individual IP address objects.
-
List: Select predefined lists that contain multiple IPs, subnets, or FQDNs.
-
FQDN: Select fully qualified domain name (FQDN) objects for domain-based split tunneling rules.
For more information on creating Subnet, IP, List, and FQDN objects, see Addresses. -
Updatable Objects: Select dynamic object groups that automatically update their IP ranges.
For more information, see Updatable Objects.Note - Microsoft Azure services, Amazon Web Services (AWS), and Geolocation-based Updatable Objects are not supported for Split Tunneling.
-
-
Verify the selected objects under the Assigned tab.
-
Click Apply Changes.
Note - The processing time depends on the system resource. It takes up to 3 seconds for every 500 subnets.
Private DNS
Private DNS lets the network resolve hostnames through configured DNS servers instead of public resolvers. Configure Private DNS at two scopes:
-
Network - Applies to all regions in the network.
-
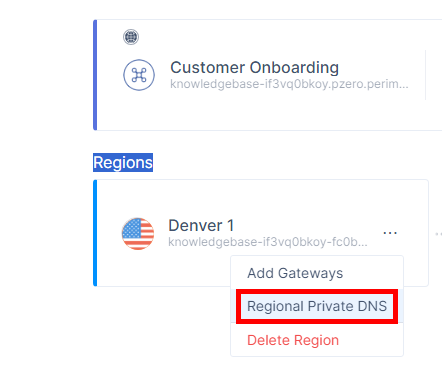
Region - Overrides the network-wide settings for agents connected to that region.
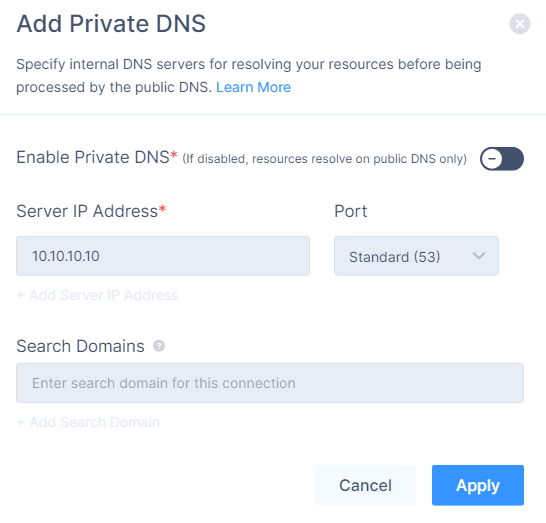
Open the panel from the network or region. The title reads Manage Network Private DNS or Manage Region Private DNS accordingly. Turn on Use Private DNS Servers to enable the rest of the panel.
-
Network-level Private DNS and regional Private DNS can be used at the same time.
-
Regional DNS overrides network-level Private DNS for that region. If no regional DNS exists, network-level Private DNS applies.
What you can configure
-
Choose which DNS queries are sent to the private DNS servers - either all queries, or only the domains in the list.
-
Add domains as exact names (
mysite.acme.com) or wildcards (*.acme.org), up to 100 entries. -
Decide whether queries that fail on the private servers fall back to public DNS or are returned as a failure to the client.
-
Define up to 4 private DNS servers (IPv4 and port).
-
Add optional Search Domains that agents append to short hostnames.
Resolution modes
|
Mode |
What it Does |
When to Use |
|---|---|---|
|
Specify Private Domains |
Only DNS queries that match a domain in the list are forwarded to the private DNS servers. All other queries go directly to public DNS. |
Route only internal or corporate domains through the private servers. All other queries go directly to the internet. |
|
All Domains |
Every DNS query is forwarded to the private DNS servers. If a query fails, the agent falls back to public DNS. |
Have the private DNS servers answer every query the network handles. |
Adding private domains
In Specify Private Domains mode, use the Add Private Domains field to list the domains resolved through the private servers. Enter a domain and press Enter. Entered domains appear as chips and can be removed with the × next to each chip.
|
Pattern |
Matches |
|---|---|
|
|
The exact host. Subdomains are not matched. |
|
|
Any subdomain of |
|
|
Any subdomain of |
The list accepts up to 100 domains and requires at least one entry. If the list is empty, the panel shows At least one domain is required and Apply is disabled.
Public DNS fallback
The Use Public DNS Servers on Failure checkbox controls what happens when the private DNS servers fail to answer a query (timeout, SERVFAIL, REFUSED, or NXDOMAIN).
-
In Specify Private Domains mode, the checkbox is editable:
-
Off - Failures from the private servers are returned to the client. The query is not retried against public DNS, so internal domain names are not exposed to public resolvers.
-
On - If the private servers fail, the agent retries the query against public DNS.
-
-
In All Domains mode, the checkbox is selected and locked. Any query that fails on the private servers is automatically retried against public DNS.
|
|
Note - In Specify Private Domains mode, leave Use Public DNS Servers on Failure off to prevent internal domain names from leaking to public resolvers. This is recommended once the domain list is curated. |
Private DNS servers
Add up to 4 private DNS servers. For each server, enter an IPv4 address in Server IP Address and select a Port (default Standard (53)). Click + Add Server IP Address to add more entries. At least one server is required.
|
|
Note - Do not use public DNS resolvers (such as 8.8.8.8, 8.8.4.4, 1.1.1.1, or 1.0.0.1) as private DNS servers. If the DNS server does not have a public IP address, reach it through an IPSec or WireGuard tunnel. |
(Optional) Search domains
Add suffixes that agents append when resolving short hostnames. Search domains apply in both resolution modes. Click + Add Search Domain to add more entries.
Configure private DNS
-
Access the Check Point SASE Administrator Portaland click Networks.
-
Select the network. To configure Private DNS for a single region, open that region instead.
-
To add a Private DNS.
-
For a network, click
and then click Private DNS.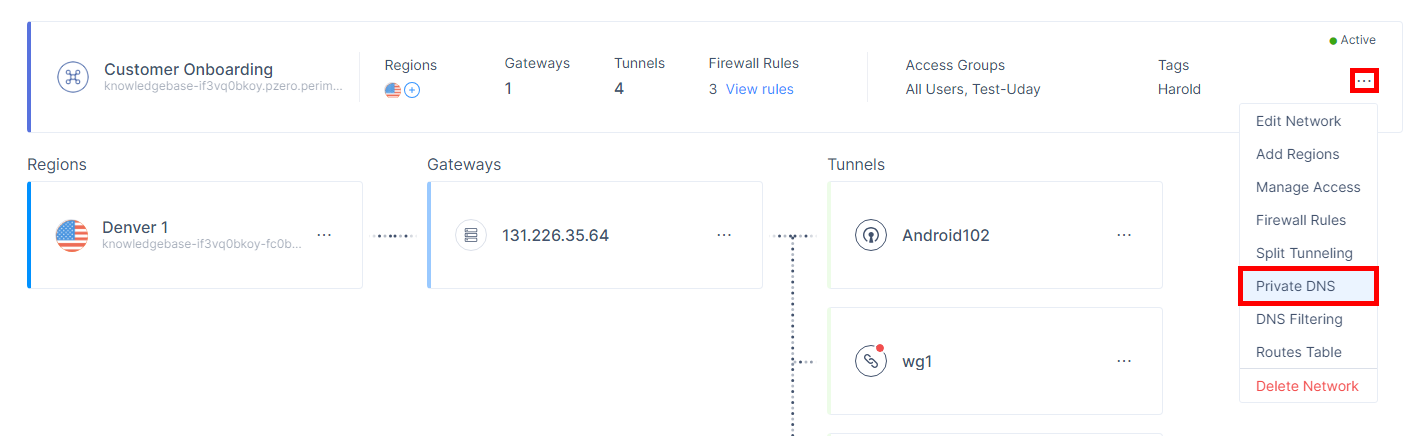
-
For a region, in the Regions section, click ⋮ and then click Regional Private DNS.
The Manage Network Private DNS for networks and Manage Region Private DNS for regions popup appears.
-
-
Turn on Use Private DNS Servers.
-
Select a resolution mode:
-
Specify Private Domains - Add at least one domain (exact or wildcard) to Add Private Domains.
-
All Domains - No domain list is needed. Every query is forwarded to the private servers.
-
Set Use Public DNS Servers on Failure as required. The checkbox is locked on in All Domains mode.
-
Add up to 4 private DNS servers (Server IP Address and Port).
-
(Optional) Add Search Domains.
-
Click Apply and wait for the configuration to deploy.
DNS Filtering
DNS Filtering allows you to manage internet access for members in your network by blocking or allowing websites using allow-list and block-list.
|
|
Best Practices -
|

To configure DNS filtering for a network:
-
Access the Check Point SASE Administrator Portal and click Networks.
-
Select the network.
-
Click
and then click DNS Filtering.
The DNS Filtering window appears.

-
Turn on the Enable DNS Filter toggle button.
-
From the Blocked Domain Categories list, select the website categories you want to block.
-
In the Blocked Domains field, enter the domains you want to block or upload a .CSV file with the domains.
Make sure that the .CSV file:
-
Contains all the entries in a single column.
-
Each cell contain only one entry.
-
The number of entries does not exceed 1000.
-
Each entry is in the form domain.com, without www, HTTP, HTTPs prefixes.
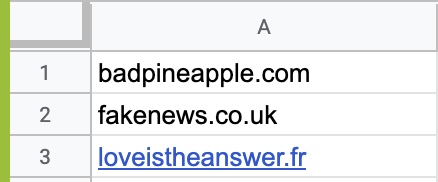
Note - When you block a domain, the system blocks the related sub-domains as well.
-
-
In the Exclusion list field, enter the URLs you want to exempt from the blocked domains list or upload a .CSV file with the domains.
-
Click Apply.
After the settings are applied, a tooltip shows that DNS filtering is activated in your network.

The changes are enforced the next time when the member connects to your network using the Check Point SASE Agent.
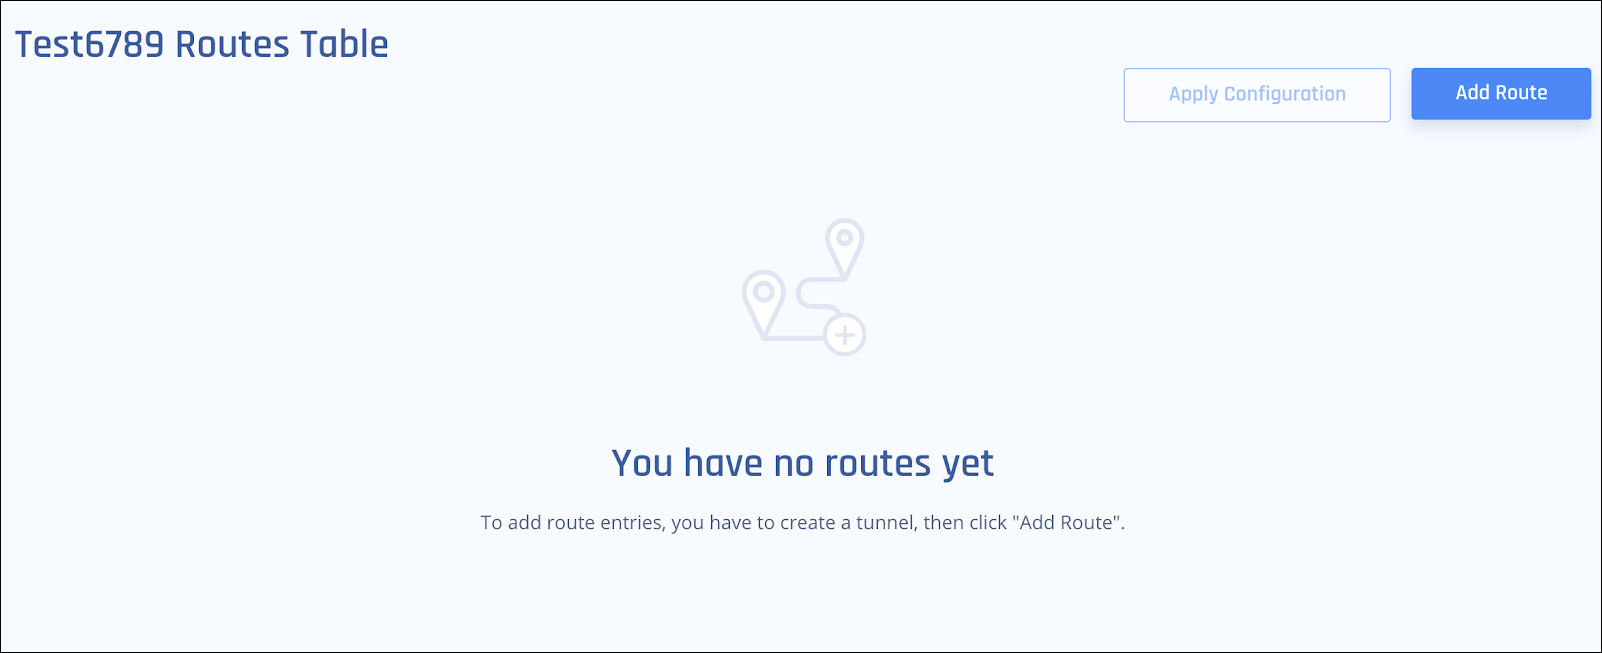
Routes Table
Routes Table shows the routes created for the tunnels in your network.
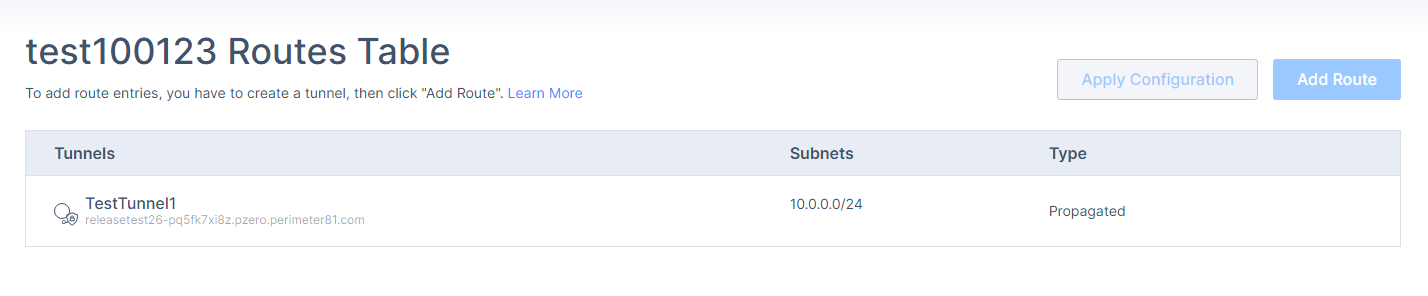
To add a new route to a tunnel in your network:
-
Access the Check Point SASE Administrator Portal and click Networks.
-
Select the network.
-
Click
at the right end of the network and then select Routes Table.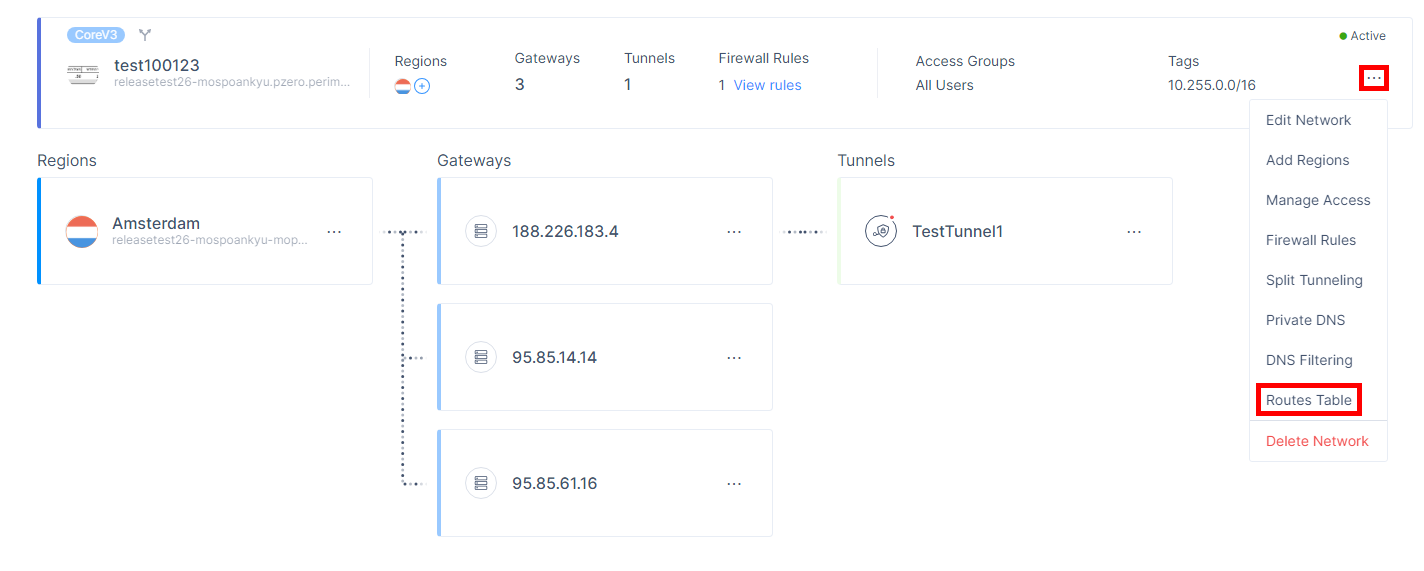
-
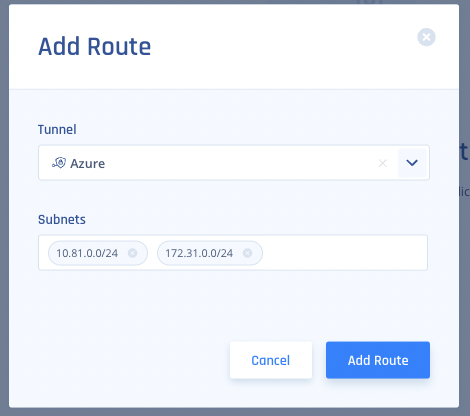
Click Add Route.
-
Enter all the subnets on the remote side of the tunnel and then click Add Route.
For cloud-based resources, enter these values for your vendor.
Tunnel Type
Subnets
Amazon AWS
AWS Single Tunnel - Transit Gateway
CIDRs of the attached VPCs (The VPCs to which you want to gain access)
AWS Single Tunnel - Virtual Gateway
Subnets you want to reach on the AWS side of the tunnel.
AWS Redundant Tunnels - Transit Gateway
Subnets you want to reach on the AWS side of the tunnel.
Note - Ensure that the added route matches the route transmitted by BGP. Any discrepancies, such as incorrect subnetting or supernetting, are strictly prohibited.
AWS Redundant Tunnels - Virtual Private Gateway
Google Cloud Platform
Single Tunnel
From the GCP console, copy the subnets of the regions where your resources are installed.

Redundant Tunnels
Microsoft Azure
Single Tunnel -
Virtual Network Gateway
Subnets of the regions where your resources are installed.
Redundant Tunnels - Virtual Network Gateway
Redundant Tunnels - Virtual WAN
-
Click Apply Configuration.

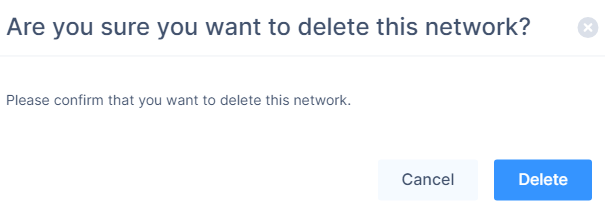
Deleting a Network
-
Access the Check Point SASE Administrator Portal and click Networks.
-
Select the network.
-
Click
and then click Delete Network.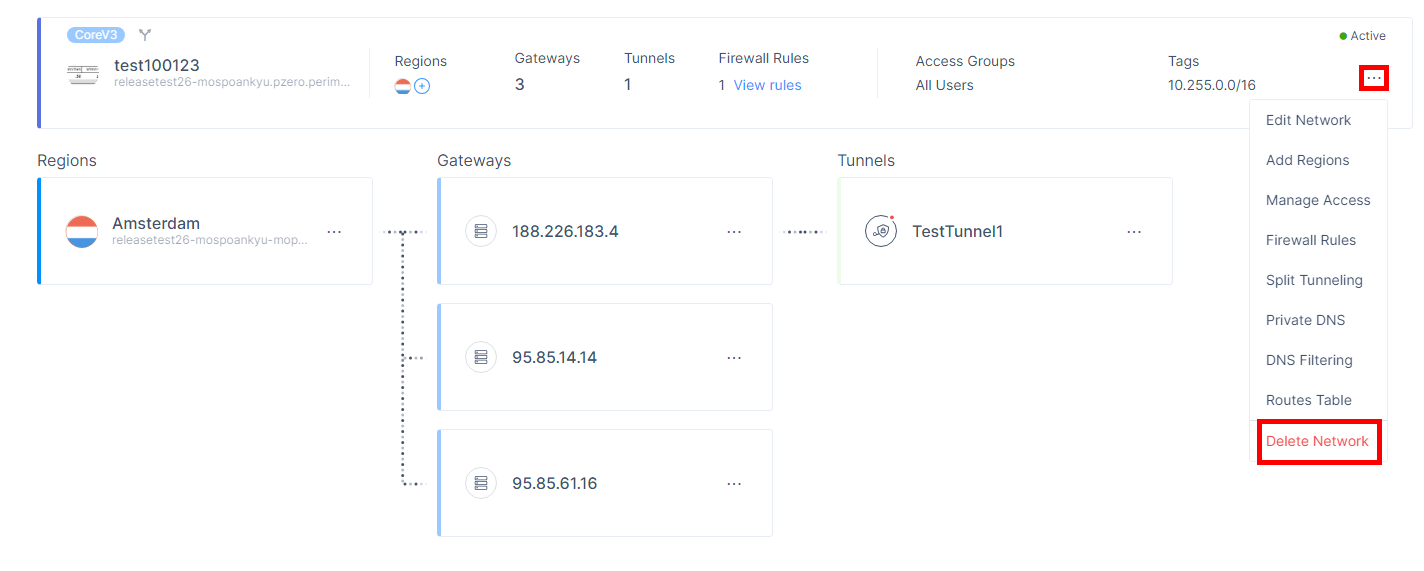
-
Click Delete.