Step 2 - Configuration in Smart-1 Cloud
This is a step in the Smart-1 Cloud Deployment.
Part 1 - Prerequisites for Smart-1 Cloud
-
Register to the Infinity Portal.
In the Infinity Portal Administration Guide, see the chapter "Getting Started":
-
Follow the section "How to Create an Account".
-
Follow the section "How to Log in to your Account".
-
-
Enable the Smart-1 Cloud Application:
-
On the Infinity Portal top left corner, click the button.
-
In the Quantum column, click Smart-1 Cloud.
-
Approve the service terms and privacy policy and check the box:
I accept the Infinity Portal terms of service and the privacy policy -
Click Try Now.
-
The Infinity Portal sends an email to your email account with confirmation of your Smart-1 Cloud registration.
-
After you approve your registration, the Smart-1 Cloud page automatically refreshes, and you can start to use the application.
-
-
Create and Deploy a New Smart-1 Cloud:
-
Click Get Started.
-
Enter the required information to configure the service:
Field
Description
Service Identifier
The service identifier that you enter is used as a prefix for the unique identifier generated by the application.
Desired Log Retention Period
-
The desired retention period to keep the logs.
-
Logs are deleted after the defined period.
-
If the available storage space cannot maintain the desired log retention period, Smart-1 Cloud sends a notification to your email.
When the storage is full, Smart-1 Cloud deletes old logs.
-
-
Click Create.
The Preparing Account window opens.
It takes 1-2 minutes to create a new service.
After the process is complete, an email is sent to your account.
-
-
In your User Center Account, add your Smart-1 Cloud Account.
As a result, Smart-1 Cloud can fetch all licenses and contracts automatically.
-
If you configured Manual Proxy ARP (sk30197) and Manual NAT rules, then you must follow these steps in SmartConsole:
-
Click > Global properties.
-
In the left tree, click NAT - Network Address Translation.
-
Select Automatic ARP configuration.
-
Select Merge manual proxy ARP configuration.
-
Click OK.
-
Part 2 - Configure Configuration Sharing and Onboarding
-
Connect with the Desktop SmartConsole to Smart-1 Cloud:
-
Download the SmartConsole package from one of these places in the Smart-1 Cloud Application:
-
From the left navigation panel, click the Welcome view.
In the Service Management column, click Download SmartConsole for Windows.
The Settings view > SmartConsole page opens.
-
From the left navigation panel, click the Settings view > SmartConsole page.
-
-
Select the desired package:
-
SmartConsole Installation
-
SmartConsole Portable (for more information, refer to sk116158)
-
-
Install SmartConsole:
-
If you downloaded the EXE file, double-click it and follow the instructions on the screen.
-
If you downloaded the ZIP file, extract it (refer to sk116158).
-
-
Open SmartConsole.
See the R82 SmartConsole Online Help for information about how to use SmartConsole.
To open the relevant help page for a SmartConsole screen, press the F1 key.
-
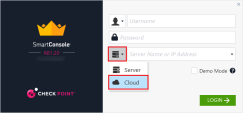
From the server drop-down list, select Cloud.
-
Enter the Management Connection Token.

Note
-
Click Infinity Login.
-
SmartConsole closes, and the default browser opens for authentication.
-
Enter your Infinity Portal administrator credentials.
-
Click Sign in and let the browser open Check Point SmartConsole.
-
SmartConsole portal opens for you to start work.
-
-
From the left navigation panel, click Infinity Services.

-
Enable Configuration Sharing:
Note - Log Sharing is enabled automatically, although not indicated in SmartConsole.
-
In SmartConsole, in the bottom left section Infinity Portal Settings, on the right of Configuration Sharing, click Edit.
Example:

-
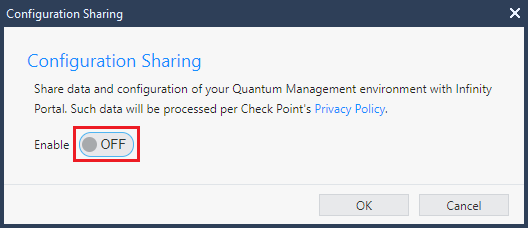
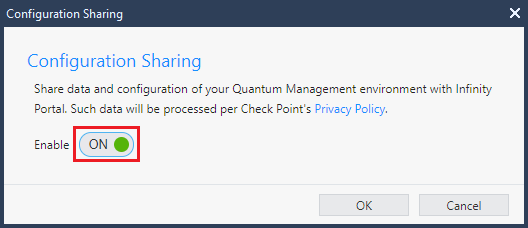
The Configuration Sharing window opens.
-
Near the Enable option, click the OFF button.

It must change to ON.

Click OK.
-
The configuration sharing starts, and after some time its status changes from Initializing to Active.
Example:


From this point, objects configured in SmartConsole on the on-premises Management Server appear in Infinity Portal as assets.
-
-
Configure how to onboard the supported SD-WAN Security Gateways:
-
In the bottom left section Infinity Portal Settings, on the right of Gateways Connector, click Edit.

-
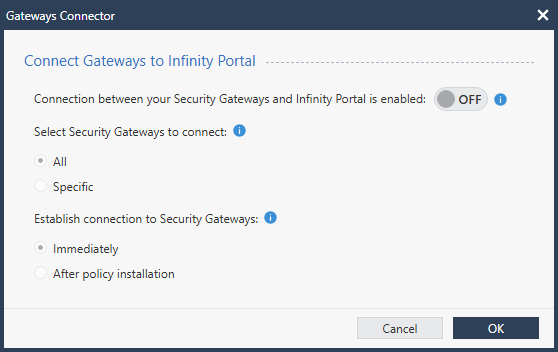
The Gateways Connector window opens.
-
Select which supported SD-WAN Security Gateways to onboard and when:

-
Move the toggle Connection between your Security Gateways and Infinity Portal isenabled from OFF to ON.
-
In the section Select Security Gateways to connect, select which supported Security Gateways to onboard:
For more information, click the (i) icon and see sk180557.
-
All
All supported Security Gateways establish connection with Infinity Portal.
-
Specific
Only the selected supported Security Gateways establish connection with Infinity Portal.
-
-
In the section Establish connection to Security Gateways, select when to onboard the supported Security Gateways:
For more information, click the (i) icon and see sk180557.
-
Immediately
This is the default. Supported SD-WAN Security Gateways try to establish an immediate connection with Infinity Portal and then during every subsequent policy installation.
-
After policy installation
Supported SD-WAN Security Gateways try to establish a connection with Infinity Portal only after you complete this procedure and install the Access Control policy.
Note - You can always change this setting later in SmartConsole > Infinity Services view > in the bottom right corner, on the right of Gateways Connector, click Edit.
-
-
At the bottom, click OK.
-
-
What is Next?
Follow Step 3 - Configuration on Security Gateways.
|
|
Important - Connect the Security Gateways to Smart-1 Cloud only after you configure the Security Gateways for SD-WAN. This makes sure the Security Gateway objects automatically get the correct interface topology. To connect a Security Gateway to Smart-1 Cloud, follow the Quantum Smart-1 Cloud Administration Guide > Chapter "Connecting Gateways and Clusters". |


