Directory Sync with Active Directory
The Directory Sync![]() A solution that holds static Directory information regarding users, groups, devices, and memberships. . feature automates the alignment of user accounts, groups, and devices between an on-premises Active Directory server and the Check Point Portal. It ensures data consistency and accuracy by reflecting changes in Active Directory directly in the Check Point Portal. This eliminates manual updates, prevents errors, and ensures administrators always work with current user and group information.
A solution that holds static Directory information regarding users, groups, devices, and memberships. . feature automates the alignment of user accounts, groups, and devices between an on-premises Active Directory server and the Check Point Portal. It ensures data consistency and accuracy by reflecting changes in Active Directory directly in the Check Point Portal. This eliminates manual updates, prevents errors, and ensures administrators always work with current user and group information.
Prerequisites
-
A Check Point Portal account. Refer to the Getting Started in the Check Point Portal guide for setup instructions.
-
An Active Directory Domain Controller that is operational and properly configured.
-
The domain must have either domain admin credentials or permissions for the Deleted Objects container.
-
For more information about the Deleted Objects container, see Microsoft documentation.
-
Check Point Identity Collector
 Check Point dedicated client agent installed on Windows Servers in your network. Identity Collector collects information about identities and their associated IP addresses and sends it to the Check Point Security Gateways for identity enforcement, you can download the Identity Collector package from the Support Center. installed on a Windows server in the Active Directory domain. For documentation, see the Identity Awareness Clients Administration Guide.
Known Limitation
A maximum of 300,000 members in one Active Directory group is supported.
Use Case
Challenge:
Manual updates to user accounts, group assignments, and device information consume significant time and introduce risks of errors.
Solution:
Use Directory Sync to automate synchronization of user details, group memberships, and device information. This approach ensures accurate records, simplifies access control, and maintains an updated inventory of associated devices, which improves both efficiency and security.
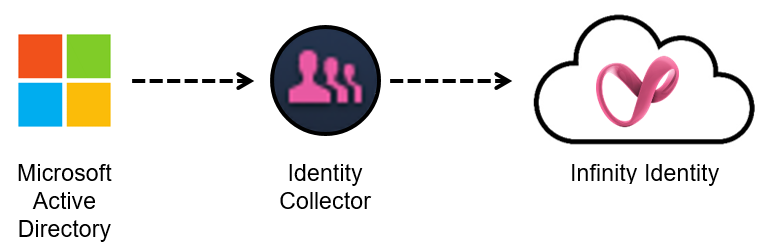
Architecture
This drawing illustrates the Identity Collector configured with Directory Sync. It extracts user, group, and identity data directly from the Active Directory source and transmits the information to the Check Point Portal for centralized management.
Comparison of Active Directory and Microsoft ADFS
Identity and Trust supports Microsoft ADFS and legacy Active Directory. We recommend to use Microsoft ADFS. Active Directory provides Identity and Trust with basic directory information about users and groups. Microsoft ADFS is software installed on your Active Directory server to allow it to function as a SAML server. SAML is the basis for modern authentication through a web browser using Single Sign-On.
Overview of the Directory Sync Domain Table:
The Directory Sync Domain table provides a detailed overview of domain synchronization settings. This table displays the associated domains, their sync status, and any configurations applied during the synchronization process. Use this table to manage and verify domain synchronization.
 Note - In the Directory Sync, each row is a domain.

If Microsoft ADFS or Active Directory is already connected to the Check Point Portal, go to "Step 2: Configure Cloud Connectivity".
Watch the Video
-
In Identity and Trust, from the left menu, click Getting Started.
-
On the right, in the Connect a directory section, click add Another Directory.
The IdP Integration wizard opens.
-
Enter an Integration Title to show to users (for example:"Acme Corp Authentication").
-
Select ADFS/AD.
-
Click Next.
-
In the Integrate ADFS or Active Directory step:
-
In the table column for ADFS or for Active Directory, click Select.
-
Click Next.
-
-
Complete the configuration wizard for ADFS or for Active Directory.
The Microsoft ADFS configuration wizard requires you to allow connectivity between Identity and Trust and ADFS. For detailed instructions, see Microsoft ADFS.
The Active Directory configuration wizard only requires you to enter the Domain of the Active Directory.
Keep Identity and Trust and Identity Collector open throughout this procedure.
|
|
Note - This procedure is for an Identity Collector that collects identities from Cisco ISE, Syslog, or NetIQ eDirectory. For Identity Collector that collects identities for Active Directory, see Directory Sync with Active Directory. |
Watch the Video
-
In Identity and Trust, from the left menu, click Integrations.
-
Click the + (plus sign) button. Then, expand Identity Integrations and click Identity Collector.
The Identity Collector window opens.
-
For Integration title, enter a title for the Identity Collector integration. This title will appear in Identity and Trust.
-
For Available Integrations, select one or more of these identity sources:
-
Identity and Trust AD (Active Directory)
-
Cisco ISE
-
Syslog
-
NetIQ eDirectory
-
-
Click Create.
The Identity Collector window reloads.
-
In the Identity Collector window:
Copy these values from Identity and Trust and keep them in a safe place:
-
Client ID
-
Access Key
-
URL
-
Watch the Video
- On the Windows server, open the Check Point Identity Collector application.
-
From the top toolbar, click Cloud Configuration.
The Cloud Configuration window opens.
-
Paste these values that you copied from Identity and Trust into Identity Collector:
-
Client ID
-
Access Key
-
URL
-
-
In Identity Collector, click Test to test the connectivity between Identity Collector and Identity and Trust. If the test is successful, green check marks appear next to Directory Sync and Identity and Trust.
-
After the test finishes, click OK to confirm.
|
|
Note - If Identity Collector is already connected to an Active Directory Domain, and you want to use this domain for Identity and Trust, you can skip this step. |
-
Open the Identity Collector application.
-
At the top, click Domains.
-
From the top toolbar, click New Domain (
 ).
). -
Enter the Domain name to show in the Identity Collector.
The domain name must exactly match the actual domain name to ensure all features function correctly.
-
Optional: Enter the comment.
-
In the Username and Password fields, enter the Domain account credentials.

Important:
-
The account must be a member of the Event Log Readers group.
-
To enable the configuration of Domain Controllers automatically by DNS and LDAP queries, as well as the periodic AD discovery flows to function seamlessly with Kerberos authentication, it is imperative that domain credentials be formatted in the User Principal Name (UPN) format. It is crucial to note that the use of a combination of User Principal Name format and DC IP address is not compatible.
-
-
In the DC Host name / IP Address field, enter the host name or the IP address of one of the Domain Controllers that you want to add.
-
Click OK.
|
|
Note - If Identity Collector is already connected to an Active Directory Domain Controller (DC), and you want to use this domain for Identity and Trust, you can skip this step. |
You can add a new Active Directory server automatically or manually.
Automatic Configuration of Active Directory Domain Controller (DC) with DNS and LDAP Queries
-
Open the Identity Collector application.
-
From the left navigation toolbar, click Identity Sources.
-
From the top toolbar, click New Source > Active Directory > Fetch Automatically.
-
Enter the Domain Controller information:
-
Domain - Select the Active DirectoryDomain, or configure a new one.
-
DC Host name / IP Address - Enter the host name or the IP address of one of the Domain Controllers you want to add.
Note -To work with Kerberos authentication, you must use the host name.
-
-
Optional: To configure the Identity Collector to fetch Active Directory Domain Controllers from LDAP over SSL, select LDAP over SSL.
-
Click Fetch.
A list of the Domain Controllers appears.
-
Enable the Domain Controllers you want to add.
-
Click OK.
The enabled Domain Controllers are added.
Manual Configuration of Active Directory Domain Controller (DC)
-
Open the Identity Collector application.
-
From the left navigation toolbar, click Identity Sources.
-
From the top toolbar, click New Source > Active Directory > Add Manually.
-
Enter the Domain Controller Name to appear in the Identity Collector.
-
Optional: Enter your comment.
-
Enter the Domain Controller information:
-
Domain
Select the Active DirectoryDomain, or configure a new one.
-
DC Host name / IP Address
Enter the host name or the IP address of one of the Domain Controllers you want to add.
Note - To work with Kerberos authentication, you must use the host name.
-
Site
Optional. Enter the Domain Controller site name.
-
Is Forwarded Event Log Collector
Select this option, if this server is not a Domain Controller, but a server, to which the login events are forwarded.
-
-
Click Test.
-
Click OK.
The Domain Controller is added.
Select the Active Directory to sync with the Check Point Portal.
-
From the side menu, select Directory Sync and click the Edit Server icon:
-
Select the server to sync with Identity and Trust and click OK.
(Optional) Server Priority -
For environments with multiple Domain Controllers on the same domain, you can set the synchronization order. Specify the primary DC for synchronization, and if it fails, the process shifts to the next priority DC. This ensures efficient and reliable synchronization across multiple Domain Controllers.
The Active Directory identities synchronize with Check Point's database.
Additional sync options (optional):
From the side menu, select Directory Sync and then select one of these options:
-
Sync
Immediately synchronizes the latest Active Directory changes with Identity and Trust. A sync automatically occurs every 10 minutes to keep the database updated with the latest directory changes.
-
Stop Sync
Not recommended, as it can cause inconsistencies.
Note - Selecting Stop Sync only stops the current synchronization process, but it automatically resumes after a 10-minute interval.
-
In the Identity Collector application, from the left toolbar, click Identity Servers.
-
Above the table, click
 , expand Add, and select Identity and Trust.
The Configure Identity and Trust window opens.
-
Optional - select a Query Pool to send information to Identity and Trust only for users that are in the Query Pool.
For more information about Query Pools, see theIdentity Awareness Clients Administration Guide.
-
Optional - select a Filter to send information to Identity and Trust only for users who are in the filter results.
For more information about Filters, see theIdentity Awareness Clients Administration Guide.
-
Click OK.
The Identity and Trust Identity Server
Check Point Security Gateway with enabled Identity Awareness Software Blade. object appears in the table.
How to Edit the Directory Sync Configuration
|
|
Warning -Clearing a previously selected domain removes all associated identities from the Check Point Portal within one hour. |

To select or change the Active Directory that you want to synchronize with the Check Point Portal.
-
Open the Identity Collector application and select Directory Sync.
-
Select the edit icon.
-
In the Add/Edit Servers window, select the applicable AD.
-
Click OK.
|
|
Important - The Identity Collector must remain operational at all times to maintain an active connection. Failure to do so will result in the automatic deletion of identities within one month. |