Automatic Activation of Mobile Security: Prompt the Protect app installation
You can apply the built-in CHKP Status tags to let Workspace ONE UEM![]() Unified Endpoint Management. An architecture and approach that controls different types of devices such as computers, smartphones and IoT devices from a centralized command point. identify the devices where Harmony Mobile Protect app is not installed or removed and enforce its installation.
Unified Endpoint Management. An architecture and approach that controls different types of devices such as computers, smartphones and IoT devices from a centralized command point. identify the devices where Harmony Mobile Protect app is not installed or removed and enforce its installation.
If Harmony Mobile Protect app is not installed or removed from the device, then the device is marked as not protected by the Mobile Security dashboard, and tagged with one of the CHKP Status tags. This prompts the user to install the Harmony Mobile Protect app on the device.
-
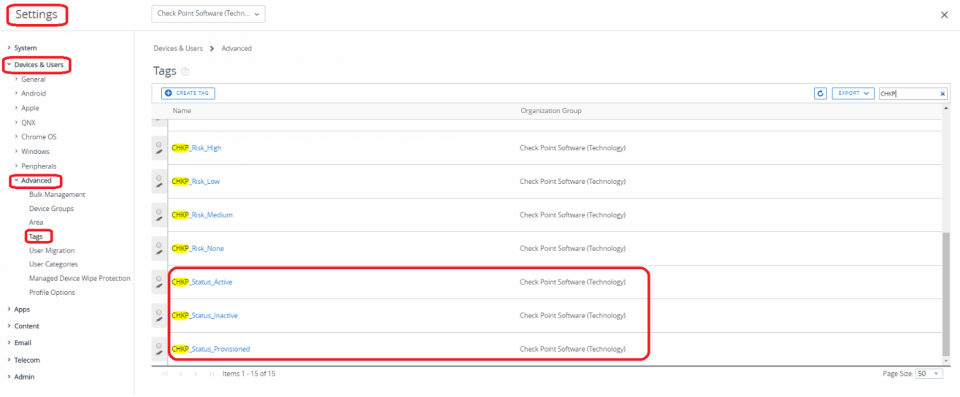
The CHKP Status tags must be created at the customer Organization Group, highest parent organization group.
-
Go to Groups & Settings > All Settings > Settings > Devices & Users > Advanced > Tags and make sure the following tags exist:
-
CHKP_Status_Provisioned
-
CHKP_Status_Active
-
CHKP_Status_Inactive

Notes:
-
If you configured Workspace ONE UEM for Allow list Apps, you must add the Harmony Mobile Protect app to the white list.
-
You must add the Harmony Mobile Protect app for both iOS and Android operating systems.
-
To prompt the Harmony Mobile Protect app installation on your devices:
-
Create a Mobile Security Protect Application Group for both iOS and Android apps.
-
Assign this group to your organization.
-
Create a compliance policy that uninstalls and/or removes all corporate apps from the device until the user installs the Harmony Mobile Protect app on the device.
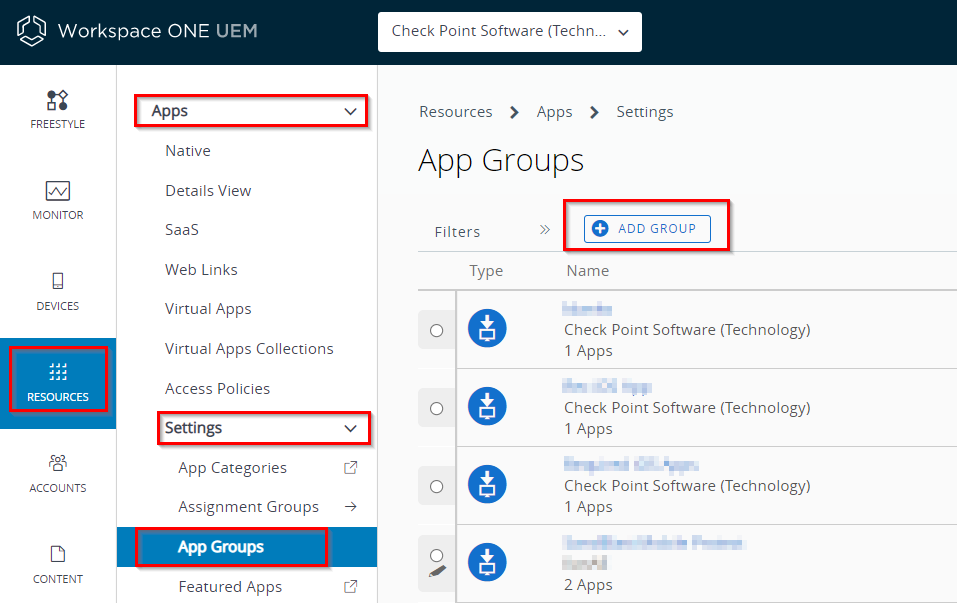
Creating App Group for the Required Apps
Procedure:
-
Go to Resources > Apps > Settings > App Groups and click + Add Group.
-
In the Add Application Group window, on the List tab, configure these settings:
-
In the Type field, select Required.
-
In the Name field, enter a unique group name.
Example, Harmony_Mobile_ Required_for_ iOS.
Note - The data fields are similar for both iOS and Android users. The examples below are applicable for both platforms.
 For iOS Apps
-
In the Platform field, select Apple iOS.
-
In Application Name field, enter the name of the Harmony Mobile Protect app (Harmony Mobile Protect).
-
Search for Harmony Mobile Protect app in the Apple Store and select it.
-
In the Application ID field, enter the Harmony Mobile Protect's application ID as defined in the App Store.

For Android Apps
-
In the Platform field, select Android.
-
In Application Name field, enter the name of the Harmony Mobile Protect app (Harmony Mobile Protect).
-
Search the managed Google Play Store for Harmony Mobile Protect app.
In the search result window, select the Harmony Mobile Protect app and click Select.

The Harmony Mobile Protect app ID is displayed in the Application ID field.
-
-
Click Add Application.
-
Click Enter.
-
Click Next.
-
In the Add Application Group window, on the Assignment tab:
-
In the Description field, enter the device group description (for example, Req. iOS devices or Req. Android devices).
-
Assign the Organization Group to the proper Mobile Security Protect group.
Enter applicable information in all the fields marked with (*).
-
-
Click Finish.
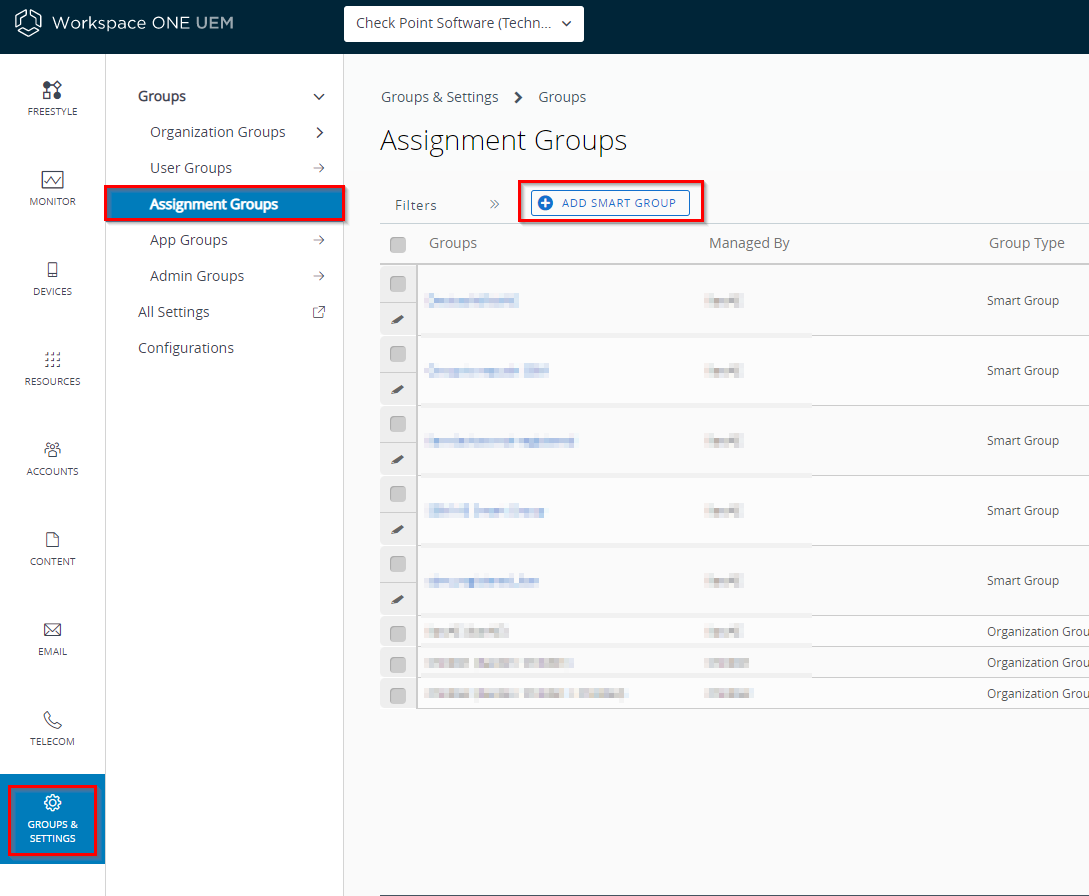
Creating Smart Groups for Required Apps
Procedure:
-
Go to Groups & Settings > Groups > Assignment Groups.
-
Click Add Smart Group.
-
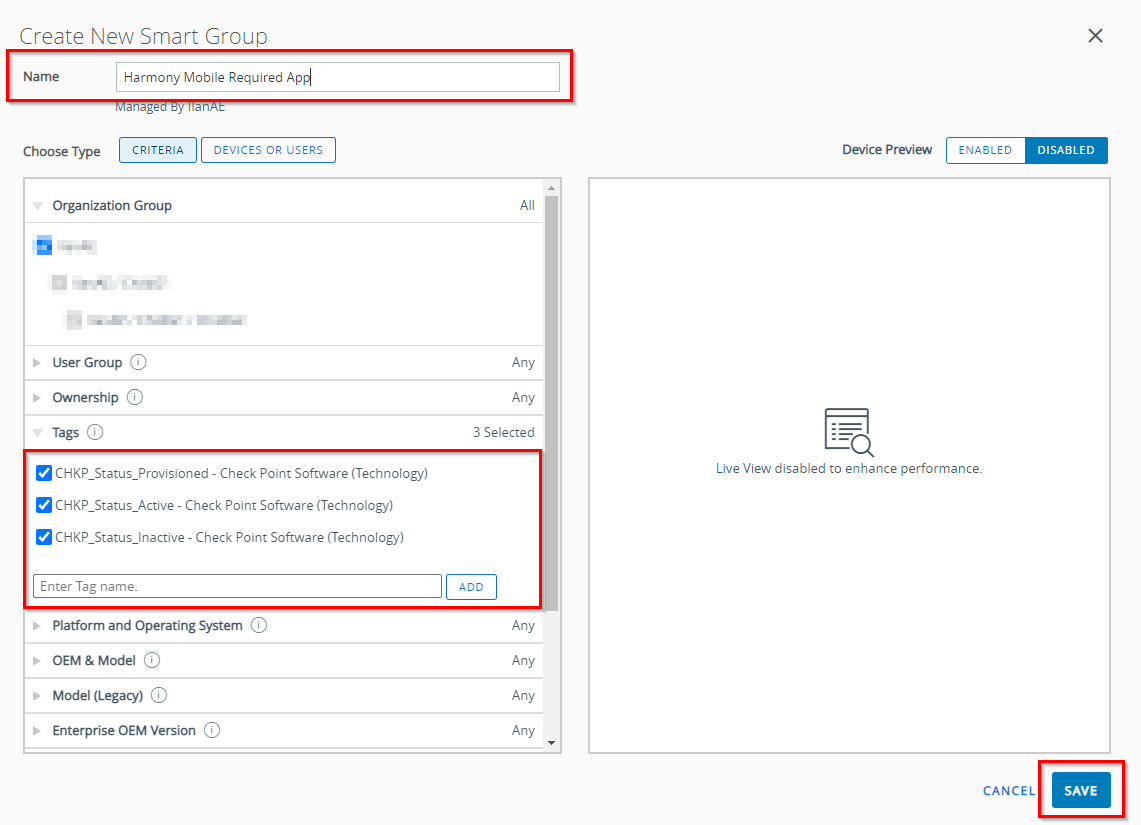
In the Create New Smart Group window, assign the tags for the dynamic group devices:
-
Name - Enter a unique Smart Group name. Example, Harmony Mobile Required App.
-
In the Tag section, select these tags:
-
CHKP_Status_Active
-
CHKP_Status_Inactive
-
CHKP_Status_Provisioned
-
-
-
Click Save.
Creating a Compliance Policy for Required Apps
The Compliance![]() Check Point Software Blade on a Management Server to view and apply the Security Best Practices to the managed Security Gateways. This Software Blade includes a library of Check Point-defined Security Best Practices to use as a baseline for good Security Gateway and Policy configuration. Policy is activated on devices that do not install the required apps. You must create separate compliance policies for specific OS types: iOS and Android.
Check Point Software Blade on a Management Server to view and apply the Security Best Practices to the managed Security Gateways. This Software Blade includes a library of Check Point-defined Security Best Practices to use as a baseline for good Security Gateway and Policy configuration. Policy is activated on devices that do not install the required apps. You must create separate compliance policies for specific OS types: iOS and Android.
|
|
Note - In every organization, the customer configures the compliance policies according to the production environment needs, and the internal security policy |
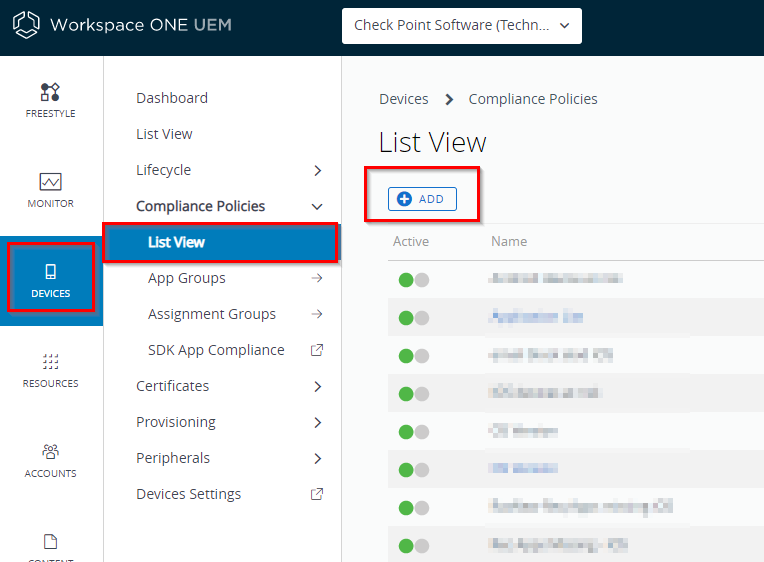
To create a Compliance Policy:
-
Go to Devices > Compliance Policies > List View and click + Add.
-
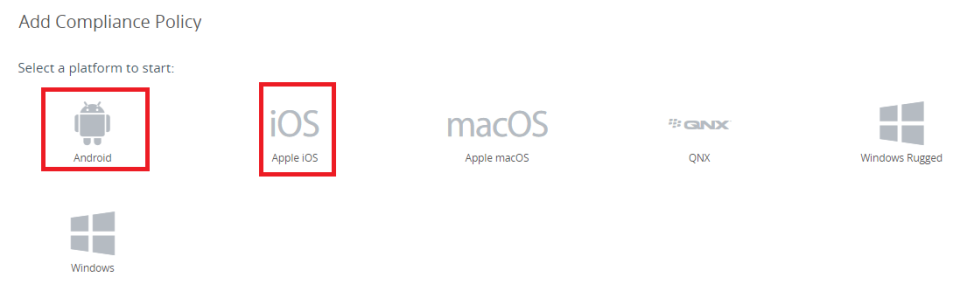
In the Add Compliance Policy window, select a platform to start.
The Add Compliance Policy window appears.
Note - The data fields are similar for both iOS and Android users. The examples below are applicable for both platforms.
-
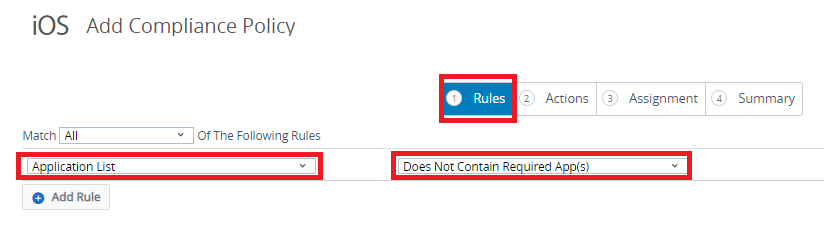
In the Rules tab, select Application List and Does Not Contain Required App(s).
-
Click Next.
-
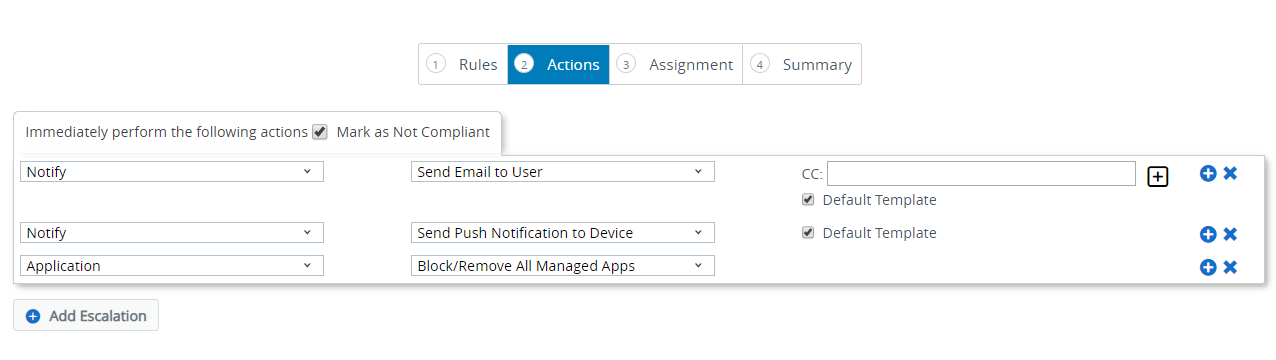
In the Actions tab, add actions:
-
Enable the Mark as Not Compliant checkbox.
-
Select and add the actions to your policy. For example, Notify the user by email, Send Push Notification to Device, and Block/Remove All Managed Apps.
-
Use the [+] button to add a new action.
Example for iOS:
Example for Android:

In Android, the Disable All managed Apps option is used to block access to corporate data from the work profile in Android Enterprise.
Note - If the user cannot resolve an issue, click + Add Escalation to add an escalation action. You can set these actions to repeat themselves over a specified number of times over a specified interval.
-
-
Click Next.
-
In the Assignment tab, in the Smart Groups field, select the dynamic Assignment Group you created in previous step Creating Smart Groups for Required Apps.
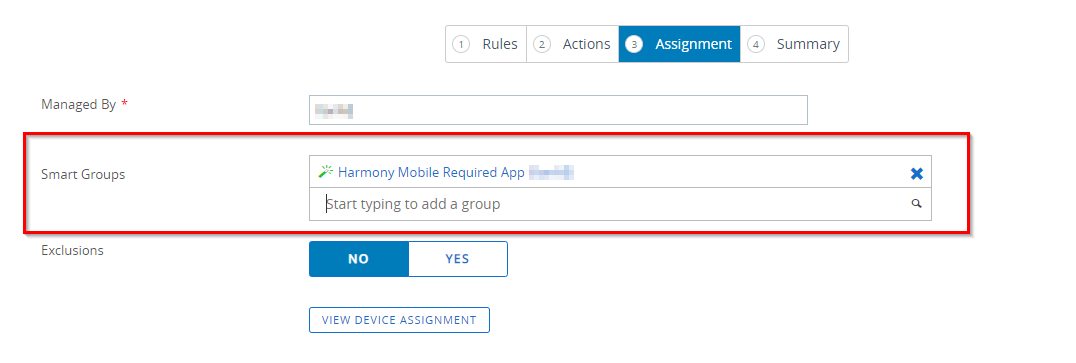
-
Click Next.
-
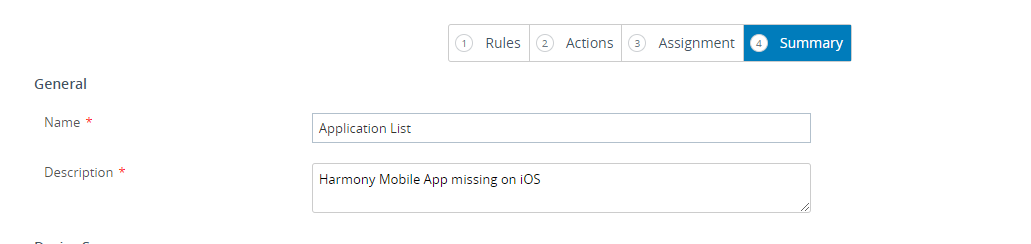
In the Summary tab, enter a unique name for the Compliance Policy, and add the description of the policy.
-
Click Finish & Activate.