Integration with IBM MaaS360
Preparing UEM Platform for Integration
IBM MaaS360 deploys Harmony Mobile Protect app on a device.
Prerequisites
-
Mobile Security service integrates with IBM MaaS360 through the existing API. To enable integration, you must first create a IBM MaaS360 API account.
Mobile Security integrates with IBM MaaS360 (On-Premise) and IBM MaaS360 is version 10.0 or later with REST API access enabled. For On-premise MaaS360 Deployments, the port used for the API must be accessible remotely through your firewall before trying to connect.
Mobile Security uses the API to synchronize the device records, to retrieve device apps list, and to report the device risk level to IBM MaaS360.
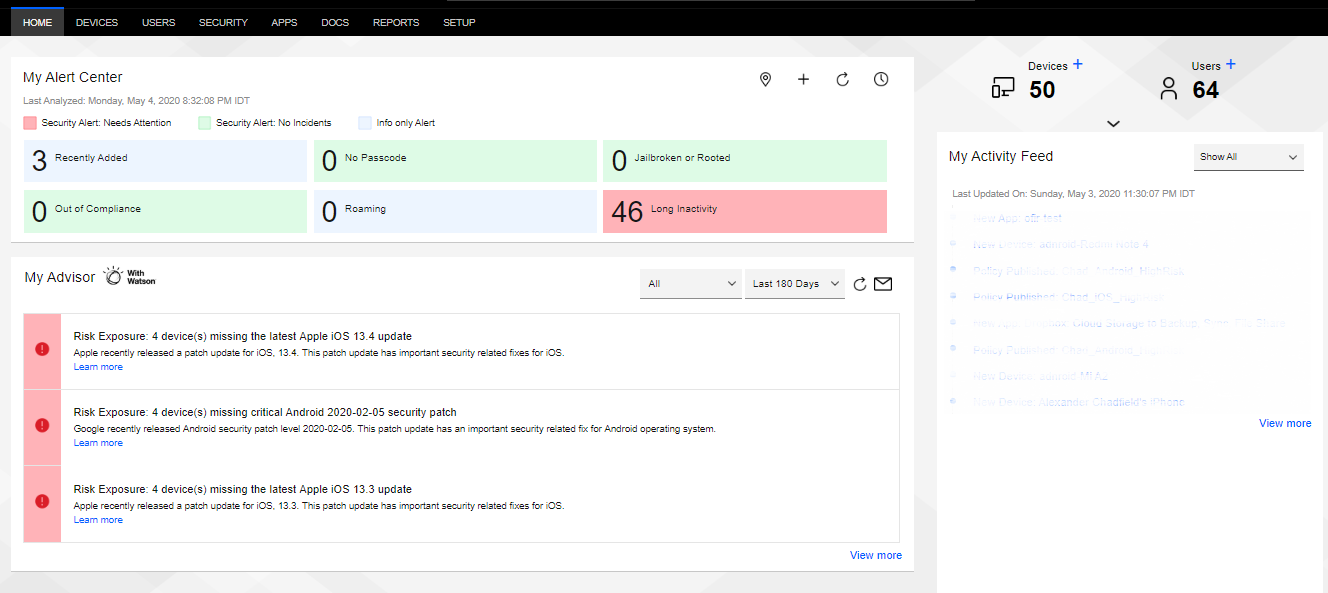
MaaS360 Portal (Example):
Log in to your MaaS360 Portal:
|
|
Note: During the procedures in this document there are quite a few pieces of information that you will need to gather or create. There is a form in the Appendix section that you can record your settings for easy reference. |

General Workflow
-
Create an API Only Administrator Account (optional). See Creating an API Only Administrator Account (optional).
-
Add a new user. See Adding a User.
-
Create a Security Group for Check Point Harmony Mobile Protect app. See Creating a Device Provisioning Group.
-
Add a device to an existing user. See Adding a Device to an Existing User.
-
Create Mitigation Label and Compliance
 Check Point Software Blade on a Management Server to view and apply the Security Best Practices to the managed Security Gateways. This Software Blade includes a library of Check Point-defined Security Best Practices to use as a baseline for good Security Gateway and Policy configuration. Policies that will be enforced on devices that are at High Risk. See Creating a Mitigation Process.
Creating an API Only Administrator Account (optional)
For the interaction at the API, we will create an API admin user in the MaaS360 portal that you use to limit the capability of the admin credentials used between the Mobile Security Dashboard and the MaaS360 system.
|
|
Best Practice - It is a best practice to create such an admin account and highly recommended, but is optional. Creating an administrator account and administrator role requires a “Services Administrator” level role. |

To create an “API” Administrator Account, follow the process below:
Create a New API Only Administrator Role
-
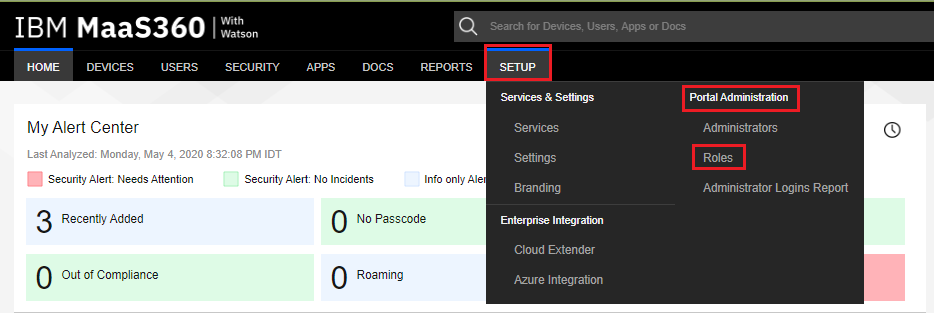
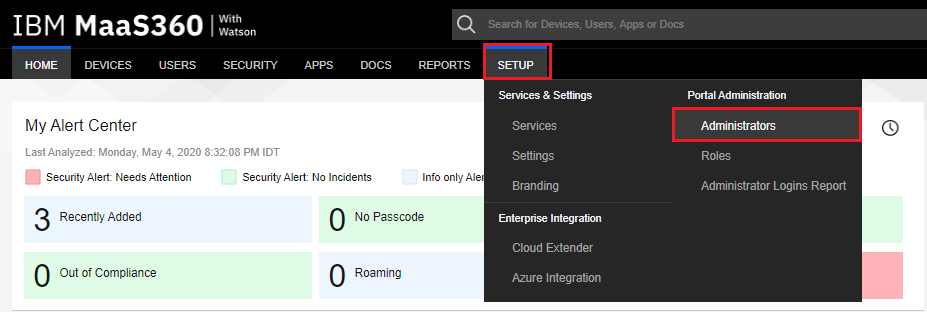
Navigate to Setup > Portal Administration > Roles.
-
Click Add Role button.

-
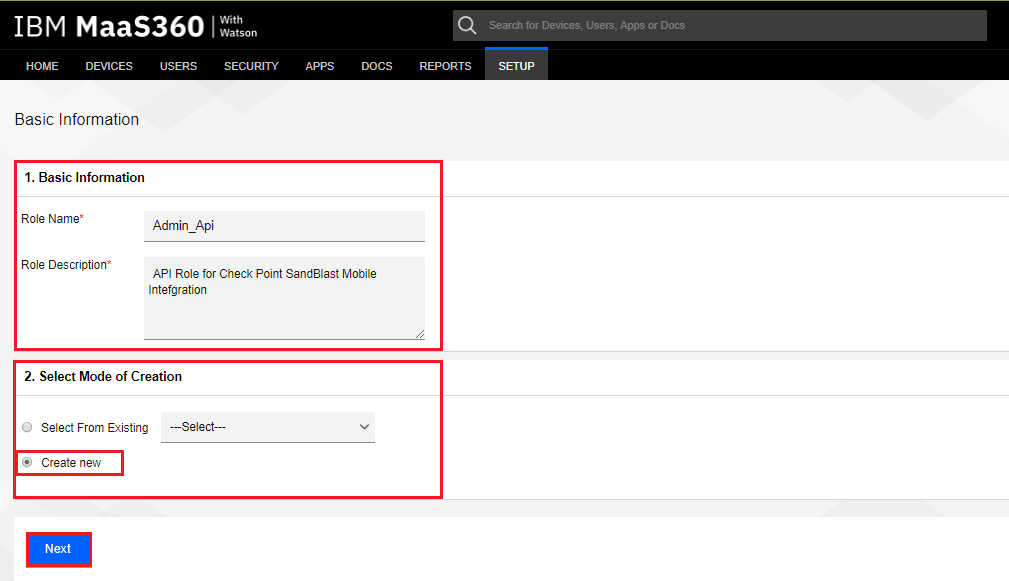
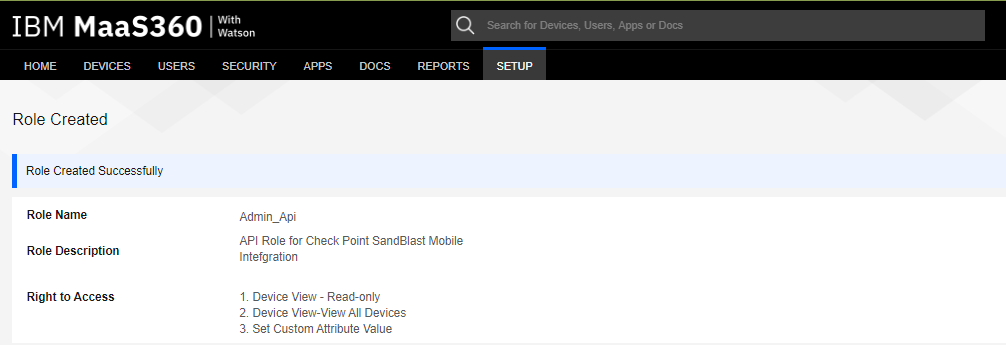
Enter in a Role Name, such as “Admin_Api”, and a description.
-
In Select Mode Creation select the Create New radio button.
-
Click Next.
-
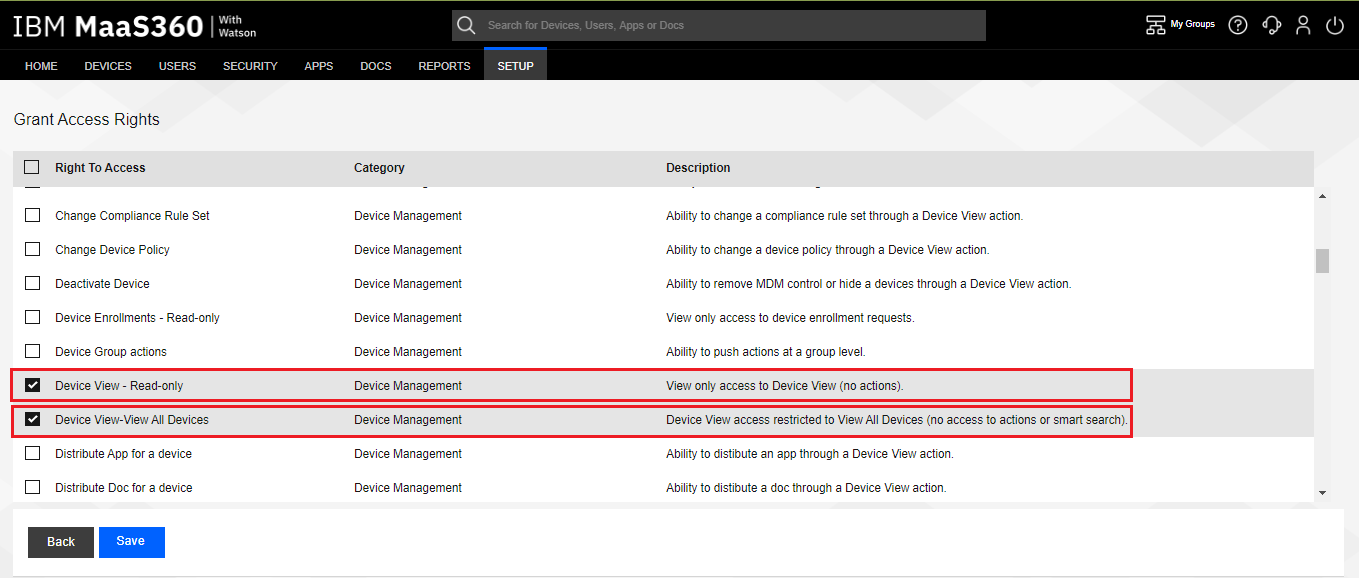
On the Grant Access Rights screen, scroll down the list and select these additional access rights for the new role:
-
Device View – Read-only
-
Device View – View All Devices
-
Set Custom Attribute Value
-
-
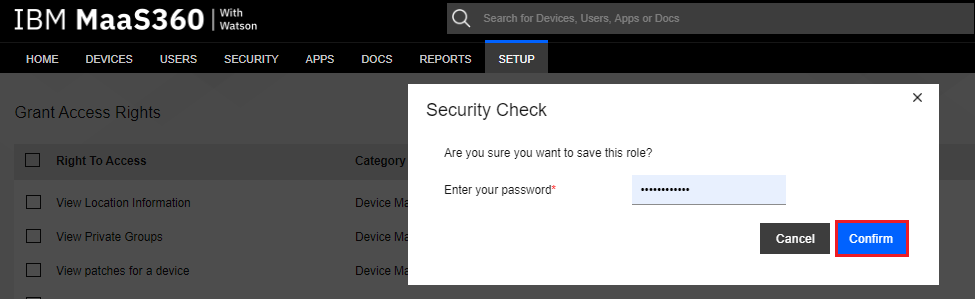
Click Save.
-
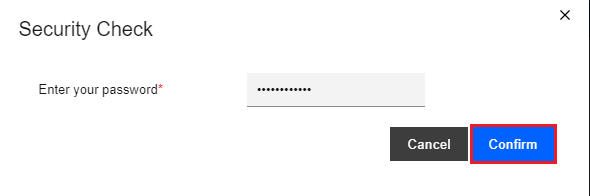
Type your admin password, and then click the Confirm button.
-
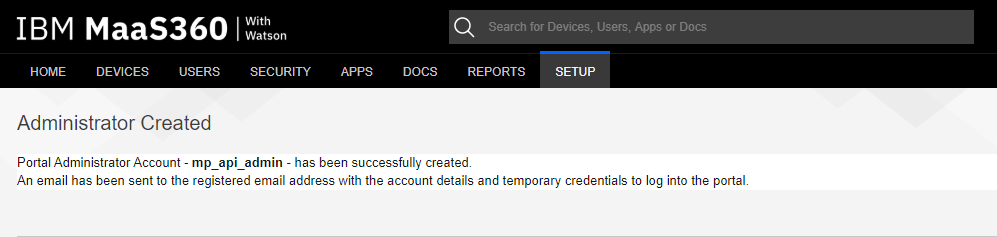
A confirmation message is displayed as below:
Create a New Administrator Account
-
Navigate to Setup > Portal Administration > Administrators.
-
Click Add Administrator.

-
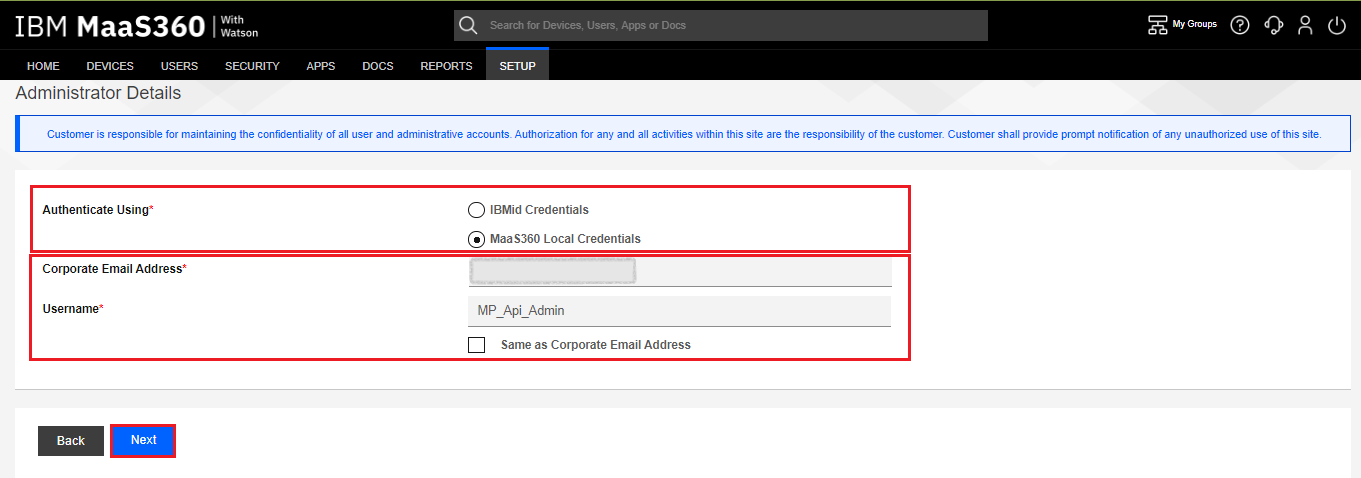
On the Administrator Details window, select Authenticate Using MaaS360 Local Credentials.
-
Fill in the email address and the user name for the new administrator.
-
If the user name is the same as the email address, select the same as Corporate Email Address checkbox. In our example, we create an admin username of “MP_Api_Admin”.
-
Click Next.
-
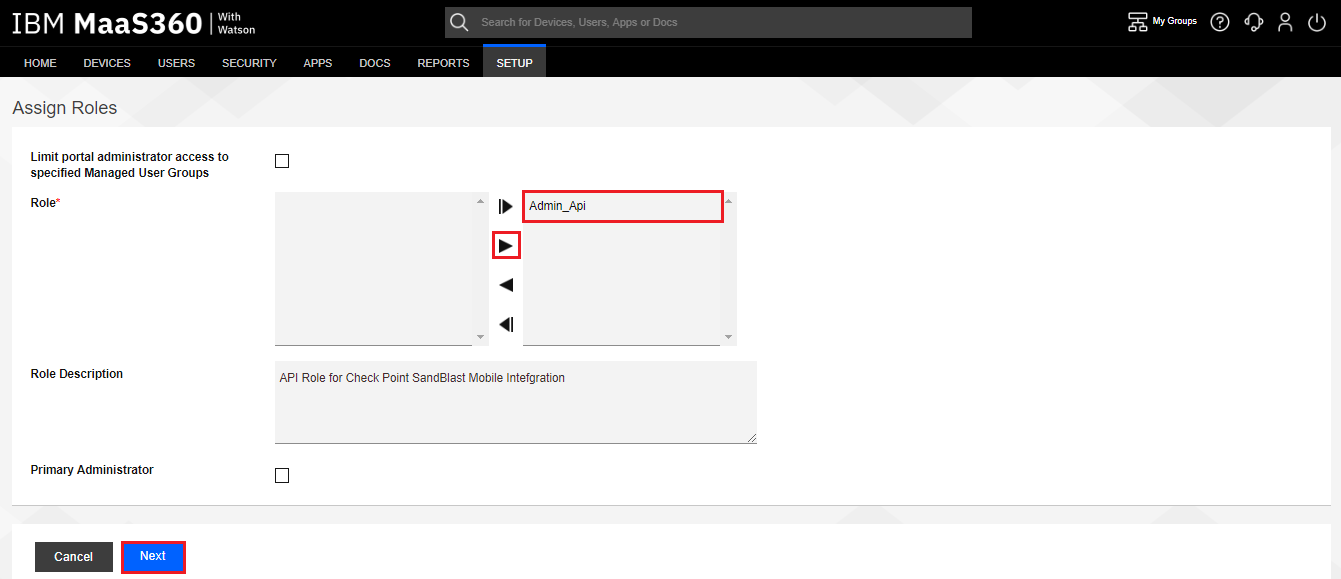
On the Assign Roles window, select the Role created in the previous section. In our example “Admin_Api”.
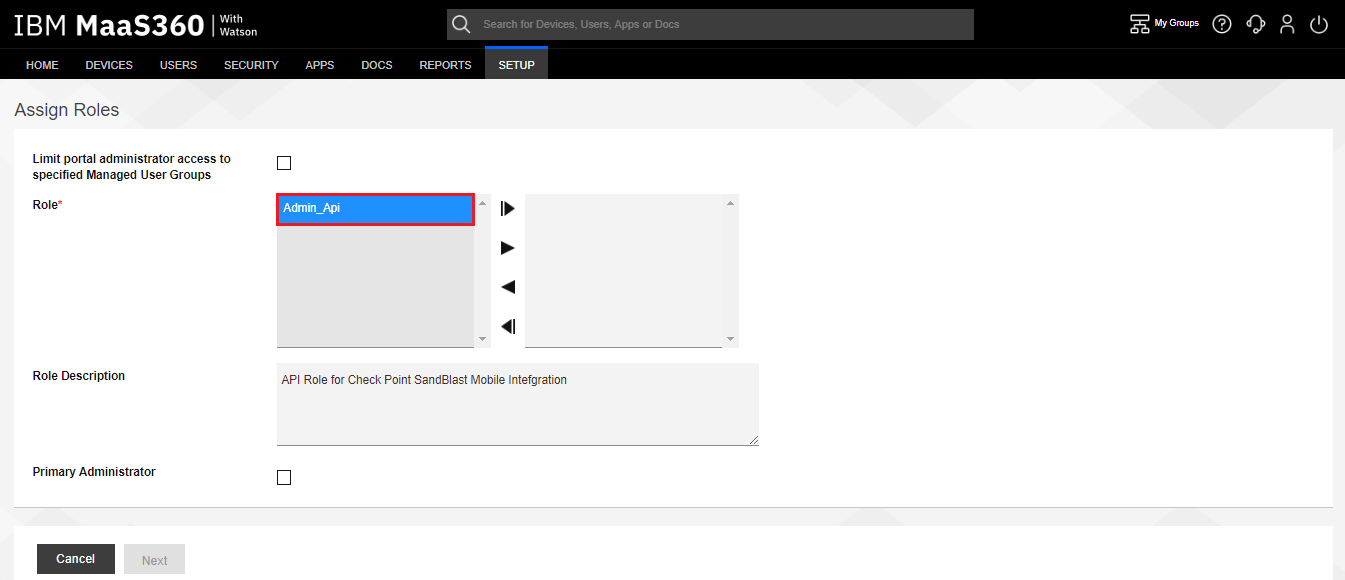
-
Click on the arrow button to add the desired role and click Next.
-
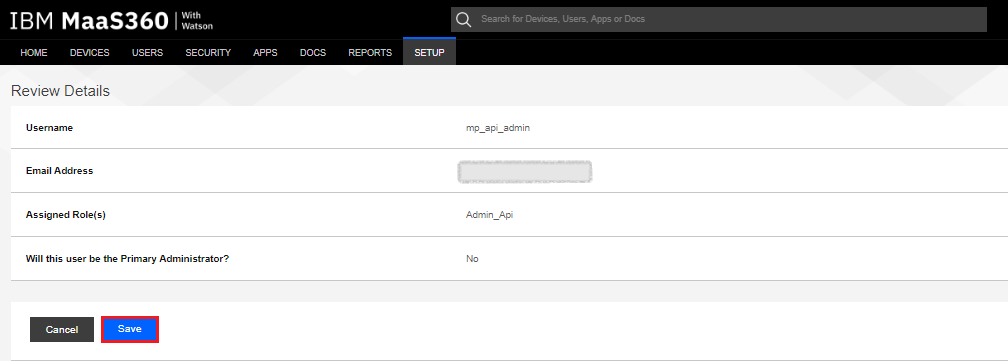
On the Review Details window, review to make sure the configuration is applicable.
-
Click Save.
-
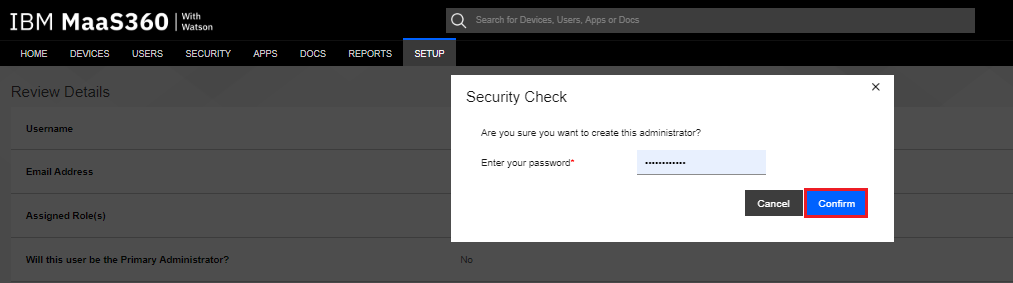
Type your admin password, and then click the Confirm button.
-
A confirmation message is displayed:
-
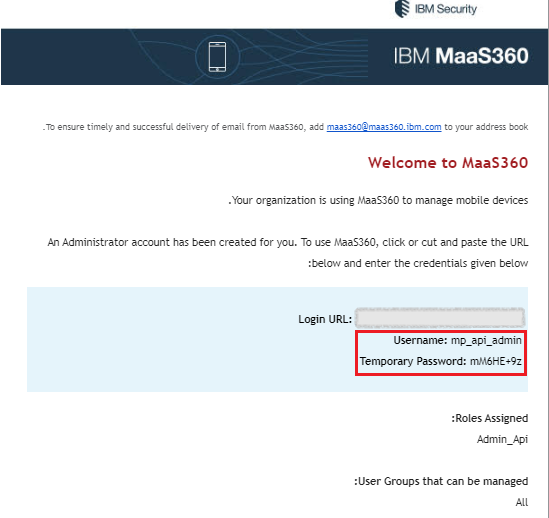
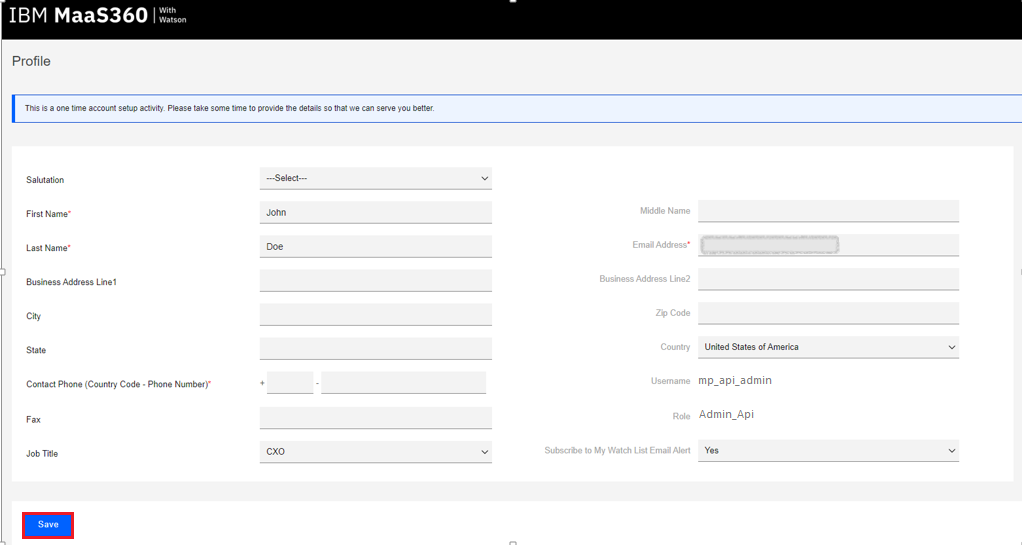
To complete the new admin account creation, log out from the MaaS360 portal and log in again with the credentials sent to the email address used for mp_api_admin. You are required to select a new unique password..
-
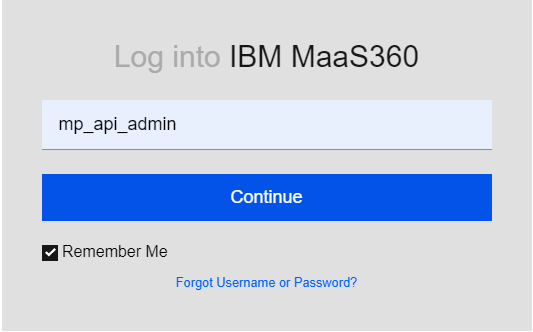
Log in to the MaaS360 Portal with the above credentials.
-
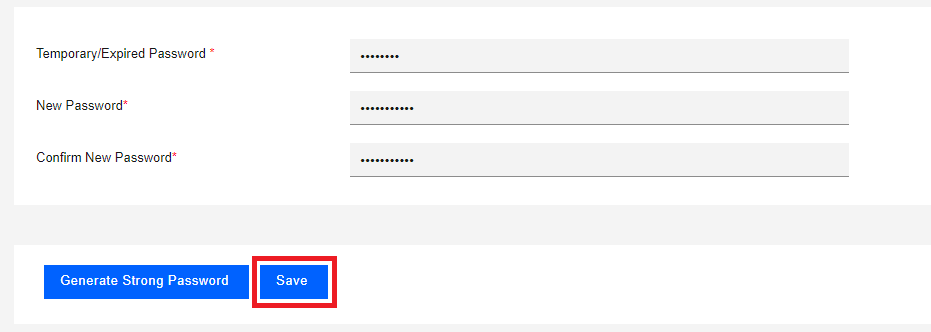
You are prompted to select a new password. Enter a password that satisfies the password rules.
-
Click Save.
-
In the Add Personal Information form, enter a First Name, Last Name, and Contact Phone Number .
-
Click Save.
|
|
Note: Log out and log back in to the MaaS360 Portal with your Service Administrator credentials to continue with the configuration |
Adding a User
There are two ways to add a user: Add User, or sync with a corporate user directory.
|
|
Note: Use the Cloud Extender or Microsoft Entra ID (formerly Azure AD) Integration to integrate with your Corporate User Directory |
Add a user with the Add User method:
-
Navigate to Users > Directory.
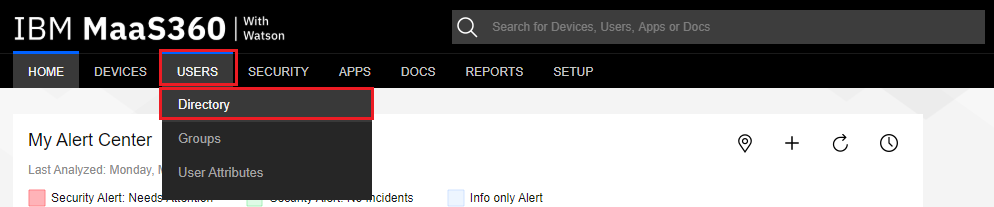
-
Click the Add User button.

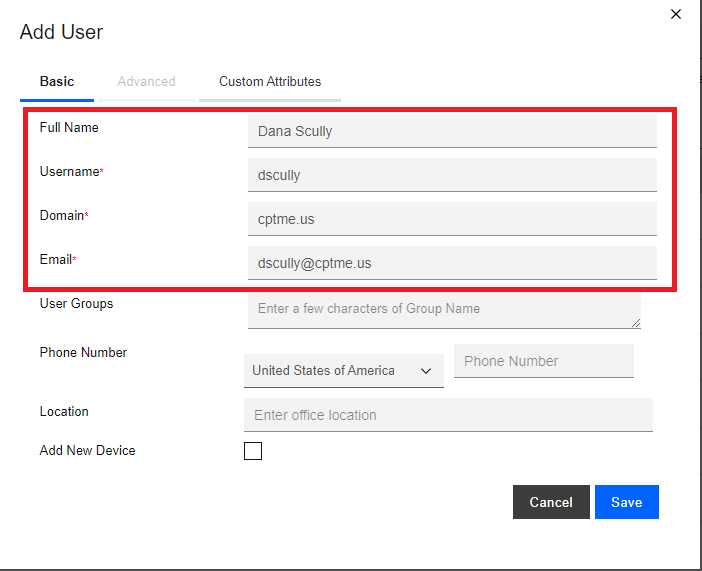
-
On the Add User pop-up window, on the Basic tab, fill in all the required (*) fields with the appropriate information, as in the example below.
|
|
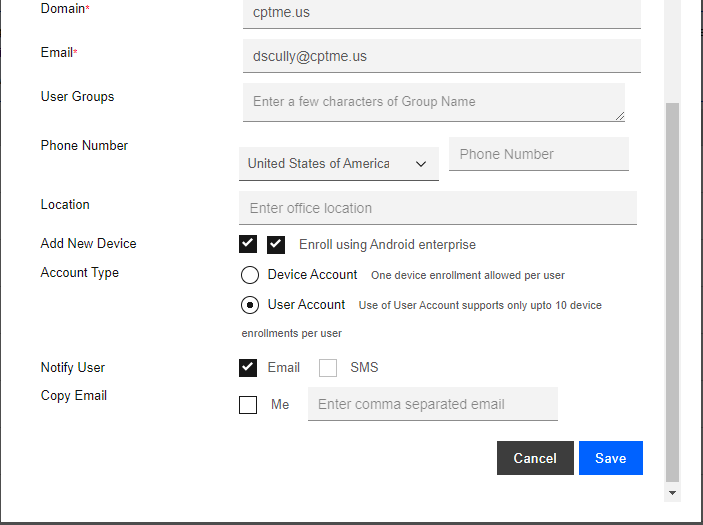
Note: You can add a new device at this time by following the instructions in the next section, or you can click the Save button and add a new device later according to the instructions in section Adding a Device to an Existing User. |
Adding a Device While Adding the User
-
To add a new device to this new user, select Add New Device check box, and select the Notify User method.
-
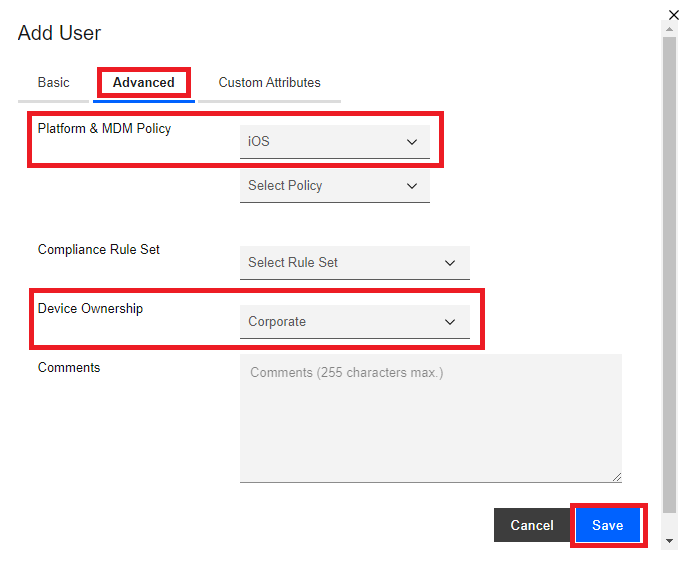
On the Add User pop-up window, click the Advanced tab.
-
On the Advanced tab, under Platform, select iOS or Android, and under the Device Ownership, select Corporate or Employee Owned.
-
Click Save.
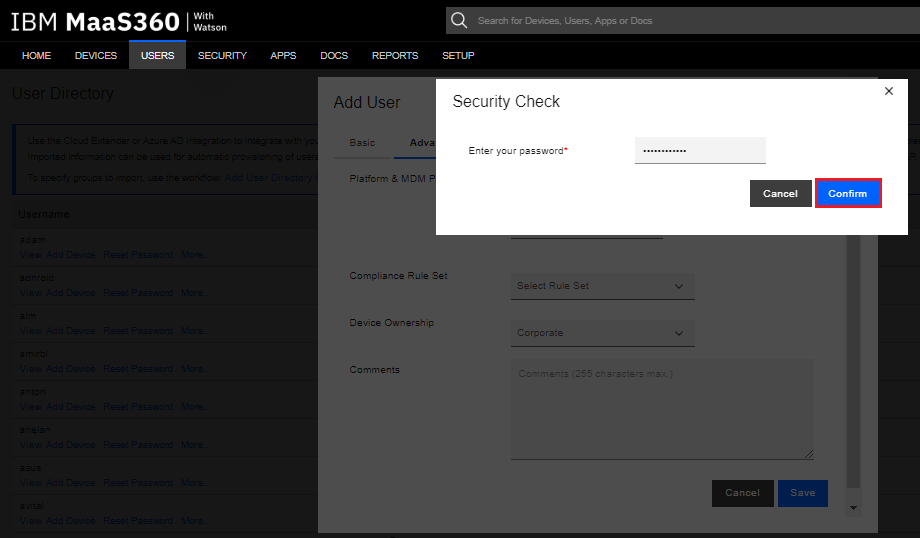
-
Enter in your admin password and click Confirm button.
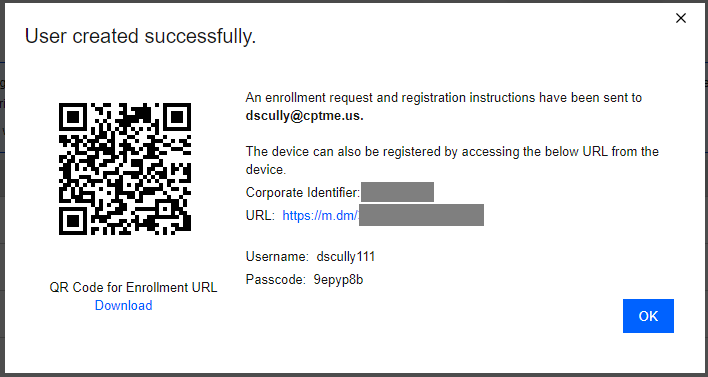
-
The system pops-up a success message with the enrollment details sent to the user.
-
Click the OK button.
Creating a User Groups
Follow this procedure to create a group of users whose devices will be registered to the Mobile Security solution. Although this can be an optional step, it is used in the creation of the dynamic Device Provisioning![]() Check Point Software Blade on a Management Server that manages large-scale deployments of Check Point Security Gateways using configuration profiles. Synonyms: SmartProvisioning, SmartLSM, Large-Scale Management, LSM. Group in the next section Creating a Simple Device Provisioning Group.
Check Point Software Blade on a Management Server that manages large-scale deployments of Check Point Security Gateways using configuration profiles. Synonyms: SmartProvisioning, SmartLSM, Large-Scale Management, LSM. Group in the next section Creating a Simple Device Provisioning Group.
Creating a User Group
-
Navigate to Users > Groups.

-
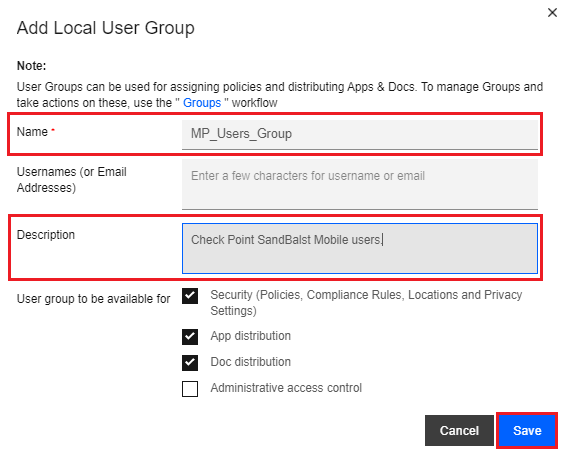
Click the Add drop-down button, and select Local User Group.

-
On the Add Local User Group pop-up window, enter a name, such as “MP_Users_Group”, and optionally, a Description.
-
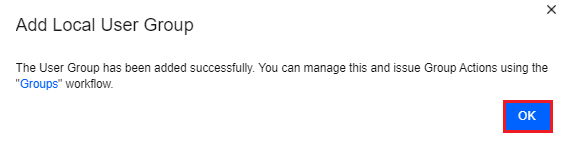
Click Save.
-
Click the OK button on the pop up window.
Adding an Existing User to a User Group
To add an existing user to the User Group you created in the previous section Creating a User Groups, follow this procedure.
-
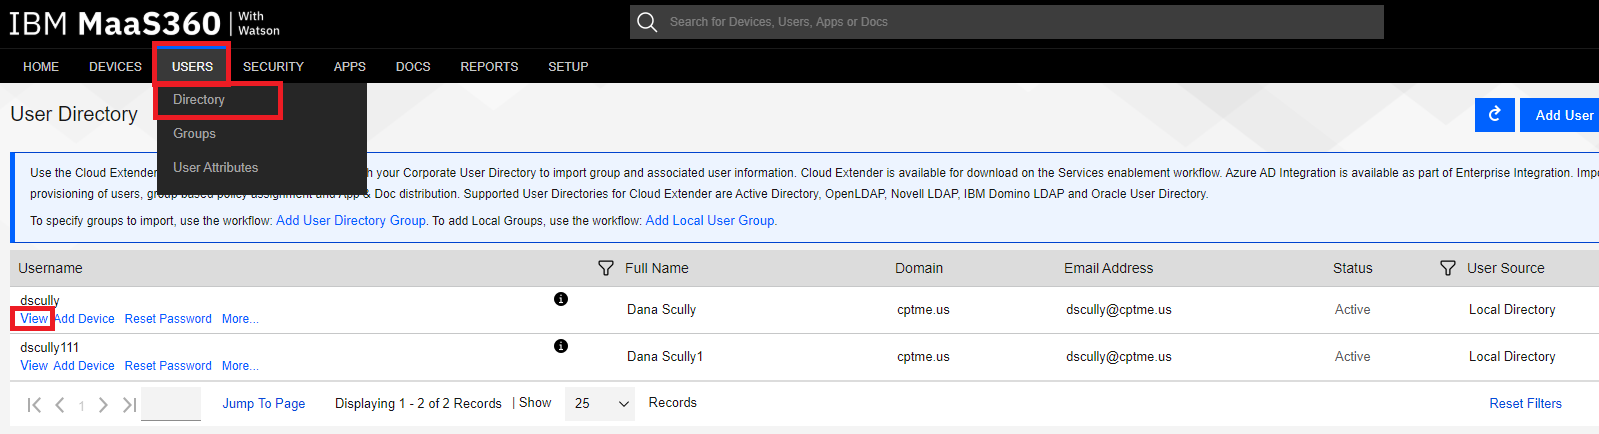
Navigate to Users > Directory, scroll to the user you want to add to a user group, and click the View link.
-
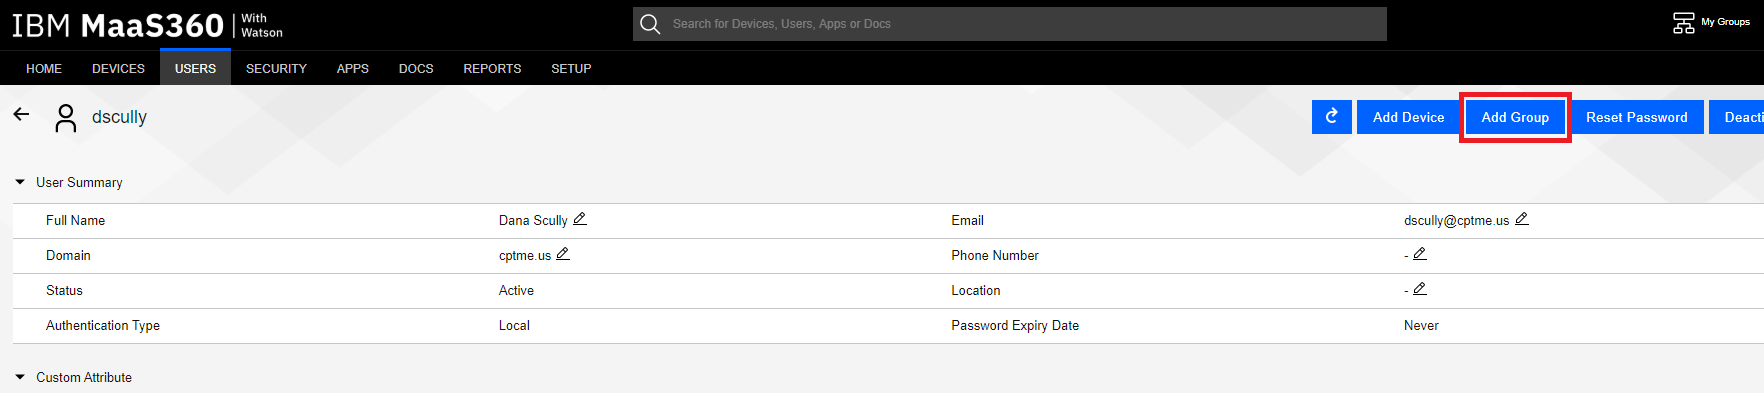
Click the Add Group button.
-
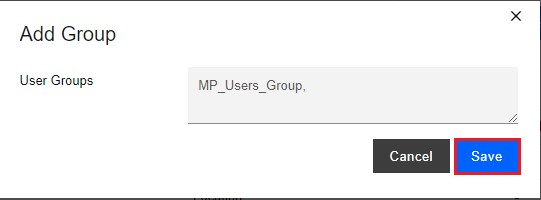
In the Add Group pop-up window, start typing the User Group you want to add the user to and select the appropriate group from the list, in our example “MP_Users_Group”.
-
Click the Save button.
-
Enter in your admin password, and click the Confirm button.
The User is now part of the User Group.
Adding a New User to an Existing User Group
Adding a new user to an existing user group is similar to the procedure in section Adding a User.
-
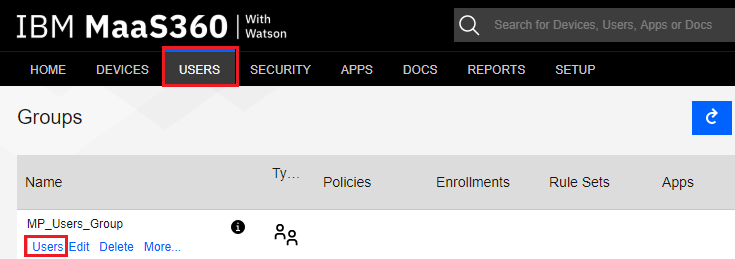
Navigate to Users > Groups, under the User Group you created in section Creating a User Groups, in this example “MP_Users_Group” click the Users link.
-
Click the Add User button.

-
On the Add User pop-up window Basic tab, fill in all the required (*) fields with the relevant information, for example:
-
Enter the user group name in the Users Groups field, in this example - “MP_Users_Group”
|
|
Note - You can add a new device at this point by following the instructions in the next section, or you can click the Save button now and add a new device later using the instructions in the section Adding a Device to an Existing User. |
Adding a Device While Adding the User
-
To add a new device to this new user, select Add New Device check box, and select the Notify User method.
-
On the Add User pop-up window, click the Advanced tab.
-
On the Advanced tab, under Platform & UEM Policy, select iOS or Android, and under the Device Ownership select Corporate or Employee Owned.
-
Click the Save button.
The system pops-up a success message with the enrollment details sent to the user.
-
Click the OK button.
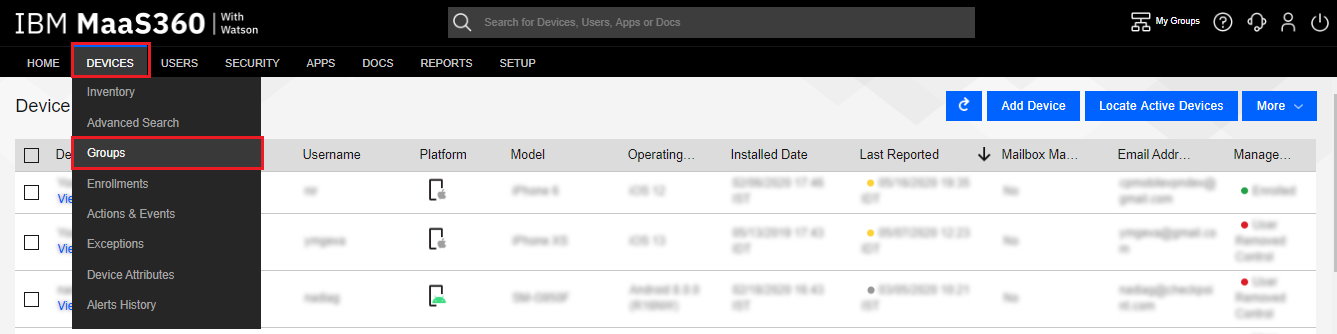
Creating a Device Provisioning Group
A device provisioning group is used to tie devices, apps, and app configurations together for deployment. Maas360 calls a device provisioning group a “device group”. This group is used in the Harmony Mobile Protect app deployment process discussed in section Configuring UEM to Deploy Harmony Mobile Protect app.
Creating a Simple Device Provisioning Group
-
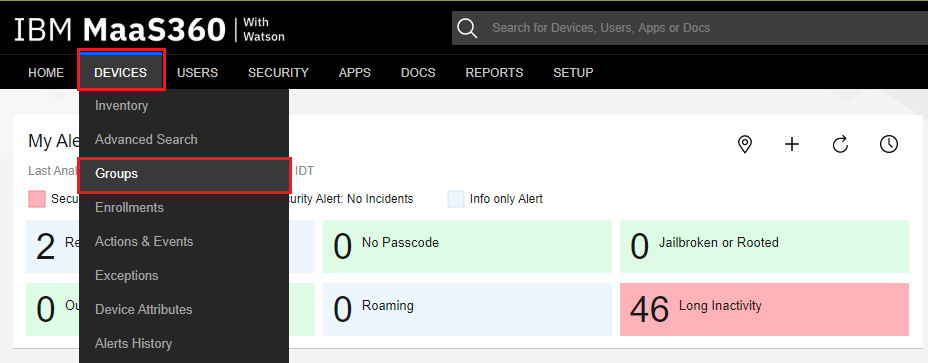
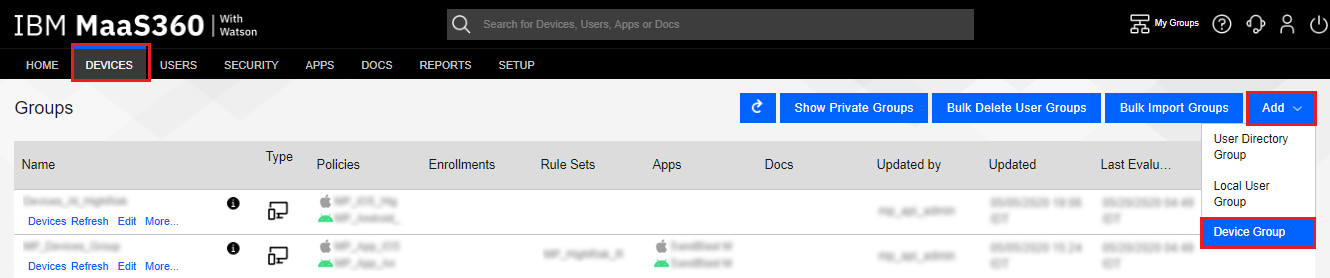
Navigate to Devices > Groups.
-
Click the Add drop-down button, and select Device Group.
-
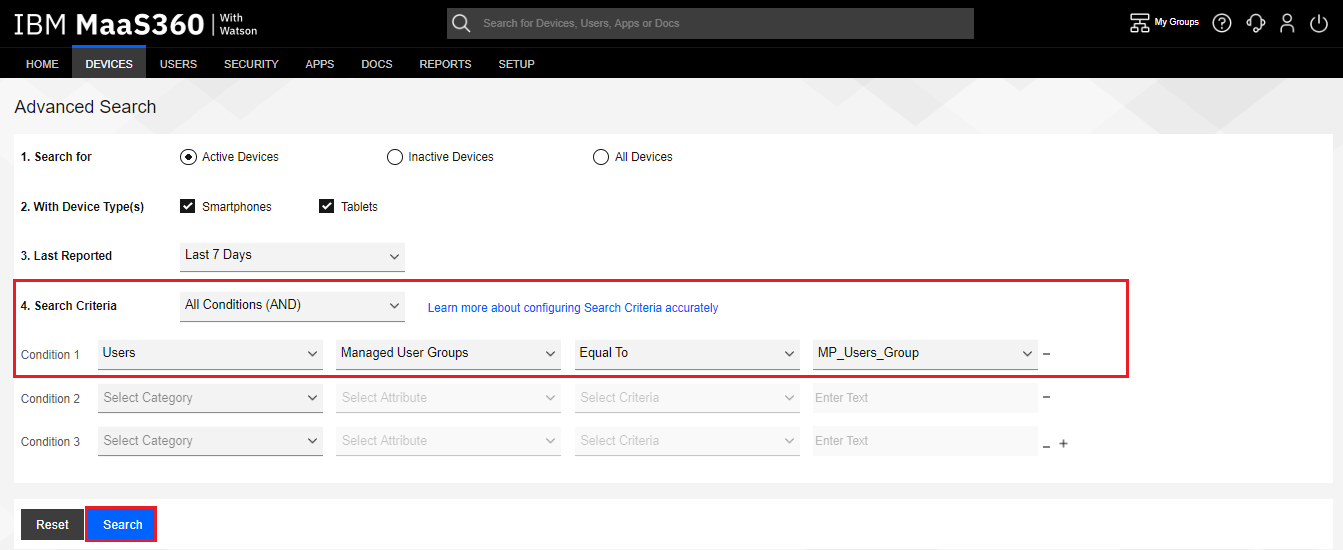
On the Advanced Search screen, build a query that groups all devices matching the criteria into the device group.
In this example, in Condition 1 we group all the devices assigned to all Users in the Managed User Groups that are “Equal To” the User Group we created in the previous section, in this example “MP_Users_Group”.
-
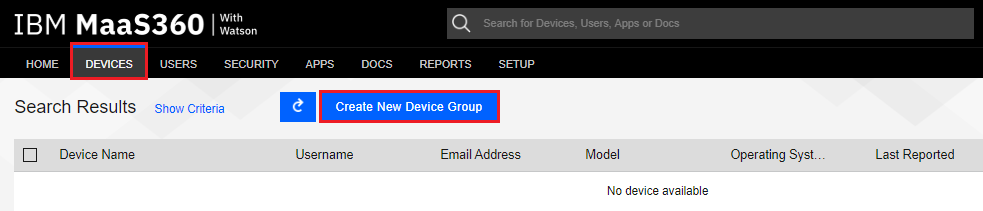
Click the Search button.
-
Click the Create New Device Group button.
-
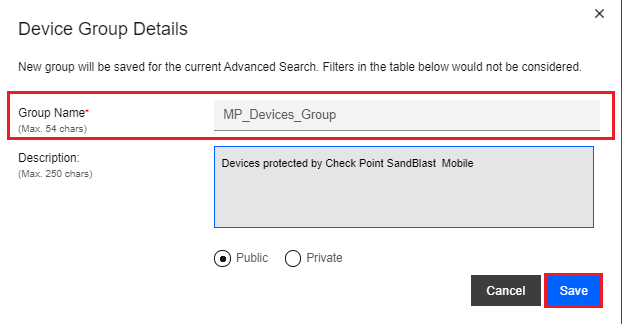
On the Device Group Details pop-up window, enter a Group Name, such as “MP_Devices_Group”, and optionally, a Description.
-
Click the Save button.
Creating a Specific Device Provisioning Group
-
Navigate to Devices > Groups.
-
Click the Add drop-down button, and select Device Group.
-
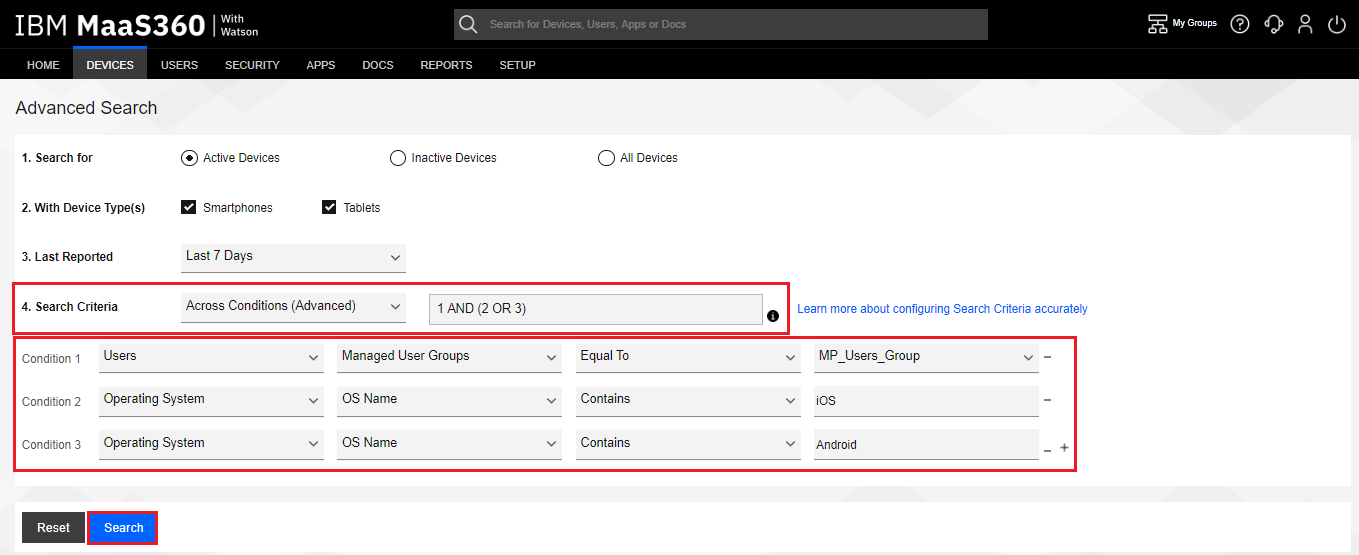
On the Advanced Search screen, build a query that group all the devices matching the criteria into the device group. In this example, we chose the following Conditions:
-
Change the Search Criteria to Across Conditions (Advanced) with the formula of 1 AND (2 OR 3)
-
Users > Managed User Groups > Equal To > MP_Users_Group
-
Operating System > OS Name > Contains > iOS
-
Operating System > OS Name > Contains > Android
-
-
These criteria matches all iOS or Android devices belonging to the users that belong to the user group “MP_Users_Group”.
-
Click the Search button.
-
Click the Create New Device Group button.
-
On the Device Group Details pop-up window, enter a Group Name, such as “MP_Devices_Group”, and optionally, a Description.
-
Click the Save button.
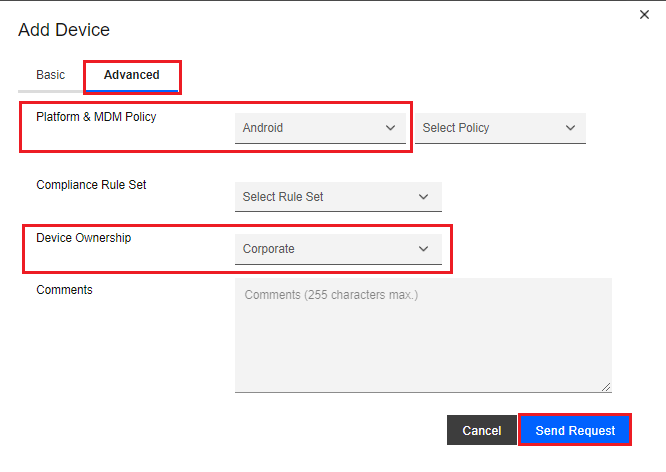
Adding a Device to an Existing User
-
You can add a device to an existing user by navigating to Users > Directory.

-
Scroll to or search for the user to add a device to, and click the Add Device link.

-
On the Add Device pop-up window Basic tab, select the Notify User method.
-
Click the Advanced tab.
-
On the Add Device pop-up window Advanced tab, under Platform & UEM Policy select iOS or Android, and under Device Ownership select Corporate or Employee Owned.
-
Click the Send Request button.
-
Enter in your admin password and click Confirm button.
-
The system pops-up a success message with the enrollment details sent to the user.
-
Click the OK button.
|
|
Note - Repeat these steps to add another device. |
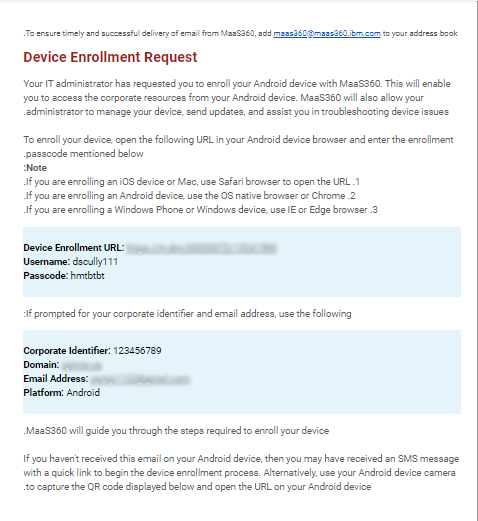
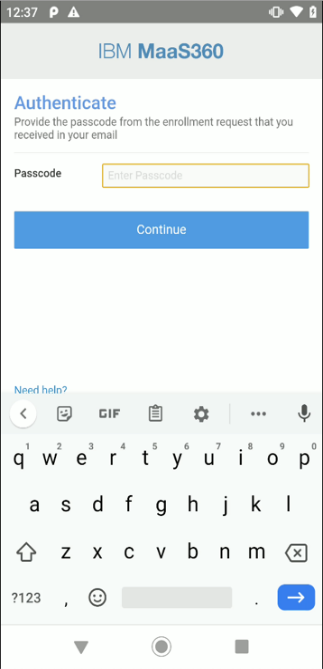
Enrolling an iOS Device to MaaS360
-
The user receive an enrollment email from the MaaS360 system.
-
Open the Device Enrollment URL link in your device’s browser.
-
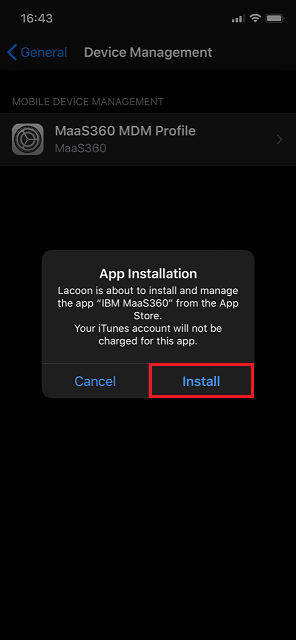
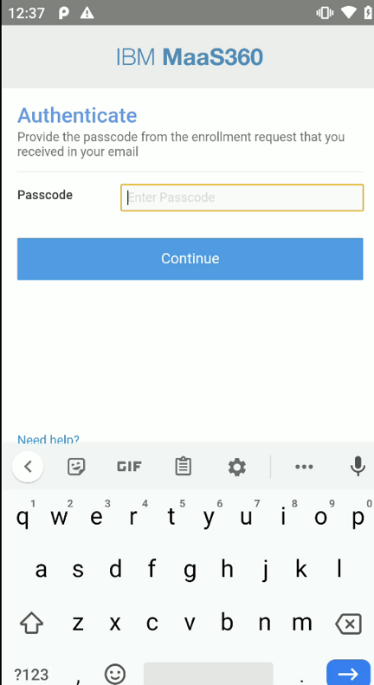
You are prompted to enter the passcode you received in the Device Enrollment Request email. Tap the Install button.
-
You are prompted to continue with the steps by tapping the Continue button.
-
To accept the “Terms of Use”, select the “I have read and accept the terms” check box, and tap the Continue button.
-
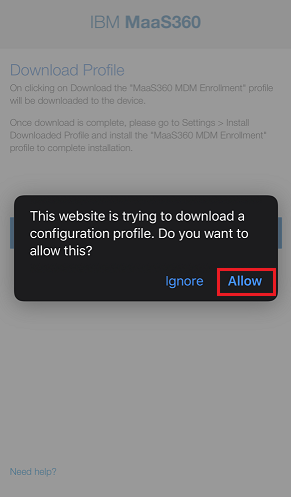
To continue with the MaaS360 UEM
Unified Endpoint Management. An architecture and approach that controls different types of devices such as computers, smartphones and IoT devices from a centralized command point. profile installation download the profile.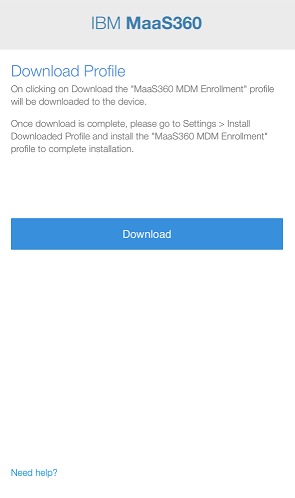
-
Tap Allow through this procedure.
-
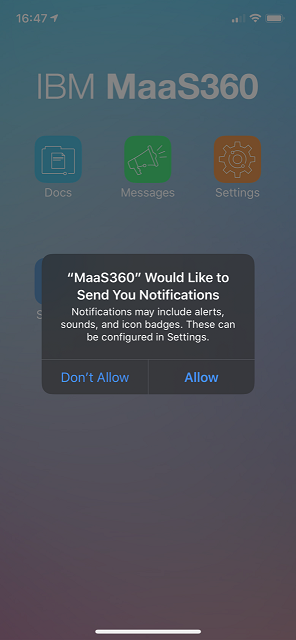
Once the profile is installed, you are prompted to install the MaaS360 app.
-
After the Maas360 app is installed, you must launch the app and Agree and Continue the enrollment process.
-
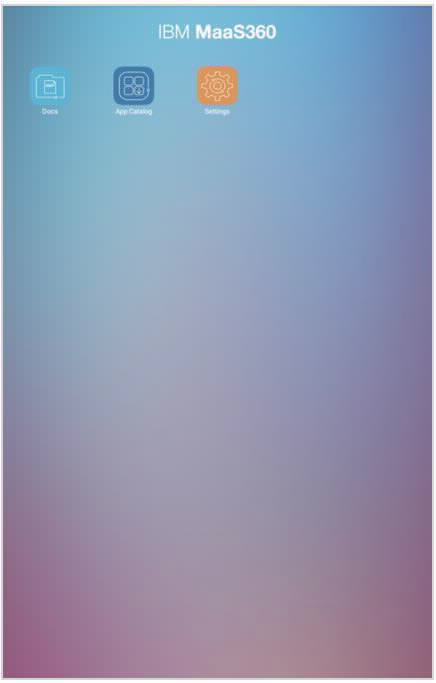
The device is successfully enrolled to the MaaS360 system.
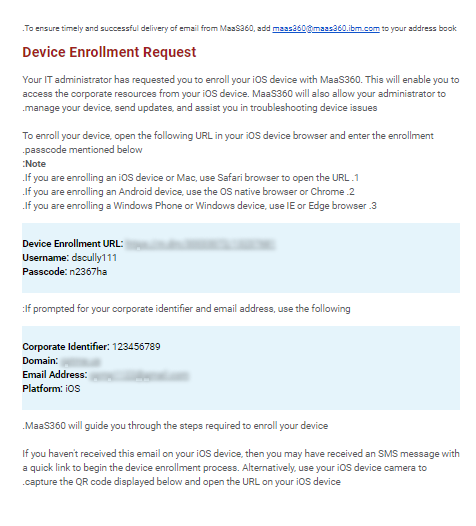
Enrolling an Android Device to MaaS360
-
The user receive an enrollment email from the MaaS360 system.
-
Open the MaaS360 link in your device’s browser. you are prompted to go to the Google Play Store to download/install the MaaS360 app.
-
Once the MaaS360 app is installed, launch the app to continue the enrollment process.
-
You are prompted for the Corporate Identifier as provided in the email and your email address.
-
Accept the Terms of Use, and Activate the MaaS360 app to be a device administrator.
-
After the setup is finished, the device is successfully enrolled to the MaaS360 system.
Creating a Mitigation Process
In this procedure, you create a mitigation label that the Mobile Security Dashboard use to label a device at High Risk as determined by the Mobile Security Analysis. This label lets the MaaS360 system to identify which devices are at High Risk and to enforce configured compliance and mitigation policies against those devices.
Creating a Mitigation Label
In MaaS360 the mitigation label is called a custom device attribute. This section describes how to create the custom device attribute. The next section Creating a Device Mitigation Group uses this custom attribute to create a device mitigation group on which compliance and mitigation policies can be applied.
-
Navigate to Devices > Device Attributes.
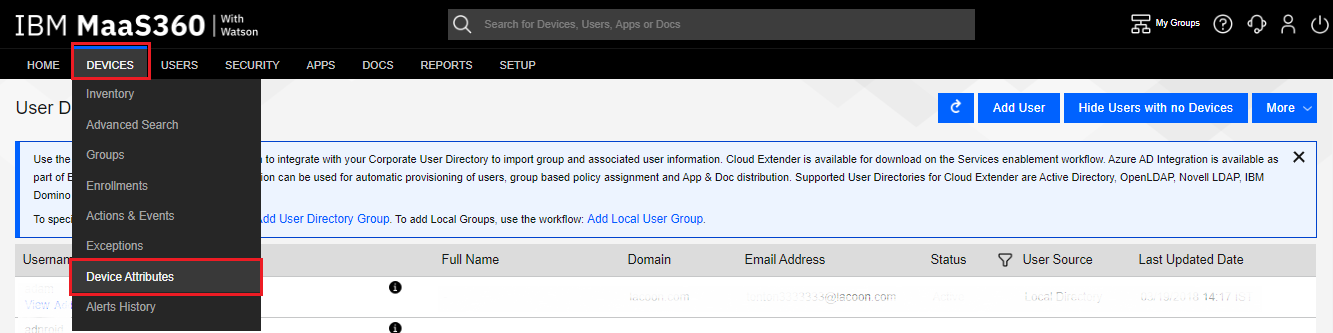
-
Click the Manage Custom Attributes button.

-
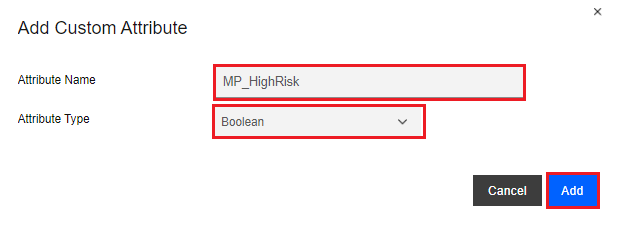
Click the Add Custom Attribute button.

-
On the Add Custom Attribute pop-up window, enter the Attribute Name, such as “MP_HighRisk”, with an Attribute Type of “Boolean”.
-
Click the Add button.
-
Enter in your admin password and click the Confirm button.
Creating a Device Mitigation Group
Now that you have a mitigation label (“MP_HighRisk”), you create a Device Mitigation Group (device group) based on this custom attribute.
We will name the device mitigation group “Devices_At_HighRisk” for this example. This group contains all the devices in which the custom attribute, for our example “MP_HighRisk”, is set to “Yes”.
-
Navigating to Devices > Groups.
-
Click the Add drop-down button, and select Device Group.
-
On the Advanced Search screen, configure the following settings:
-
On the Search Criteria set "All Conditions (AND)".
-
On the Condition 1 set "Custom Attributes" and ''MP_HighRisk'', ''Equal To'' and ''Yes''.
-
-
Click the Search button.

-
Click the Create New Device Group button.
-
On the Devices Group Details pop-up window, enter the Group Name, such as in our example “Devices_At_HighRisk”, and optionally, a Description.
-
Click Save.

Creating Compliance Policies
Now that you have a Device Mitigation Group, you can create Compliance Policies enforced on devices at High Risk using the Mitigation Label. In this section, you will create Security Policies![]() Collection of rules that control network traffic and enforce organization guidelines for data protection and access to resources with packet inspection. and Compliance Rules that are used to enforce these actions.
Collection of rules that control network traffic and enforce organization guidelines for data protection and access to resources with packet inspection. and Compliance Rules that are used to enforce these actions.
|
|
Note - We will show a couple of different compliance policies, but these enforcement policies are something that the customer should create for their environment and needs. In a production environment, the customer should configure the compliance policies according to their internal security policy. |
Security Policy (Examples)
Creating Compliance Actions for iOS Devices (Policy)
The policy specifies the actions taken on High Risk iOS devices. We will disable the camera and screen captures in our example, but you might create a policy that disables access to the corporate network or assets.
-
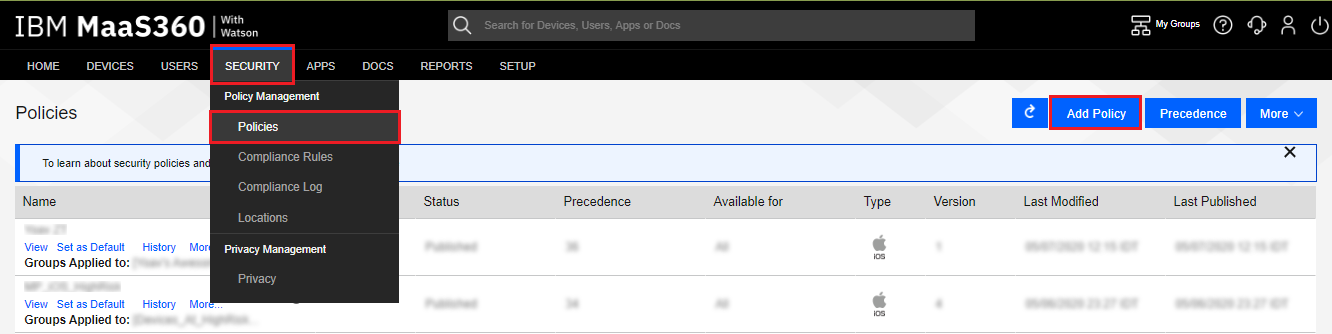
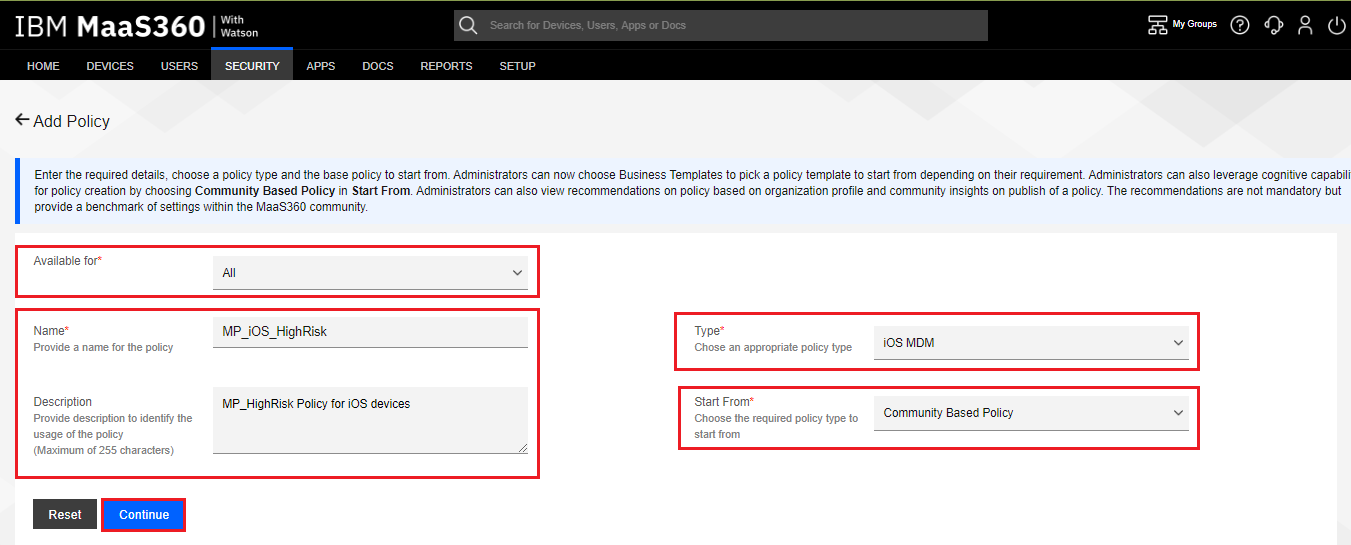
Navigate to Security > Policies, and click the Add Policy button.
-
Make the policy available for All.
-
Enter a Name for the policy, such as “MP_iOS_HighRisk”, and if desired, a description.
-
Select a Type of iOS UEM.
-
Select Start From equal to Community Based Policy.
-
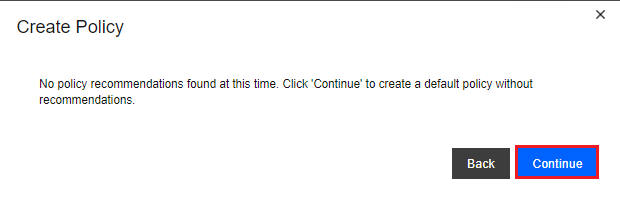
Click the Continue button.
-
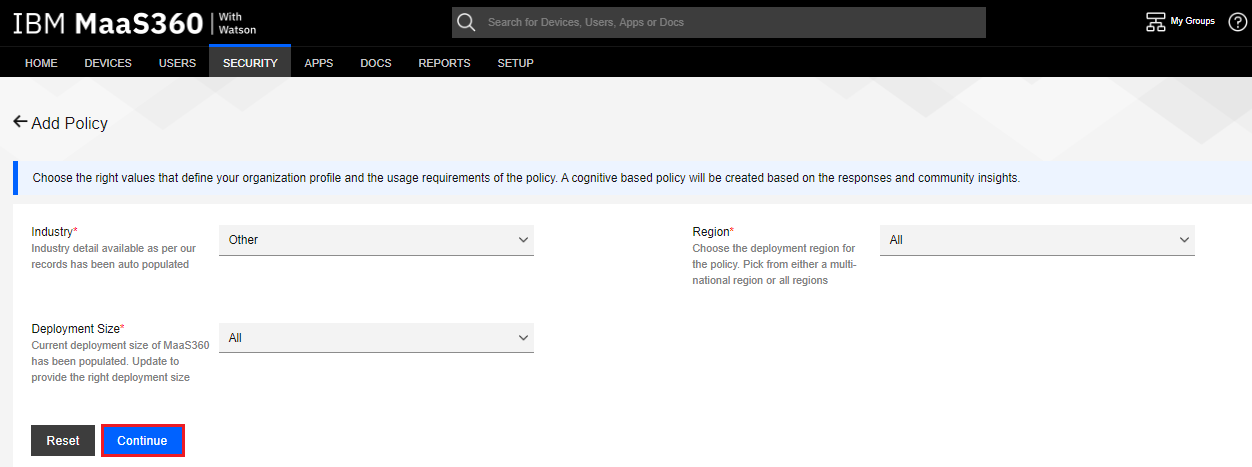
Select the Industry, Deployment Size and Region according to organization profile.
-
Click the Continue button.
-
Click the Continue button.
-
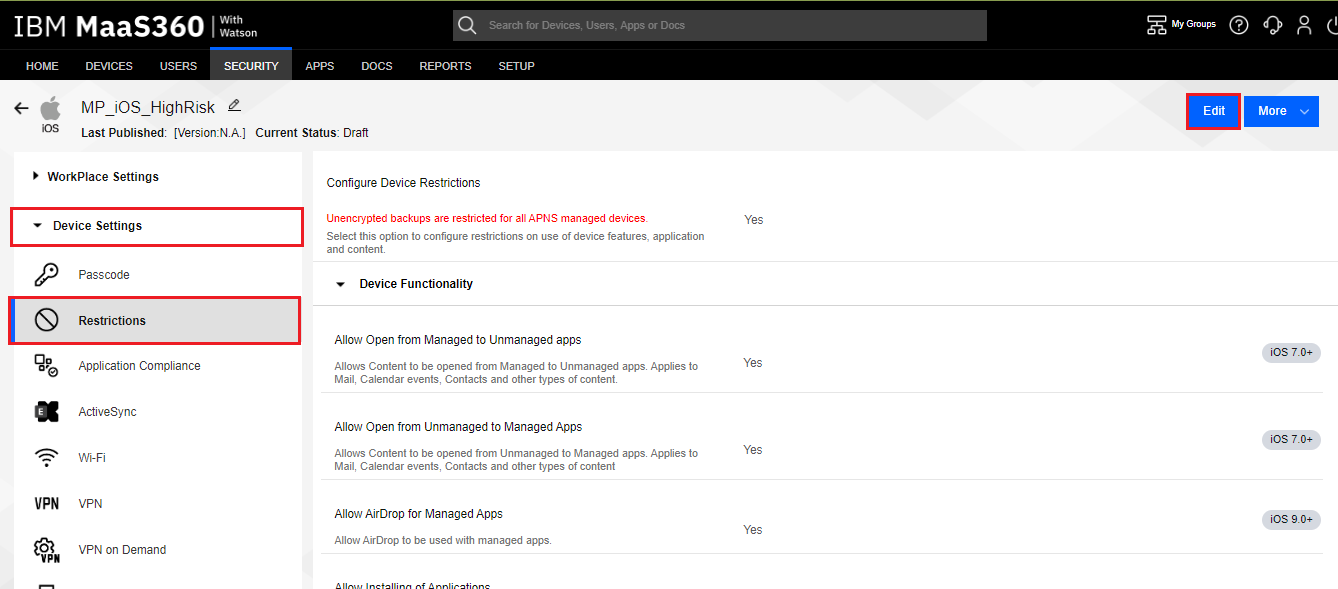
On the menu to the left select Device Settings pane. There are several options for policy sets, such as “Passcode'', ''Restrictions'', ''Application Compliance'', etc. We will make our modifications in the ''Restrictions'' section.
-
Select the Restrictions tab.
-
Click the Edit button.
-
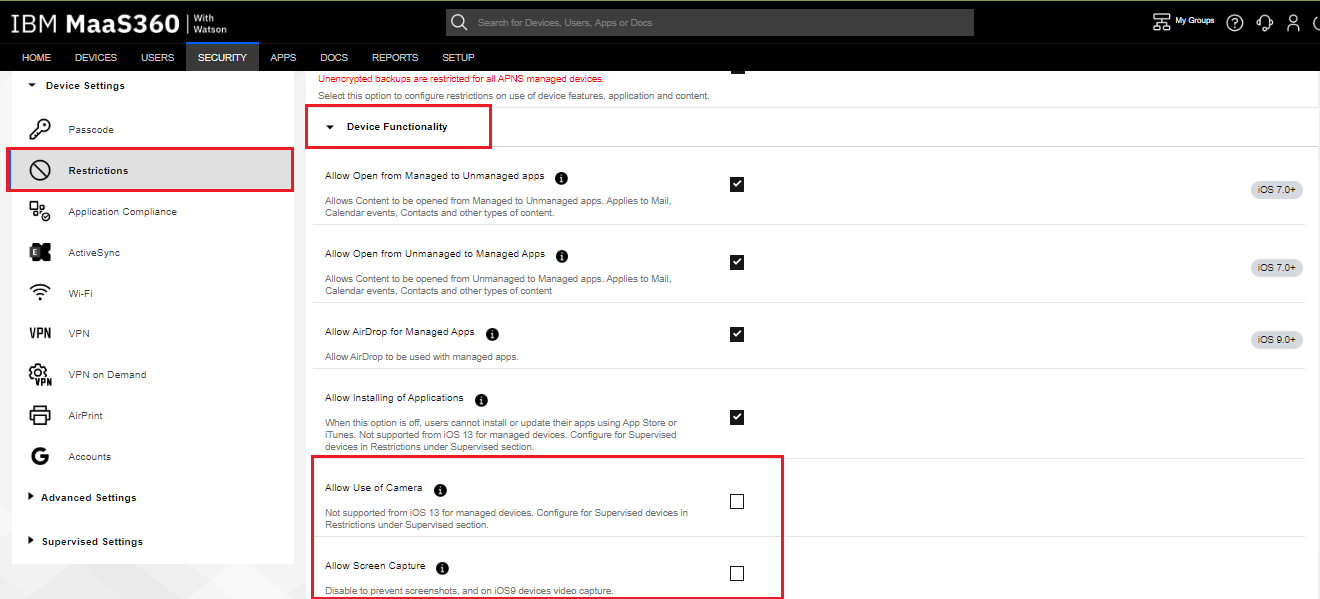
Under the Restrictions > Device Functionality section, un-select Allow Use of Camera and Allow Screen Capture.
-
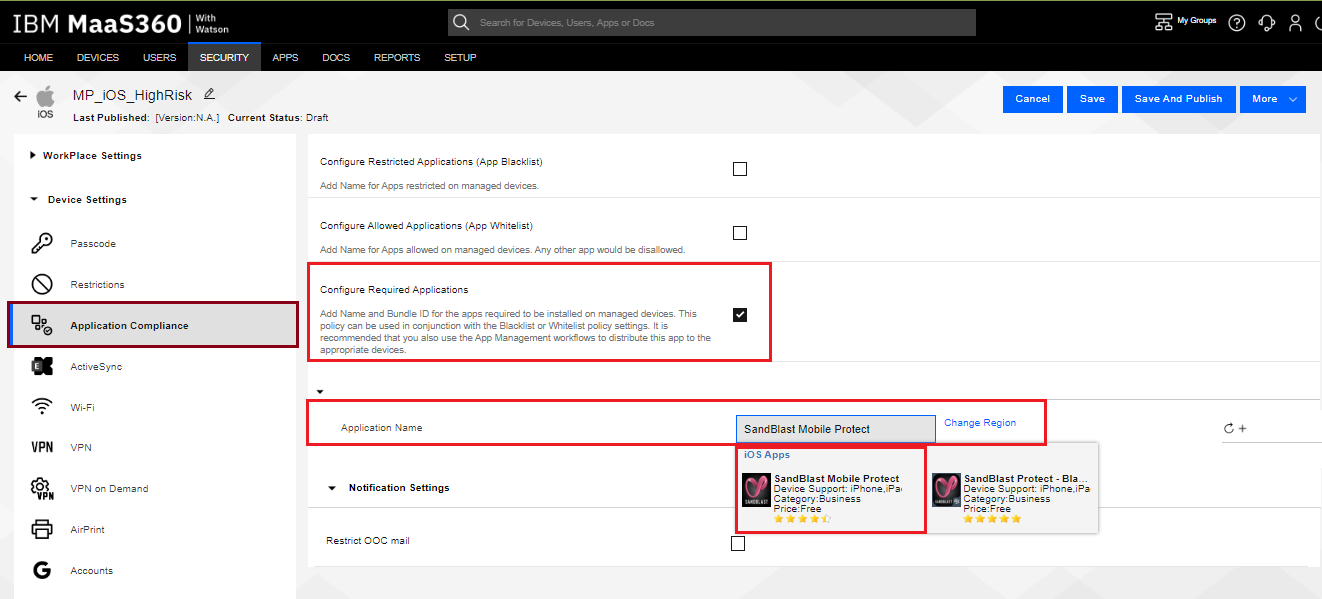
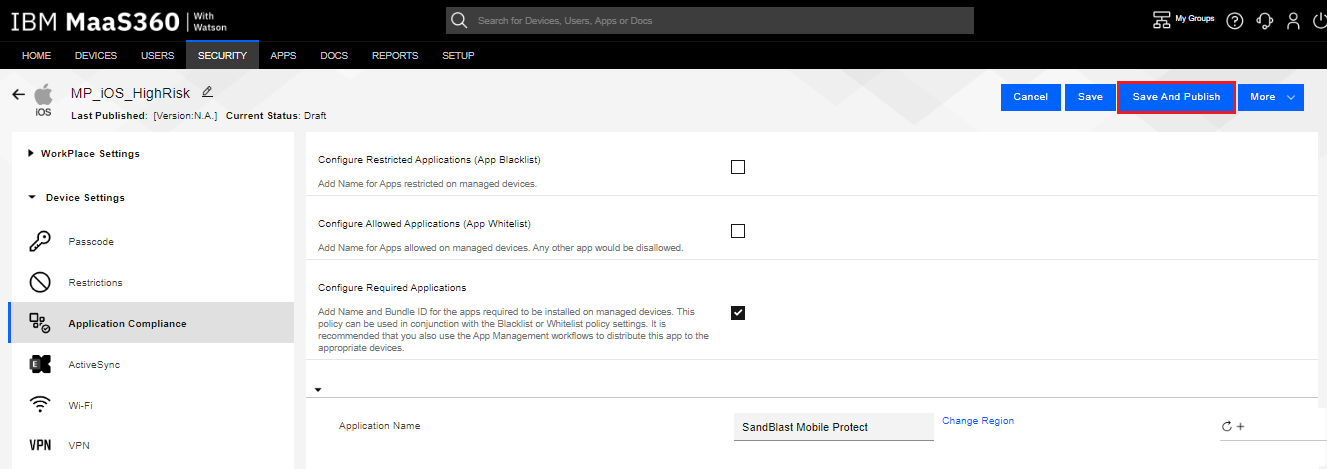
Under the Application Compliance section, select Configure Required Applications.
-
In the Application Name field, start typing “Mobile Security Protect” and the app will pop-up, select Mobile Security Protect.
-
Click the Save and Publish button.
-
Click the Continue button.

-
Enter in your admin password and click the Confirm button.
Creating Compliance Actions for Android Devices (Policy)
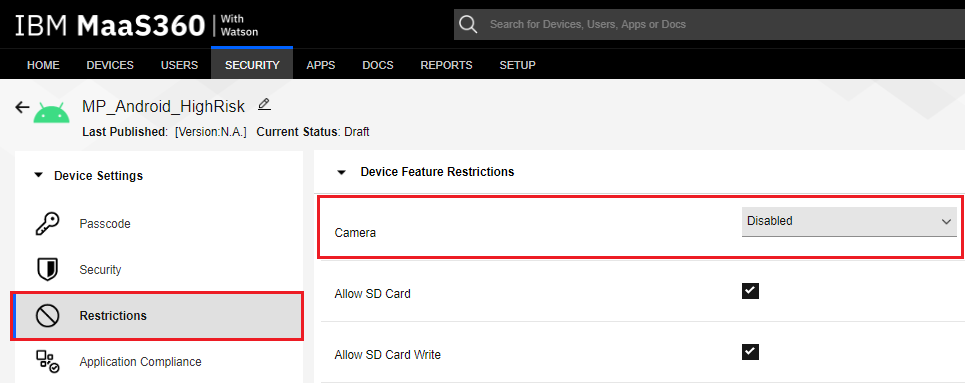
The policy specifies the actions taken on High Risk Android devices. In our example, we disable the camera and screen captures, but you might create a policy that disables access to the corporate network or assets.
-
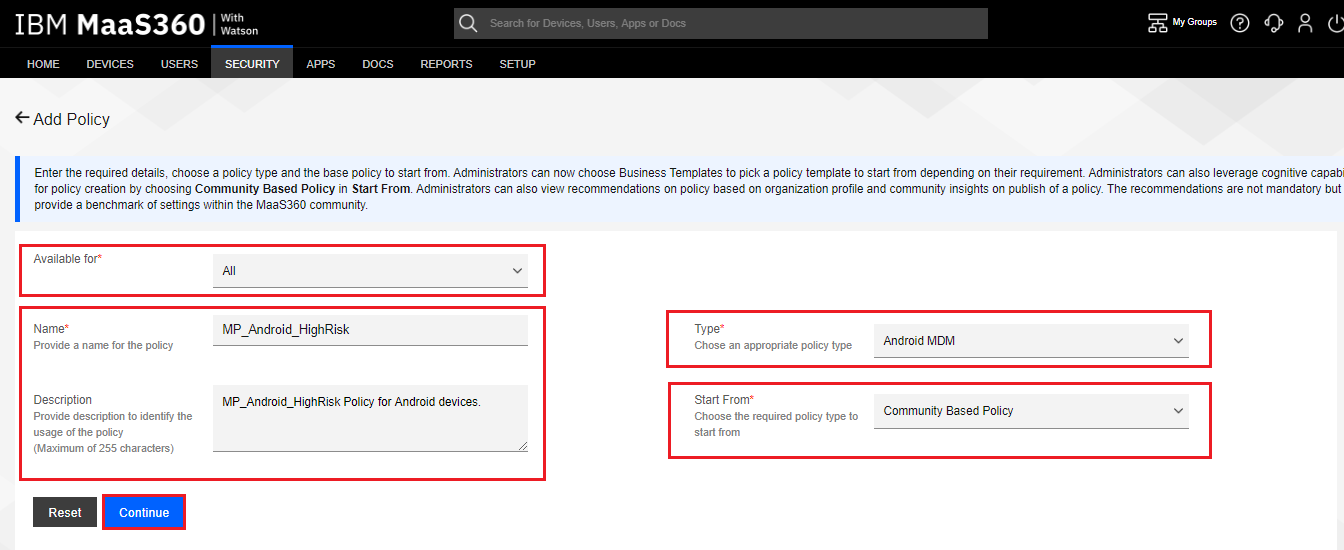
Navigate to Security > Policies, and click the Add Policy button.
-
Make the policy available for All.
-
Enter a Name for the policy, such as “MP_Android_HighRisk”.
-
Select a Type of Android UEM, and select Start From equal to Community Based Policy.
-
Click the Continue button.
-
Select the Industry, Deployment Size and Region according to organization profile.
-
Click the Continue button.
-
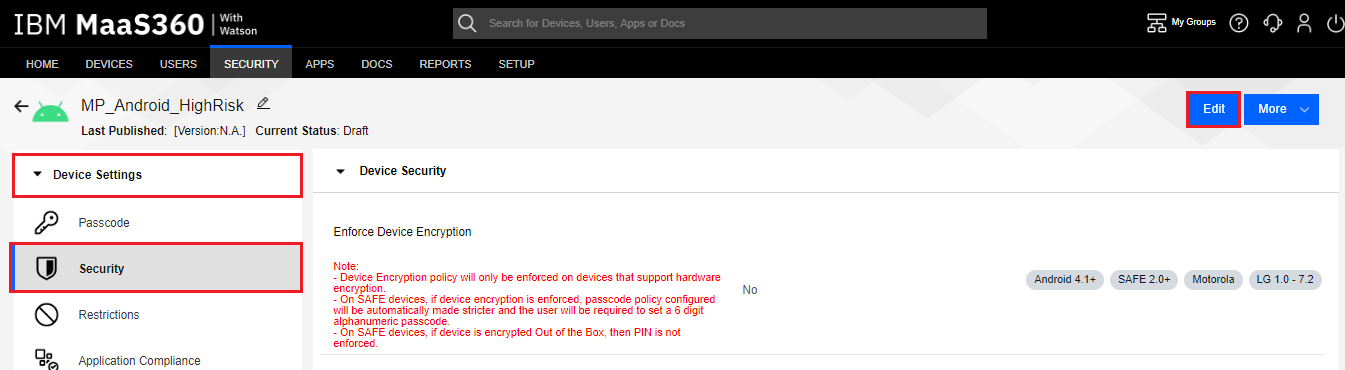
On the menu to the left select Device Settings pane. There are several options for policy sets, such as “Passcode'', ''Security'', ''Application Compliance'', etc. We make our modifications in the ''Security'' section.
-
Click the Edit button.
-
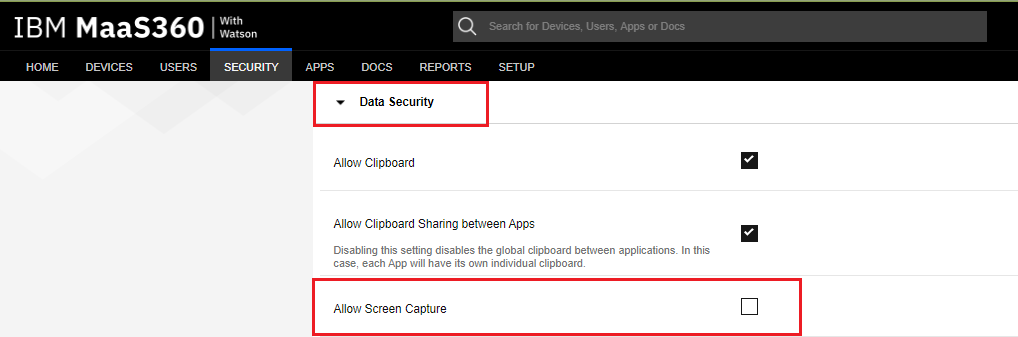
Under the Security > Data Security section, clear the Allow Screen Capture check box.
-
Select the Restrictions tab.
-
Under the Restrictions > Device Feature Restrictions section, change Camera to Disabled.
-
Select the Application Compliance tab.
-
Under the Application Compliance section, select Configure Required Applications.
-
In the Application Name field, enter Mobile Security Protect
-
In the Application ID field, enter com.lacoon.security.fox.

-
-
Click the Save And Publish button.

-
Click the Continue button.
-
Enter in your admin password and click the Confirm button.
Creating Security Compliance Rule (Enforcement)
This compliance rule![]() Set of traffic parameters and other conditions in a Rule Base (Security Policy) that cause specified actions to be taken for a communication session. is used to enforce the policies created in the previous section.
Set of traffic parameters and other conditions in a Rule Base (Security Policy) that cause specified actions to be taken for a communication session. is used to enforce the policies created in the previous section.
-
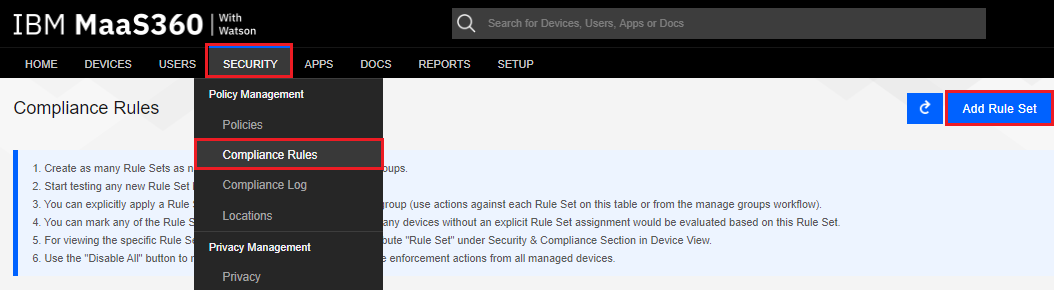
Navigate to Security > Compliance Rules, and click the Add Rule Set button.
-
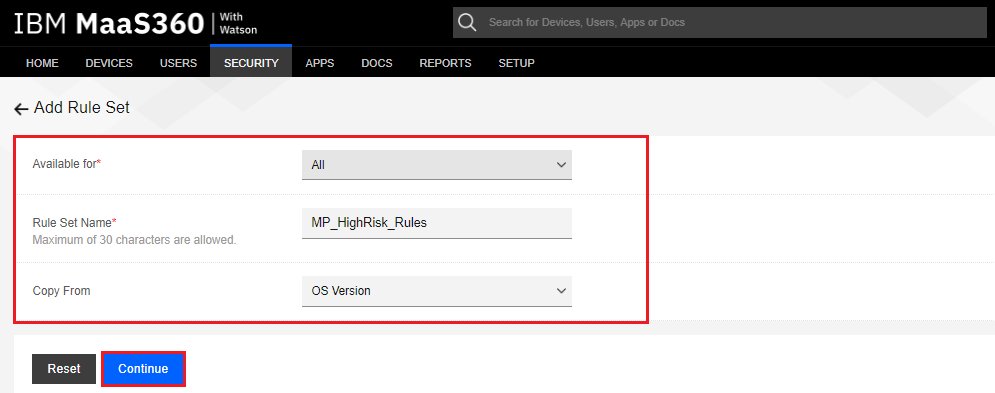
Make the rule available for the desired group.
-
Enter in a Rule Set Name, such as “MP_HighRisk_Rules”, and if desired to ''Copy From'' an existing rule, such as “OS Version”.
-
Click the Continue button.
-
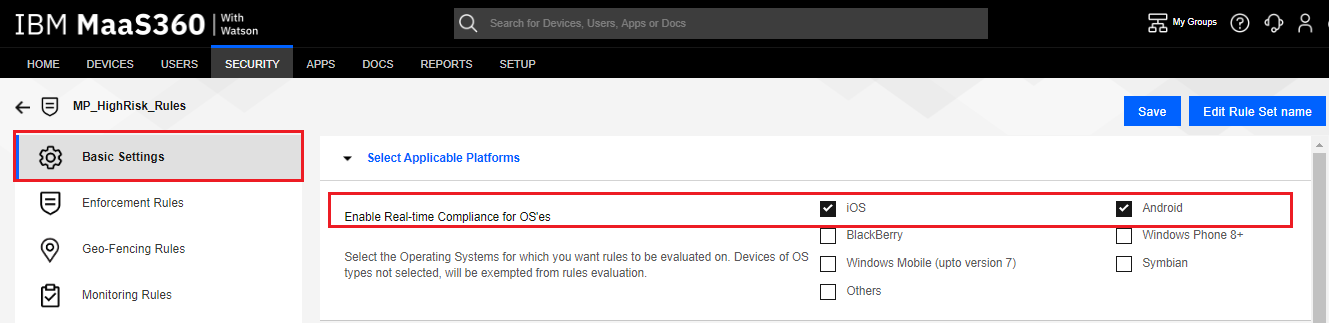
Because Mobile Security supports iOS and Android only, under Basic Settings > Select Applicable Platforms section, clear all OS’es other than iOS and Android check boxes.
-
Select Group Based Rules tab, and click the Add a New Rule button.
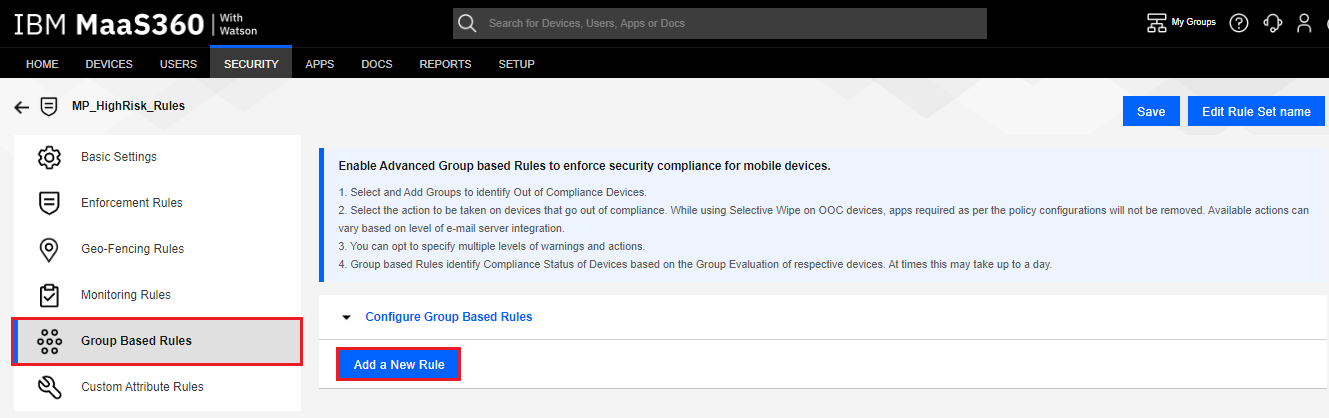
-
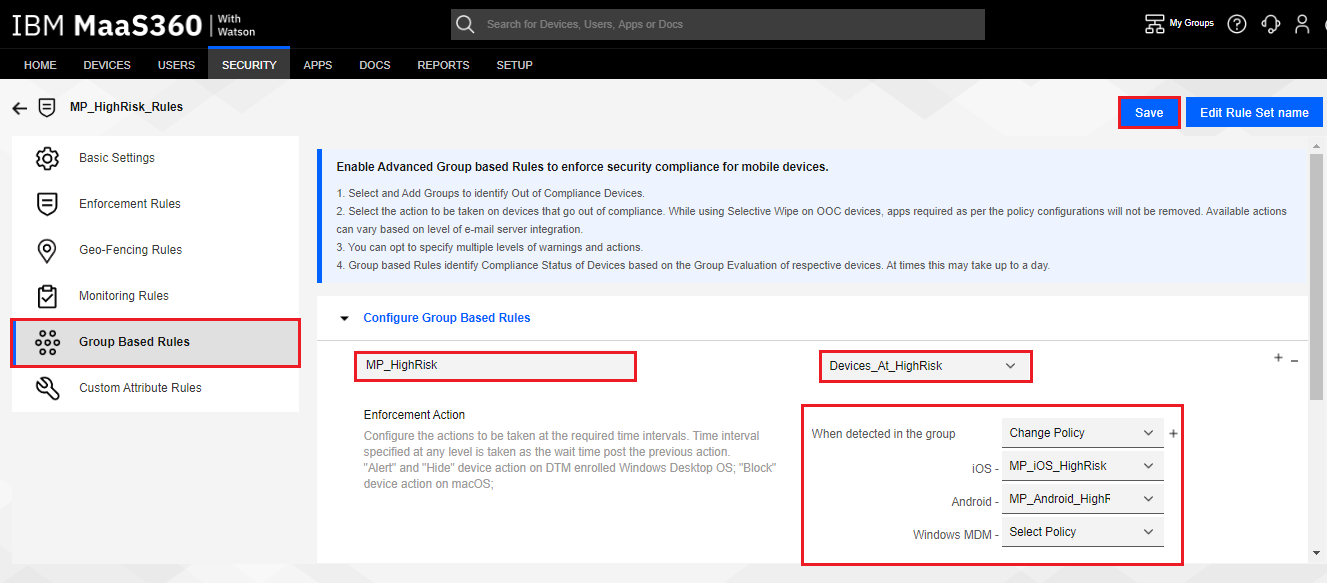
Enter in a Name, such as “MP_HighRisk”, select the Device Mitigation Group you created in section Creating a Device Mitigation Group to put all your Mobile Security Devices into, in our example “Devices_At_HighRisk”.
-
Under Enforcement Action section, the first action When detected in the group is already set to Alert. Change Alert to Change Policy action. This will create additional fields for setting the policies to enforce on iOS, Android, and Windows Phone.
-
Set iOS policy to the compliance policy you created in Section Creating Compliance Actions for iOS Devices (Policy), in our example “MP_iOS_HighRisk”.
-
Set Android policy to the compliance policy you created in Section Creating Compliance Actions for Android Devices (Policy), in our example “MP_Android_HighRisk”.
-
-
Click the Save button.
-
Enter in your admin password, and then click the Continue button.
Applying the Compliance Policy to the Device Provisioning Group
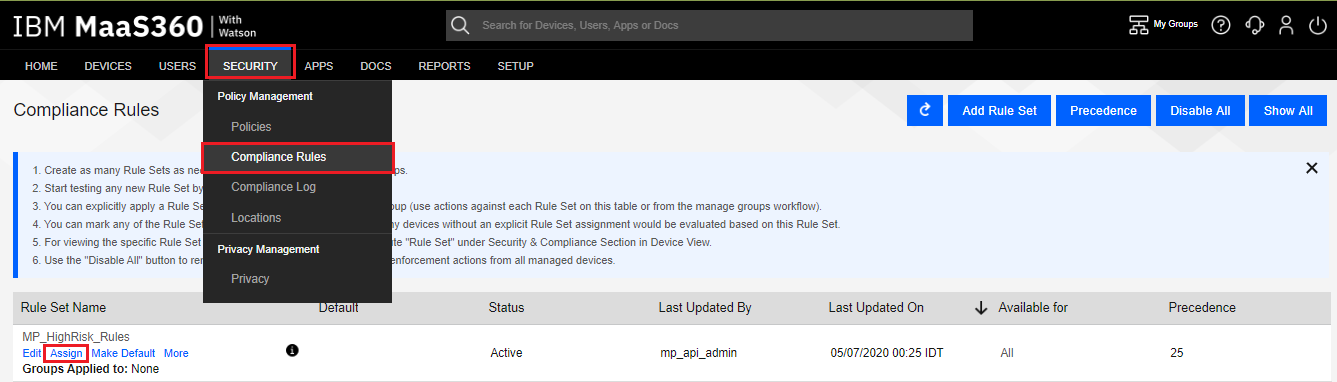
Now that you created the compliance rule (“MP_HighRisk_Rules”) you want to enforce, you need to link those rules to your Device Provisioning Group (“MP_Devices_Group”) created in Section Creating a Device Provisioning Group.
-
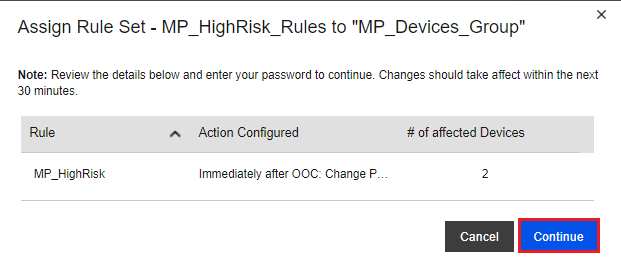
Navigate to Security > Compliance Rules, find the rule you created in section Creating Security Compliance Rule (Enforcement), our example is “MP_HighRisk_Rules”, and click the Assign link.
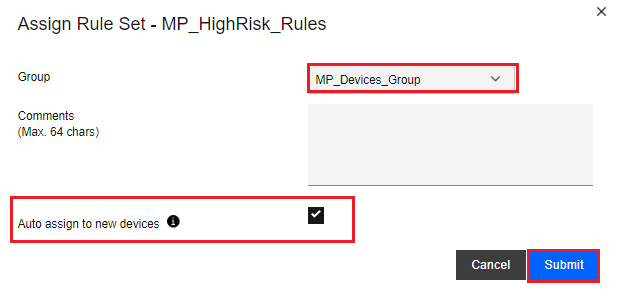
-
On the Assign Rule Set pop-up window, select the Device Provisioning Group you created in section Creating a Device Provisioning Group, in our example “MP_Devices_Group”.
-
Click the Submit button.
-
Click the Continue button.
-
Type your admin password, and then click the Continue button.
|
|
Note - Now any device in the Device Provisioning Group (“MP_Devices_Group”) that has their custom attribute (“MP_HighRisk”) set to “Yes” by the Mobile Security system will be placed in the Device Mitigation Group (“Devices_At_HighRisk”), which in turn will have the compliance actions in the Compliance Rule (“MP_HighRisk_Rules”) acted upon it.
|
|
|
Note - At this point, you have all the information needed to configure the UEM integration settings in the Mobile Security Dashboard. We are going to do that and then return to the MaaS360 Portal to configure the Harmony Mobile Protect app deployment settings. From Our Examples:
|