General
Authenticated Proxy
If you have a proxy server to authenticate access to a resource:
-
Go to Policy > Client Settings > General > Authenticated Proxy.
-
Enter:
-
Proxy - Proxy server address in the format address:host. For example, 192.168.79.157:3128
-
Username - User name for the proxy server.
-
Password - Password for the proxy server.
-
-
Click Save.
Sharing Data with Check Point
Clients can share information about detected infections and bots with Check Point.
The information goes to ThreatCloud, a Check Point database of security intelligence that is dynamically updated using a worldwide network of threat sensors.
ThreatCloud helps to keep Check Point protection up-to-date with real-time information.
|
|
Note - Check Point does not share any private information with third parties. |
To share the data with Check Point ThreatCloud:
-
Go to Policy > Client Settings > General > Sharing Data with Check Point.
-
Enable anonymized telemetry - Select to enable sharing information with Check Point.
Select or clear any of these options:
-
Anonymized forensics reports - Forensics reports include a lot of private identifiable information. This option lets customers anonymize this information.
-
Files related to detection - Select to allow Check Point learn more about the attacks through metadata.
-
Memory dumps related to detections - Select to allow sharing memory dumps from the RAM with Check Point.
-
-
Click Save.
Connection Awareness
Connection Awareness - Connection awareness controls how an endpoint enforces its Connected or Disconnected policy. By default, the client checks connectivity to the Endpoint Management Server![]() Check Point Single-Domain Security Management Server or a Multi-Domain Security Management Server. to determine its connectivity state. Alternatively, the administrator can configure the client's connection status by checking its connectivity to a different network component, for example, a web server or a router, through ICMP packets or HTTP/HTTPS/IPv4 requests. If the client can connect to the network component, then its connection status is Connected. Otherwise, its connection status is Disconnected.
Check Point Single-Domain Security Management Server or a Multi-Domain Security Management Server. to determine its connectivity state. Alternatively, the administrator can configure the client's connection status by checking its connectivity to a different network component, for example, a web server or a router, through ICMP packets or HTTP/HTTPS/IPv4 requests. If the client can connect to the network component, then its connection status is Connected. Otherwise, its connection status is Disconnected.
To configure the connection awareness setting:
-
Go to the Policy > Client Settings > General > Connection Awareness.
The Connection Awareness feature allows the administrator to choose between two options:
-
Connected to management - The client's status is Connected if it is connected to the Endpoint Security Management Servers. This is the default mode.
-
Connected to one of the specified targets - The client's status is Connected if it is connected to the specified target (network component) regardless of its connection to the Endpoint Security Management Servers.
If you do not specify a disconnected policy for these addresses, the user is automatically considered connected.

Note: Connection Awareness determines policy assignment based on a device’s connection to defined network targets, not its online/offline status.
-
-
Click Save.
|
|
Notes:
|
Super-Node
What is a Super Node?
A Super Node is a Windows device running a specially configured Endpoint Security Client with server-like and proxy capabilities. It functions as a light-weight proxy (based on NGINX) that helps reduce bandwidth consumption and supports offline updates, so that only the Super Node requires direct connectivity to the update servers.
By default, a Super Node listens on TCP port 4434 and TCP port 3128 (proxy mode) for client connections. Endpoint clients also use TCP port 4436 (HTTPS) for Super Node proximity calculations.
|
|
Note - Ensure ports 4434 and 4436 are allowed between endpoints and the Super Node under the same firewall rules. If port 4436 is blocked, the Super Node cannot perform proximity calculations. |
Primary Advantages:
-
Reduces site bandwidth usage.
-
Reduces server workload.
-
Reduces customer expense on server equipment, as there is no need for a local appliance.
-
Improved scale.
|
|
Note - Super-Node is available in both Domain and Workgroup environments. |
A Super Node is a Windows device running a specially configured Endpoint Security Client that also consists of server-like and proxy-like capabilities, and which listens on port 4434 and port 3128 to proxy by default. Super Node is a light-weight proxy (based on NGNIX) that allows admins to reduce their bandwidth consumption and enable offline updates, where only the Super Node needs connectivity to the update servers.
Super Node Workflow
When a device is assigned as a super node and has the supported blades installed, it downloads signatures from the sources defined in the policy and stores a local copy. This local copy serves as the signature source for other Endpoint Security Clients.
When an Endpoint Security Client initiates an update, it follows this process:
-
The Endpoint Security client checks for the latest signatures from a randomly selected super node listed in the Client Settings > General policy.
-
If the update fails with the chosen super node, the Endpoint Security client attempts the update with another super node in the list.
-
If the update fails with all the super nodes listed in the General Client Settings policy, the Endpoint Security client will update directly from the sources specified in the policy.
Primary Advantages:
-
Reduces site bandwidth usage.
-
Reduces server workload.
-
Reduces customer expense on server equipment, as there is no need for a local appliance.
-
Improved scale.
|
|
Notes -
|
Supported Features
|
Endpoint Security Client Version |
Features Supported |
||
|---|---|---|---|
| E85.30 and higher |
|
||
| E85.40 and higher |
|
||
| E86.10 and higher | Downloading client policies and policy changes from super nodes. | ||
| E87.00 and higher |
Endpoint Security Client for macOS and can be configured to create a local mirror of the Anti-Malware signatures which can be used as a signature source for other Endpoint Security clients for macOS. |
||
|
E88.70 and higher |
Super node proxies are supported for offline environment. |
Limitations
-
By default, the cache max size is 4 GB and will automatically purge files after 7 days of inactivity. Files stored for a longer time without access are removed from cache.
-
Super Node requires approximately 350 MB of additional space to operate properly.
To configure a Super Node through the toolbar:
For Management Servers supporting Manage Super Nodes capability:
-
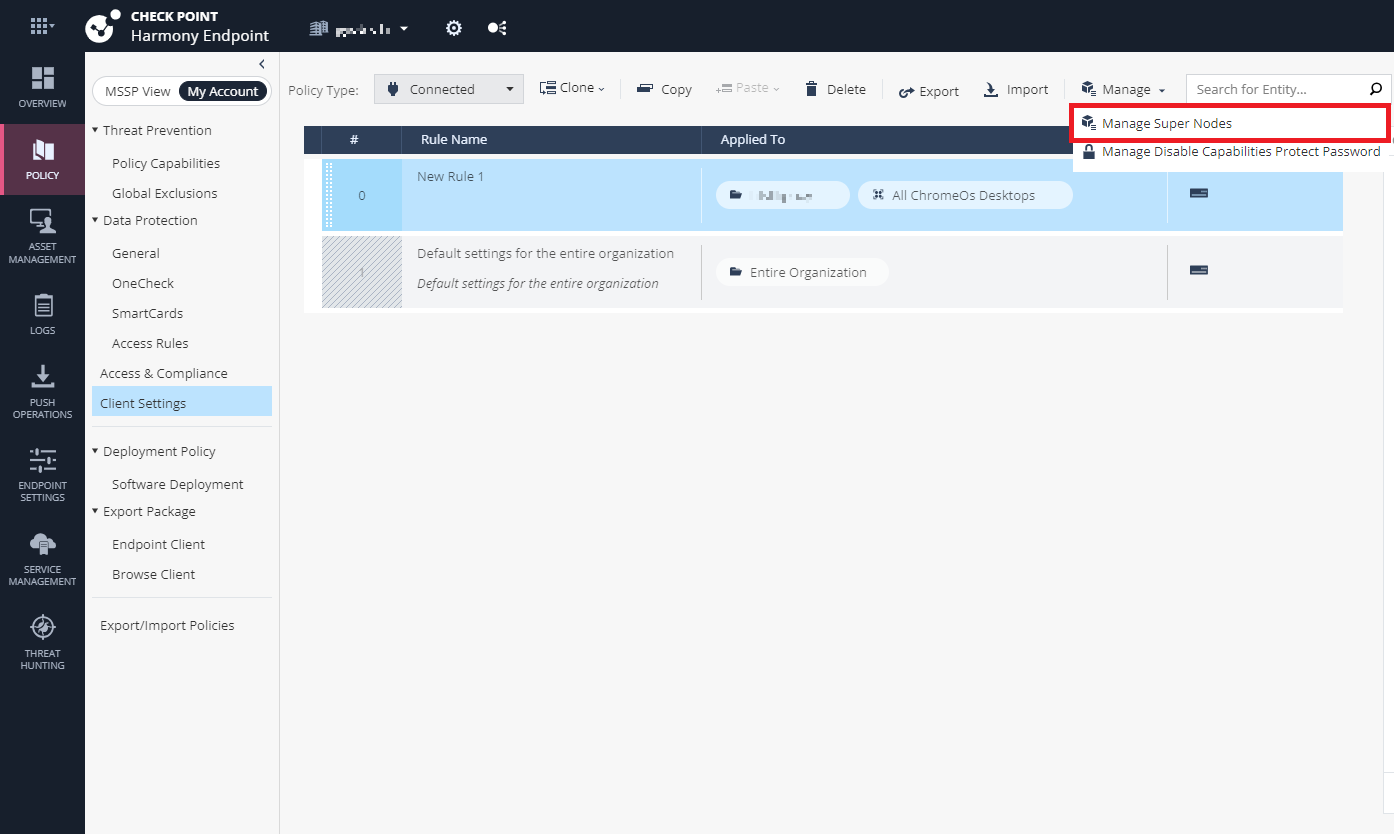
Go to Policy > Client Settings.
-
Configure the Super Node:
-
From the toolbar, click Manage Super Nodes.The Manage Super Nodes page will be displayed.
-
Click the + icon.
-
Select the required devices and click Add.
You can use the search bar to find the required device(s).
The system creates a widget for each device selected as a super node.
-
Click Save.
-
-
Apply the super node to the required policy.
-
Select the relevant policy (Policy > Client Settings).
-
In the Capabilities & Exclusions pane, go to the General tab.

-
Scroll down to the Super Nodes section and click the + icon.
-
Select the devices you want to assign as super nodes and click Add.
-
Click Save & Install.
Note - The system applies the selected super nodes only to the devices (users) selected in the policy.
-
-
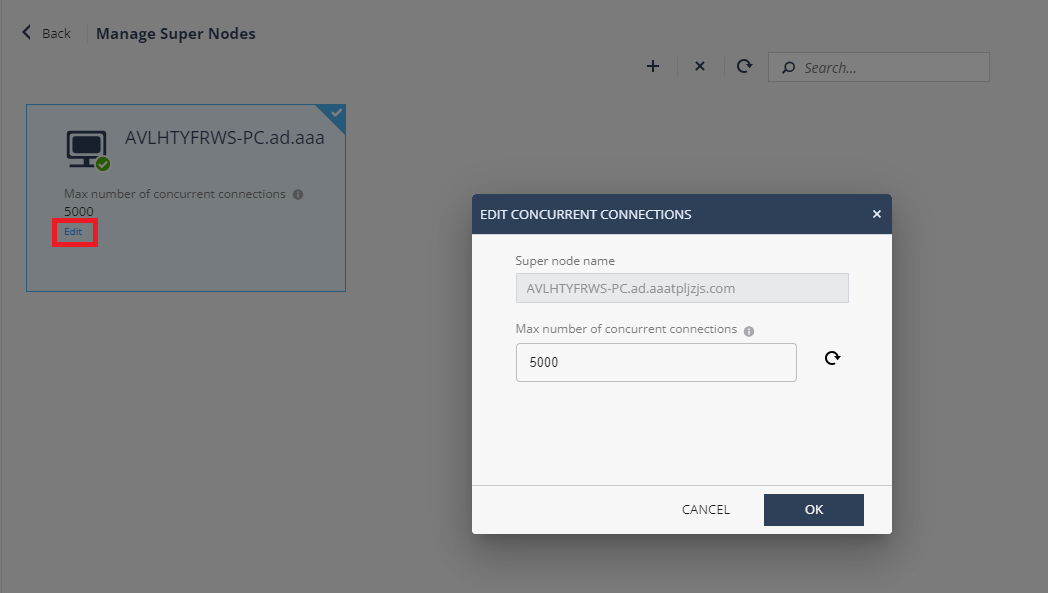
To edit the maximum number of concurrent connections a super node can handle simultaneously:
Notes -
-
This feature is supported only on Endpoint Security Client versions E88.70 and higher.
-
The default value of maximum number of simultaneous connections is 5000.
-
In the super node widget, click Edit.
The Edit Concurrent Connections window is displayed.
-
In the Max number of concurrent connections field, enter the maximum number of concurrent connections the super node can handle.
-
Click OK.
-
-
After selecting the devices
Note - Configuring a device as a Super Node does not require policy installation.
To configure a super node proxy for offline environment:
Super node proxy configuration is available for Endpoint Security client version 88.70 and higher.
|
|
Notes -
|
-
After installing Endpoint Security, configure a device with the internet access to be a super node.
-
Configure the Client Settings policy for the groups related to machines without access to internet.
-
Create an Export package.
-
Install the package with the super node policy on the device without access to the internet.
Limitations of the Super node proxy:
-
Super node proxy do not support:
-
VPN
-
Browse Security extension
-
Uploading CPInfo
-
Tiny Agent
-
IPv6
-
-
Super node does not support environments that require an explicit proxy.
-
Super node does not support an authenticated proxy configured in the Client Settings policy.
Disable Capabilities
Disable Capabilities allows users to turn on or turn off capabilities, such as Threat Prevention, Compliance![]() Check Point Software Blade on a Management Server to view and apply the Security Best Practices to the managed Security Gateways. This Software Blade includes a library of Check Point-defined Security Best Practices to use as a baseline for good Security Gateway and Policy configuration., and so on in the Endpoint Security client.
Check Point Software Blade on a Management Server to view and apply the Security Best Practices to the managed Security Gateways. This Software Blade includes a library of Check Point-defined Security Best Practices to use as a baseline for good Security Gateway and Policy configuration., and so on in the Endpoint Security client.
|
|
Note - If the Endpoint Security Client |
To allow users to disable capabilities:
-
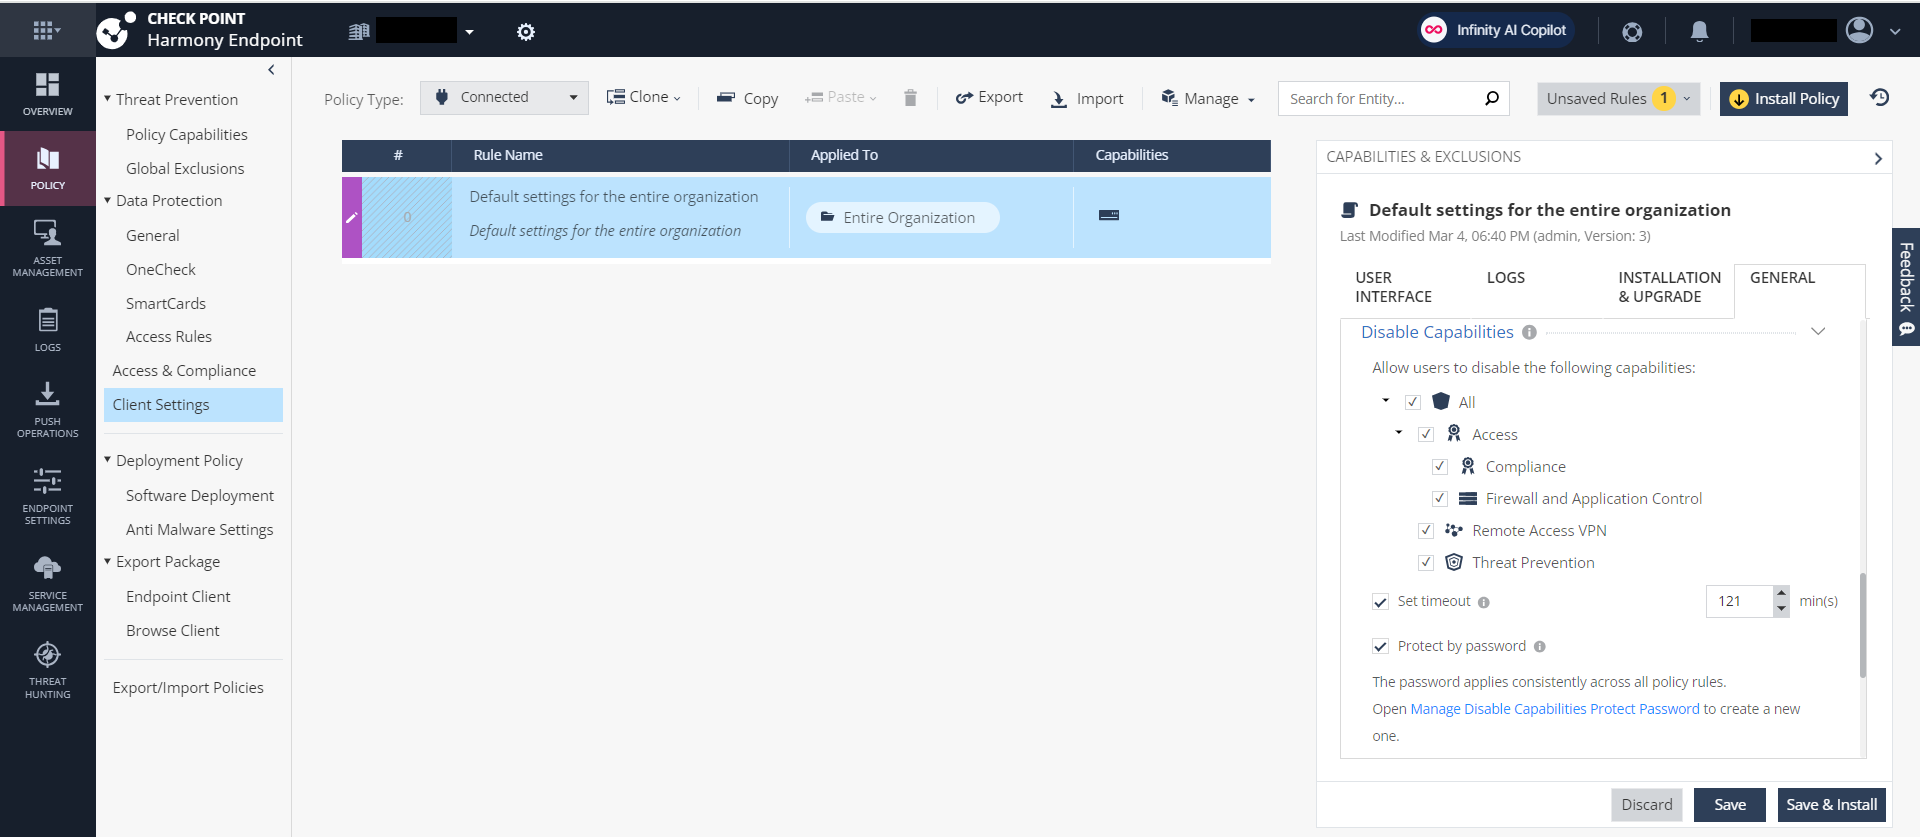
Go to Policy > Client Settings > General > Disable Capabilities.
-
Select the capabilities that can be disabled by the user on the client.
-
To enable the disabled capabilities automatically after a set interval of time:
Note - This is supported only on Windows with Endpoint Security client version E88.30 and higher.
-
Select the Set timeout checkbox.
-
In the timeout field, enter the time in minutes.
-
-
To allow users to disable the capabilities only after entering a password, select the Protect by password checkbox.
Note - This is supported only on Windows with Endpoint Security client version E88.30 and higher.
-
Click Manage Disable Capabilities Protect Password.
Note - Optionally, from the taskbar, click Manage and select the Manage Disable Capabilities Protect Password from the list.
-
In the Password field, enter a password and re-enter the password in the Confirm Password field.
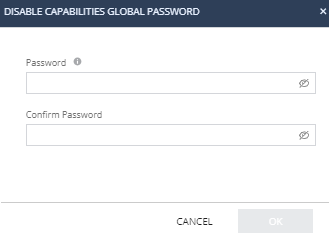
Note - Make sure the password is at least eight characters long, without spaces, and includes:
-
An uppercase letter
-
A lower case letter
-
A number.
-
-
Click OK.
-
-
Click Save & Install.
Network Protection
You can let users disable network protection on their computers.
Network Protection includes these components:
To configure network protection alerts:
-
Go to the Policy > Client Settings > General > Network Protection.
-
You may select Allow users to disable network protection on their computers - To disable network protection.
-
In the Network Protection section, select or clear these options for each Firewall and Application Control:
-
Allow Log - To generate logs for events.
-
Allow Alert - To generate alerts for events. You must also select this to use Alert in the Track column of Firewall rules.
-
-
Click Save.
Push Operations
Push Operations are operations that the server pushes directly to client computers with no policy installation required. You can set the minimum time interval between status updates of Push Operations.
For more information, see Push Operations .
To set the minimum time interval between status updates of Push Operations:
-
Go to the Policy > Client Settings > General > Push Operation.
-
Set the Minimum interval between status updates of Push Operations.
-
Click Save.