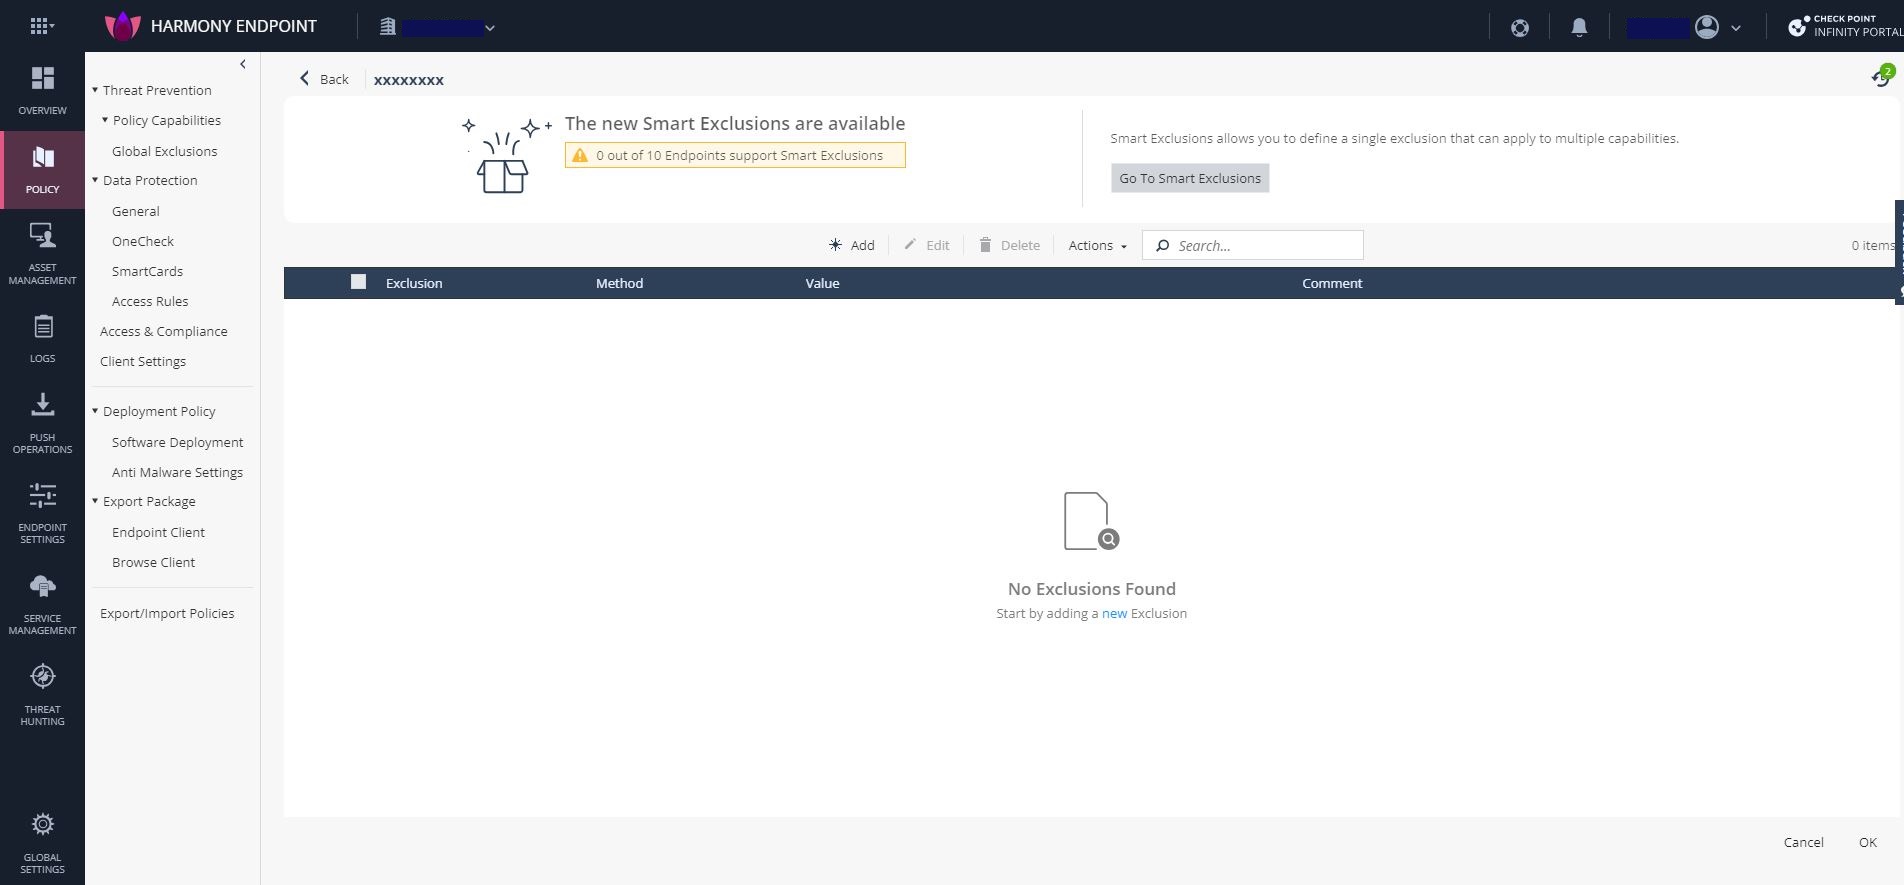
Smart Exclusions
Smart Exclusions allows you to add exclusions to one or more capabilities and types easily, whereas the Legacy Exclusions allows you to add exclusion only for one capability at a time.
With Smart Exclusions, you can:
-
Set exclusions to all capabilities and operating systems at once.
-
Use standard syntax across all exclusion types.
-
Use wider range of wildcard characters for nuanced and customized exclusion patterns.
-
Easily enable or disable exclusions with a simple toggle button without the need to delete exclusions temporarily.
|
|
Note - Smart Exclusions is supported only with Endpoint Security Client version E87.52 and higher for Windows and E87.50 and higher for macOS. |
Adding Exclusions to a Specific Rule
To add a new exclusion to a specific rule:
-
Go to Policy > Threat Prevention > Policy Capabilities.
-
Select the rule for which you want to create the exclusion.
-
In the Capabilities & Exclusions pane, click Exclusions Center.
-
Click Go to Smart Exclusions.
-
Click
 or click Create New Exclusion.
 -
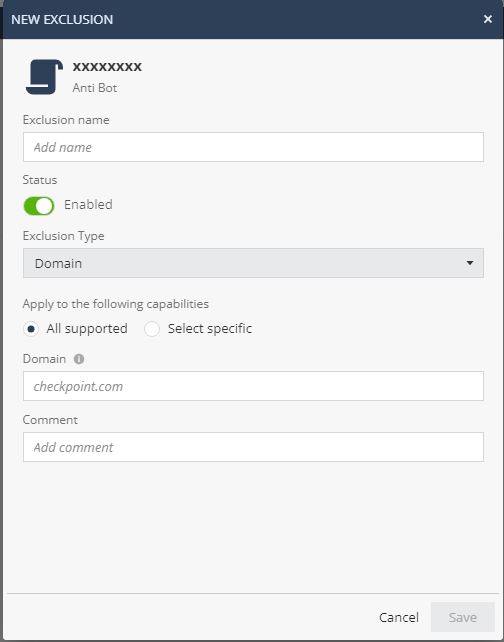
 To add an exclusion for only one exclusion type:

-
Click Single-method exclusion.
A wizard appears.
-
In the Exclusion name field, enter a name for exclusion.
-
To enable the exclusion, toggle Status to Enabled.
-
From the Exclusion Type list, select the exclusion type.
-
From the Operating system list, select the operating system to which you want to apply the exclusion. For example, endpoints running Windows operating system only. It is not available if you select All supported in the Apply to the following capabilities section.

Caution - If you make exclusions in the Forensics Monitoring capability, the activities of the excluded processes are omitted from forensic analysis. As a result, you cannot query for these activities in Threat Hunting and they are excluded from Horizon XDR/XPR analysis, detections, and the creation of security incidents related to sophisticated attacks.
-
In the Apply to the following capabilities section:
-
To apply the exclusion to all capabilities, select All supported.
-
To apply the capabilities to specific capabilities, select Select specific and from the Capabilities list, select the capabilities.

Notes:
-
Capabilities not relevant to the selected group are not available.
-
For supported syntax and capabilities for exclusion types, see sk181679.
-
If the Exclusion Type is
Then
Process path -
In the Process path field, enter the path of the process. For example, C:\windows\system\cmd.exe.
-
To specify additional criteria, expand Process path options, and select:
-
Case sensitive
-
Trusted process
-
Argument and if required, select Regex, and in the Argument value field, enter the value.
-
Process hash -
From the Process hash type list, select the hash type:
-
MD5
-
SHA1
-
SHA2
-
cdhash (for macOS only)
-
-
In the Process hash value, enter the value.
Process signer In the Process signer value field, enter the process signer value. For example, Check Point Ltd.
File path -
In the File path field, enter the path of the file. For example, C:\windows\system\.
-
To specify additional criteria, expand File path options, and select Case sensitive.
File hash -
From the File hash type list, select the hash type:
-
MD5
-
SHA1
-
SHA2
-
cdhash (for macOS only)
-
-
In the File hash value, enter the value.
File signer In the File signer value field, enter the process signer value. For example, Check Point Ltd.
IP Range
In the IP Range fields, enter the IP address range.
For example, to enter IPv4 range, enter 192.168.1.30-192.168.1.198.
For example, to enter IPv6 range, enter 2001::1-2001::254.
Url
In the URL field, enter the URL.
Domain
In the Domain field, enter the domain. For example, checkpoint.com.
Infection
In the Infection/Protection field, enter the infection (for example, not-a-virus:Adware.Win32.BroAssist.a) or a protection (for example, Gen.Exploiter.ROP).
-
-
(Optional) In the Comment field, enter comments.
-
Click Save.
-
-
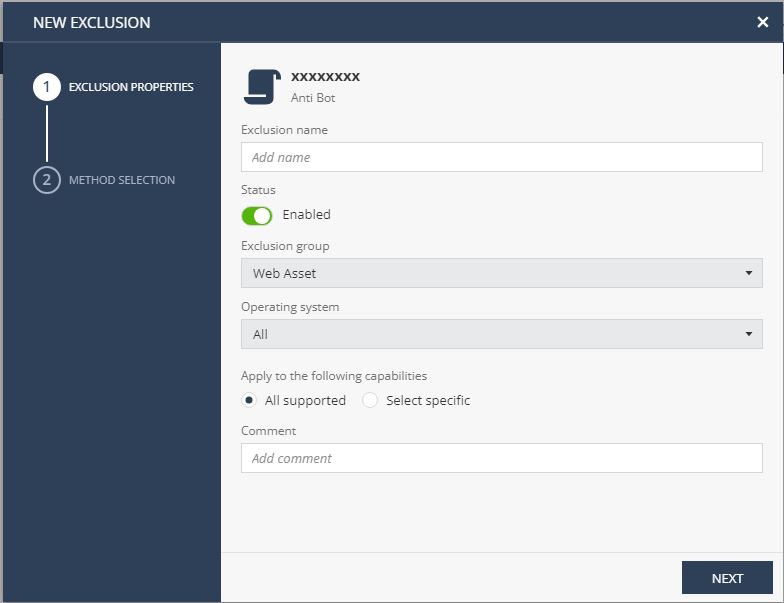
To add exclusions for multiple types of exclusions:
-
Click Multi-method exclusion.
A wizard appears.
-
In the Exclusion name field, enter a name for exclusion.
-
To enable the exclusion, toggle Status to Enabled.
-
From the Exclusion Group list, select the exclusion type.
-
From the Operating system list, select the operating system to which you want to apply the exclusion. For example, endpoints running Windows operating system only. It is not available if you select All supported in the Apply to the following capabilities section.
Caution - If you make exclusions in the Forensics Monitoring capability, the activities of the excluded processes are omitted from forensic analysis. As a result, you cannot query for these activities in Threat Hunting and they are excluded from Horizon XDR/XPR analysis, detections, and the creation of security incidents related to sophisticated attacks.
-
In the Apply to the following capabilities section:
-
To apply the exclusion to all capabilities, select All supported.
-
To apply the capabilities to specific capabilities, select Select specific and from the Capabilities list, select the capabilities. To enable Chained Exclusions, in the Chained Exclusion are available for section, turn on the Inherit exclusion to child processes button. It automatically excludes all the child processes of the excluded process.
Notes:
-
Capabilities not relevant to the selected group are not available.
-
Anti-Exploit capability supports only Process path and Infection/Protection exclusions.
-
-
-
To enable Chained Exclusions, in the Chained Exclusion are available for section, turn on the Inherit exclusion to child processes button. It automatically excludes all the child processes of the excluded process.
Notes:
-
Chained exclusion is supported only with the Exclusion group of the type System and to these specific exclusions:
-
Process path
-
Process original name
-
Process hash
-
Process signer
-
-
For Endpoint Security Client version E88.40 and lower, it is mandatory to provide either
Process pathor theProcess signerparameter. All the other parameters are optional. -
With the Endpoint Security Client version E88 and higher, it supports only the Forensics Monitoring capability.
-
With the Endpoint Security Client version E88.20 and higher, it additionally supports Threat Emulation, Anti-Bot, Anti-Malware (DHS compliant), SSLi and URL Filtering capabilities.
-
-
(Optional) In the Comment field, enter comments.
-
Click Next.
Note - For supported syntax and capabilities for exclusion types, see sk181679.
If the Exclusion Group is
Exclusion Type
Then
System Process path -
In the Process path field, enter the path of the process. For example, C:\windows\system\cmd.exe.
-
To specify additional criteria, expand Process path options, and select:
-
Case sensitive
-
Trusted process
-
Argument and if required, select Regex, and in the Argument value field, enter the value.
-
Process original name 1 Enter the process original name. For example, Cmd.exe.
Supported only for Windows-based endpoints.
Notes -
-
To find the original name of the process:
-
Right-click on the executable file.
-
Go to Properties > Details > Original filename.
-
-
Process original name is case-sensitive.
Process hash -
From the Process hash type list, select the hash type:
-
MD5
-
SHA1
-
SHA2
-
cdhash (for macOS only)
-
-
In the Process hash value, enter the value.
Process signer 1 In the Process signer value field, enter the process signer value. For example, Check Point Ltd.
File path -
In the File path field, enter the path of the file. For example, C:\windows\system\.
-
To specify additional criteria, expand File path options, and select Case sensitive.
File hash -
From the File hash type list, select the hash type:
-
MD5
-
SHA1
-
SHA2
-
cdhash (for macOS only)
-
-
In the File hash value, enter the value.
File signer In the File signer value field, enter the process signer value. For example, Check Point Ltd.
Web Asset
IP Range
In the IP Range fields, enter the IP address range.
For example, to enter IPv4 range, enter 192.168.1.30-192.168.1.198.
For example, to enter IPv6 range, enter 2001::1-2001::254.
Url
In the URL field, enter the URL.
Domain
In the Domain field, enter the domain. For example, checkpoint.com.
Infection/Detection
Infection
In the Infection/Protection field, enter the infection (for example, not-a-virus:Adware.Win32.BroAssist.a) or a protection (for example, Gen.Exploiter.ROP).
1 It is mandatory to provide either
Process original nameor theProcess signerparameter. All the other parameters are optional. -
-
Click Finish.
-
-
Click OK.
-
Click Save & Install.
|
|
Note - You can change Single-method exclusion to Multi-method exclusion. See Managing Exclusions. |
Adding Global Exclusions
To add global exclusions that apply to all the rules:
-
Go to Policy > Threat Prevention > Global Exclusions.
-
Click Go to Smart Exclusions.
-
Click
or click Create New Exclusion. -
To add an exclusion for only one exclusion type:
-
Click Single-method exclusion.
A wizard appears.
-
In the Exclusion name field, enter a name for exclusion.
-
To enable the exclusion, toggle Status to Enabled.
-
From the Exclusion Type list, select the exclusion type.
-
From the Operating system list, select the operating system to which you want to apply the exclusion. For example, endpoints running Windows operating system only. It is not available if you select All supported in the Apply to the following capabilities section.
Caution - If you make exclusions in the Forensics Monitoring capability, the activities of the excluded processes are omitted from forensic analysis. As a result, you cannot query for these activities in Threat Hunting and they are excluded from Horizon XDR/XPR analysis, detections, and the creation of security incidents related to sophisticated attacks.
-
In the Apply to the following capabilities section:
-
To apply the exclusion to all capabilities, select All supported.
-
To apply the capabilities to specific capabilities, select Select specific and from the Capabilities list, select the capabilities.
Notes:
-
Capabilities not relevant to the selected group are not available.
-
For supported syntax and capabilities for exclusion types, see sk181679.
-
If the Exclusion Type is
Then
Process path -
In the Process path field, enter the path of the process. For example, C:\windows\system\cmd.exe.
-
To specify additional criteria, expand Process path options, and select:
-
Case sensitive
-
Trusted process
-
Argument and if required, select Regex, and in the Argument value field, enter the value.
-
Process hash -
From the Process hash type list, select the hash type:
-
MD5
-
SHA1
-
SHA2
-
cdhash (for macOS only)
-
-
In the Process hash value, enter the value.
Process signer In the Process signer value field, enter the process signer value. For example, Check Point Ltd.
File path -
In the File path field, enter the path of the file. For example, C:\windows\system\.
-
To specify additional criteria, expand File path options, and select Case sensitive.
File hash -
From the File hash type list, select the hash type:
-
MD5
-
SHA1
-
SHA2
-
cdhash (for macOS only)
-
-
In the File hash value, enter the value.
File signer In the File signer value field, enter the process signer value. For example, Check Point Ltd.
IP Range
In the IP Range fields, enter the IP address range.
For example, to enter IPv4 range, enter 192.168.1.30-192.168.1.198.
For example, to enter IPv6 range, enter 2001::1-2001::254.
Url
In the URL field, enter the URL.
Domain
In the Domain field, enter the domain. For example, checkpoint.com.
Infection
In the Infection/Protection field, enter the infection (for example, not-a-virus:Adware.Win32.BroAssist.a) or a protection (for example, Gen.Exploiter.ROP).
-
-
(Optional) In the Comment field, enter comments.
-
Click Save.
-
-
To add exclusions for multiple types of exclusions:
-
Click Multi-method exclusion.
A wizard appears.
-
In the Exclusion name field, enter a name for exclusion.
-
To enable the exclusion, toggle Status to Enabled.
-
From the Exclusion Group list, select the exclusion type.
-
From the Operating system list, select the operating system to which you want to apply the exclusion. For example, endpoints running Windows operating system only. It is not available if you select All supported in the Apply to the following capabilities section.
Caution - If you make exclusions in the Forensics Monitoring capability, the activities of the excluded processes are omitted from forensic analysis. As a result, you cannot query for these activities in Threat Hunting and they are excluded from Horizon XDR/XPR analysis, detections, and the creation of security incidents related to sophisticated attacks.
-
In the Apply to the following capabilities section:
-
To apply the exclusion to all capabilities, select All supported.
-
To apply the capabilities to specific capabilities, select Select specific and from the Capabilities list, select the capabilities. To enable Chained Exclusions, in the Chained Exclusion are available for section, turn on the Inherit exclusion to child processes button. It automatically excludes all the child processes of the excluded process.
Notes:
-
Capabilities not relevant to the selected group are not available.
-
Anti-Exploit capability supports only Process path and Infection/Protection exclusions.
-
-
-
To enable Chained Exclusions, in the Chained Exclusion are available for section, turn on the Inherit exclusion to child processes button. It automatically excludes all the child processes of the excluded process.
Notes:
-
Chained exclusion is supported only with the Exclusion group of the type System and to these specific exclusions:
-
Process path
-
Process original name
-
Process hash
-
Process signer
-
-
For Endpoint Security Client version E88.40 and lower, it is mandatory to provide either
Process pathor theProcess signerparameter. All the other parameters are optional. -
With the Endpoint Security Client version E88 and higher, it supports only the Forensics Monitoring capability.
-
With the Endpoint Security Client version E88.20 and higher, it additionally supports Threat Emulation, Anti-Bot, Anti-Malware (DHS compliant), SSLi and URL Filtering capabilities.
-
-
(Optional) In the Comment field, enter comments.
-
Click Next.
Note - For supported syntax and capabilities for exclusion types, see sk181679.
If the Exclusion Group is
Exclusion Type
Then
System Process path -
In the Process path field, enter the path of the process. For example, C:\windows\system\cmd.exe.
-
To specify additional criteria, expand Process path options, and select:
-
Case sensitive
-
Trusted process
-
Argument and if required, select Regex, and in the Argument value field, enter the value.
-
Process original name 1 Enter the process original name. For example, Cmd.exe.
Supported only for Windows-based endpoints.
Notes -
-
To find the original name of the process:
-
Right-click on the executable file.
-
Go to Properties > Details > Original filename.
-
-
Process original name is case-sensitive.
Process hash -
From the Process hash type list, select the hash type:
-
MD5
-
SHA1
-
SHA2
-
cdhash (for macOS only)
-
-
In the Process hash value, enter the value.
Process signer 1 In the Process signer value field, enter the process signer value. For example, Check Point Ltd.
File path -
In the File path field, enter the path of the file. For example, C:\windows\system\.
-
To specify additional criteria, expand File path options, and select Case sensitive.
File hash -
From the File hash type list, select the hash type:
-
MD5
-
SHA1
-
SHA2
-
cdhash (for macOS only)
-
-
In the File hash value, enter the value.
File signer In the File signer value field, enter the process signer value. For example, Check Point Ltd.
Web Asset
IP Range
In the IP Range fields, enter the IP address range.
For example, to enter IPv4 range, enter 192.168.1.30-192.168.1.198.
For example, to enter IPv6 range, enter 2001::1-2001::254.
Url
In the URL field, enter the URL.
Domain
In the Domain field, enter the domain. For example, checkpoint.com.
Infection/Detection
Infection
In the Infection/Protection field, enter the infection (for example, not-a-virus:Adware.Win32.BroAssist.a) or a protection (for example, Gen.Exploiter.ROP).
1 It is mandatory to provide either
Process original nameor theProcess signerparameter. All the other parameters are optional. -
-
Click Finish.
-
-
Click Save.
The exclusions are automatically enforced on the client without installing the policy.
|
|
Note - You can change Single-method exclusion to Multi-method exclusion. See Managing Exclusions. |
Migrating Legacy Exclusions
|
|
Best Practice - Check Point recommends to follow these steps before migrating to Smart Exclusions:
|

To migrate legacy exclusions to smart exclusions:
-
To migrate legacy exclusions for a rule:
-
Go to Policy > Threat Prevention > Policy Capabilities.
-
Select the rule.
-
In the Capabilities & Exclusions pane, click Exclusions Center.
-
-
To migrate legacy global exclusions, go to Policy > Threat Prevention > Global Exclusions.
-
Click Go to Smart Exclusions.
-
To migrate all legacy exclusions:
-
Click Migrate from Legacy Exclusions (available only if there are no exclusions) or click
 and click All exclusions from legacy.
The Import All Legacy Exclusions window appears.
-
(Recommended) To remove all the legacy exclusions after you migrate to smart exclusions, select Remove all the imported exclusions from legacy.
-
Click Import.
-
-
To migrate specific exclusions:
-
Click
and Select exclusions from legacy.The Transfer from Legacy - Select Exclusions window appears.
-
Select the exclusions.
-
Click OK.
The exclusions are added to smart exclusions.
-
-
For specific rule, click OK and Save & Install.
-
For global exclusions, click Save.
The exclusions are automatically enforced on the client without installing the policy.
Importing and Exporting Exclusions
To import or export exclusions:
-
To import or export exclusions for a rule:
-
Go to Policy > Threat Prevention > Policy Capabilities.
-
Select the rule.
-
In the Capabilities & Exclusions pane, click Exclusions Center.
-
-
To import or export global exclusions, go to Policy > Threat Prevention > Global Exclusions.
-
Click Go To Smart Exclusions.
-
To import exclusions:
-
Click
and click Import Files. -
Browse and select the import file in the JSON format.
-
For specific rule, click OK and Save & Install.
-
For global exclusions, click Save.
The exclusions are automatically enforced on the client without installing the policy.
-
-
To export exclusions, click
 .
.The file is exported in the JSON format.
Managing Exclusions
To manage exclusions:
-
To manage smart exclusions for a rule:
-
Go to Policy > Threat Prevention > Policy Capabilities.
-
Select the rule.
-
In the Capabilities & Exclusions pane, click Exclusions Center.
-
-
To manage global smart exclusions, go to Policy > Threat Prevention > Global Exclusions.
-
Click Go To Smart Exclusions.
-
To edit an exclusion:
-
Select the exclusion and click
 .
. -
Right-click the row and click Edit.
To a change Single-method exclusion to Multi-method exclusion, click Edit in multi-value wizard at the bottom of the wizard.
Refer to Adding Exclusions to a Specific Rule to edit the exclusion.
-
-
To delete exclusions:
-
Select the exclusions and click
 .
. -
Click the row and at the end of the row, click
. -
Select the exclusions, right-click and click Delete.
-
-
To duplicate exclusions:
-
Select the exclusion and click
 .
. -
Click the row and at the end of the row, click
. -
Select the exclusion, right-click and click Duplicate.
-
-
To enable or disable the exclusion, toggle the button in the Status column.
-
To edit Name, Capabilities and Comment:
-
Click the row.
-
At the end of the row, click
. -
Edit the details.
-
Click
 .
.
-
-
For a specific rule, click OK and Save & Install.
-
For global exclusions, click Save.
The exclusions are automatically enforced on the client without installing the policy.