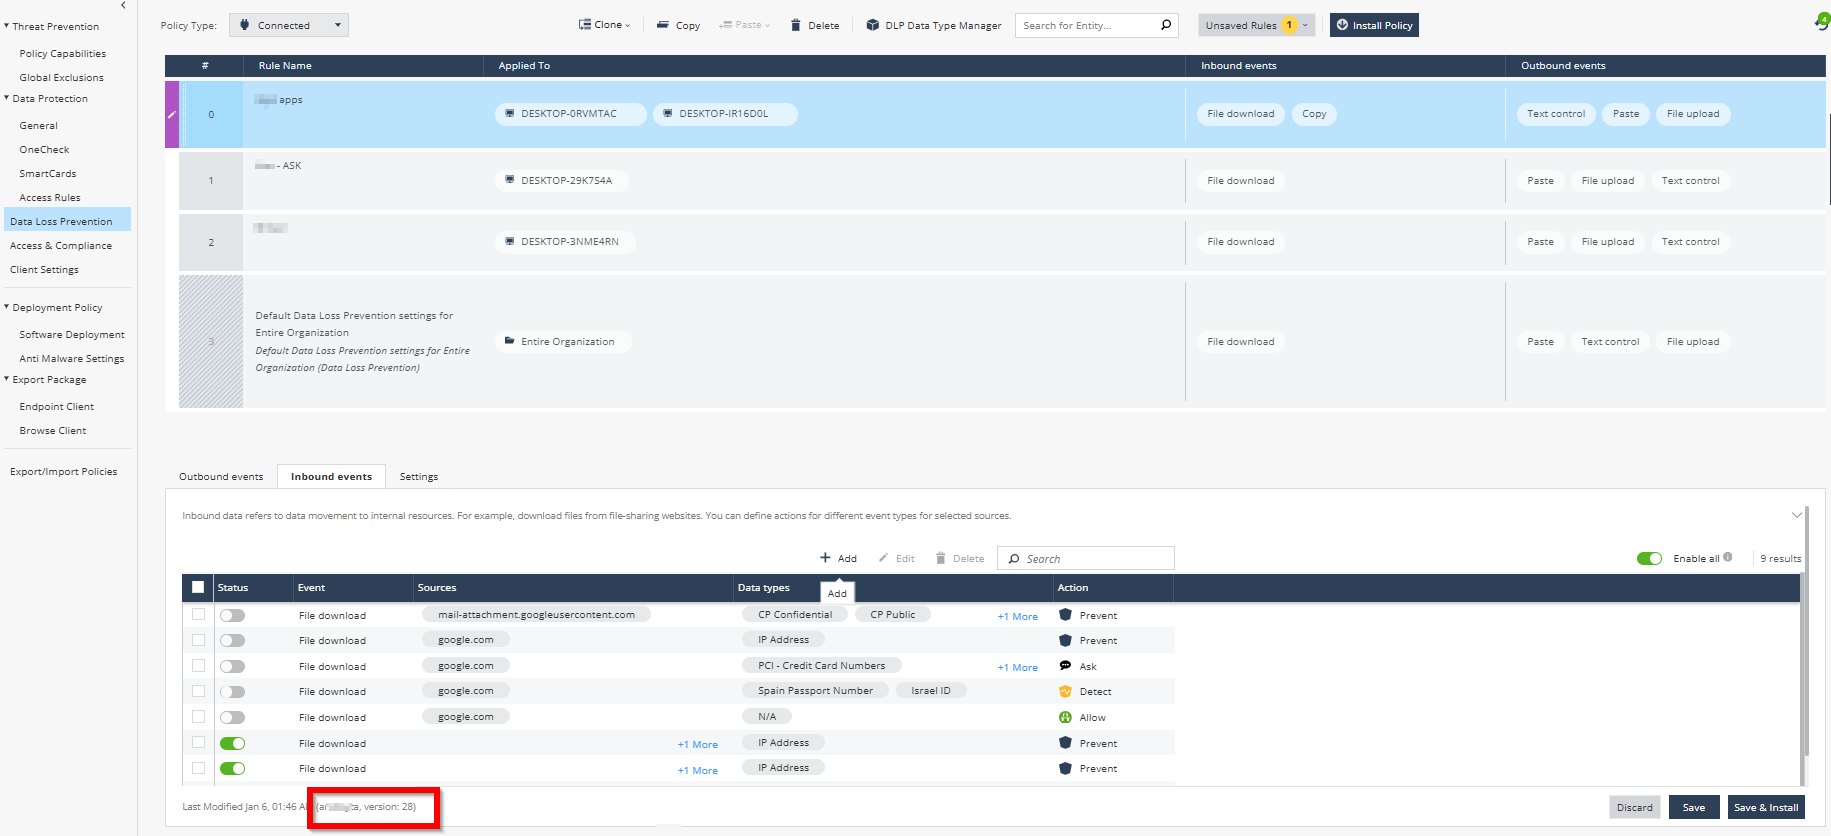
Data Loss Prevention
Data Loss Prevention![]() Check Point Software Blade on a Security Gateway that detects and prevents the unauthorized transmission of confidential information outside the organization. Acronym: DLP. (DLP) detects and prevents unauthorized transmission of confidential information, such as social security numbers, credit card numbers, bank account numbers and so on.
Check Point Software Blade on a Security Gateway that detects and prevents the unauthorized transmission of confidential information outside the organization. Acronym: DLP. (DLP) detects and prevents unauthorized transmission of confidential information, such as social security numbers, credit card numbers, bank account numbers and so on.
Browser-Based DLP capabilities allow you to enforce DLP by associating data types with a DLP rule![]() Set of traffic parameters and other conditions in a Rule Base (Security Policy) that cause specified actions to be taken for a communication session..
Set of traffic parameters and other conditions in a Rule Base (Security Policy) that cause specified actions to be taken for a communication session..
In the Data Loss Prevention tab, you can set rules based on specific events, data types and actions.
These actions are available within the DLP rules:
- Detect - Performs the DLP scan but does not block the data.
-
Prevent - Performs the DLP scan and prevents data transfer if it finds a match to a data type.
- Allow - Acts as exclusions, allowing data transfer in certain events.
-
Block - Blocks the data without the DLP scan.
-
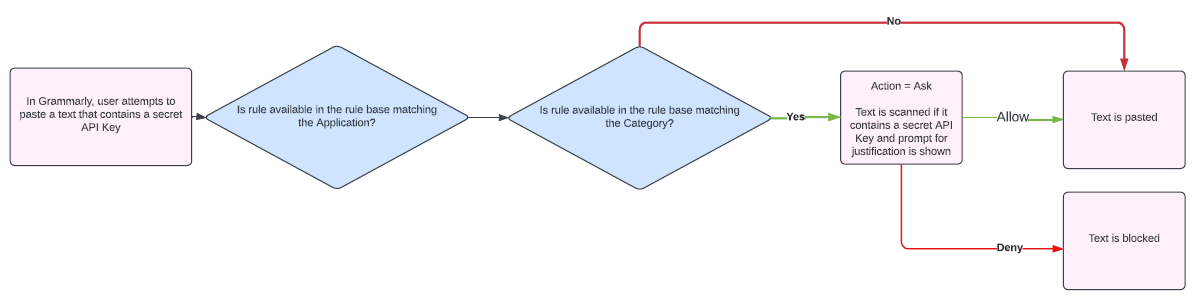
Ask - Asks the user to provide justification before allowing data transfer based on the DLP scan results.
-
Redact - Performs a DLP scan and removes sensitive data based on a pre-defined set of Data Types. This action is available only for the Text-control category.
-
Force redact - Automatically replaces sensitive data with asterisk.
-
The Data Loss Prevention policy allows the administrators to enable the Gen AI Protect feature on the endpoints. Gen AI Protect monitors the use of various generative AI applications by the endpoints. It detects and prevents the sharing of potential confidential information in the prompts to any Gen AI tools by the Endpoint Security Clients. For more information, see Enabling GenAI Protect.
|
|
Notes:
|
DLP Logs
-
Logs are sent for Block, Prevent, Detect, Ask, and Redact actions.
-
File upload and File download events generate log for each handled file, regardless of whether the event is blocked, prevented, detected, or allowed.
-
Text control, Copy and Paste events send logs for blocked, prevented, or detected incidents.
Use Case
You are a financial organization aiming to prevent the upload or download of files containing confidential and sensitive data, such as bank account numbers, tax and revenue details, by unauthorized users.
Known Limitations
-
This feature is supported only in the EU, US, India, Australia, and UAE regions.
-
Supported on the following versions of Endpoint Security Clients:
-
Windows: E88.50 and later
-
macOS: E89.10 and later
-
-
DLP is not applied if the file size is greater than 10 MB.
-
DLP is not applied when you drag and drop a folder to upload files, and in such cases, the upload of the folder gets blocked.
-
If the downloaded file is scanned by DLP, it is not sent to Threat Emulation
 Check Point Software Blade on a Security Gateway that monitors the behavior of files in a sandbox to determine whether or not they are malicious. Acronym: TE..
 -
The Application destination type is applicable only to Text Control and Paste events and is supported only on Windows client version E88.70 or later.
-
DLP policies do not apply to User-Based Virtual Groups. However, they do apply to machines and Machine-Based Virtual Groups.
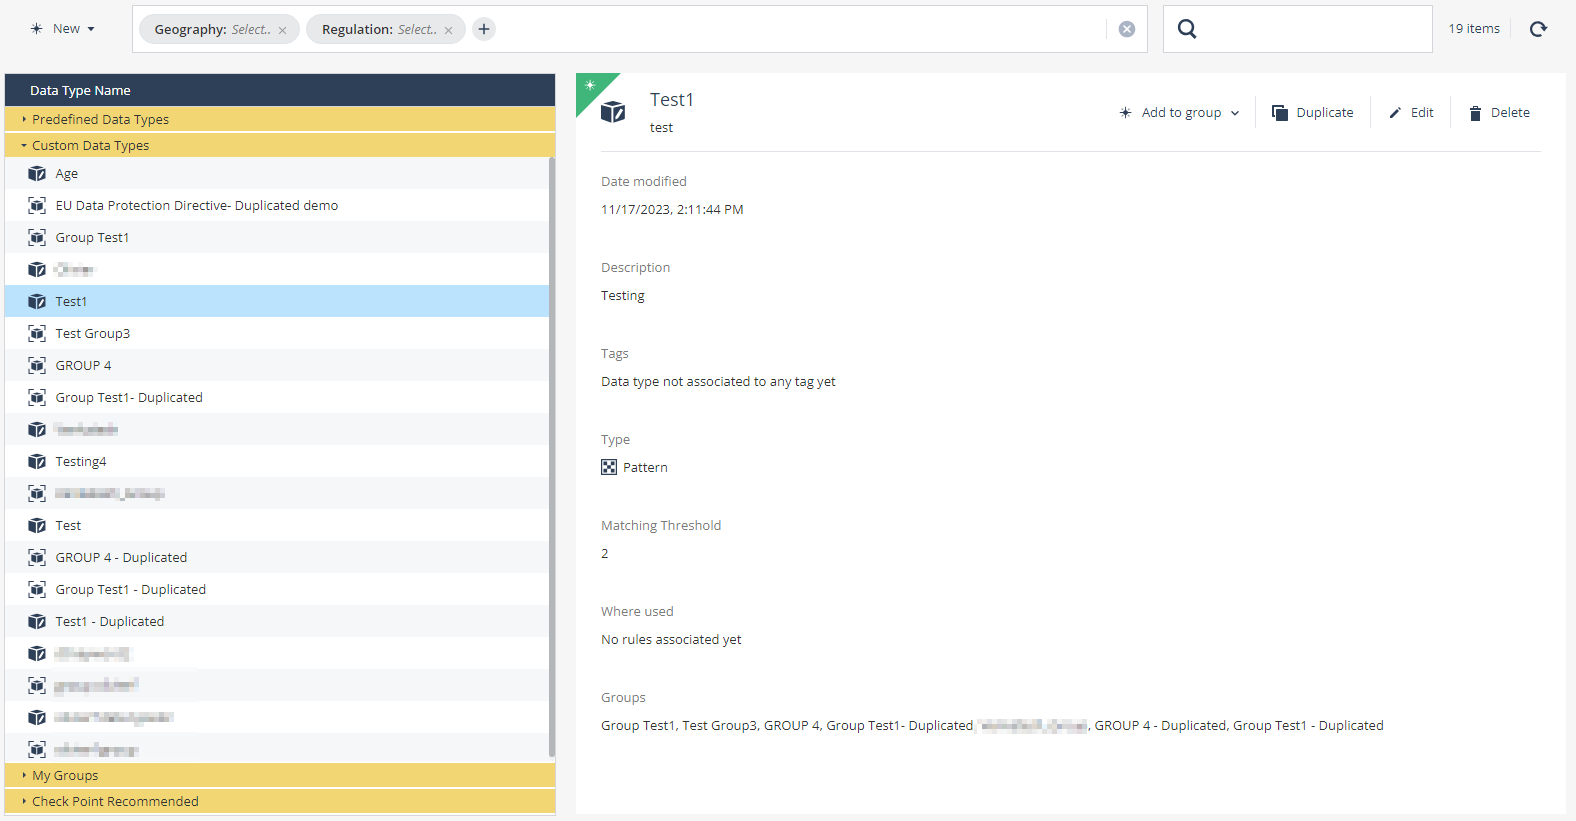
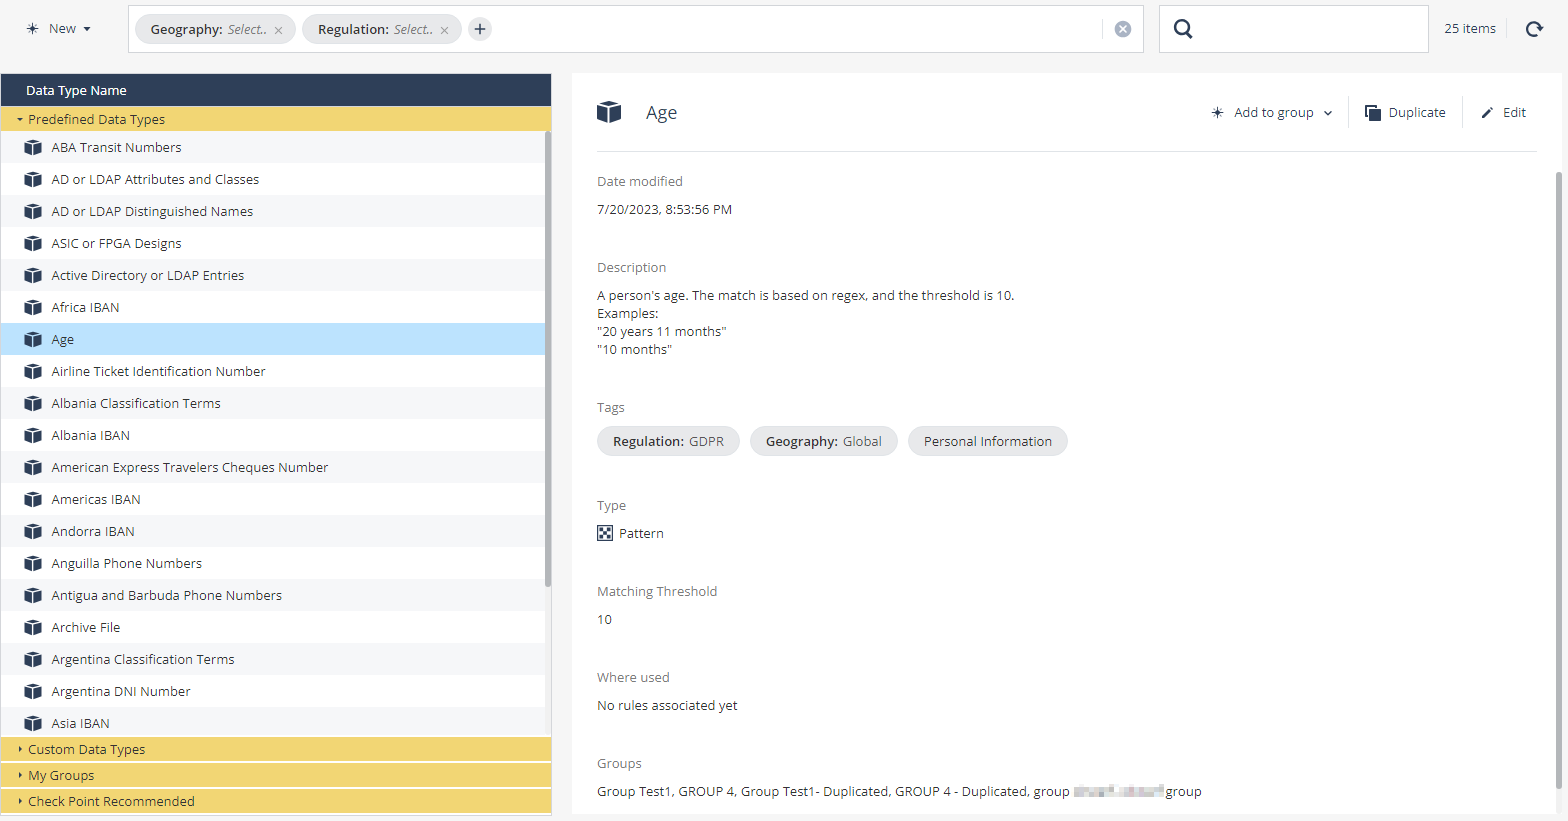
Sample Data Type
For supported data and file types, see sk181662.
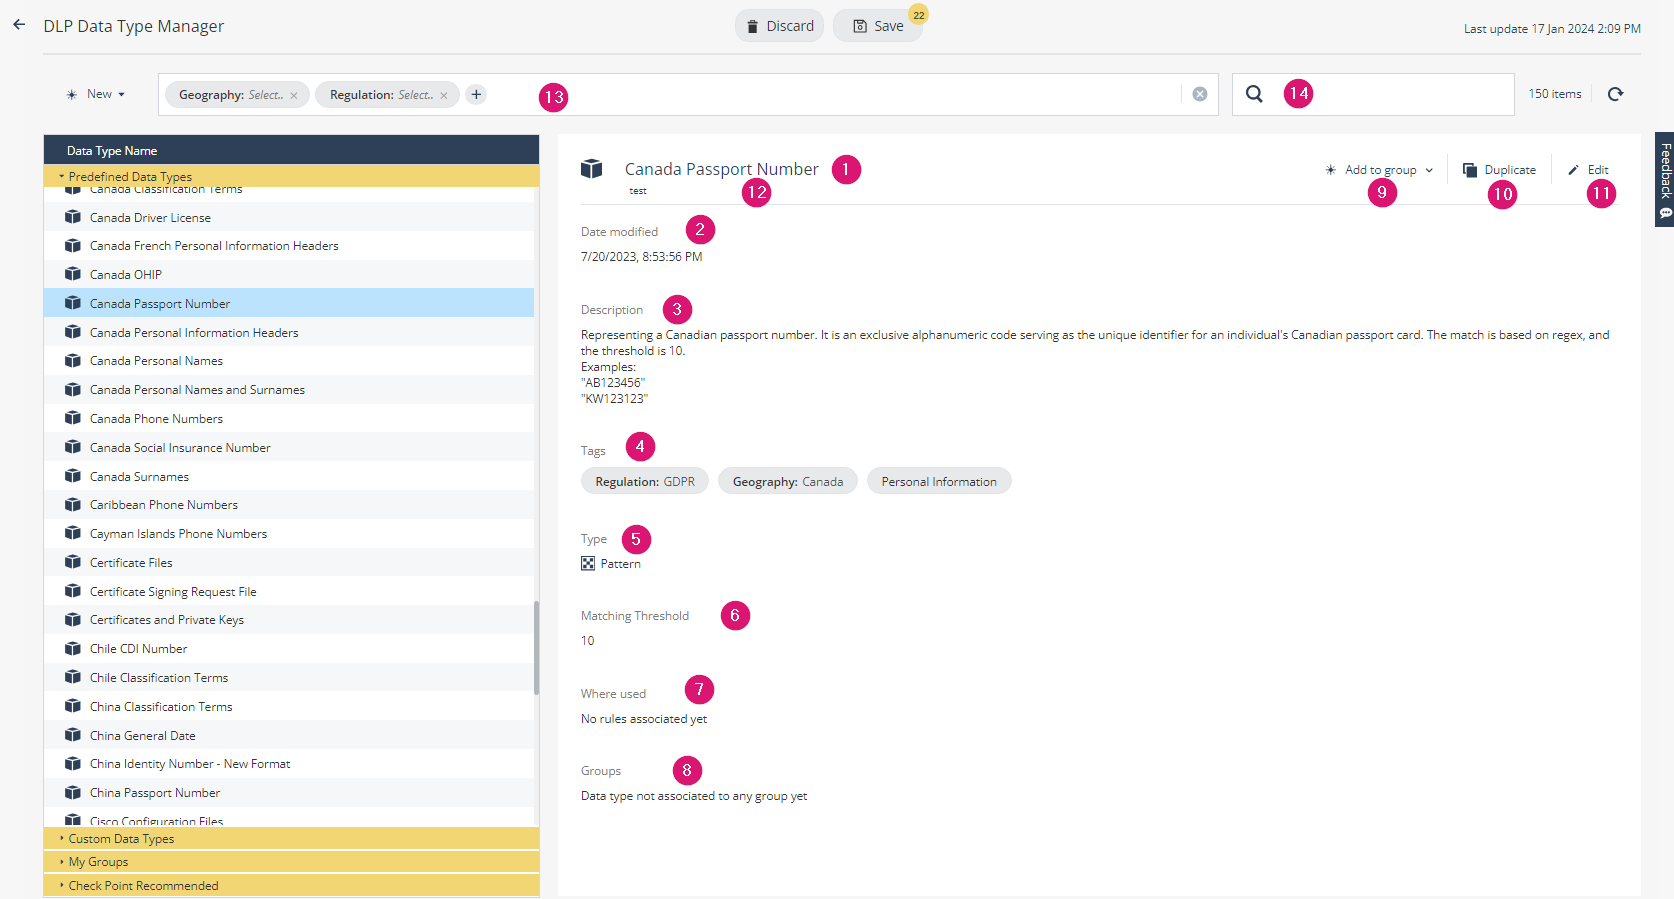
| Legends | Description |
|---|---|
|
1 |
Name of the data type. |
|
2 |
Date and time (in MM/DD/YY, HH:MM:SS XM format) when the data type was last modified. |
|
3 |
Brief description of the data type. |
|
4 |
Custom tags (category) for the data type. Helps in searching for data types. |
|
5 |
Matching criteria:
|
|
6 |
The minimum number of times the matching criteria must be present in the file to trigger the DLP action specified in the policy capability rule. For example, if the matching criteria is Keyword, the value is credit and the Matching Threshold is 5, then the system takes the action specified by the policy capability rule if the file contains the term credit five times or more. |
|
7 |
Policy capability rules where the data type is used. |
|
8 |
Groups associated with the data type. |
|
9 |
|
|
10 |
|
|
11 |
|
|
12 |
Comment. |
|
13 |
Filter data type by category. |
|
14 |
Search for a data type. |
Creating a Custom Data Type
-
Go to Policy > Data Loss Prevention and click DLP Data Type Manager.
-
Click New and select Data type.
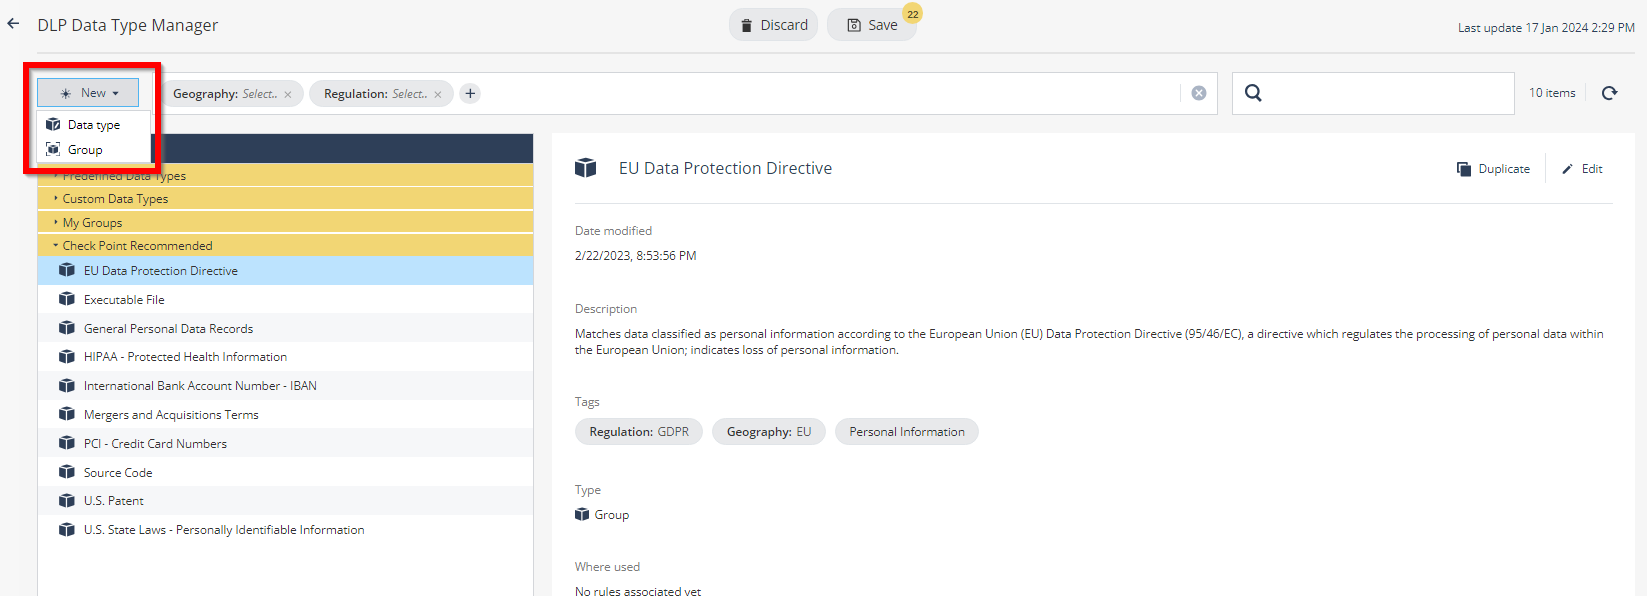
The Add data type wizard appears.

-
Enter the data type name, object comment (optional) and description.
-
From the Data type recognition method list, select a recognition method:
Recognition method Description Action
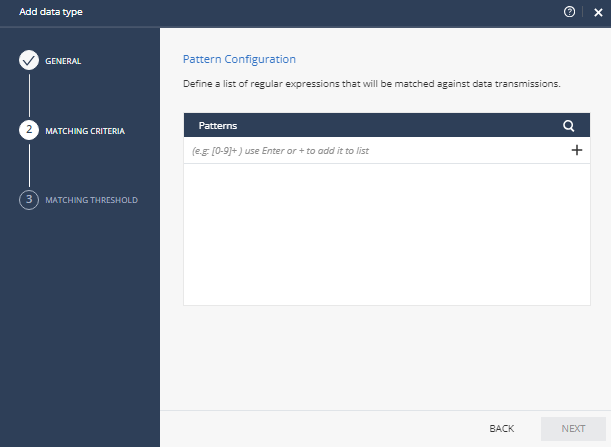
Applies the action specified in the policy capability rule if the file contents match the threshold for the pattern. For example, 5523-2342.
In the Patterns section, enter the pattern and click
 .
.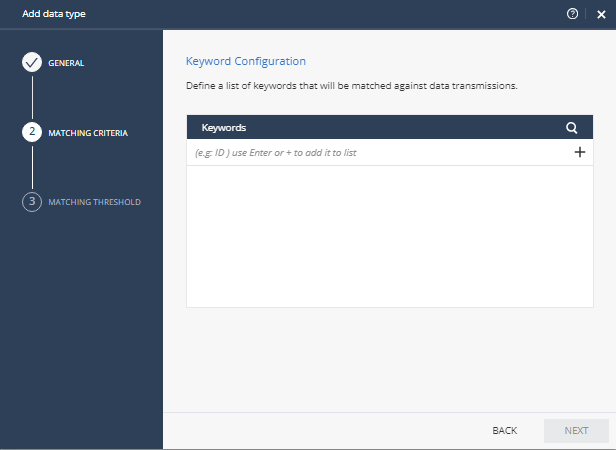
Applies the action specified in the policy capability rule if the file contents match the threshold for the keyword. For example, Confidential, Secret.
In the Keywords section, enter the keywords and click
.
Applies the action specified in the policy capability rule if the file contents match the threshold for the terms in the dictionary. For example, Spain, China, United Kingdom.
Each keyword must be specified in a single line in the UTF-8 format.

Note - The recommended file formats are Microsoft Word and .txt.
Upload the dictionary file.
Weighted Words
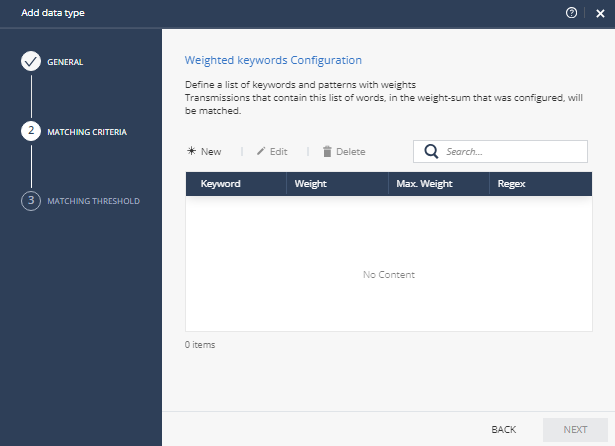
Applies the action specified in the policy capability rule if the file contains keywords and the cumulative weight matches or exceeds the threshold.
Use this method to specify multiple keywords.
For example, consider two keywords:
-
credit with Weight=1 and Max. Weight=3
-
transaction with Weight=2 and Max. Weight=30
and Matching Threshold=15.
If the file contains six occurrences of credit, each contributing a Weight of 1. That is, 1x6=6. As the Max. Weight=3, the final weight is 3.
If the file contains eight occurrences of transaction, each contributing a Weight of 2. That is, 2x8=16. As the Max. Weight=30, the final weight is 16.
As the sum of final weights of credit and transaction, that is, 16+3=19 is greater than the Matching Threshold, the system applies the specified action in the policy capability rule.
If the sum of the final weights of the keywords is less than the Matching Threshold, then the file is uploaded or downloaded.
-
Click New.
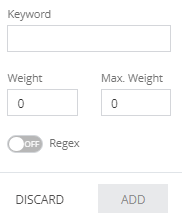
-
Enter these:
-
Keyword
-
Weight - Weight for each occurrence of the keyword.
-
Max. Weight - Maximum allowed for weight for the keyword.
-
-
If the keyword is a regular expression, turn on the Regex toggle button.
-
Click Add.
-
Repeat steps a through d to add the next keyword.

Applies the action specified in the policy capability rule if the file contents match the threshold for the terms in the template. For example, a template with a set header, footer and logo.
If the template contains images, the DLP is triggered only if the file contains the images in the same format as in the specified template.
Upload the template file. 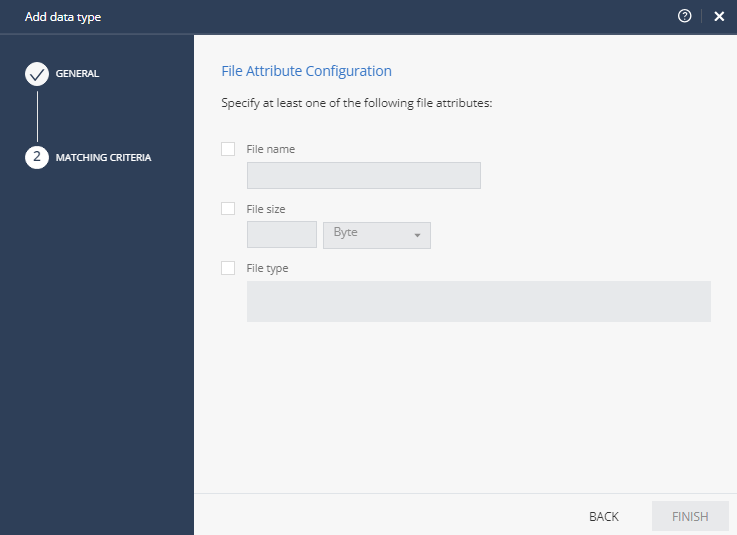
Applies the action specified in the policy capability rule if the file:
-
Matches the specified file name.
-
Size is equal to or greater than the specified file size.
-
Type matches the specified file type.
Select any of these and enter a value:
-
File name. For example, Account Numbers, Employee Details.
-
File size. File size in Byte, KB, MB or GB.
-
File type.
-
Click
 and select the file type(s) from the list.
-
-
-
Click Next.
Note - This step does not apply to Template and File attribute recognition methods.
-
Select the matching threshold.
The minimum number of times the matching criteria must be present in the file to trigger the DLP. For example, if the matching criteria is Keyword, the value is credit and the Matching Threshold is 5, then the system takes the action specified by the policy capability rule if the file contain the term credit five times or more.
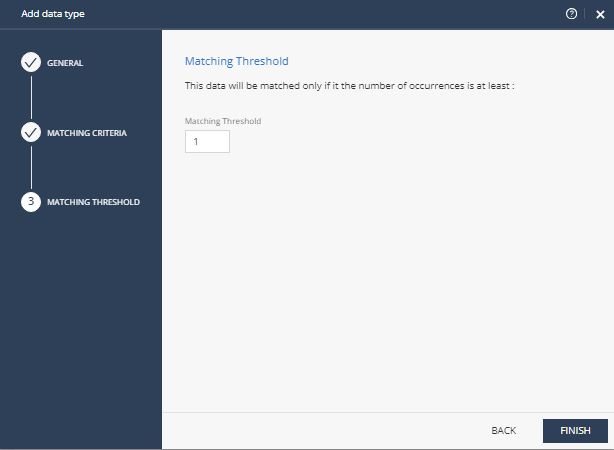
Note - This step does not apply to Template and File attribute recognition methods.
-
Click Finish.
The new custom data type is listed under Custom Data Types.
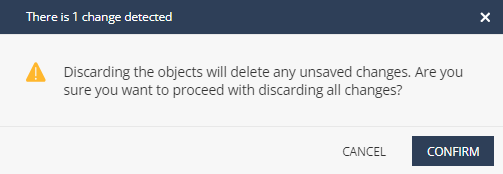
-
To permanently save all the changes to the database, click Save at the top.
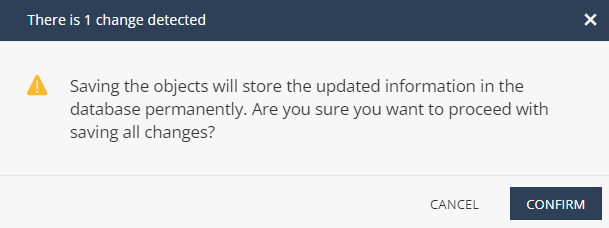
The change detected window appears.
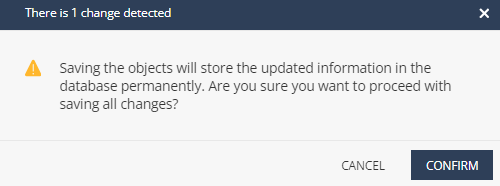
-
Click Confirm.
-
To discard all the changes, click Discard at the top.
The change detected window appears.
-
Click Confirm.
Creating a Custom Data Type Group
To create a custom data type group:
-
Go to Policy > Data Loss Prevention and click DLP Data Type Manager.
-
Click New and select Group.
The New Data type Group window appears.
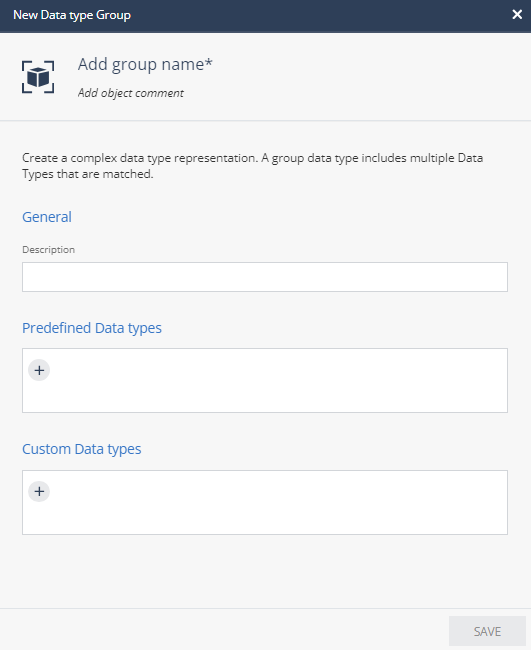
-
Enter a group name, object comment (optional) and description.
-
To add predefined data types to the group, click
 in the Predefined Data types field and select the data type.
 -
To add custom data types to the group, click
in the Custom Data types field and select the data type. -
Click Save.
The new data type group is listed under My Groups.
-
To permanently save all the changes to the database, click Save at the top.
The change detected window appears.
-
Click Confirm.
-
To discard all the changes, click Discard at the top.
The change detected window appears.
-
Click Confirm.
Adding an Existing Data Type to a Group
To add an existing data type to a group:
-
Go to Policy > Data Loss Prevention and click DLP Data Type Manager.
-
In the Data Type Name list, expand Custom Data Types or Predefined Data Types and select the data type.
-
Click Add to group.
-
Select the group(s) from the list.
-
Click Add.
-
To permanently save all the changes to the database, click Save at the top.
The change detected window appears.
-
Click Confirm.
-
To discard all the changes, click Discard at the top.
The change detected window appears.
-
Click Confirm.
Editing a Data Type or Group
|
|
Note - If you edit a data type, the changes are reflected in all the groups that contain this data type. |
To edit a data type or group:
-
Go to Policy > Data Loss Prevention and click DLP Data Type Manager.
-
In the Data Type Name list, expand the DLP group and select the data type or the group.
-
Click Edit.
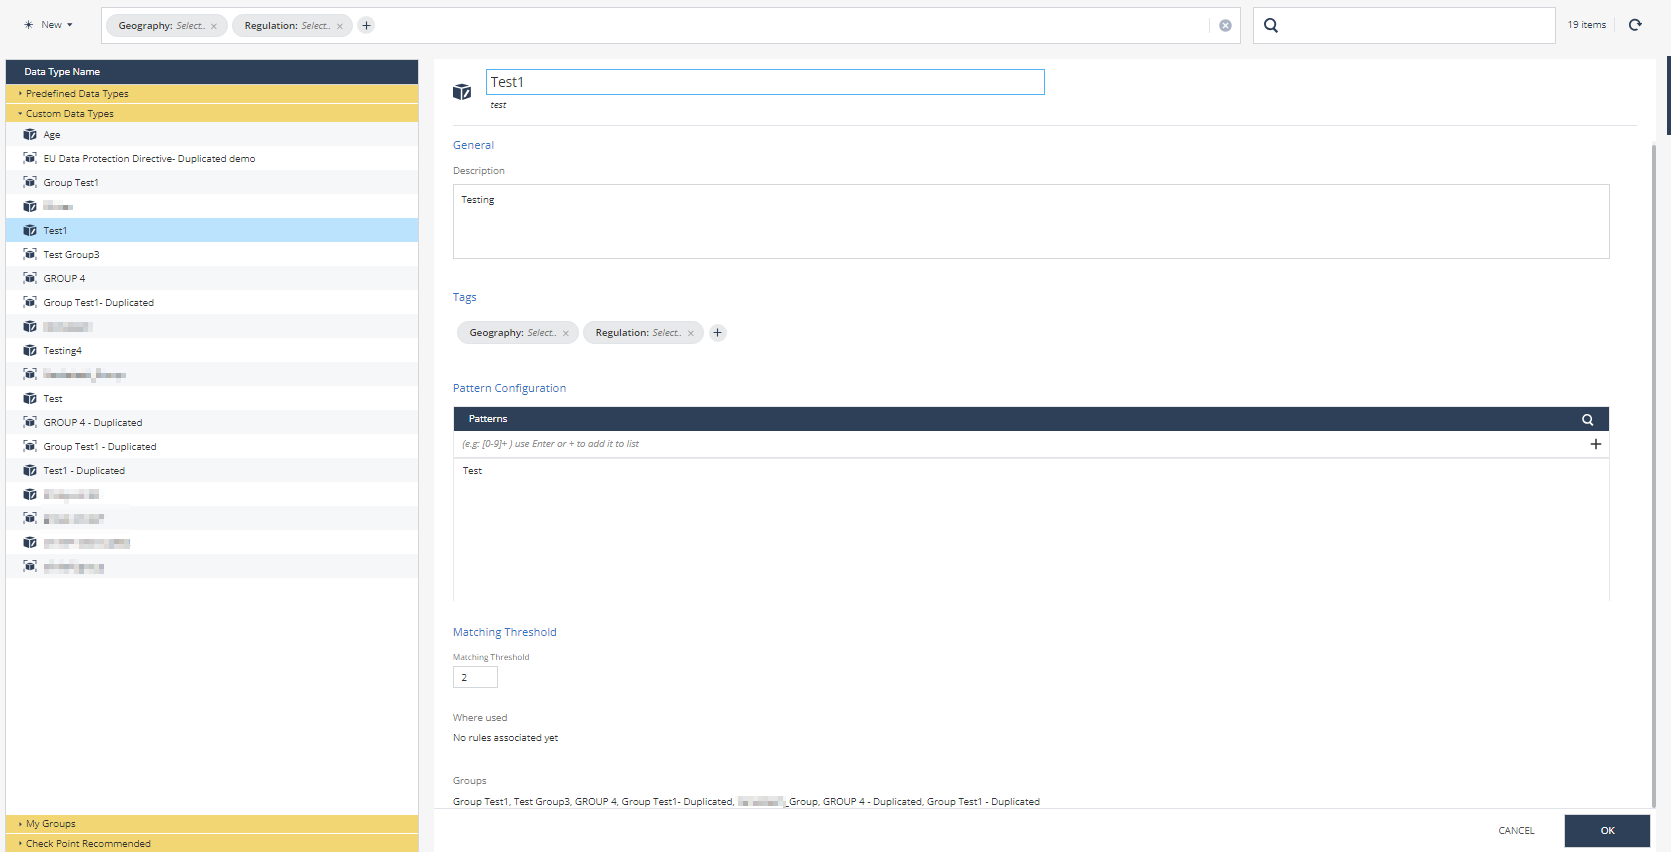
-
Make the required changes.
Note - In the Check Point Recommended and Predefined Data Types DLP groups, you can edit only Matching level and Add object comment.
-
Click OK.
-
To permanently save all the changes to the database, click Save at the top.
The change detected window appears.
-
Click Confirm.
-
To discard all the changes, click Discard at the top.
The change detected window appears.
-
Click Confirm.
Duplicating a Data Type or a Group
To duplicate a data type or group:
-
Go to Policy > Data Loss Prevention and click DLP Data Type Manager.
-
In the Data Type Name list, expand the DLP group and select the data type or the group within.
-
Click Duplicate.
-
Make the required changes.
-
Click OK.
-
To permanently save all the changes to the database, click Save at the top.
The change detected window appears.
-
Click Confirm.
-
To discard all the changes, click Discard at the top.
The change detected window appears.
-
Click Confirm.
Deleting a Data Type or a Group
|
|
Note - Before you delete a data type, make sure to remove the data type from the group(s) and policy capability rules. |
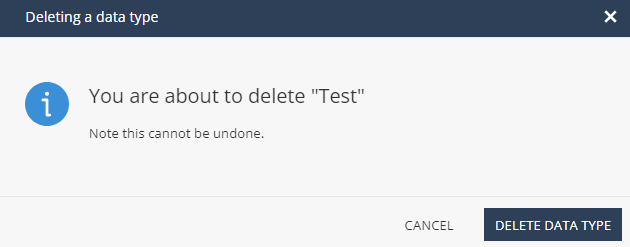
To delete a data type or group:
-
Go to Policy > Data Loss Prevention and click DLP Data Type Manager.
-
In the Data Type Name list, expand the DLP group and select the data type or the group within.
-
Click Delete.
The Deleting a data type window appears.
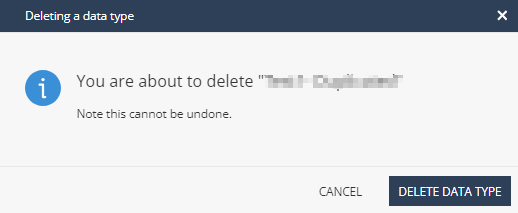
-
Click Delete Data Type.
-
To permanently save all the changes to the database, click Save at the top.
The change detected window appears.
-
Click Confirm.
-
To discard all the changes, click Discard at the top.
The change detected window appears.
-
Click Confirm.
Managing Microsoft Sensitivity Labels for DLP
Endpoint Security allows you to integrate Sensitivity labels from Microsoft Purview Information Protection into your DLP system, providing an additional layer of data protection based on predefined sensitivity classifications.
Step 1 - Copy the Microsoft Sensitivity label names and their UUIDs from Microsoft Purview
-
Log in to Microsoft Purview Portal: https://purview.microsoft.com/
-
Go to Solutions > Information protection > Labels.

-
Click the label name for which you want to find the UUID.
-
Copy the UUID in the Label ID or GUID section.
-
Install the Exchange Online Management Module
The Microsoft Purview Security & Compliance
Check Point Software Blade on a Management Server to view and apply the Security Best Practices to the managed Security Gateways. This Software Blade includes a library of Check Point-defined Security Best Practices to use as a baseline for good Security Gateway and Policy configuration. PowerShell uses the Exchange Online Management Module for connection.-
Open PowerShell as an administrator.
-
Run the following command:
Install-Module -Name ExchangeOnlineManagement -Force -
If the system prompts to install
NuGetor trust the repository, enterYand press Enter.
-
-
Connect to the Microsoft Purview Security & Compliance Center.
-
Run the following command to create a session:
Connect-IPPSSession -
In the Microsoft login page that appears, authenticate with the Microsoft 365 administrator credentials.
Note - The administrator must have Compliance Administrator or Information Protection Administrator roles.
- If your Microsoft Purview portal has Multi-Factor Authentication (MFA), complete the MFA process.
Once authenticated, the session connects to the Microsoft Purview Security & Compliance Center.
Now, you can run Microsoft Purview Security & Compliance PowerShell commands, such as managing labels, policies, or settings.
-
-
To view the UUID of the labels, run the following commands:
Get-Label | Select-Object DisplayName, Name, Guid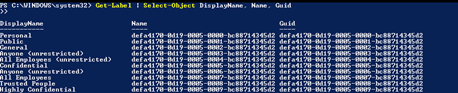
-
Copy the UUID of the labels.
-
To disconnect the session, run the following command:
Disconnect-ExchangeOnline
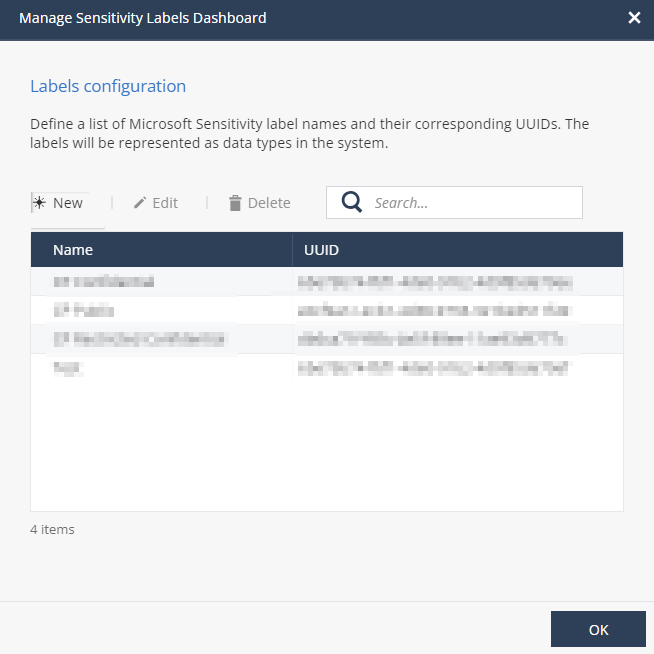
Step 2 - Creating Microsoft Sensitivity Labels in Endpoint Security
-
Log in to Check Point Portal and access the Endpoint Security Administrator Portal:
-
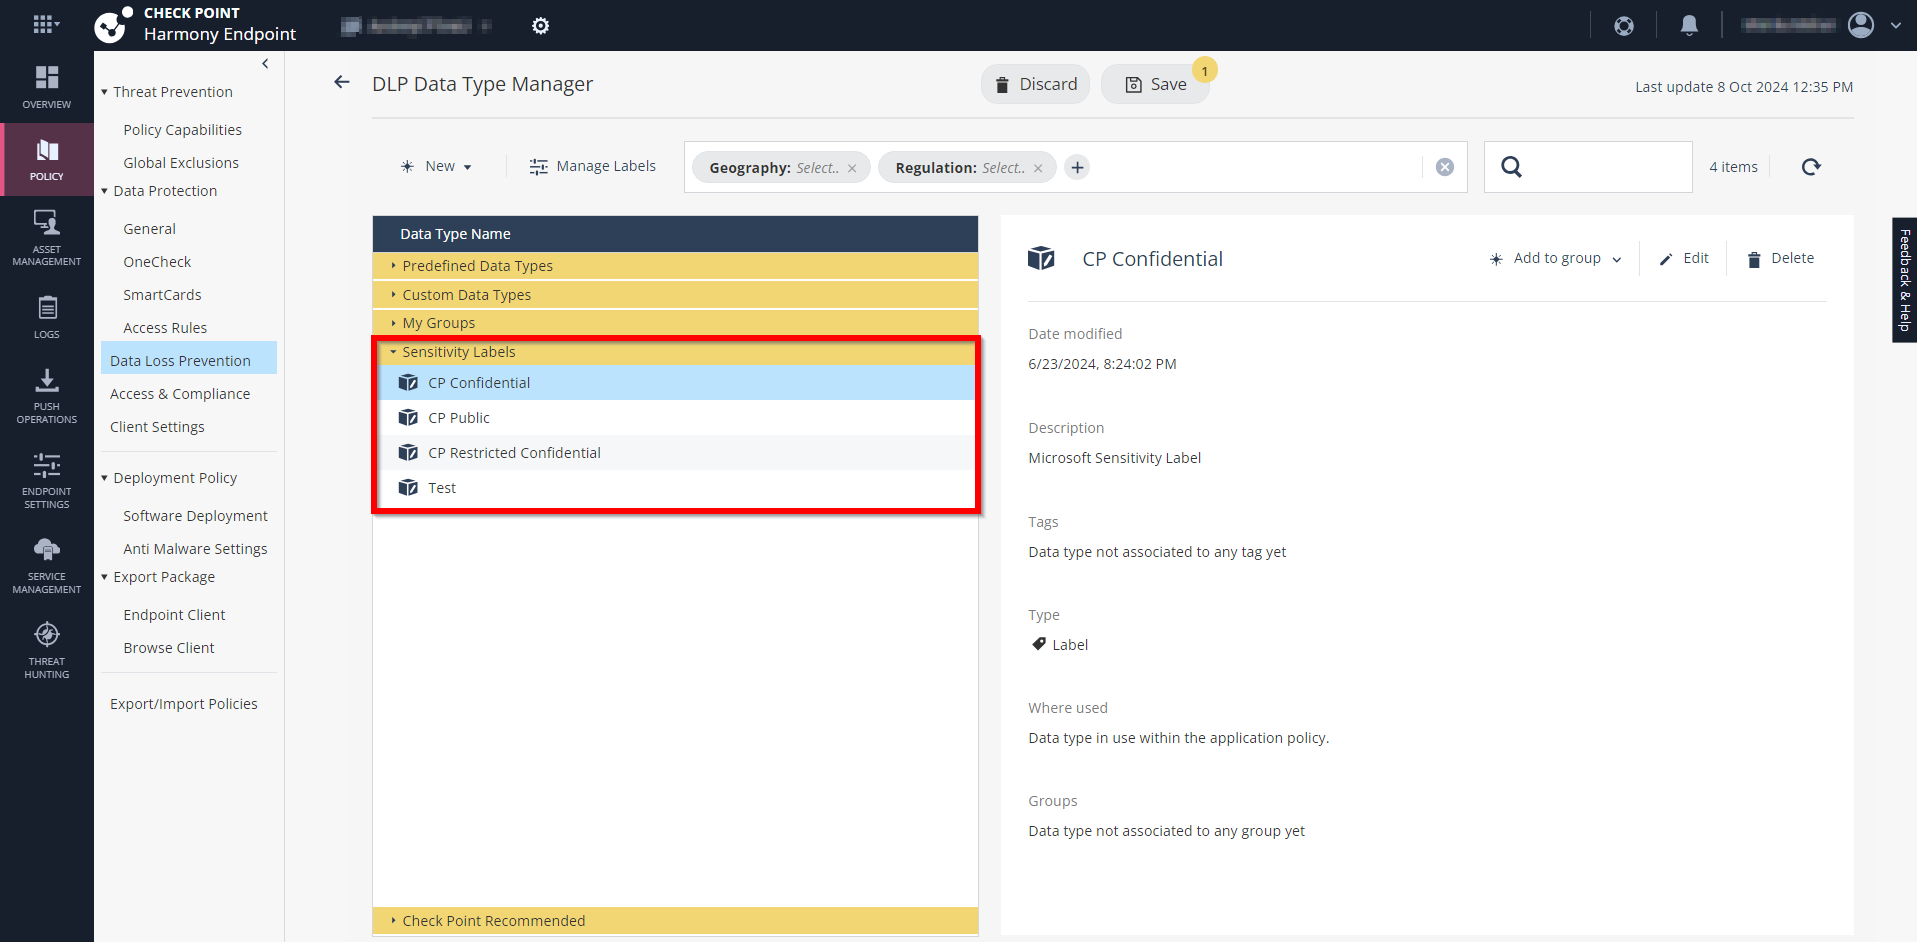
Go to Policy > Data Loss Prevention and click DLP Data Type Manager.
-
Click Manage Labels.
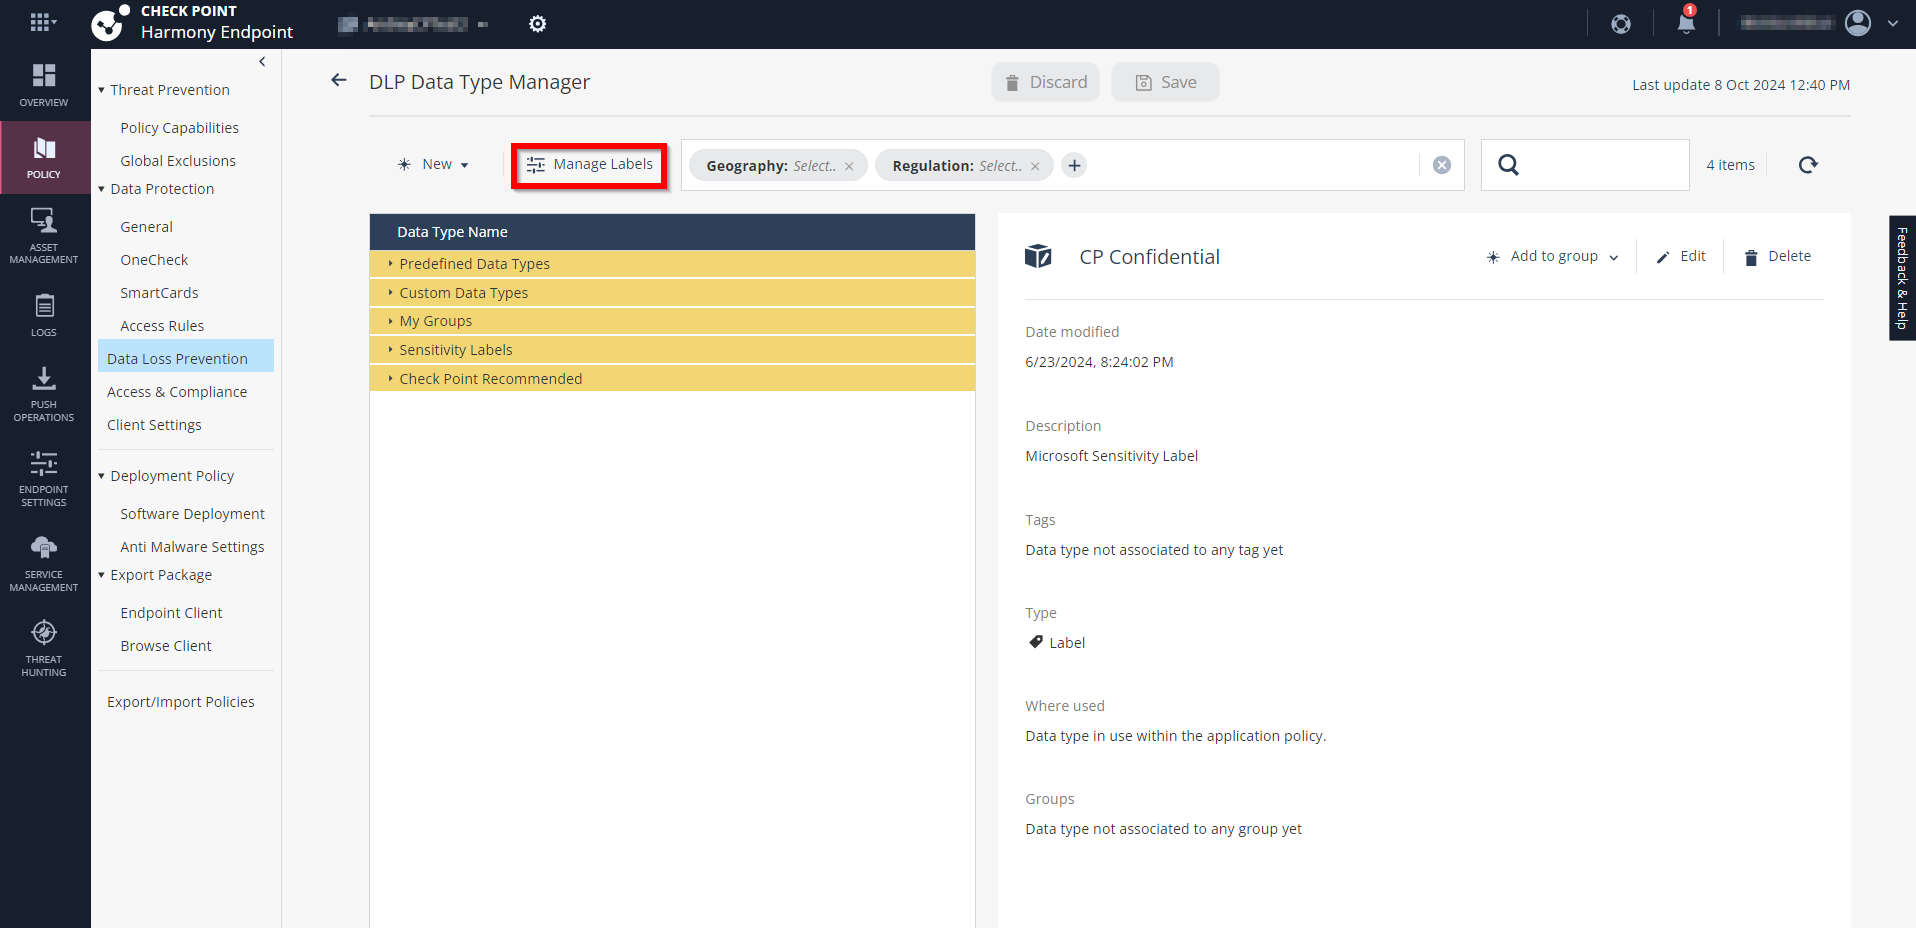
The Manage Sensitivity Labels Dashboard window appears.
-
Click New.
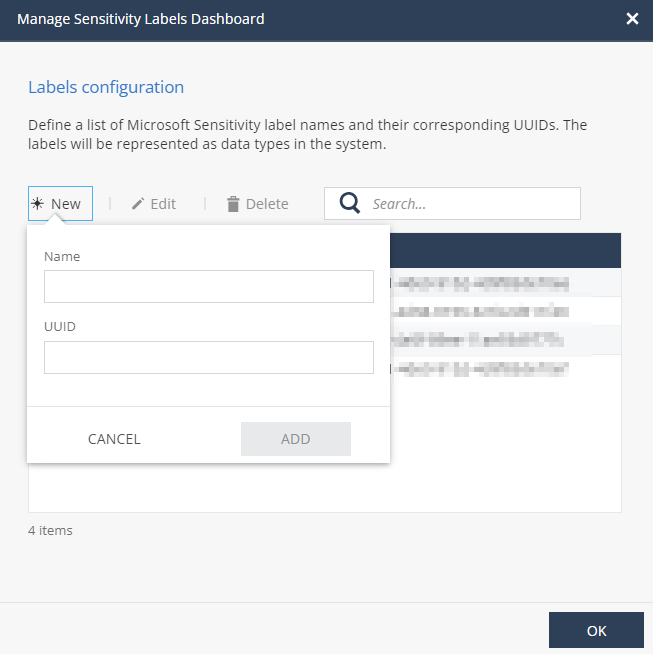
-
In the Name field, enter a name for the label. For example, MIP_EXAMPLE.
-
In the UUID field, enter the label UUID. For more information, see Step 1 - Copy the Microsoft Sensitivity label names and their UUIDs from Microsoft Purview.
-
Click Add.
-
Click OK.
Note - The newly created label is now listed in Sensitivity Labels under Data Type Name section.
It also shows the label details:
-
Date modified
-
Description
-
Tags - Shows tags assigned, if any, for further categorization
-
Where used - Shows the DLP rule name that uses this label to enforce protection.
-
Groups - Shows if the label is part of any group.
You can use Tags and Groups to better organize and manage the sensitivity labels.
-
-
To edit a label, select the label you want to edit, click Edit, update the field and then click Apply.

-
To delete a label, select the label you want to delete, click Delete and then click Delete Data Type.
-
Click Save.
-
Click Confirm.
Step 3 - Assign Sensitivity Labels to DLP Rules
After creating Sensitivity labels in Endpoint Security, you must assign them to the DLP rules to enforce data protection based on these sensitivity labels.
To assign sensitivity labels to a DLP rules, see Creating a DLP Rule and Associating with an Event.
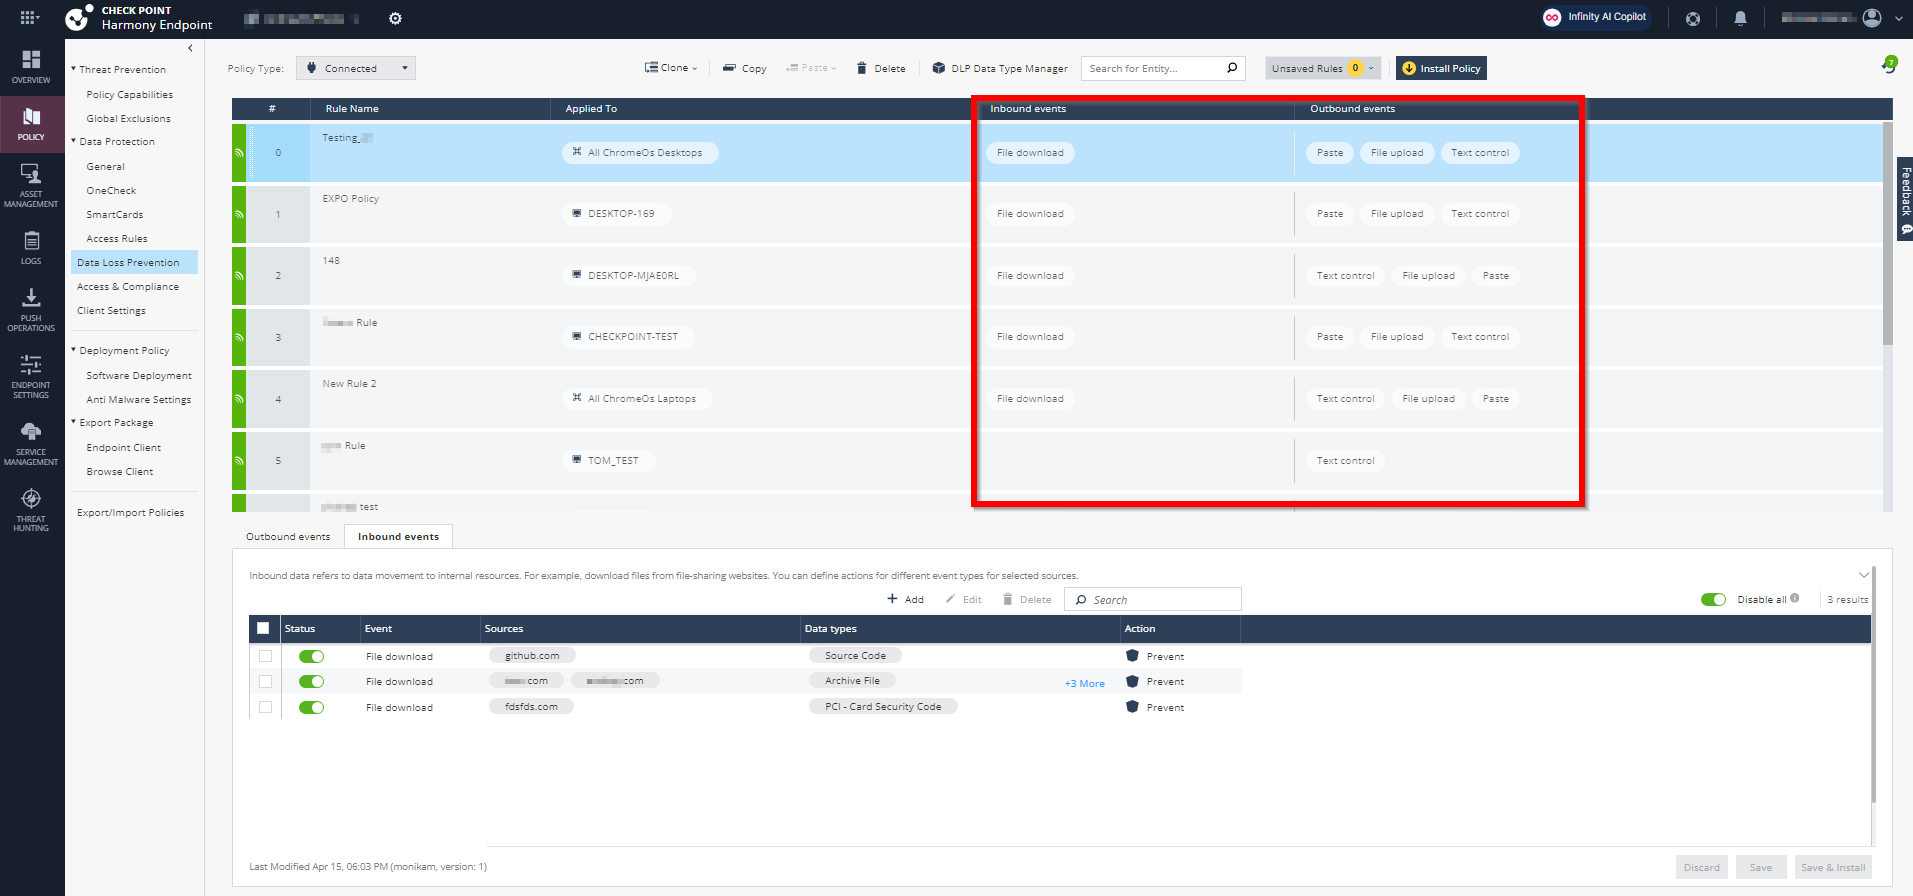
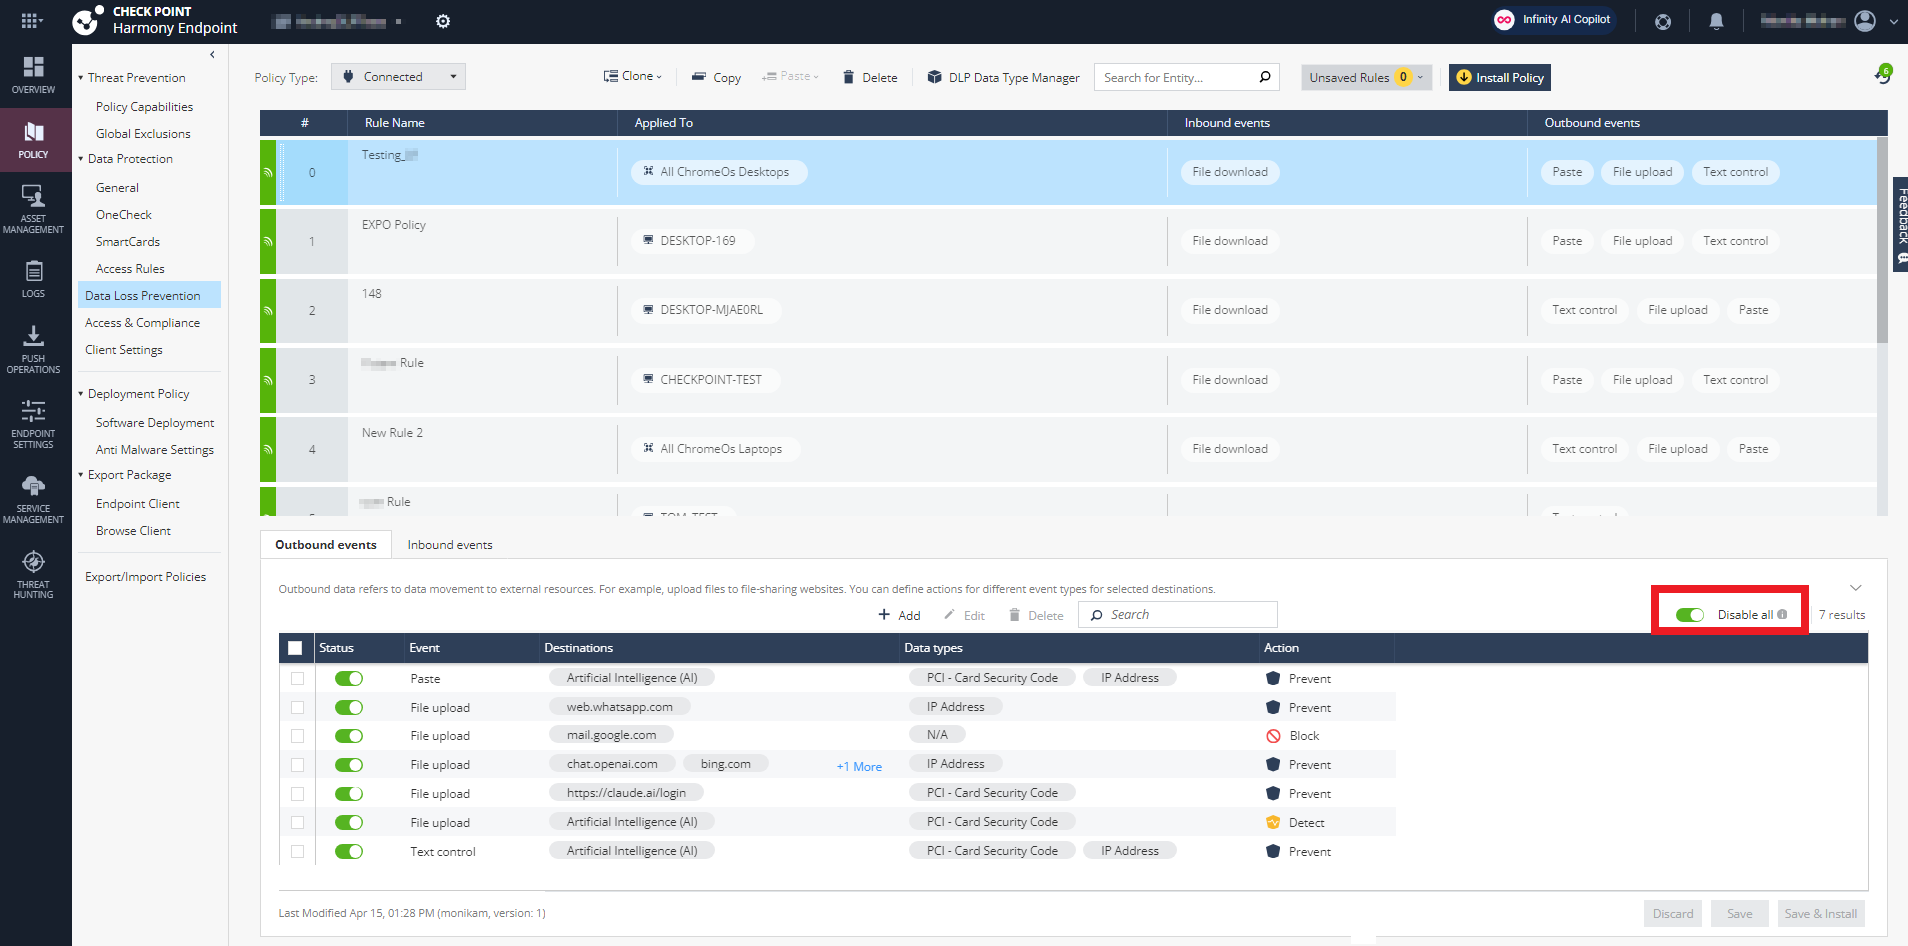
Creating a DLP Rule and Associating with an Event
-
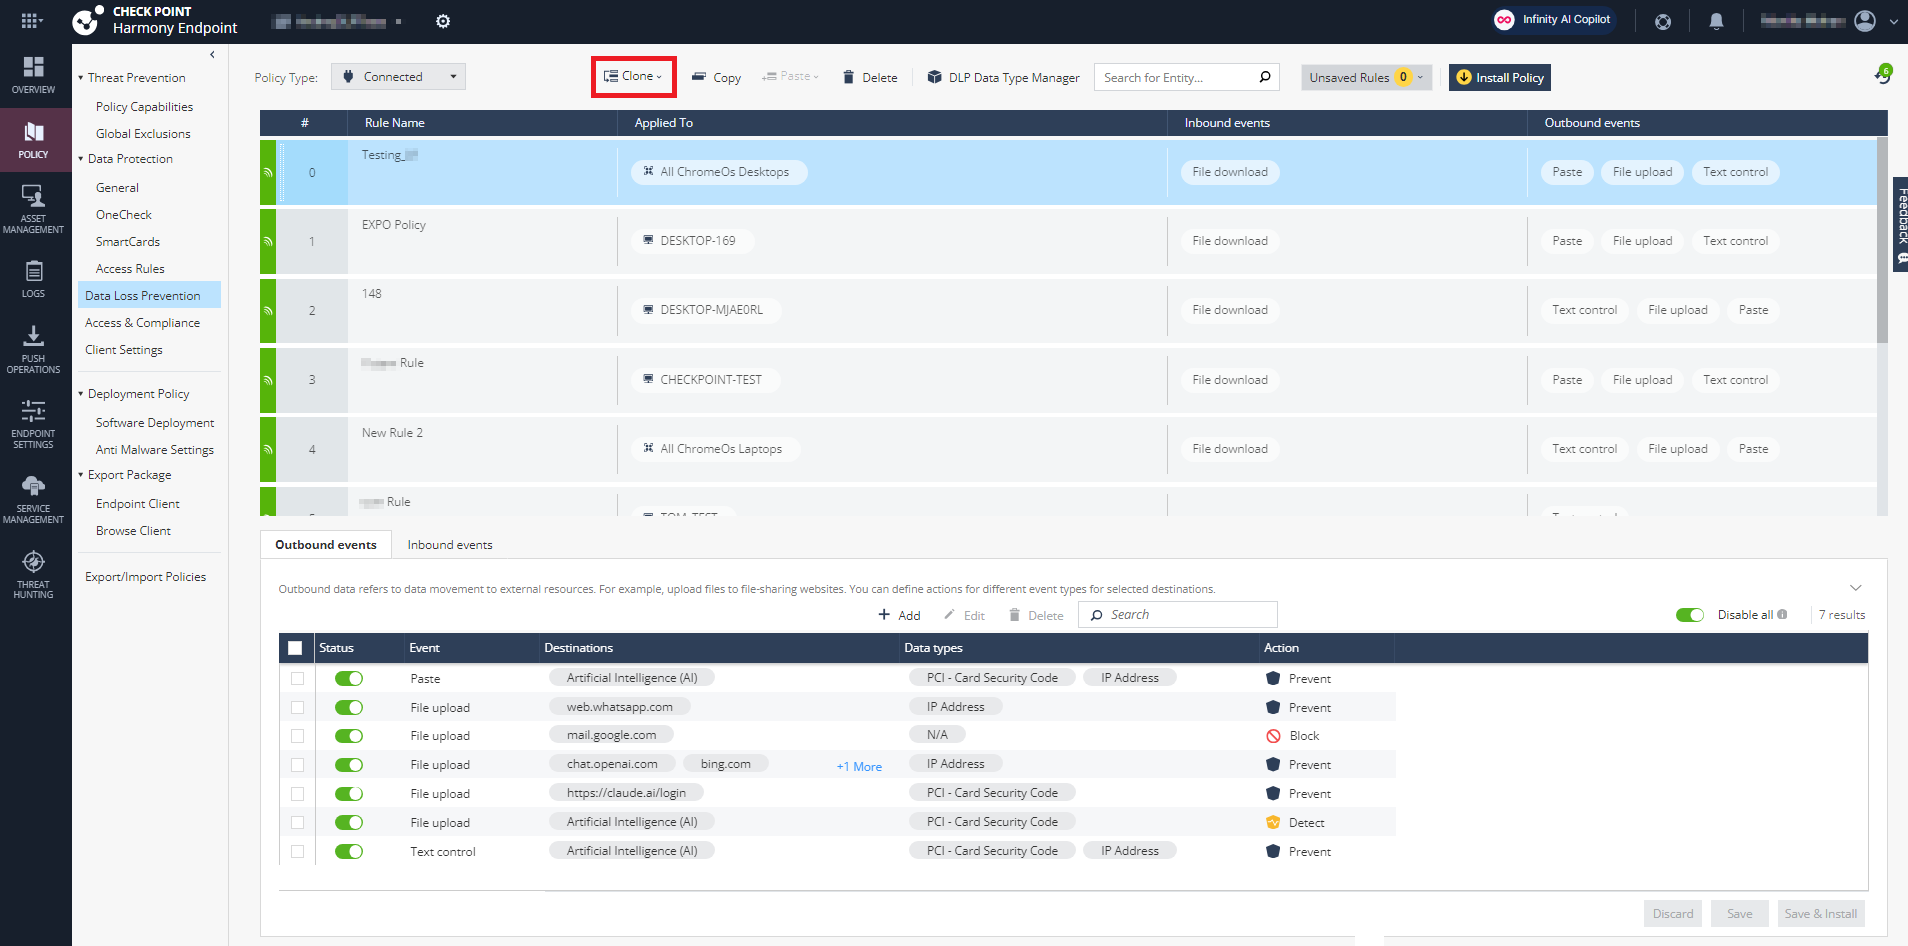
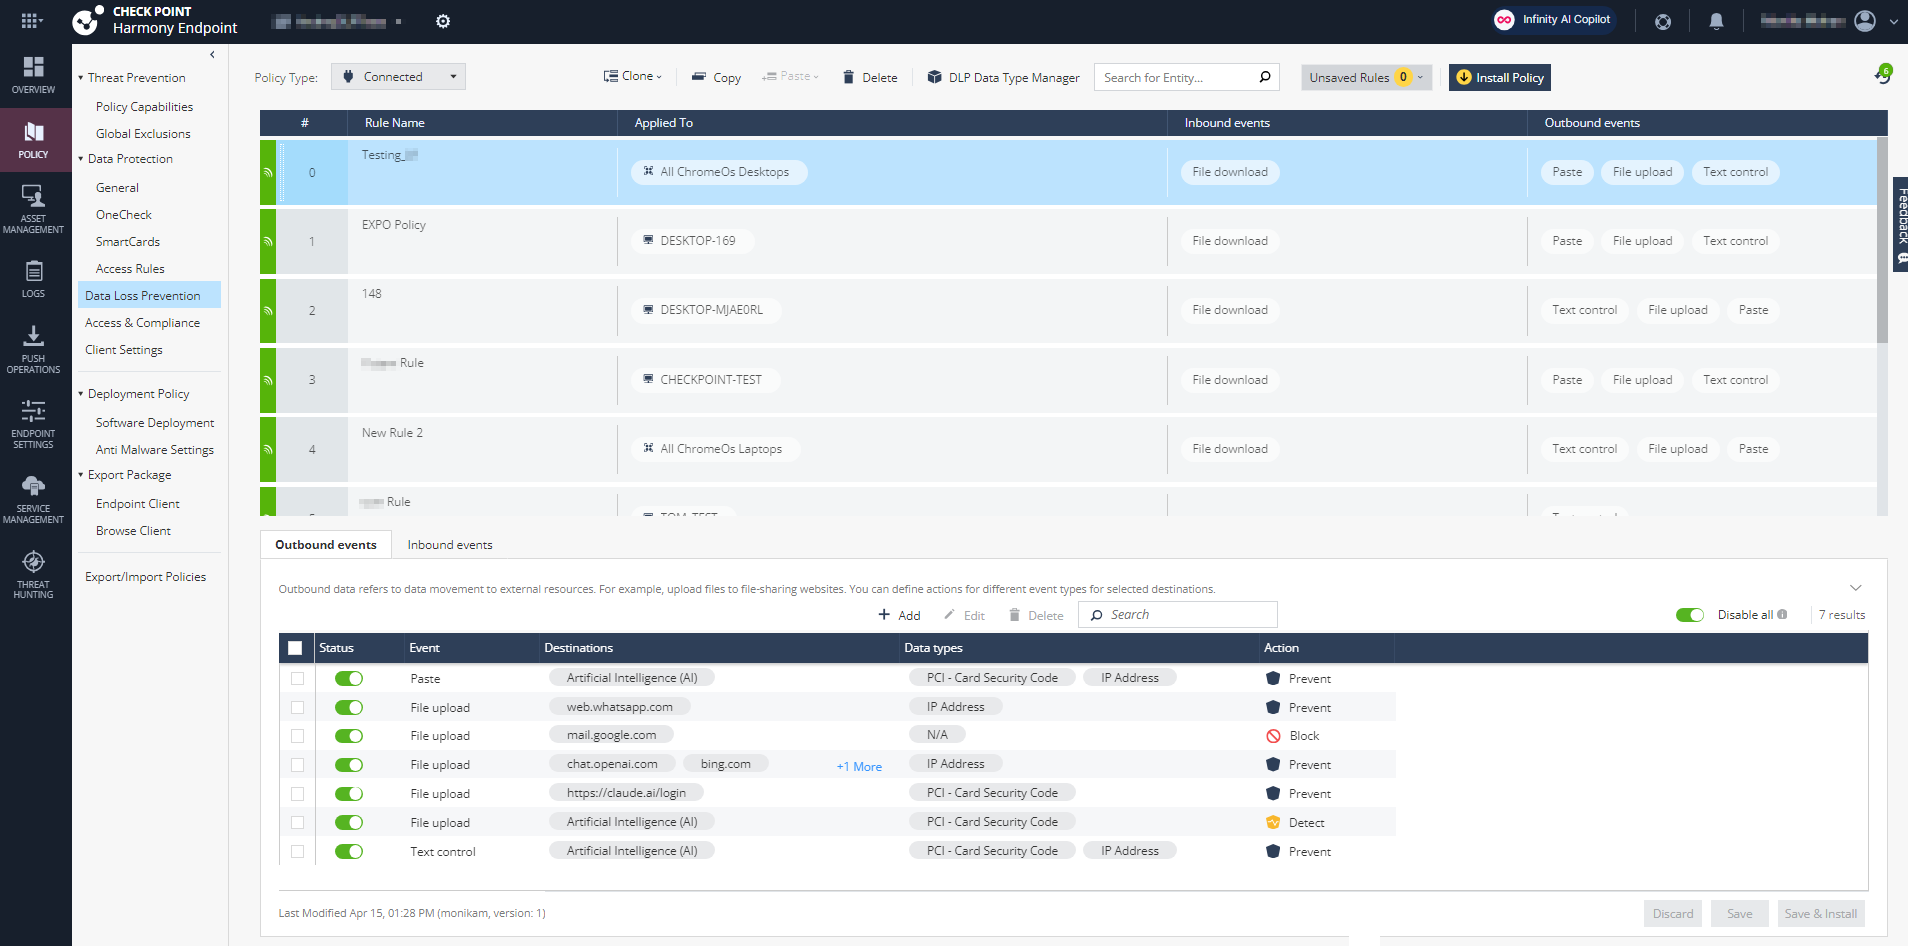
Go to Policy > Data Loss Prevention.
-
Add a rule:
-
Select a rule.
-
Click Clone and click Clone Above or Clone Below.
Note - If you have selected the default rule, select Clone Above.
The Clone Rule window appears.
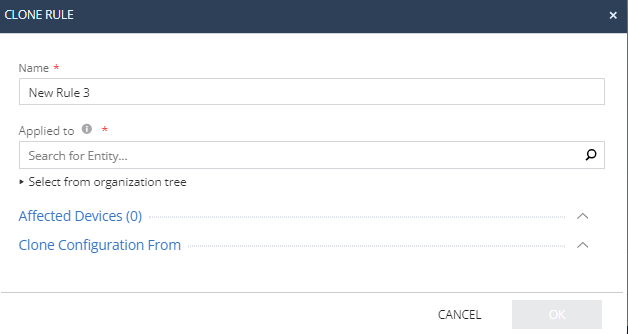
-
In the Name field, enter a rule name.
-
From the Applied to list, select a device(s) to which you want to apply the rule.
-
Click OK.
-
-
To enable the Gen AI protection, see Enabling GenAI Protect.
-
Click one of these tabs:
-
Outbound events - Outbound data refers to transferring content to external resources.
Examples:
-
Uploading file to a file sharing website.
-
Entering text in a text box of an external resource, such as ChatGPT.
-
Pasting text in a text box of an external resource, such as ChatGPT.
Note - Enforcement of DLP for Paste and Text Control events is only supported for Generative AI sites.
-
-
Inbound events - Inbound data refers to downloading data and sharing content within internal corporate resources.
Example - Downloading file from a file sharing website.
-
-
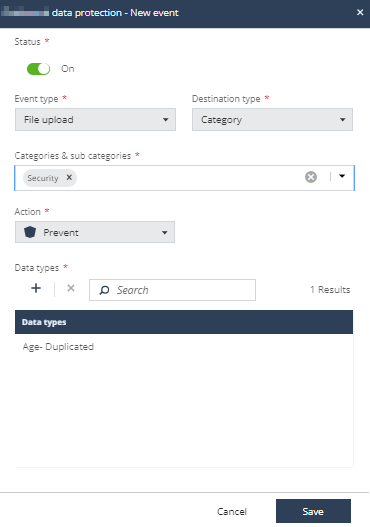
Click Add.
The Data Protection - New Event window appears.
-
By default, the event is enabled. To disable, turn off the Status toggle button.
-
From the Event type list, select one of these:
Event Type
Applies to
Description
File upload Outbound events To apply the DLP rule when you upload a file to an external resource. Text control Outbound events
To apply the DLP rule when you type text in an external resource text box. For example, in ChatGPT. Paste Outbound events
To apply the DLP rule when you paste content into an external resource. For example, ChatGPT. File download Inbound events
To apply the DLP rule when you download a file from an internal resource. Copy Inbound events
To apply the DLP rule when you copy content from an internal resource.
Note - Enforcement of DLP for Paste and Text Control events is only supported for Generative AI sites.
-
From the Destination type list, select one of these type to which you want to apply the rule:
Destination type
Applies to
Description
All
File upload
N/A
Url
-
File upload
-
File download
-
Copy
In the URL field, enter the web addresses to which you want to apply the rule.
Application
-
Text control
-
Paste
In the Applications field, select the application(s) to which you want to apply the rule.
Domain -
File upload
-
File download
-
Copy
In the Domain field, enter the domain to which you want to apply the rule.
Category
- File upload
-
Text control
-
Paste
From the Categories & sub categories list, select one or more categories.
Notes:
-
In Inbound events, you can only choose a URL or Domain.
-
In Inbound events, if a source is added for DLP scanning, files downloaded from that source are not scanned by Threat Emulation.
-
-
From the Action list, select one of these:
- Detect - Performs the DLP scan but does not block the data.
-
Prevent - Performs the DLP scan and prevents data transfer if it finds a match to a data type.
- Allow - Acts as exclusions, allowing data transfer in certain events.
-
Block - Blocks the data without the DLP scan.
-
Ask - Asks the user to provide justification before allowing data transfer based on the DLP scan results.
-
Redact - Performs a DLP scan and removes sensitive data based on a pre-defined set of Data Types. This action is only available for the Text-control category.
-
Force redact - Automatically replaces sensitive data with asterisk.
-
-
To associate data types with an event, in the Data types section, click
 and select the data type or a group.
Note - This step is applicable only if the Action is Ask, Detect or Prevent.
-
Click Save.
The events are displayed in the Outbound events and Inbound events columns in the DLP rule.
-
To delete an event, select the event that you want to delete and click Delete.
-
To edit an event, select the event that you want to edit, click Edit, make the required changes and click OK.
-
To disable all events, turn off the Disable all toggle button.
-
Click Save & Install.
The Install Policy window appears.
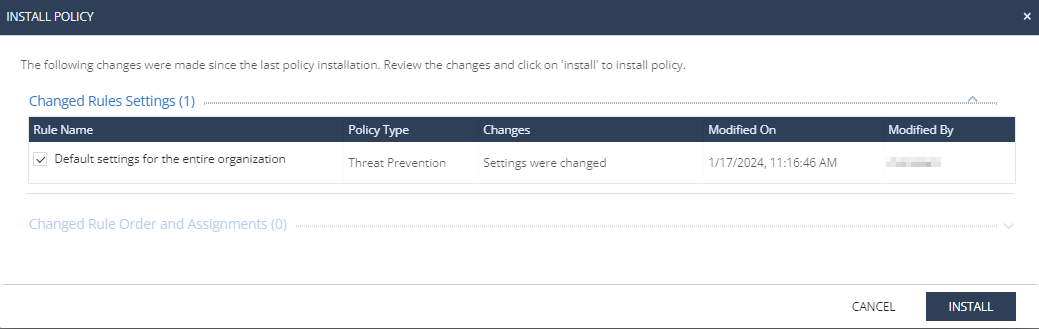
-
Click Install.
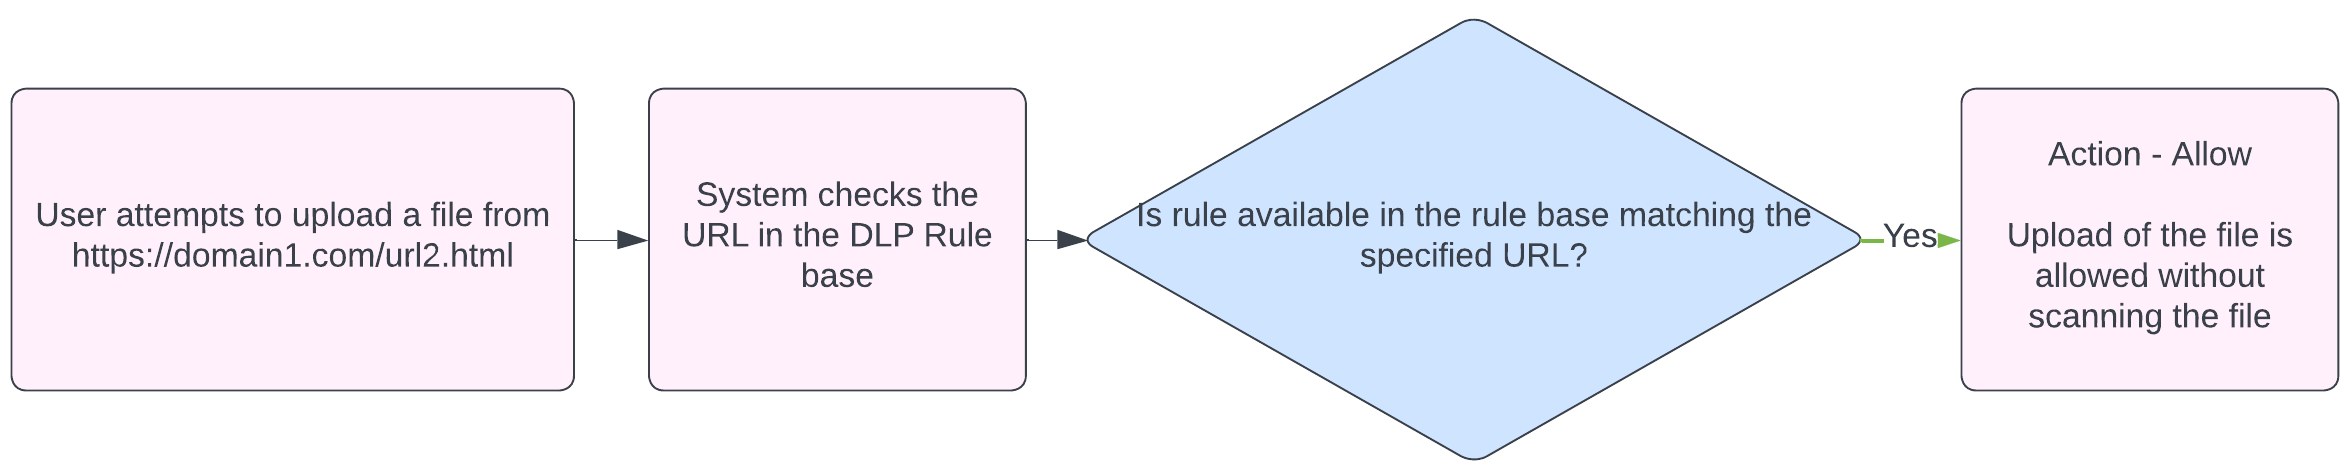
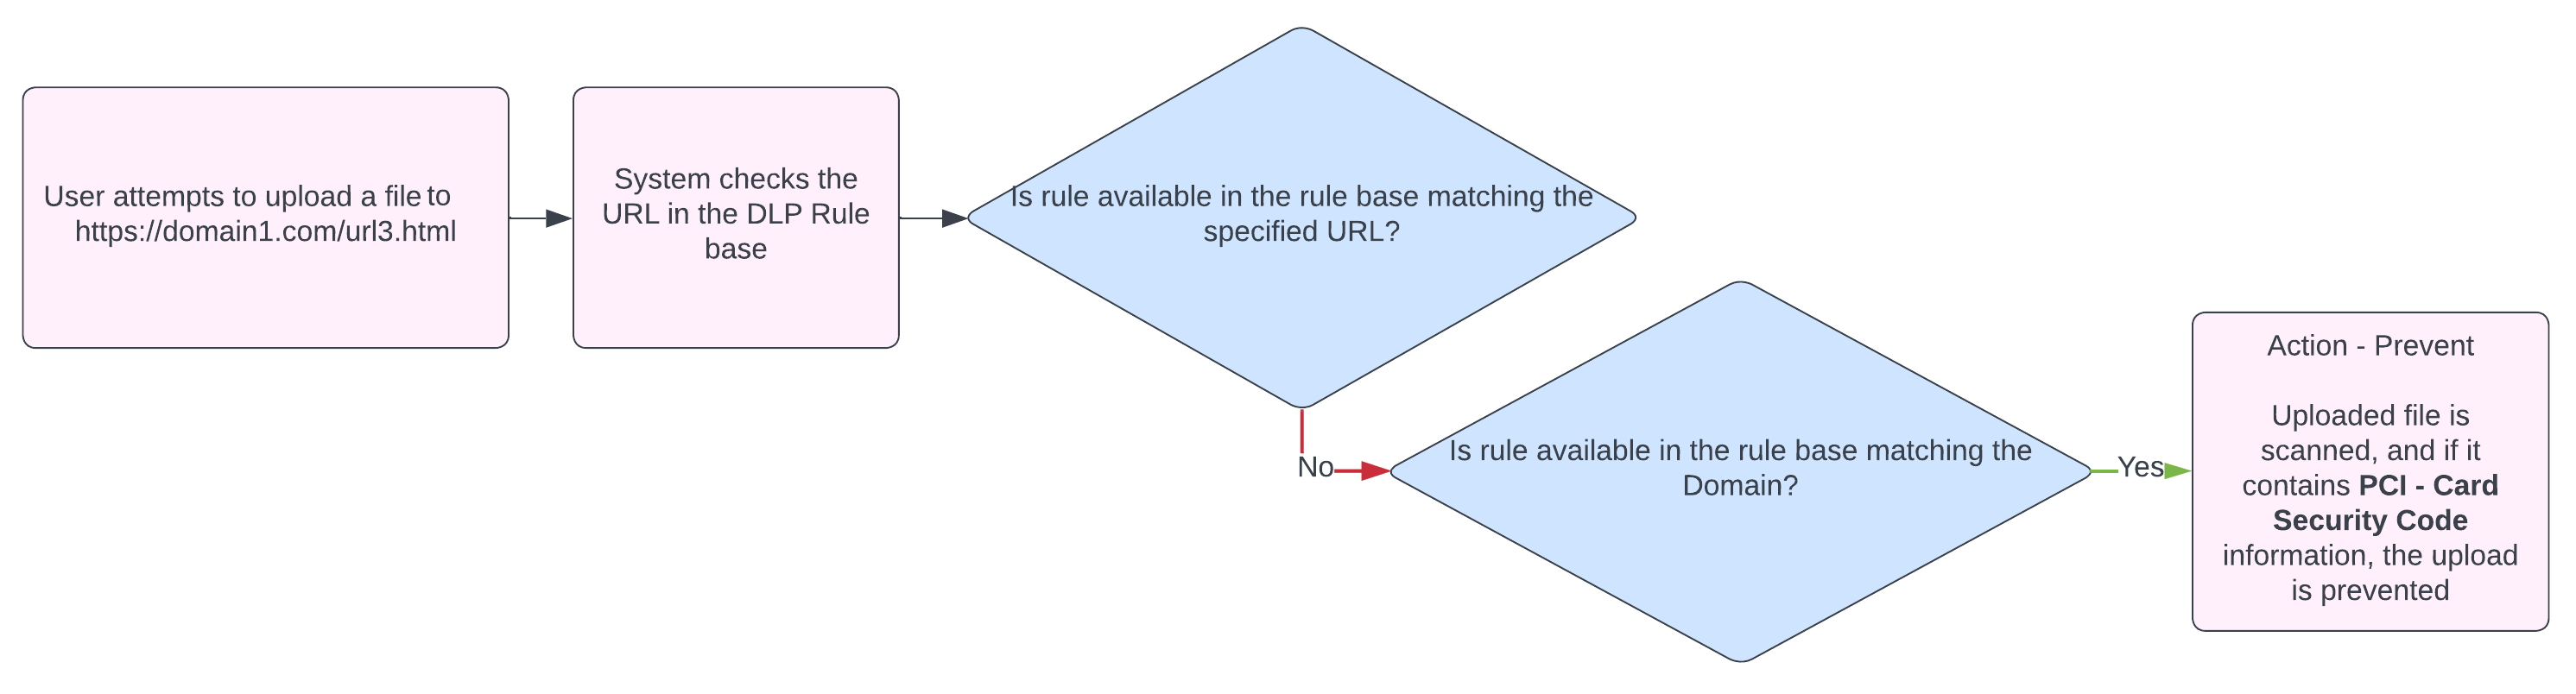
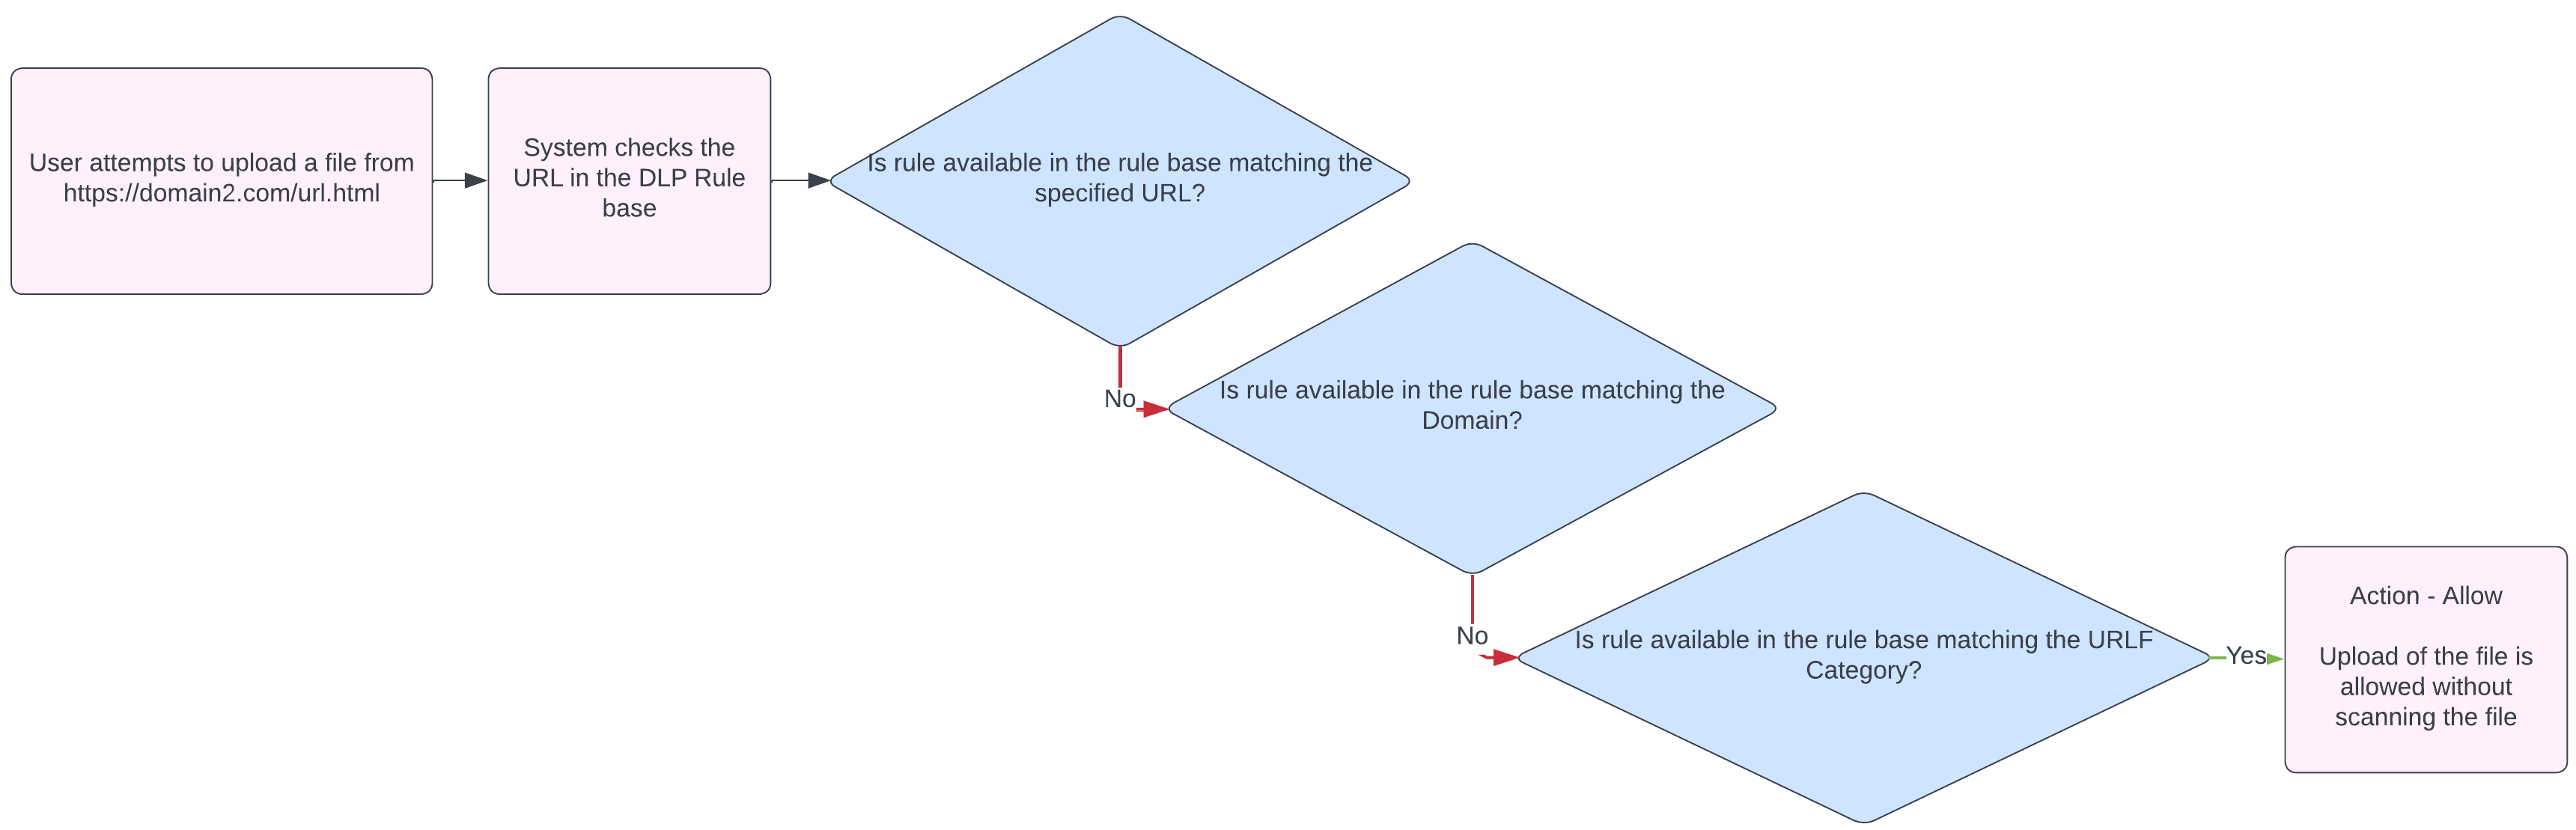
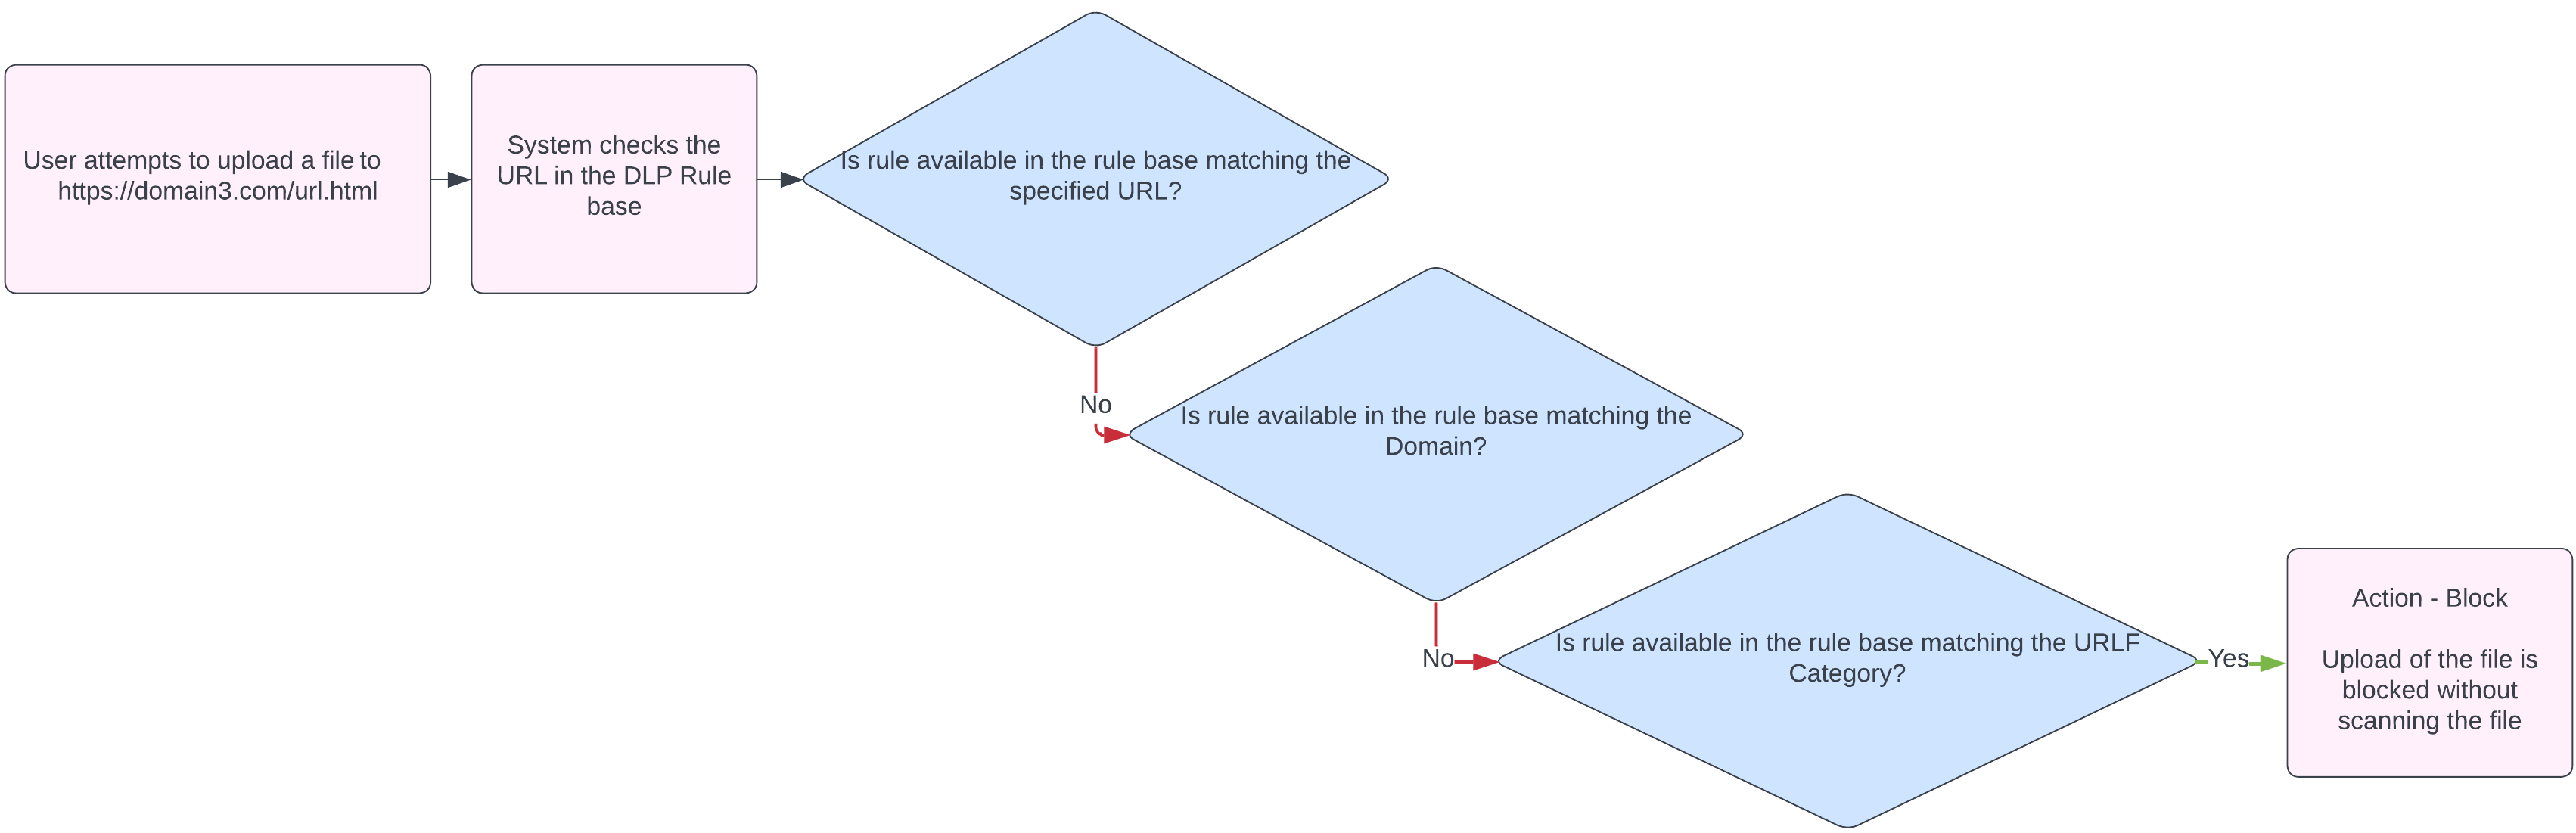
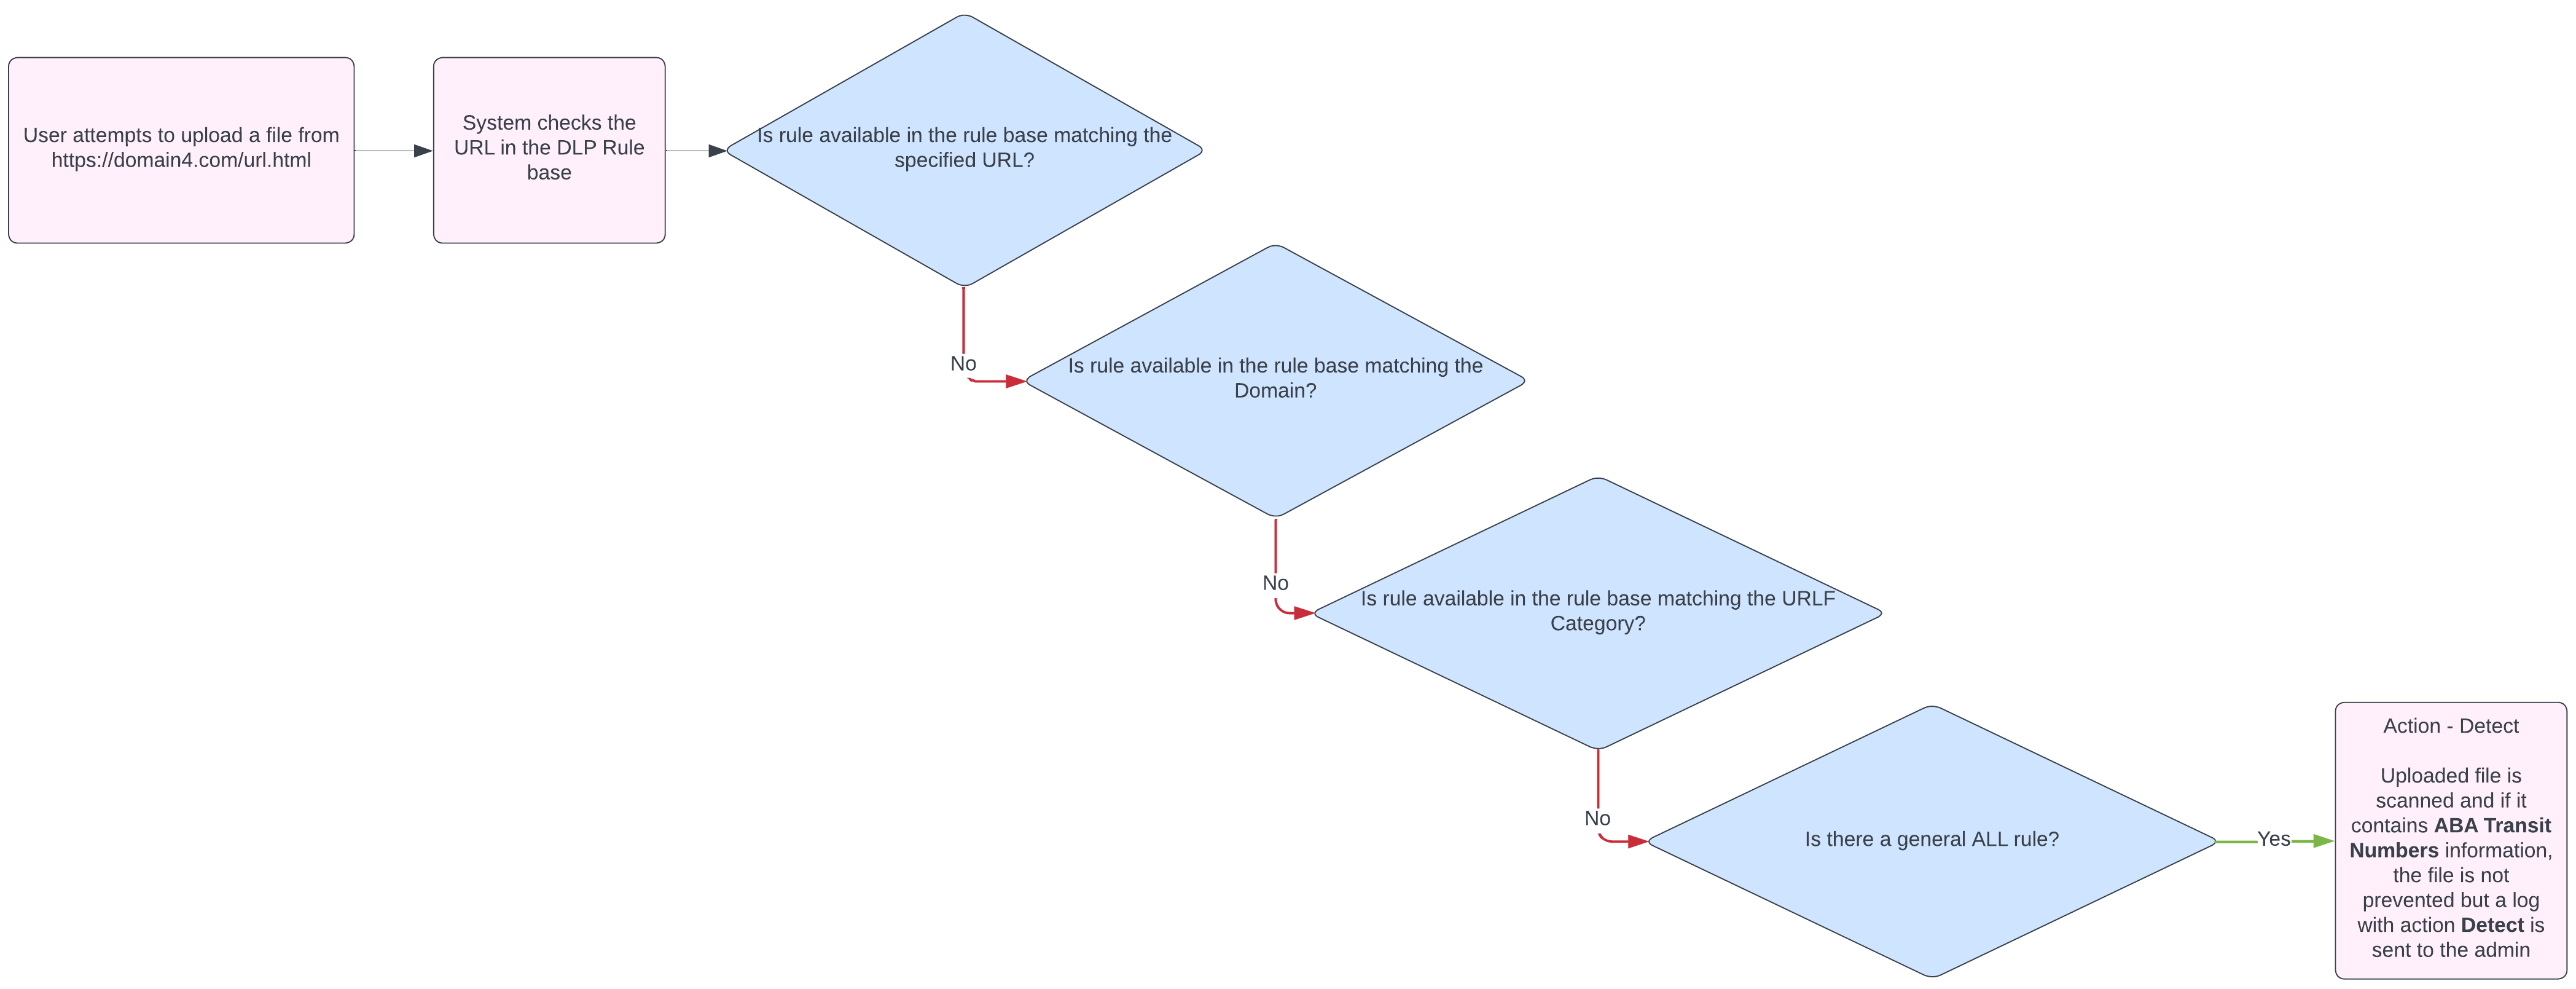
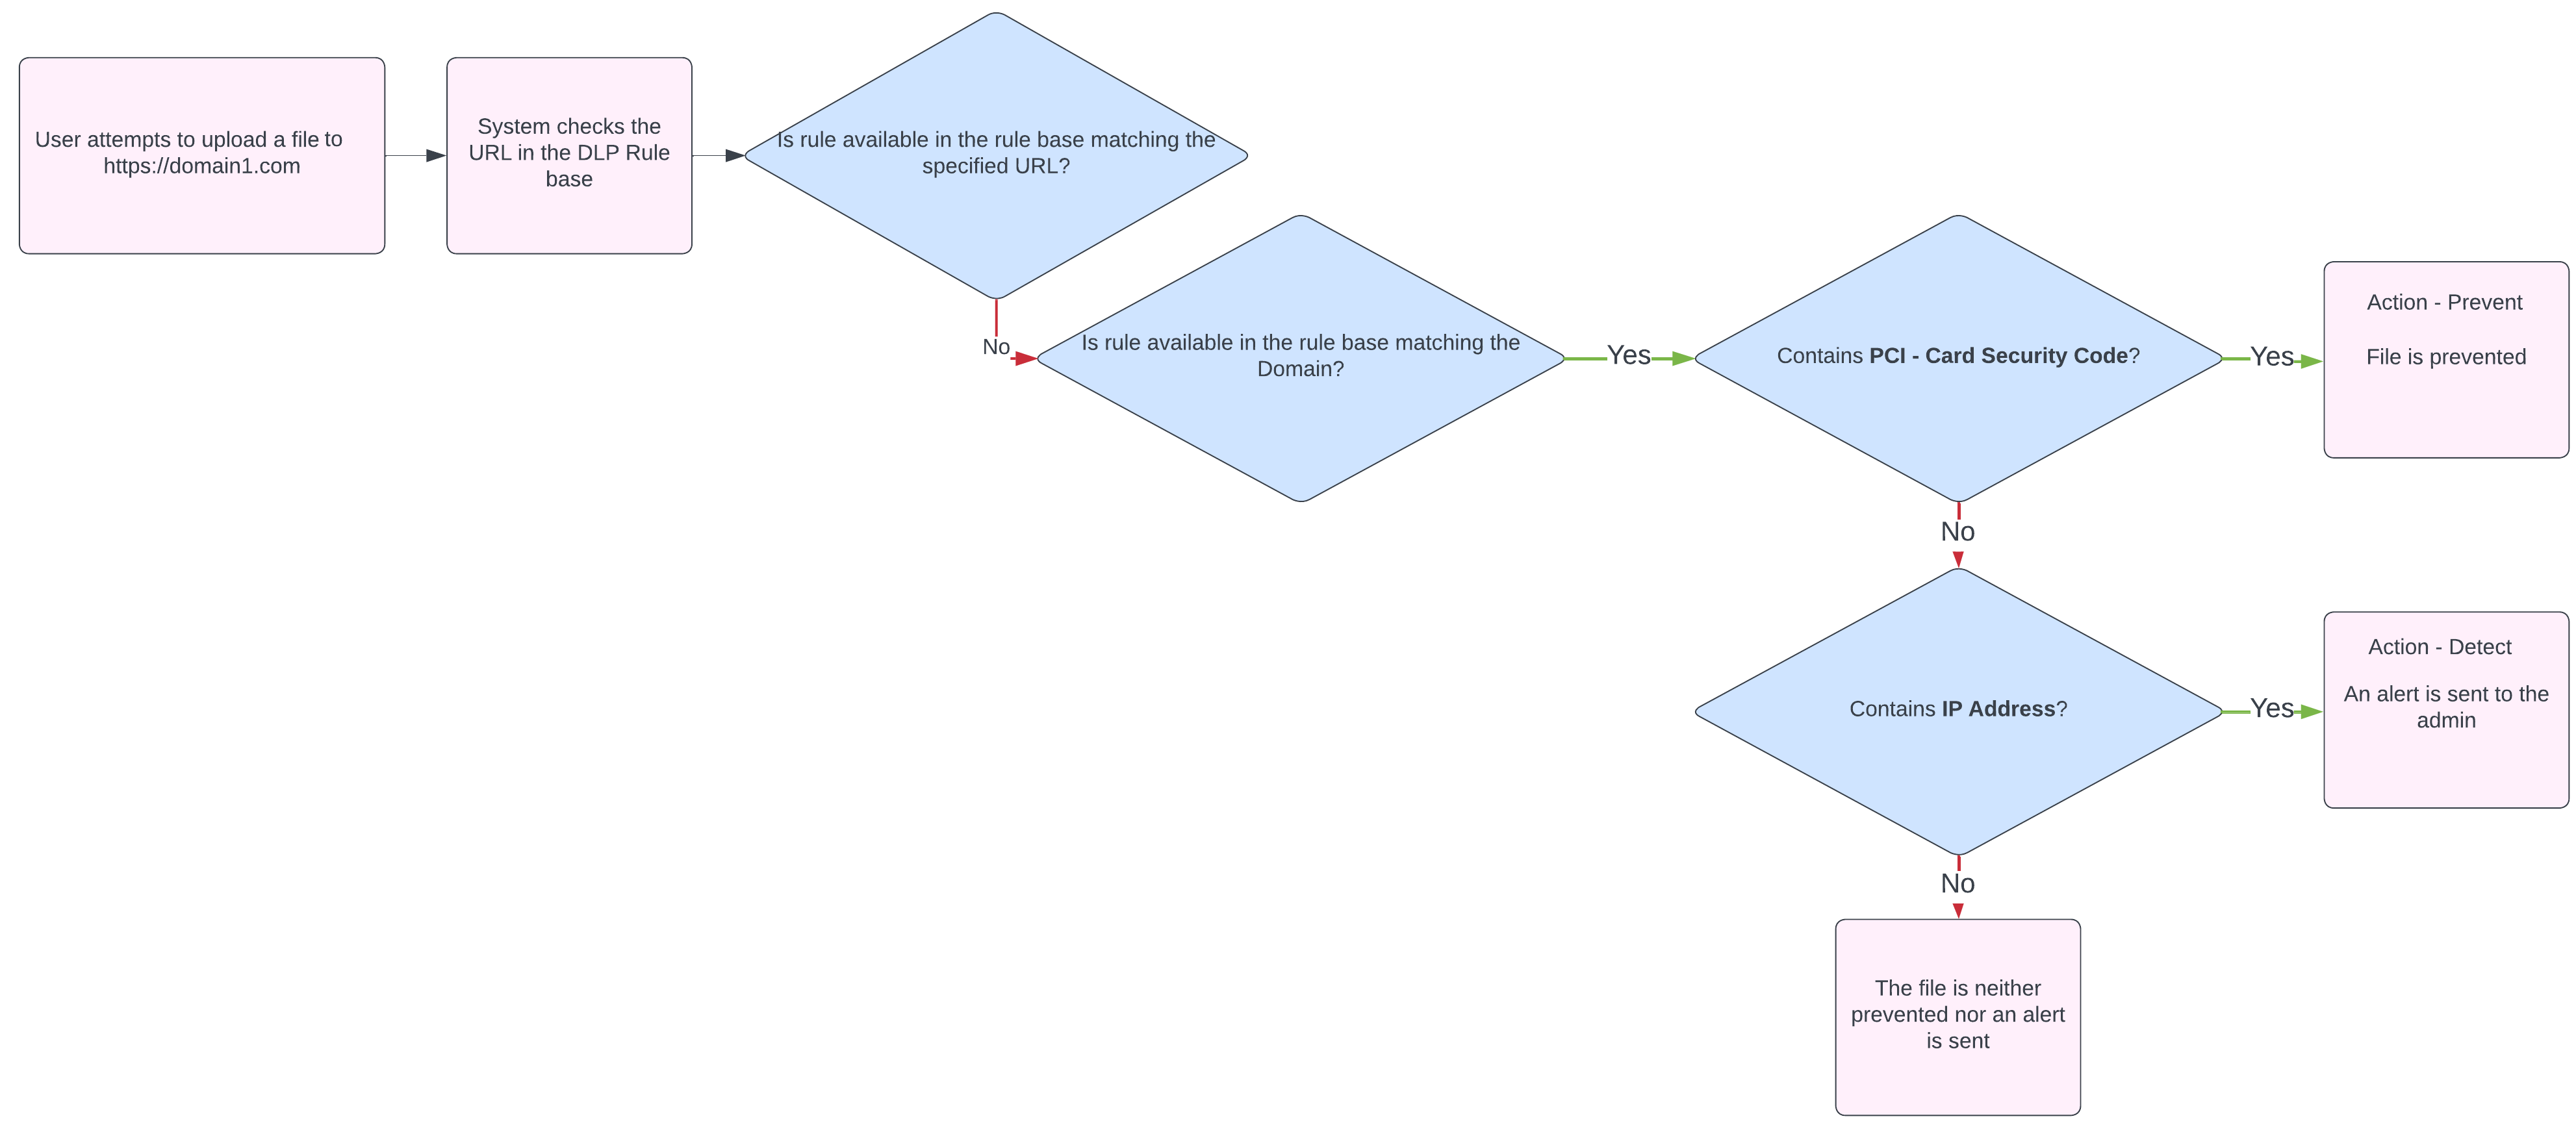
Rule Configuration Logic
The rule configuration logic offers a systematic method for applying policy rules to events. The system prioritizes the most specific events and progresses through these levels of specificity:
-
URL
-
Application
-
Domain
-
Category
-
All
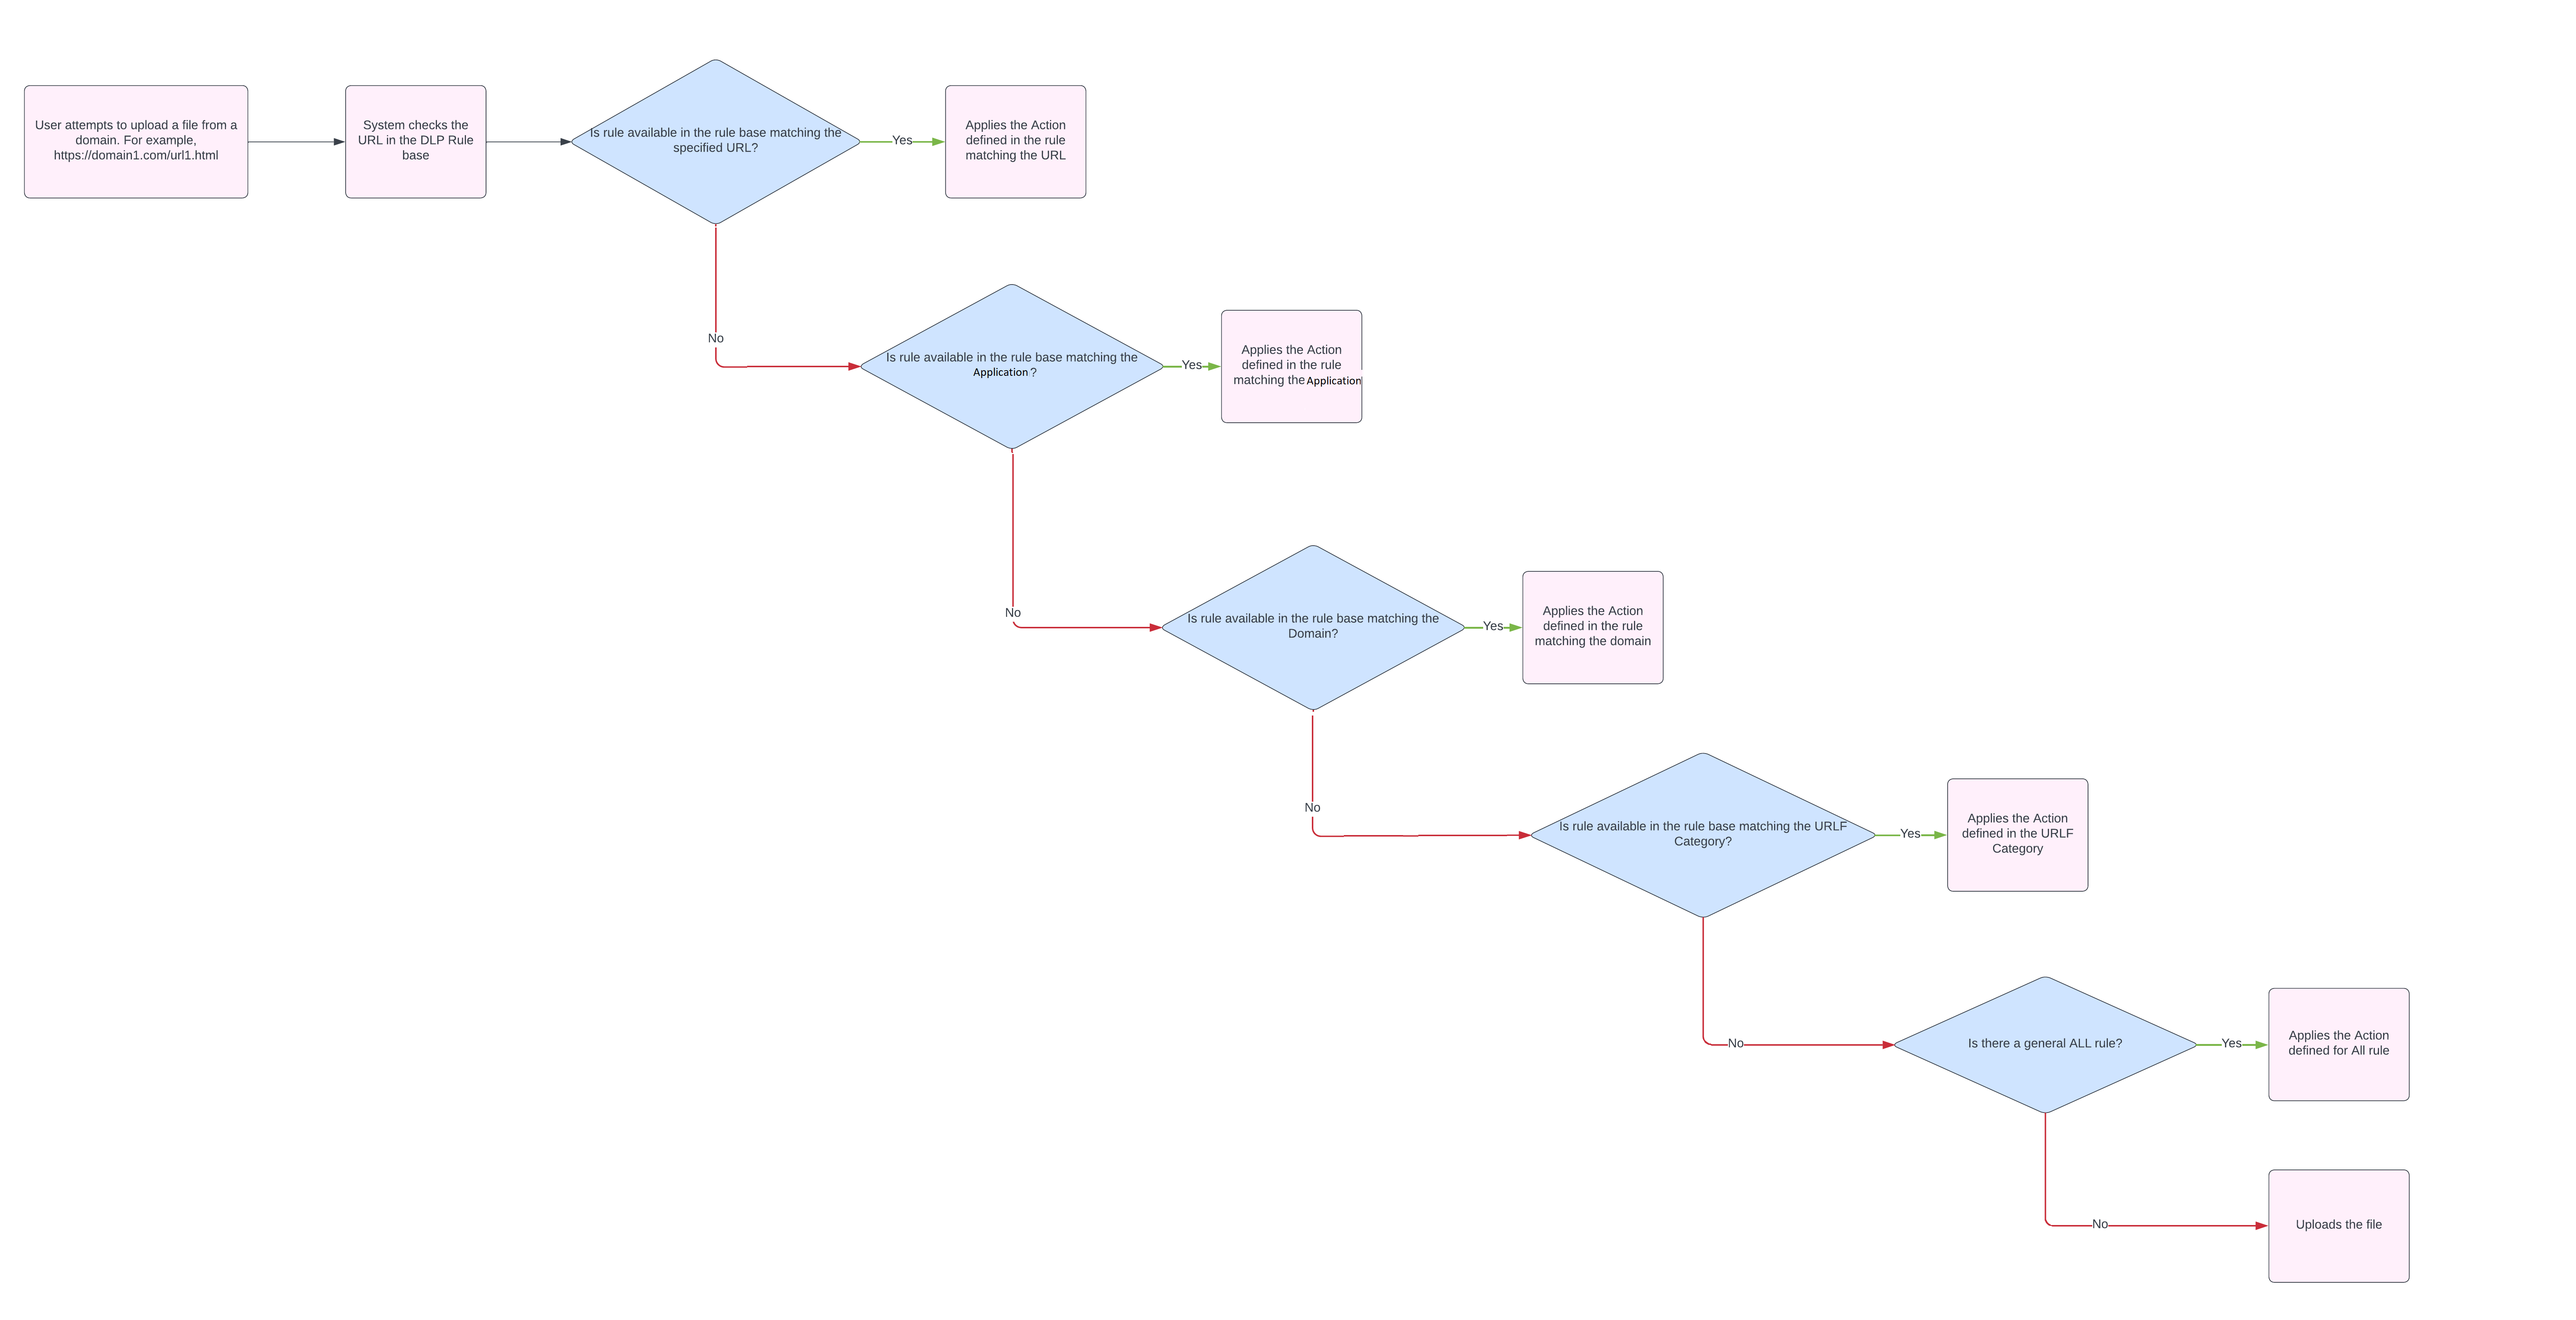
|
|
Note - The Paste and Text control events have access only to the Application and Category levels. |
Scenarios


When multiple events are relevant for the same incident, the events with the strict action is selected.


Context Objects
Context objects are AI-based data classification models designed to improve the detection of sensitive information through contextual analysis. These are used exclusively to detect prompts in GenAI applications.
|
|
Note - Context Objects are available only for Artificial Intelligence (AI) category and can only be used in Text Control and Paste events. |
For the list of available Context Objects, see sk181662.
Enabling GenAI Protect
The Data Loss Prevention policy allows the administrators to enable the Gen AI Protect feature on the endpoints. It monitors the use of various generative AI applications in the endpoints. It detects and prevents the sharing of potential confidential information in the prompts to any generative AI applications by the Endpoint Security Clients.
|
|
Note - GenAI Protect feature is supported only for the Check Point Portal tenants residing in the EU, India, US, and Australia, and Canada regions. |
Prerequisites
-
Ensure that the administrator account used to configure GenAI Protect has the required permissions before you enable the feature.
-
Create a DLP policy.
Note - The GenAI Protect SaaS dashboard becomes visible only after the first DLP policy is created.
To assign the required permissions:
-
Log in to the Check Point Portal.
-
Go to Settings > Users.
-
Select the administrator profile that will be used to configure GenAI Protect, and click Edit.
-
In the Edit User tab, scroll to the Global Role section.
-
In the Service drop‑down list, select SaaS.
-
In the Specific service role(s) drop‑down list, select Admin – View All Sensitive Prompts.
-
Click Save.
|
|
Notes -
|
To enable GenAI Protect and view the Dashboard:
-
Access the Endpoint Security Administrator Portal.
-
From the left navigation panel, click Policy > Data Loss Prevention.
-
Create a Data Loss Prevention policy with Outbound events for Text Control or Paste actions with these options:
-
In the Categories & Subcategories list, select Artificial Intelligence (AI).
-
In the Action list, select the action required.
-
Prevent
-
Detect
-
Ask
Note - If you want to exclude an application from GenAI Protect monitoring, you can use the Allow action, or use the Block action to prevent the action from running in that particular application.
-
-
In Data types, select the data types required for the policy.
-
Click Save.
-
-
Go to Settings tab and select the Enable GenAI protect checkbox.

-
Click Save & Install.
-
To view the dashboard, from the top right corner of the page, click GenAI Protect Dashboard.

The system redirects you to the SaaS Security Administrator Portal and shows the GenAI Protect Dashboard.
Notes:
-
If you access the GenAI Protect dashboard for the first time, the system might request to activate SaaS Security. Click Start trial.
Though GenAI Protect is visible in the SaaS Security Administrator Portal, you do not need additional license to use GenAI Protect and it is a part of Endpoint Security
-
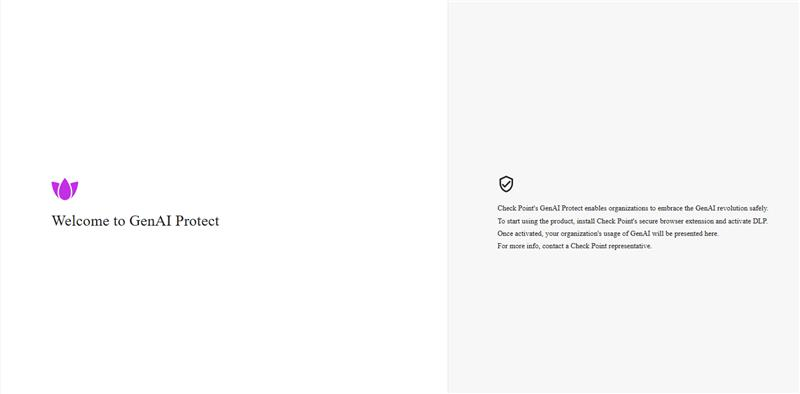
Till the time, the secure browser extension detects events that match the DLP policy rules of GenAI Protect, the system shows the Welcome page.
-
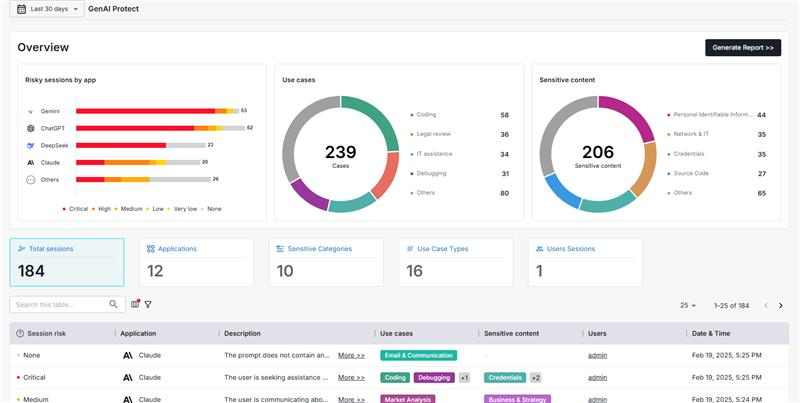
Once the secure browser extension detects events that match the DLP policy rules of GenAI Protect, the system shows events in the GenAI Protect Dashboard.
-
For information about how to use GenAI Protect dashboard, see SaaS Security Administration Guide