AWP for AWS Environments
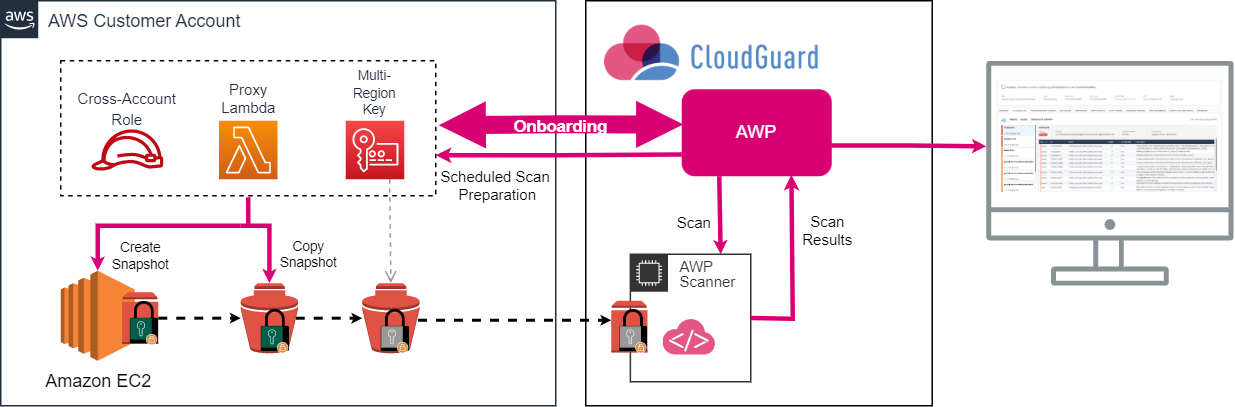
When you enable AWP, it creates a cross-account stack on your AWS![]() Amazon® Web Services. Public cloud platform that offers global compute, storage, database, application and other cloud services. account. The cross-account stack deploys in your account these primary resources:
Amazon® Web Services. Public cloud platform that offers global compute, storage, database, application and other cloud services. account. The cross-account stack deploys in your account these primary resources:
-
Cross-account IAM
 Identity and Access Management (IAM) - A web service that customers can use to manage users and user permissions within their organizations. role
 -
Proxy utility Lambda
-
Multi-Region key (for SaaS mode)
The data that the AWP scanner sends to CloudGuard are only CVEs and paths of the secrets.
All resources that AWP creates in your account have the Owner : CG.AWP tag.
Onboarding Workflow
To enable AWP on your AWS environment:
-
In the CloudGuard portal, navigate to Assets > Environments.
-
Click Enable in the AWP column for your AWS environment.
Alternatively, open the AWS environment, go to the AWP tab, and click Enable Agentless Workload Posture.
-
Follow the instructions on the wizard page that opens.
-
Select one of the options:
-
In-Account to scan one account locally. See Independent Accounts
-
In-Account Sub to scan one or more accounts on another (centralized) account. See Centralized Account and its Sub-Accounts
-
SaaS to scan one account remotely on CloudGuard accounts. See AWS SaaS Mode
-
In-Account Centralized to scan one or more accounts on this (centralized) account. See Centralized Account and its Sub-Accounts
-
-
Copy the URL generated by CloudGuard and paste it in a new browser tab. When you sign in to your AWS account, you are redirected to the CloudFormation page to create a new CFT stack.
-
In AWS, select the option I acknowledge that AWS CloudFormation might create IAM resources with custom names.
-
Click Create stack. CloudFormation starts to create the stack. After you create the stack, additional permissions are granted to CloudGuard.

Important - Make sure you do not change the mode (SaaS/In-Account) during the onboarding. For successful onboarding, you must use the same mode that you selected before the stack creation.
-
-
In the CloudGuard wizard, click Enable AWP. CloudGuard completes the process to enable AWP scanning.
|
|
Note - If you onboarded your AWS environment to CloudGuard with Terraform |
AWS In-Account Mode
With the In-Account mode, AWP scans data locally, so everything stays in your AWS account. The only data sent to CloudGuard are the AWP scanner findings. With this mode, you can keep all your data private, however, the volumes scanning entails additional costs.
Independent Accounts
In the In-Account mode for independent accounts, AWP generates the scan resources inside the same accounts, whose workloads it scans.
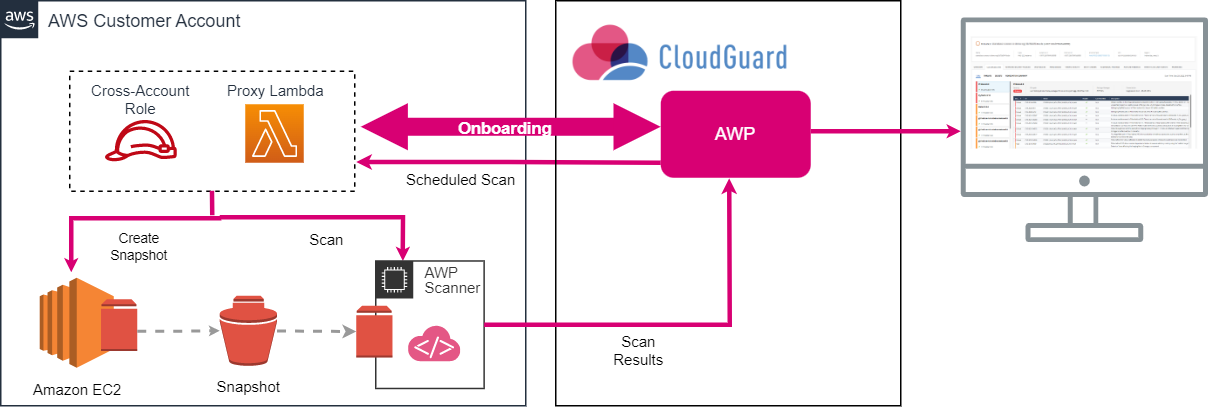
-
With the Cross-account role, AWP gathers information about your instance volumes.
-
With the Cross-account role, AWP remotely invokes the proxy utility Lambda with a request to create snapshots from the instance volumes.
-
When all instance volumes have their equivalent snapshots created, AWP launches an EC2
Amazon EC2 - A web service for launching and managing Linux/UNIX and Windows Server instances in Amazon data centers. instance on the customer account and performs the scanning. This instance runs in the same region as the original EC2, in a custom VPC that AWP creates for this task.-
The scanner outbound traffic is restricted by a security group rule that limits access exclusively to S3 IP addresses.
-
No inbound rules are configured.
To ensure that network traffic remains within the AWS backbone, the VPC utilizes an S3 endpoint.

Note - Make sure that your account does not reach the VPC quota (by default, 5 VPCs for each region) before you enable AWP.
-
-
When the scan is complete, AWP sends a request to Lambda to delete the snapshots created for the scan.
-
In the onboarding wizard, select the In-Account option for the scan mode.
-
The link in step 2 has some default onboarding parameters. If you need to change them, click Advanced and edit:
-
Name of the CloudFormation stack
-
Cross-Account External ID
-
Cross-Account Role Name
-
Optionally, you can enable the scanning of AWS Marketplace licensed images by selecting the Scan licensed images option. Due to internal restrictions, AWP can skip some licensed images with an indication unsupported license.
Note - Scanning of AWS Marketplace licensed images may result in additional charges based on AWS pricing policies. Initially, AWP attempts to scan with the regular machine types. If this fails, it reverts to the original machine types, subject to some cost limitations. Review your cloud storage plan to understand potential costs.
-
-
Copy the URL generated by CloudGuard and paste it into a new browser tab. When you sign in to your AWS account, you are redirected to the CloudFormation page to create a new CFT stack.
-
In AWS, select the option I acknowledge that AWS CloudFormation might create IAM resources with custom names.
-
Click Create stack. CloudFormation starts to create the stack. After you create the stack, additional permissions are granted to CloudGuard.
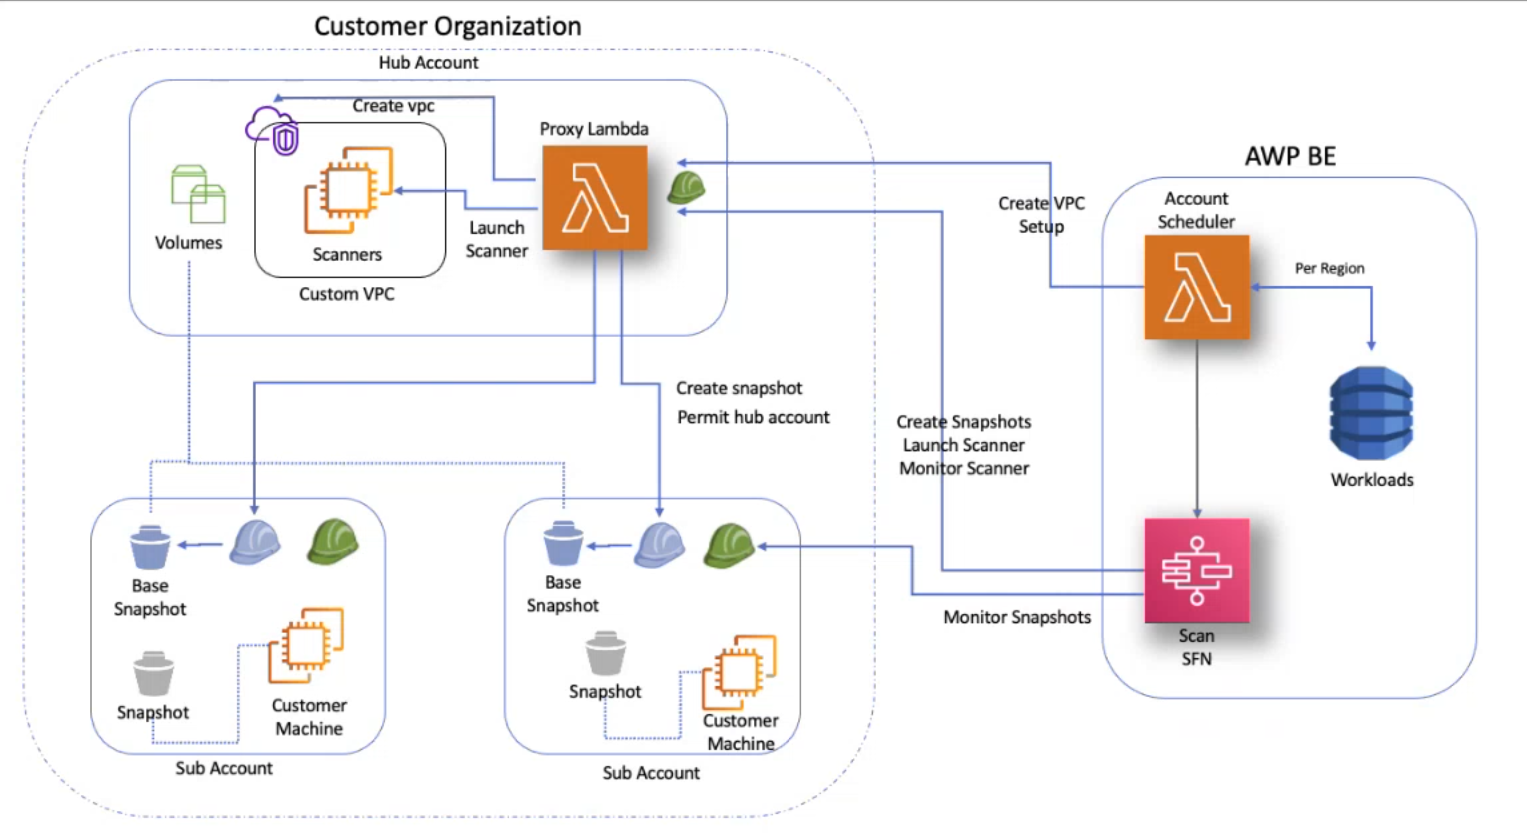
Centralized Account and its Sub-Accounts
When you select to use the In-Account mode for independent accounts, AWP creates multiple resources on your account during its scanning. If you have many accounts, these multiple distributed resources can be impracticable for management and billing. In such cases, you can configure one of your onboarded AWS accounts as a Centralized account, where all AWP scans and resources are located. You can configure other AWS accounts in the same organization as Sub-accounts to have their scanners and AWP resources located in the centralized account.
-
With the Cross-account role, AWP uses the proxy utility Lambda to create a custom VPC where the scanners can run.
-
AWP remotely invokes the proxy Lambda with a request to create snapshots on a sub-account. The proxy Lambda assumes the operator role of the sub-account and, in case of the encrypted volume, re-encrypts the snapshots with the CloudGuard multi-Region key.
Note - The key resources are regional. Sometimes the instance is in a region where the multi-Region key does not have a replica yet. In such a case, AWP creates a replica of the key in the relevant region, with its Cross-account role.
-
AWP monitors the creation of the snapshots with the Reader role until the snapshots are ready.
-
When all sub-account snapshots are created, AWP launches the proxy Lambda on the centralized account and performs the scanning in the created VPC. In the case of the encrypted volume, the AWP scanner has access to the data of the sub-account snapshots because they are encrypted with AWP's own multi-Region key. The EC2 instance runs in the same region as the centralized account, in a custom VPC that AWP creates for this task.
-
The scanner outbound traffic is restricted by a security group rule that limits access exclusively to S3 IP addresses.
-
No inbound rules are configured.
To ensure that network traffic remains within the AWS backbone, the VPC utilizes an S3 endpoint.
Note - Make sure that your account does not reach the VPC quota (by default, 5 VPCs for each region) before you enable AWP.
-
-
When the scan is complete, AWP sends a request to Lambda to delete the snapshots created for the scan.
The centralized account serves the entire organization. If the organization has several centralized accounts, each of them has permissions to manage scanners and AWP resources for all sub-accounts in the organization.
First, you need to onboard a centralized account. Then you can onboard a sub-account which assets are to be scanned on the centralized account.
Centralized Account
-
In the onboarding wizard, select the In-Account Centralized option for the scan mode.
-
The link in step 2 has some default onboarding parameters. If you need to change them, click Advanced and edit:
-
Name of the CloudFormation stack
-
Cross-Account External ID
-
Cross-Account Role Name
-
-
Copy the URL generated by CloudGuard and paste it in a new browser tab. When you sign in to your AWS account, you are redirected to the CloudFormation page to create a new CFT stack.
-
In AWS, select the option I acknowledge that AWS CloudFormation might create IAM resources with custom names.
-
Click Create stack. CloudFormation starts to create the stack. After you create the stack, additional permissions are granted to CloudGuard.
|
|
Note - Make sure to validate in AWS that all regions enabled for sub-accounts are also enabled for the centralized account. |
Sub-Account
-
In the onboarding wizard, select the In-Account Sub option for the scan mode.
-
Select the centralized account where this sub-account has its scanner and AWP resources.
-
The link in step 3 has some default onboarding parameters. If you need to change them, click Advanced and edit:
-
Name of the CloudFormation stack
-
Cross-Account External ID
-
Cross-Account Role Name
-
-
Copy the URL generated by CloudGuard and paste it in a new browser tab. When you sign in to your AWS account, you are redirected to the CloudFormation page to create a new CFT stack.
-
In AWS, select the option I acknowledge that AWS CloudFormation might create IAM resources with custom names.
-
Click Create stack. CloudFormation starts to create the stack. After you create the stack, additional permissions are granted to CloudGuard.
When the onboarding is completed, the AWP tab of the AWS environments shows its mode, its related centralized account and other scan statistics.
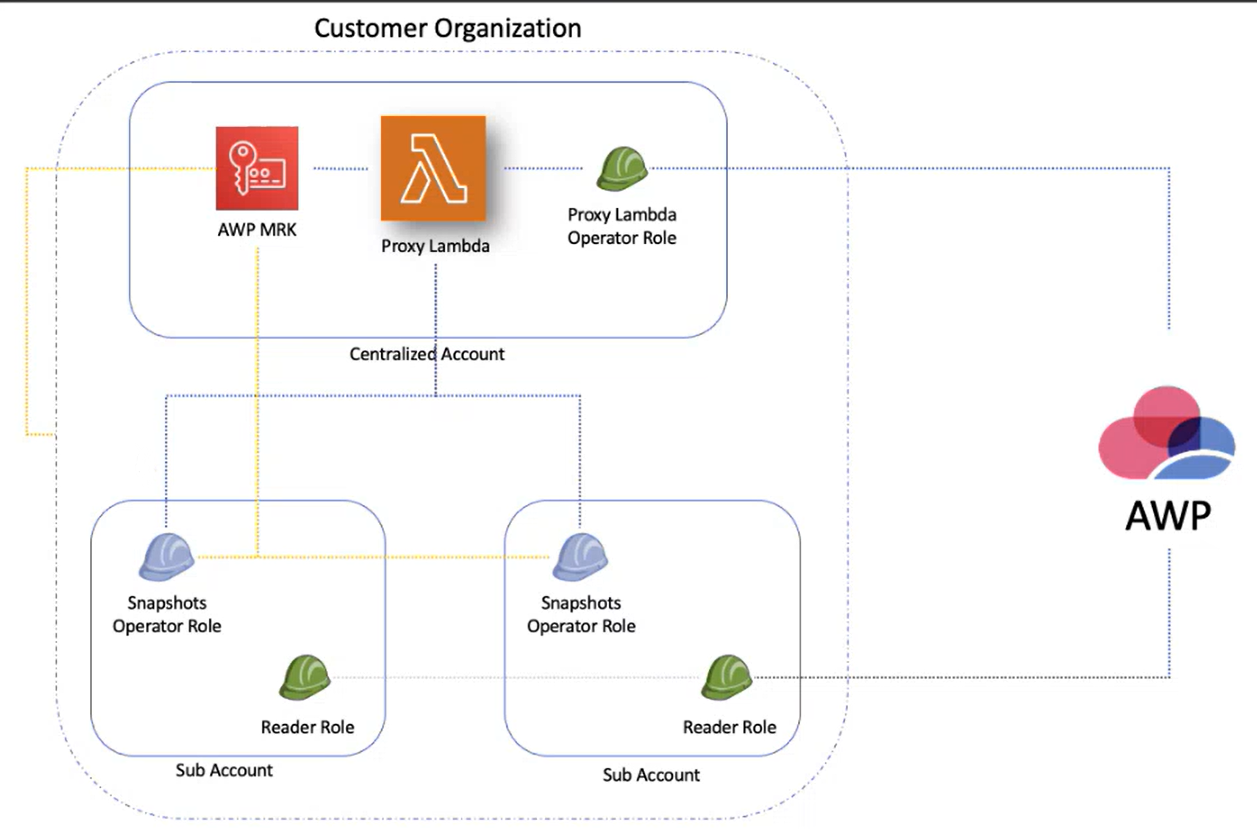
Roles and Permissions
|
Role |
Permission |
|---|---|
|
Proxy Lambda Operator role |
|
|
Proxy Lambda role |
|
|
Role |
Permission |
|---|---|
| Reader role |
|
| Operator role |
|
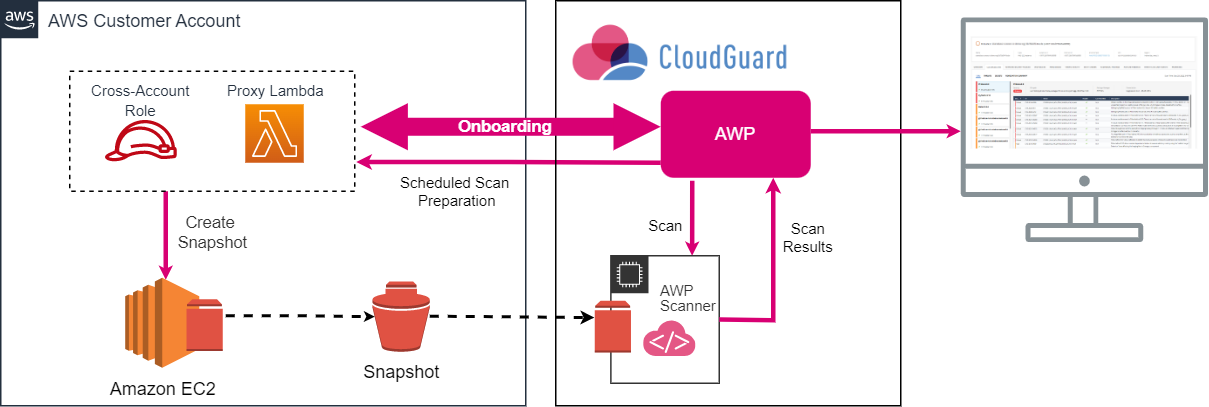
AWS SaaS Mode
In the SaaS mode, AWP creates the snapshots of your EC2 volumes and scans the snapshots on a virtual machine located on the CloudGuard's own AWS account. With this mode, you do not pay for the scans, and CloudGuard fully manages all the required resources.
-
With the Cross-account role, AWP gathers information about your instance volumes.
-
With the Cross-account role, AWP remotely invokes the proxy utility Lambda with a request to create snapshots in the customer account from the instance volumes.
-
When all instance volumes have their equivalent snapshots created, a scanner machine launches at the AWP engine with the snapshots attached to it and performs the scanning.
-
When the scan is complete, AWP sends a request to Lambda to delete the snapshots created for the scan.
Scanning Encrypted Volumes in SaaS Mode
For security reasons, AWP does not have access to encrypted volumes in your EC2 instance and cannot scan them. It happens because CloudGuard does not require access to the encryption keys and never obtains them from you as this can compromise your data.
To scan the encrypted volumes securely, CloudGuard re-encrypts the volume data with its own multi-Region key. It installs the key as part of the AWP cross-account stack. Likewise, it installs a proxy utility Lambda function as part of the cross-account stack. With its cross-account role, this Lambda function manages all procedures of the snapshots' creation and re-encryption on remote requests (invocations) from the AWP engine.
This limits access to your account keys only to the proxy Lambda, where you have full visibility and control.
-
With the Cross-account role, AWP gathers information about your instance volumes.
-
With the Cross-account role, AWP remotely invokes the proxy utility Lambda with a request to create snapshots from the instance volumes.
In the case of encrypted snapshots, AWP sends one more request to Lambda to re-encrypt the snapshots created in the customer account with the CloudGuard multi-Region key.
Note - The key resources are regional. Sometimes the instance is in a region where the multi-Region key does not have a replica yet. In such a case, AWP creates a replica of the key in the relevant region, with its Cross-account role.
-
When all instance volumes have their equivalent snapshots created, a scanner machine launches at the AWP engine with the snapshots attached to it and performs the scanning.
For encrypted snapshots, the AWP scanner has access to the snapshots' data because they are encrypted with AWP's own multi-Region key.
-
When the scan is complete, AWP sends a request to Lambda to delete the snapshots created for the scan.
-
In the onboarding wizard, select the SaaS option for the scan mode.
-
The link in step 2 has some default onboarding parameters. If you need to change them, click Advanced and edit:
-
Name of the CloudFormation stack
-
Cross-Account External ID
-
Cross-Account Role Name
-
-
Copy the URL generated by CloudGuard and paste it in a new browser tab. When you sign in to your AWS account, you are redirected to the CloudFormation page to create a new CFT stack.
-
In AWS, select the option I acknowledge that AWS CloudFormation might create IAM resources with custom names.
-
Click Create stack. CloudFormation starts to create the stack. After you create the stack, additional permissions are granted to CloudGuard.
Actions
Ignoring an Instance Scan
If you need to deliberately skip scanning an instance, set a tag for the instance on the AWS console.
To set a tag for the AWP scanner to ignore an EC2 instance:
-
In the AWS console, navigate to EC2 > Instances and select your instance.
-
On the Tags tab, click Manage tags.
-
In the Manage tags window, click Add tag and add a new tag with the key
CG_AWP_SKIP_SCAN.
Offboarding AWP
When you disable AWP for your environment, you must delete the CloudFormation stack created on your account. This process removes the stack created with the CloudFormation Template.
-
Sign in to your AWS account.
-
Delete the AWP CloudFormation stack.
-
Use an API call to remove AWP from your environment. For more information, see Delete Agentless Account.
-
Sign in to your AWS account.
-
Use an API call to remove AWP from your environment. For more information, see Delete Agentless Account.
-
Delete the AWP CloudFormation stack.
-
Make sure that the centralized account does not have connected sub-accounts. If it has, first remove AWP from the connected sub-accounts.
-
Sign in to your AWS account.
-
Delete the AWP CloudFormation stack.
-
Use an API call to remove AWP from your environment. For more information, see Delete Agentless Account.
Switching between AWP Modes
You cannot instantly switch the AWP mode from SaaS to In-Account and in reverse. For this, you must offboard AWP and then onboard it again with another mode.
To change the AWP mode:
-
Remove AWP from your AWS account.
-
Onboard AWP on the account with another mode.
Creating a Dedicated VPC
During each scanning process, AWP creates a custom VPC in the region where your EC2 instance runs. You can use your own VPC (not recommended), for accounts onboarded to AWP with In-Account or In-Account Centralized mode.
To use your dedicated VPC, create all the required resources and follow these general instructions:
-
VPC - Create a VPC in each region that has workloads to be scanned.
Note - The VPC and other resources created for a Centralized account are used for all its sub-accounts.
-
Custom tag - Add a custom tag with the
CG_AWP_NETWORKkey (key:CG_AWP_NETWORKvalue: any) to the VPC and related resources (subnet, route table, and security group). -
S3 Bucket access - Make sure you have access to S3 buckets
A bucket is a container for objects stored in Amazon S3 (Amazon Simple Storage Service). and to AWS regional S3 IPs. -
Route table - Create a route table and attach it to the VPC.
-
Network ACL (Access Control List) - Create a network ACL for the VPC.
-
Subnets - Create the necessary subnets in the VPC, minimum one subnet. One subnet for each Availability Zone (AZ) is recommended. The number and configuration of subnets depend on your needs. Associate each subnet with the route table created earlier.
-
Security Group - Create a security group in the VPC and add a new rule to allow outbound traffic to the specified S3 prefix list.
-
Internet Gateway or S3 Gateway Endpoint - Based on your needs, create an Internet Gateway and attach it to the VPC, or an S3 Gateway Endpoint.
If you select to work with S3 Endpoint, make sure:
-
You have access to these S3 buckets:
-
arn:{CloudGuard_aws_account}:s3:::agentless-* -
arn:{CloudGuard_aws_account}:s3:::agentless-*/*
-
-
The VPC has permissions to AWP bucket with these actions:
-
s3:GetObject -
s3:PutObject -
s3:DeleteObject
-
-
Customer VPC API
You can indicate that your VPC is managed by you during the onboarding process or update the account settings after it is onboarded.
To add an independent account:
POST V2/workload/agentless/aws/accounts/{accountNumber}/enable
{"scanMode": "inAccount",
"agentlessAccountSettings": {"inAccountScannerVPC": "ManagedByCustomer"
}
}
For more details, see the CloudGuard API Reference Guide
To add a centralized account:
POST V2/workload/agentless/aws/accounts/{accountNumber}/enableCentralizedAccount
{ "agentlessAccountSettings": {"inAccountScannerVPC": "ManagedByCustomer"
}
}
For more details, see the CloudGuard API Reference Guide
To update account settings:
PATCH V2/workload/agentless/{provider}/accounts/{accountNumber}/settings
{"inAccountScannerVPC": "ManagedByCustomer"
}
For more details, see the CloudGuard API Reference Guide
More Links