Sending Findings to Eventarc
Google Cloud Platform (GCP![]() Google® Cloud Platform - a suite of cloud computing services that runs on the same infrastructure that Google uses internally for its end-user products, such as Google Search, Gmail, Google Drive, and YouTube.) Eventarc is a service that allows you to asynchronously deliver events from different event sources to different event consumers. When integrated with Eventarc, CloudGuard sends events to Eventarc, with the API interface.
Google® Cloud Platform - a suite of cloud computing services that runs on the same infrastructure that Google uses internally for its end-user products, such as Google Search, Gmail, Google Drive, and YouTube.) Eventarc is a service that allows you to asynchronously deliver events from different event sources to different event consumers. When integrated with Eventarc, CloudGuard sends events to Eventarc, with the API interface.
In this integration, it is necessary to create an Eventarc Trigger that operates with other Google Cloud Platform components. Then you connect the Trigger with a Channel, which is a GCP resource in your project that represents the source of events from CloudGuard. Creating and activating a Channel serves as your explicit request to receive events from CloudGuard at Eventarc. Triggers filter and route events from a specific Channel.
The diagram below shows how to set a connection between CloudGuard and Eventarc:
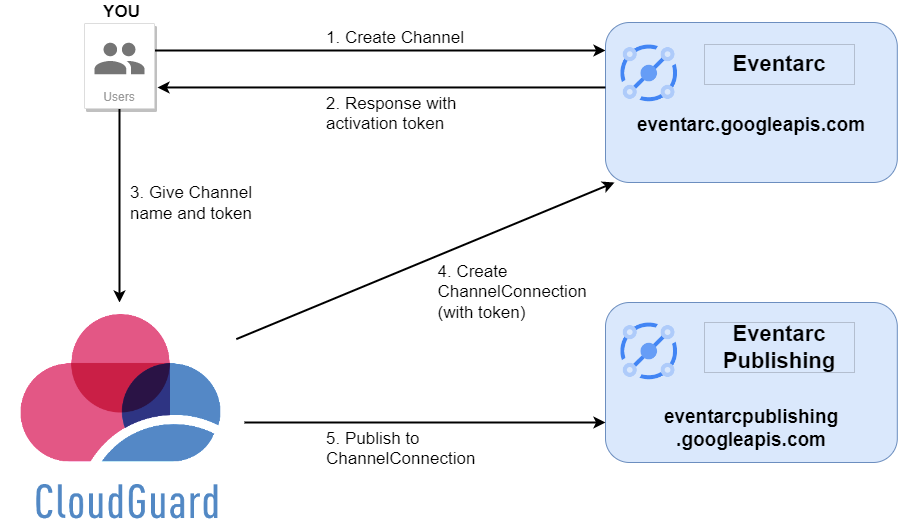
Create a channel in the Google Cloud Platform. Eventarc responds with the channel name and activation token.
-
Log in to the Google console.
-
In the search bar, type Eventarc and select it from the list of Products & Pages to open the service.
-
In Eventarc, click Create Trigger.
-
In the Create Trigger window, set the required details:
-
Trigger name - Select a name for the trigger, for example, Events-from-CloudGuard.
-
Event provider - Start to enter Check Point CloudGuard and click to select it from the list.
-
Channel - Select an active channel or click Create Channel to create a new channel (Step 1 on the diagram). To learn how to create a channel, see Google documentation.
After you create the channel, Eventarc shows this information that you need to save for the CloudGuard API call:
-
Channel full name - The channel name which includes the Google Cloud project ID and location of the resource. For example:
projects/your-project-123/locations/us-central1/channels/your-channel -
Activation token - The token is valid for 24 hours after the channel creation. After 24 hours, the channel becomes Inactive.
When you click Done, the new channel appears from the list of available channels with the Pending status.

Important - Make sure that the channel status changes to Active when the provider (CloudGuard) activates the channel with the channel name and activation token (Step 4 on the diagram).
-
-
Event - Select
cloudguard.v1.event. -
Region - Select one of the available regions.

Note - The region selected for the channel must be the same region that you use in CloudGuard with this GCP project.
-
In CloudGuard, use an API call to send to CloudGuard the channel name and token received from EventArc. With this information, CloudGuard creates a ChannelConnection (activates the channel) and sends you an identifier for the notification.
Request
POST /v2/Compliance/ContinuousComplianceNotification/eventarcChannelConnection
{
  "channelFullName": "string",
  "activationToken": "string"
}
For API documentation and code examples, see API reference guide.
Authorization
Basic Authorization: Use the API key and secret as username and password respectively.
Parameters
-
channelFullName - Full name of the channel created in the Google Cloud Platform
-
activationToken – Activation token generated by Google Cloud Platform
Response
200 – OK
"string"
Use the response string in Step 5 for channelConnectionId.
|
|
Important - The channel status changes to Active when CloudGuard successfully activates the channel with the channel name and activation token. |
Use an API call to create a notification, which allows CloudGuard to publish events to ChannelConnection.
Request
POST /v2/Compliance/ContinuousComplianceNotification
{
     "changeDetection": {
          "eventarcData": {
               "channelConnectionId": "string"
          },
          "eventarcIntegrationState": "Enabled"
     }
}
For API documentation and code examples, see the API reference guide.
Authorization
Basic Authorization: Use the API key and secret as username and password, respectively.
Parameters
-
"changeDetection": "eventarcIntegrationState": "Disabled" - Set the status to "Enabled"
-
"eventarcData": "channelConnectionId": "string" - Use the string from the Step 4 response
Response
200 - OK
When you complete these steps, CloudGuard starts to send the events to Eventarc.
On Eventarc, you can see the graph of the trigger invocations when you navigate to the trigger's Details page.