Unified Onboarding of AWS Environments
This topic describes how to onboard an AWS![]() Amazon® Web Services. Public cloud platform that offers global compute, storage, database, application and other cloud services. environment automatically. For other onboarding methods, see Onboarding AWS Environments.
Amazon® Web Services. Public cloud platform that offers global compute, storage, database, application and other cloud services. environment automatically. For other onboarding methods, see Onboarding AWS Environments.
Prerequisites
Before onboarding your AWS account, make sure:
-
You have Administrator permissions to create and manage resources in this account.
Two Paths: One Click or Advanced Onboarding
Select an onboarding path for your AWS environment:

-
ONE CLICK Onboarding - Automatically onboard your AWS account to CloudGuard. The welcome screen includes the features enabled for your environment. The CloudGuard algorithm decides which resources to onboard and how with minimal involvement from your side. Your initial configuration includes:
-
Posture Management - CloudGuard creates these policies from the rulesets recommended by Check Point security experts:
-
AWS CIS Foundation ruleset - Latest version
-
AWS CloudGuard Best Practices
-
AWS CloudGuard CheckUp
-
-
Intelligence Account Activity (for Standard AWS Accounts only. GovCloud and China Cloud Accounts are not supported) - Intelligence Account Activity is enabled on a selected S3 bucket that has a CloudTrail.

Note - In this path, CloudGuard activates Intelligence automatically. Before you start the onboarding process, make sure that your AWS account has an active CloudTrail with an S3 bucket assigned.
CloudGuard creates your Intelligence policy based on the AWS CloudGuard Best Practices Intelligence ruleset.
-
Permissions - CloudGuard applies the Monitor mode to all assets related to this account, for example to the Security Groups.
CloudGuard can manage your AWS accounts in Monitor or Full Protection modes that determine the type of permissions that CloudGuard receives from AWS.
-
Serverless Protection (for Standard AWS Accounts only) - CloudGuard enables Serverless Protection on your account by default.
-
-
ADVANCED Onboarding - Multiple options for non-standard and customizable environments. Select the functionalities, resources, and settings to configure. During the onboarding process, CloudGuard uses a combination of Lambda functions and CFT deployed on your account to create an optimal configuration.
-
In the CloudGuard portal, navigate to Assets > Environments.
-
For first-time onboarding, click AWS. Or, if you already onboarded environment(s), then from the top bar, select Add > AWS Environment.
-
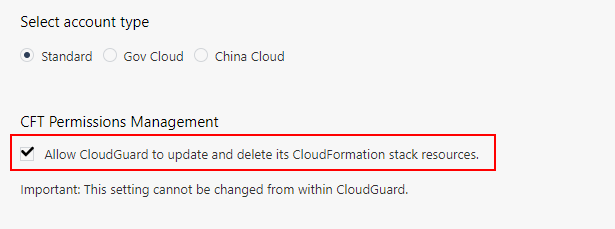
On the Welcome page, select an account type:
-
Standard AWS Account
-
GovCloud Account
-
Amazon Web Services (China) Account - China Cloud
-
-
For CFT Permissions Management, if you agree to start the process of permissions update automatically from CloudGuard select Allow CloudGuard to update and delete its CloudFormation stack resources. If you select this option, then when the permissions update is required, you have to do it manually in the AWS portal. For more information, see Updating AWS Permissions.


Important - You cannot revoke this consent from the CloudGuard portal after the account onboarding is done.
-
If ONE CLICK is not selected, click the Select button on the relevant card and click Next.
-
On the Set up your cloud account page, follow the on-screen instructions:
-
Click CFT Template to review all resources for CloudGuard to deploy on your environment. These resources are organized by components on different tabs for Onboarding, Permissions, Serverless, and Intelligence. Optionally, you can click:
-
Download CFT - Save the resource file for each component in YAML on your local drive.
-
Review Source - Browse the resources code in the GitHub repository.
-
-
Click Close.
-
Open a new browser tab, go to the AWS portal and sign in to your AWS account.
-
In the CloudGuard onboarding wizard, click Launch Stack.
A new browser tab opens with the CloudFormation stack. CloudGuard automatically enters all required parameters.

Note - By default, using the ReadOnlyAccess policy is enabled, which allows you to receive permissions update requests less frequently. You can manually disable the policy at this stage in the UseAwsReadOnlyPolicy field if you prefer not to grant redundant permissions. For more information about policies, see Policies.
-
Below Capabilities, read the explanation and select the I acknowledge... option to accept. Click Create stack.
AWS begins to create the stack. This stack creates new roles and resources for initial work and an AWS Lambda to arrange the environment and set up all modules. After deployment, the stack deletes the Lambda function from your environment.
CloudGuard waits for the stack deployment to complete before the last step. This procedure can take several minutes.
-
-
After the deployment process is complete, in the CloudGuard portal click Next.
- The last screen in the wizard is the Onboarding Summary. Until the process is done, the page shows the current status with the number of active, pending, and inactive features, the number of errors, error details, and suggested remediation. When the onboarding is done, click Finish.
Your environment is onboarded to CloudGuard with a default CloudGuard-Managed policy. When the process is done, CloudGuard redirects you to the Environments page that lists your new onboarded environment.
-
In the CloudGuard portal, navigate to Assets > Environments.
-
For first-time onboarding, click AWS. Or, if you already onboarded environment(s), then from the top bar, select Add > AWS Environment.
-
On the Welcome page, select an account type:
-
Standard AWS Account
-
GovCloud Account
-
Amazon Web Services (China) Account - China Cloud
-
-
For CFT Permissions Management, if you agree to start the process of permissions update automatically from CloudGuard select Allow CloudGuard to update and delete its CloudFormation stack resources. If you select this option, then when the permissions update is required, you have to do it manually in the AWS portal. For more information, see Updating AWS Permissions.


Important - You cannot revoke this consent from the CloudGuard portal after the account onboarding is done.
-
If the Advanced option is not selected, click the Select button on the relevant card and click Next.
-
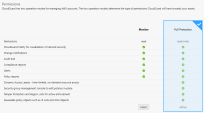
On the Permissions page, click Select for the desired operation mode:
-
Monitor - Monitor and visualize your environments in CloudGuard, run compliance tests, and receive alerts, notifications and reports of activities and changes to cloud entities. You cannot manage the entities from CloudGuard.
-
Full Protection - Contains all the capabilities of the Monitor mode. In addition, you can use CloudGuard to enforce access protection and tamper protection on your assets, manage your Security Groups, and control direct access to your cloud assets.
-
-
Click Next.
-
On the Posture Management page, select the rulesets to enable on your environment and click Next.
-
The Common rulesets (click to expand) include CSPM rules to check your environment's compliance with industry standards and best practices.
-
The Additional rulesets (click to expand) include all other rulesets customized for an organization's security policy.
To open and review a ruleset, click the arrow after the ruleset's description.
When the onboarding process completes, CloudGuard creates a policy for each selected ruleset.
-
-
On the Intelligence page, turn the Intelligence Account Activity on or off. If you enable the Intelligence Account Activity, you can select rulesets from the table. When the onboarding process completes, CloudGuard creates a policy for each selected ruleset. The AWS CloudGuard Best Practices ruleset for Intelligence is selected by default.
-
Click Next.

Notes:
-
This capability is not available for GovCloud and China Cloud accounts.
-
To activate Intelligence, before you start the onboarding process, make sure that your account has an active CloudTrail with an S3 bucket assigned.
-
-
On the Serverless Protection page, turn the protection on or off.
-
Click Next.

Note - This function is not available for GovCloud and China Cloud accounts.
-
On the Set up your cloud account page, follow the on-screen instructions:
-
Click CFT Template to review all resources for CloudGuard to deploy on your environment. These resources are organized by components on different tabs for Onboarding, Permissions, Serverless, and Intelligence. Optionally, you can click:
-
Download CFT - Save the resource file for each component in YAML on your local drive.
-
Review Source - Browse the resources code in the GitHub repository.
-
-
Click Close.
-
Open a new browser tab, go to the AWS portal and sign in to your AWS account.
-
In the CloudGuard onboarding wizard, click Launch Stack.
A new browser tab opens with the CloudFormation stack. CloudGuard automatically enters all required parameters.

Note - By default, using the ReadOnlyAccess policy is enabled, which allows you to receive permissions update requests less frequently. You can manually disable the policy at this stage in the UseAwsReadOnlyPolicy field if you prefer not to grant redundant permissions. For more information about policies, see Policies.
-
Below Capabilities, read the explanation and select the I acknowledge... option to accept. Click Create stack.
AWS begins to create the stack. This stack creates new roles and resources for initial work and an AWS Lambda to arrange the environment and set up all modules. After deployment, the stack deletes the Lambda function from your environment.
CloudGuard waits for the stack deployment to complete before the last step. This procedure can take several minutes.
-
-
The last screen in the wizard is the Onboarding Summary. Until the process is done, the page shows the current status with the number of active, pending, and inactive features, the number of errors, error details, and suggested remediation. When the onboarding is done, click Finish.
Your environment is onboarded to CloudGuard with the advanced settings. When the process is complete, CloudGuard redirects you to the Environments page that lists your new onboarded environment.

