Configuring the SD-WAN Device
First, configure the branch device at the Harmony Connect branch site. Then configure the Aruba SD Branch at the Aruba Central portal.
Configuring the Branch Device
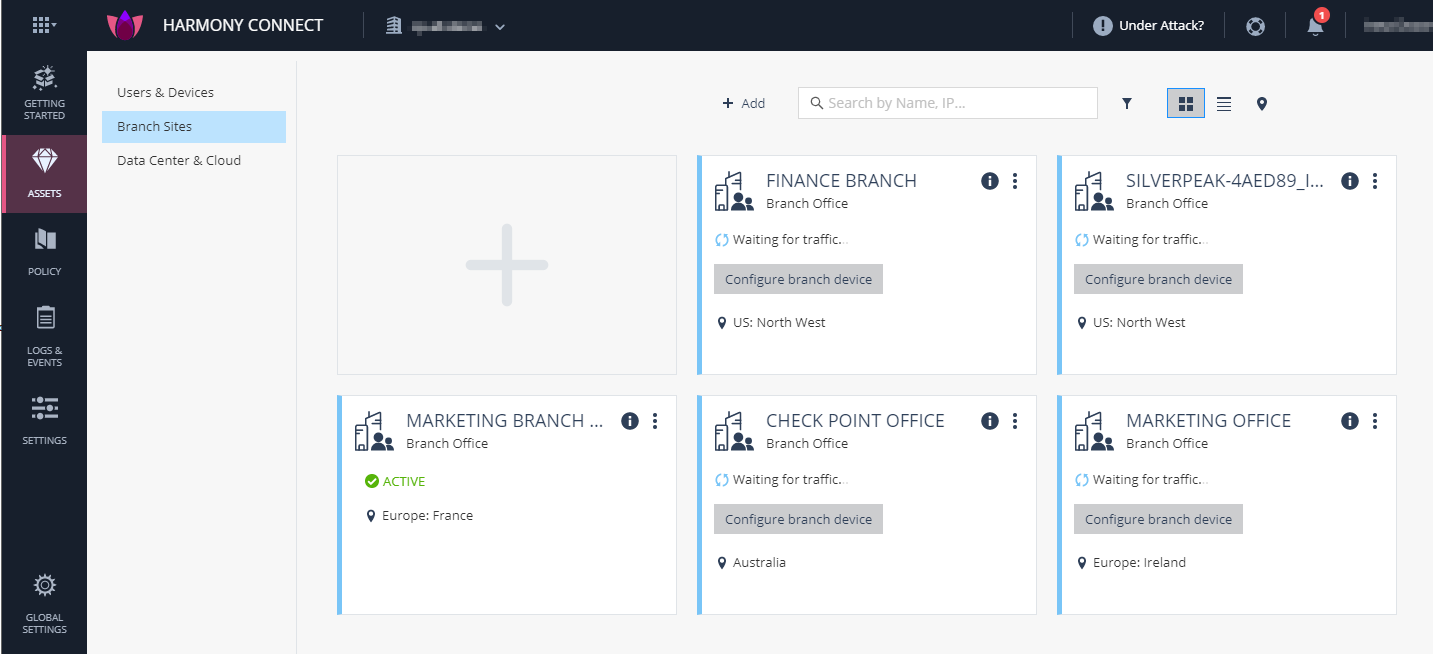
After you create the site at Check Point Harmony Connect, on this site you must configure your branch office to route traffic through Harmony Connect.
Check Point creates the back-end architecture for tunneling the traffic from the branch device to the Internet.
|
|
Notes:
|
To configure your branch device:
-
On the site thumbnail, click the Configure branch device button.
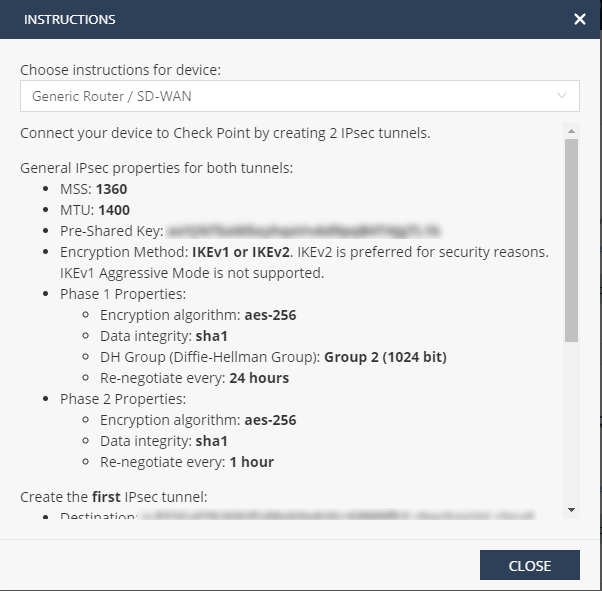
The Instructions window opens.
-
From the top field, select your SD-WAN branch office device.
-
Follow the instructions on the screen to get the IPsec configuration properties, pre-shared key, tunnel addresses, and the traffic routes.
-
Click Close.
Configuring Aruba Central
Refer to the Aruba Central SD-WAN Help for additional information.
To configure Aruba Central on your SD-WAN Device, perform these steps:
-
Configure your SD-WAN branch device. See Setting up Aruba SD Branch.
-
Create and configure two IPsec Tunnels for the routing traffic. See Creating IPsec Tunnels.
-
Route the traffic through the Check Point tunnels. See Routing Rules through the IPsec Tunnels.
-
Test your configuration. See Testing your Configuration.
To route the service through Check Point, you must select the relevant Aruba SD Branch for your site, create a VPN encryption profile for it, and identify the Uplink VLAN for the traffic that will be routed through Check Point.
To filter the configuration to the selected edge device:
-
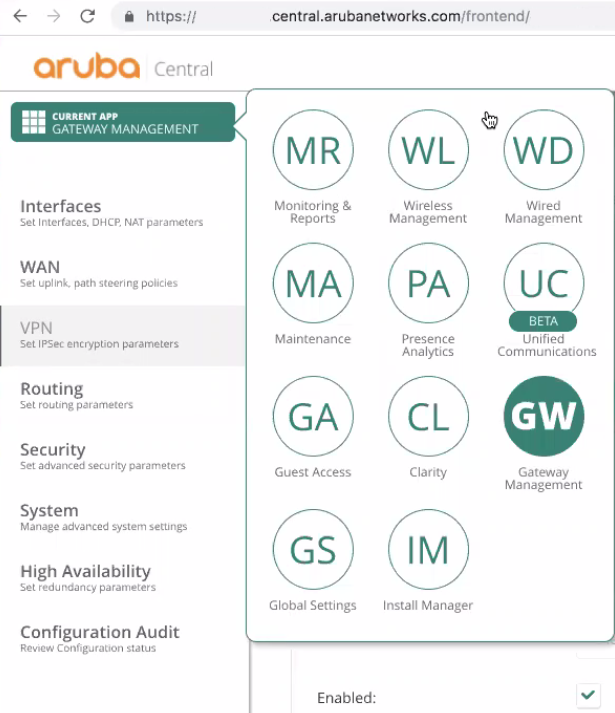
Log into the Aruba Central web interface.
-
Go to Gateway Management application.
-
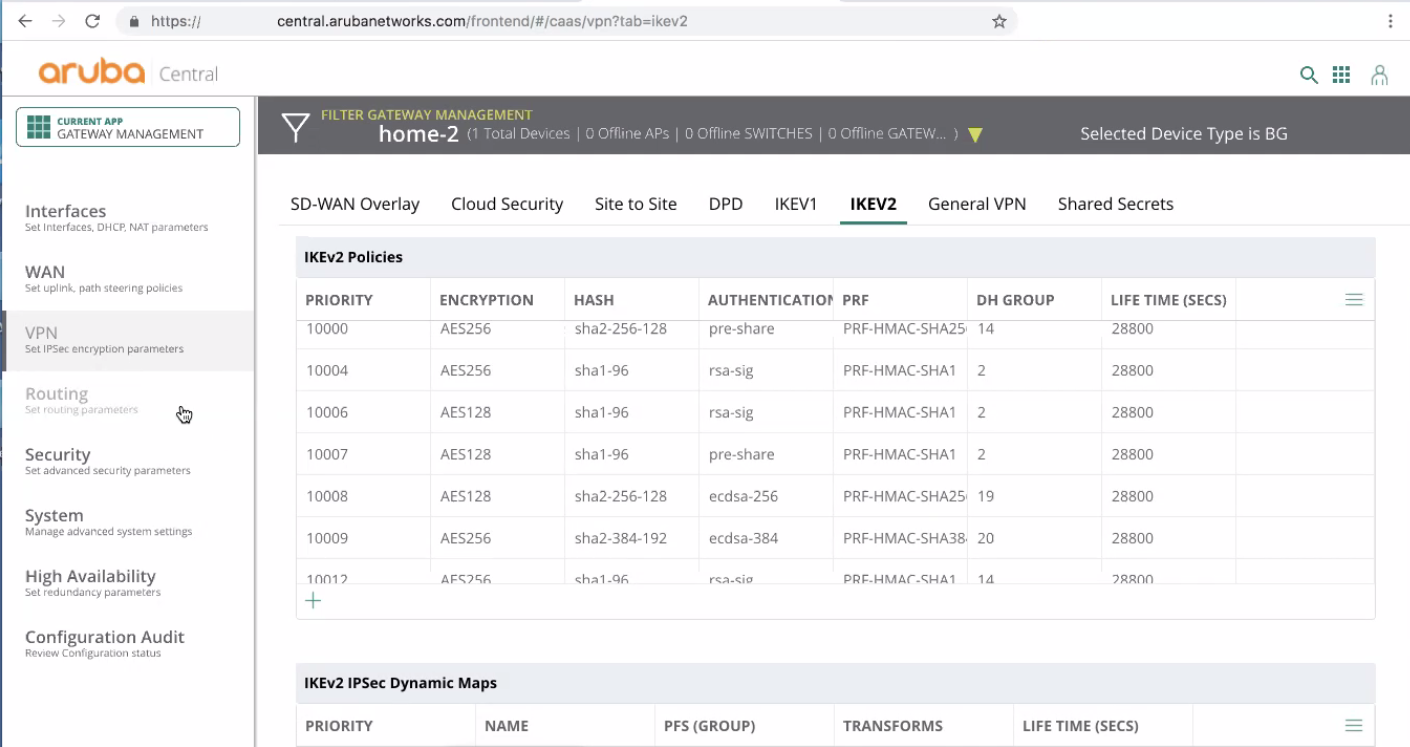
Click Filter icon.
-
Select your Aruba device.
For example, this device name is home-2.

-
 Locate or create a suitable IKEv2 Profile with Check Point encryption settings
To create a VPN Encryption Profile:
-
From the Aruba Central SD-WAN User Interface, go to VPN > IKEV2.
-
Under IKEv2 Policies, make sure to create at least one profile with these parameters:
-
ENCRYPTION must be set to AES256.
-
HASH must be set to sha1-96.
-
AUTHENTICATION must be set to pre-share.
-
PRF must be set to PRF-HMAC-SHA1.
-
DH GROUP must be set to 2.
-
-
Save the Priority Number of this profile for the next configuration steps.
-
-
Identify the Uplink VLAN for the Traffic
Procedure:
-
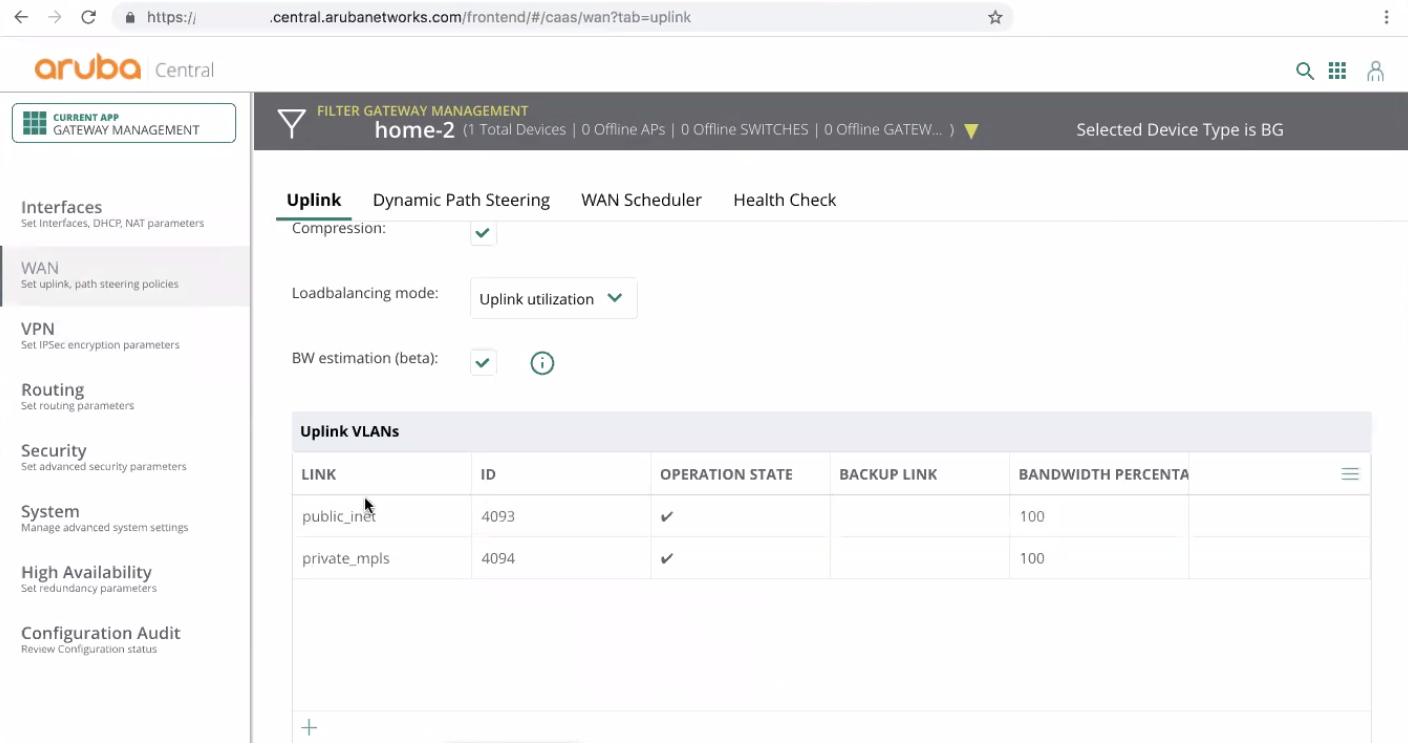
From the Aruba Central SD-WAN User Interface, go to WAN > Uplink.
-
In the Uplink VLANs section, enable at least one outbound VLAN and use its ID for the next configuration steps.
-
Save the ID of the identified uplink VLAN and use it later for routing the traffic through Check Point.
-
Check Point provides two IPsec tunnels for its cloud security service. In process of a back-end upgrade Check Point can reset one of these tunnels for a short period of time. In this case, to achieve an up-time of 99.999% you must create two identical IPsec tunnels. Attach them suffixes 1 and 2.
In this guide, the tunnels names are Check-Point-tunnel-1 and Check-Point-tunnel-2.
-
Creating the First IPsec Tunnel
This WAN Edge IPSec Interface Name must have a suffix of 1.
To create a WAN Edge IPsec first tunnel:
-
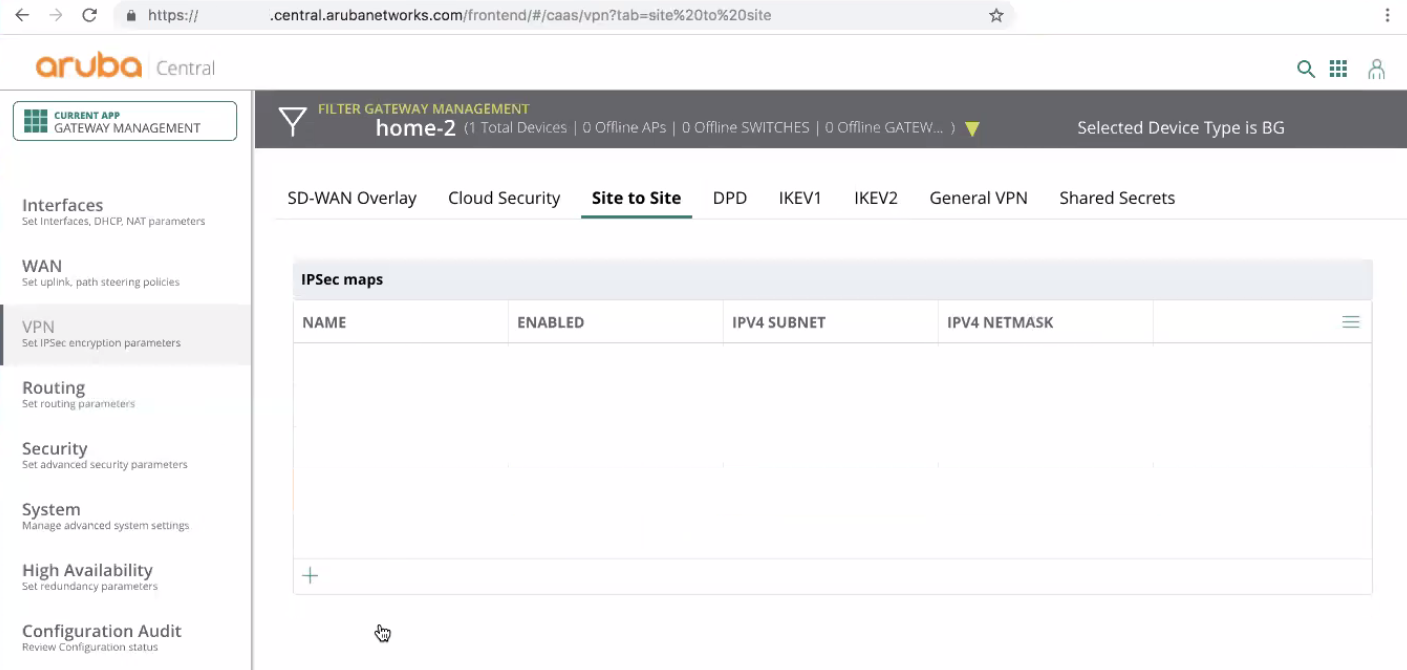
From the Aruba Central SD-WAN User Interface, go to VPN > Site to Site.
-
Create a new IPSec map.
-
Set these parameters:
-
Name must be an alias for this tunnel. In this case, Check-Point-tunnel-1.
-
Enable option must be selected.
-
Client-mode must be set to Network.
-
Source network type must be set to Any.
-
Destination network type must be set to Any.
-
IKE version must be set to v2.
-
IKE policy must be the priority number of the IKEv2 profile that you created at the previous step.
-
Transforms must be set to its default value.
-
Remote peer addressing must be set to Static.
-
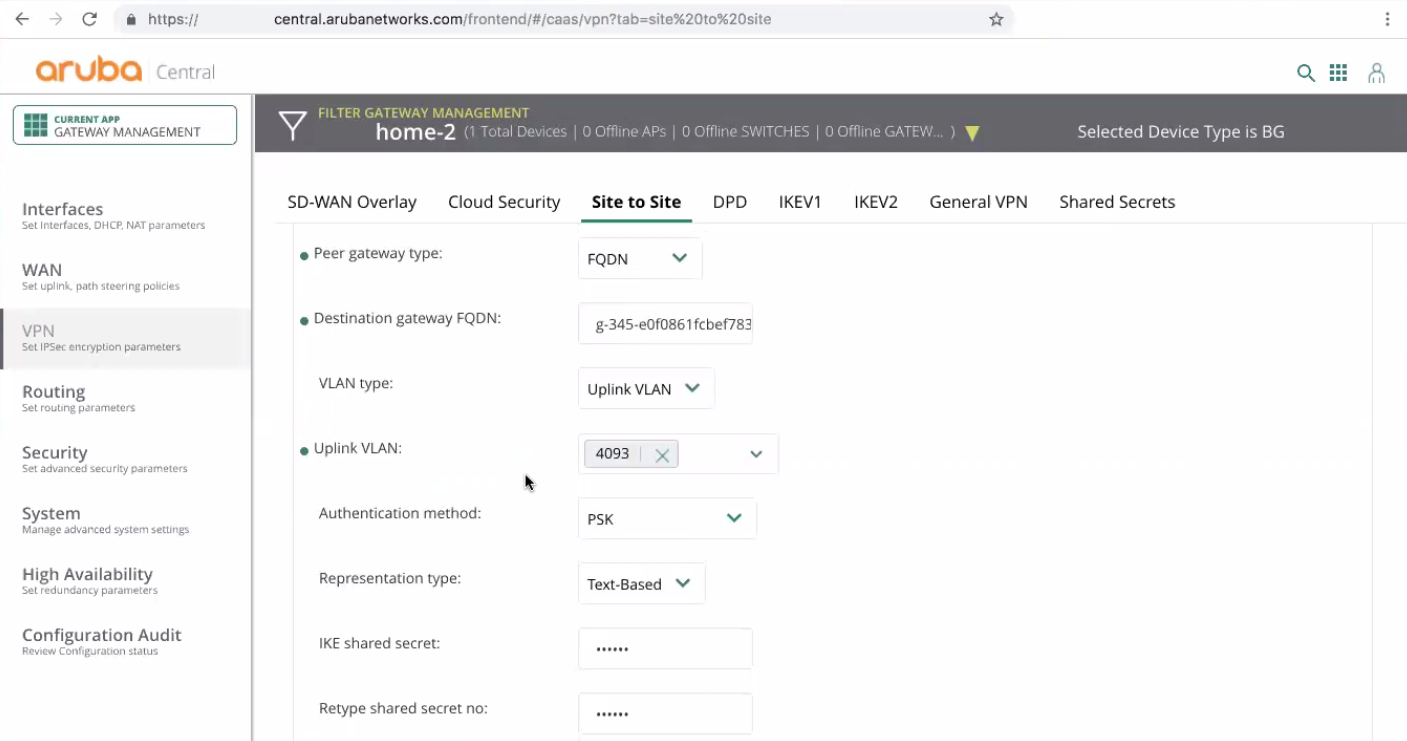
Peer gateway type must be set to FQDN.
-
Destination gateway FQDN must be set to FQDN for the first tunnel that you copied from the instructions at Check Point Infinity Portal.
-
VLAN type must be set to Uplink VLAN.
-
Uplink VLAN must be set to the ID of the uplink VLAN that was identified at the previous steps. In this example, the uplink VLAN ID is 4093.
-
Authentication method must be set to PSK.
-
Representation type must be set to Text-Based.
-
IKE shared secret must be set to the pre-shared key that you defined at Check Point Infinity Portal.

-
-
Click Save.
-
-
Creating the Second IPsec Tunnel
This WAN Edge IPsec Interface name must have a suffix of 2.
To create a WAN Edge IPsec second tunnel:
Perform the full procedure as described in Creating the First IPsec Tunnel.

Note - The Name must be an alias for this tunnel. In this case, Check-Point-tunnel-2.
-
Configuring IPsec Tunnel Redundancy and Failover
For more reliable connection, configure the redundancy and failover on both Check Point tunnels.
Procedure:
-
From the Aruba Central SD-WAN User Interface, go to Routing > NextHop Configuration.
-
Create a new Nexthop for the tunnel Check-Point-tunnel-1:

-
Nexthop-list name must be set to an alias for this hop policy.
-
NextHop IP/DHCP must be set to empty.
-
IPsec map must be set to the first Check Point tunnel Check-Point-tunnel-1 that you created in previous steps.
-
Preemptive failover must be selected.
-
-
Create a new Nexthop for the tunnel Check-Point-tunnel-2:
-
Repeat the Step 2 above.
-
Set the IPsec map to the second Check Point tunnel Check-Point-tunnel-2 that you created in previous steps.
-
-
To complete your Harmony Connect configuration and remove any other conflicting routes, you must create a security policy and define security roles. Security Roles are a key concept at Aruba. Routing decisions are assigned to each role. You define the user roles that uses the Check Point routing policy and have secured traffic, and assign the security policy to this user(s).
Procedure:
-
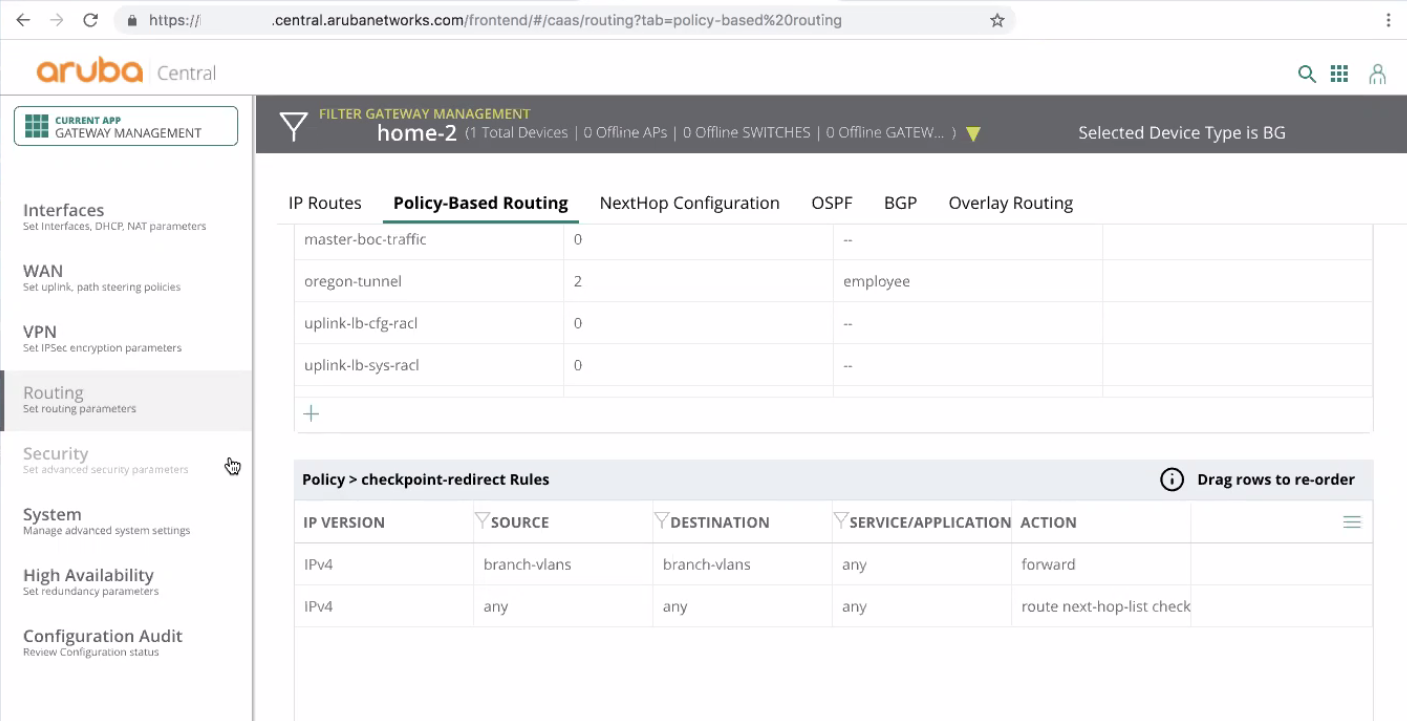
From the Aruba Central SD-WAN User Interface, go to Routing > Policy-Based Routing.
-
Create a new policy
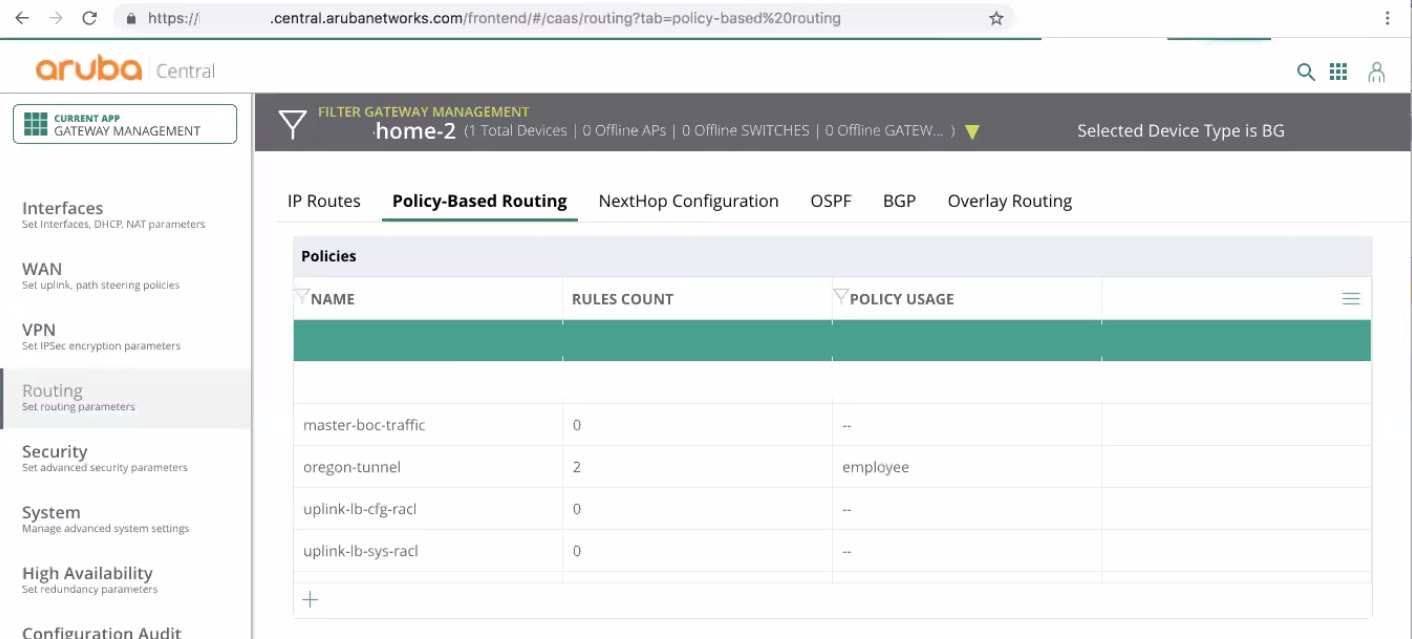

Best Practice - Create 2 rules. One rule that routes branch to branch directly and a default rule that routes all rules through Check Point. The rule that uses Check Point must have its action set to the Nexthop object that you created before.
-
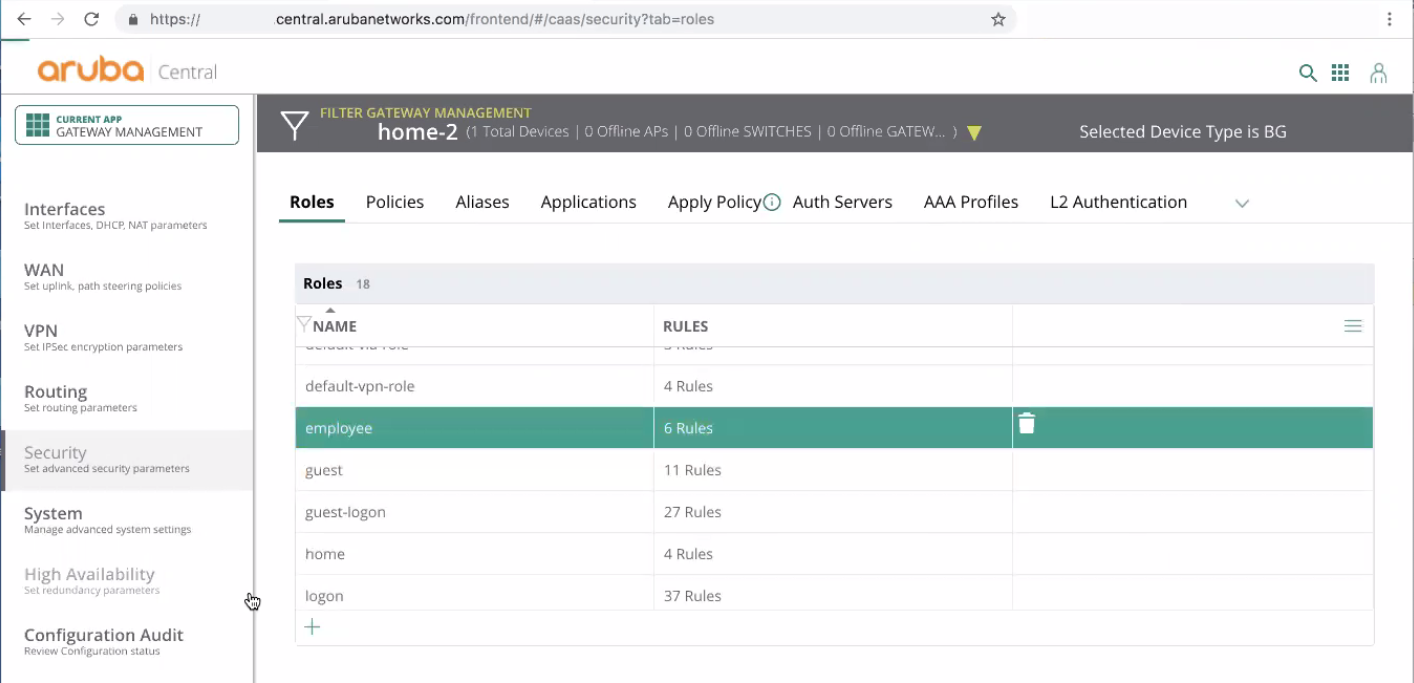
Define User Roles for Check Point Routing Policy
-
From the Aruba Central SD-WAN User Interface, go to Security > Roles.
-
Select a role from the list.
In this example, we select the employee role:
-
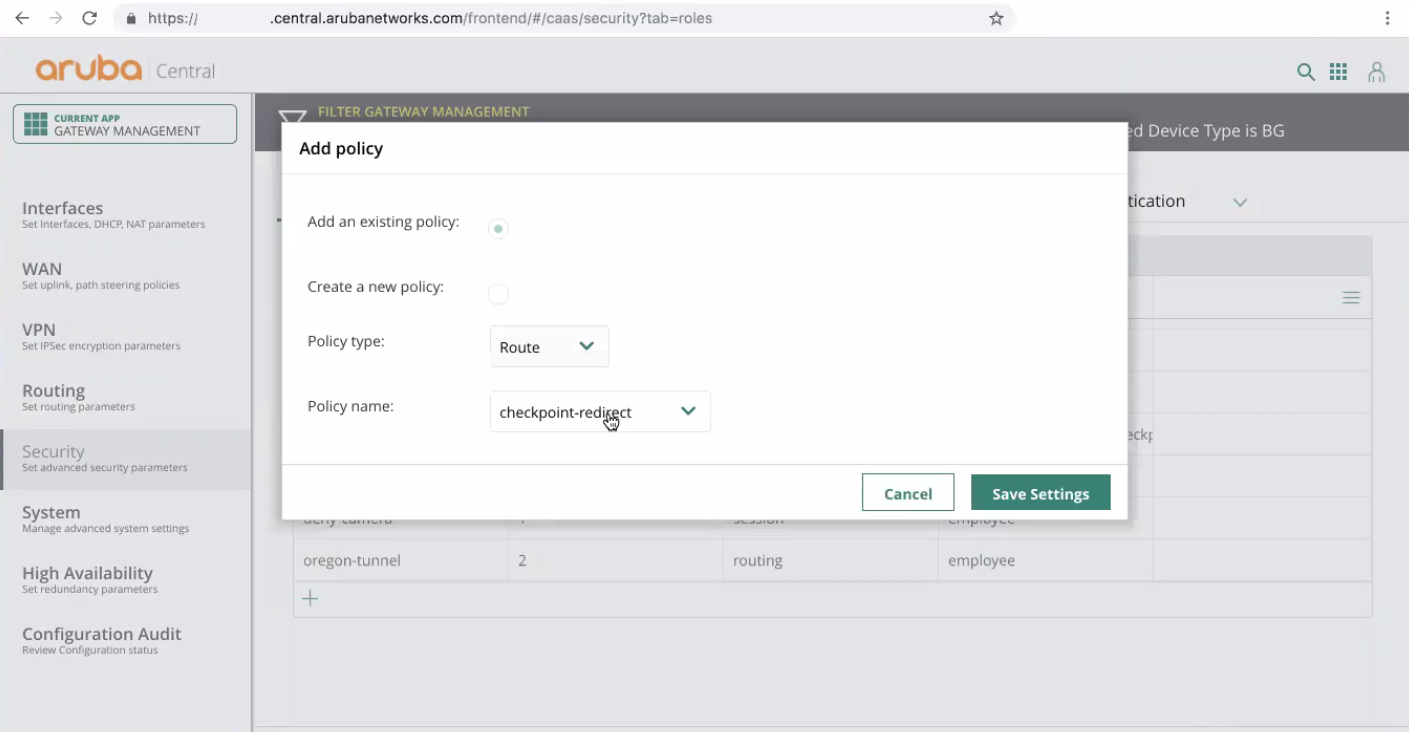
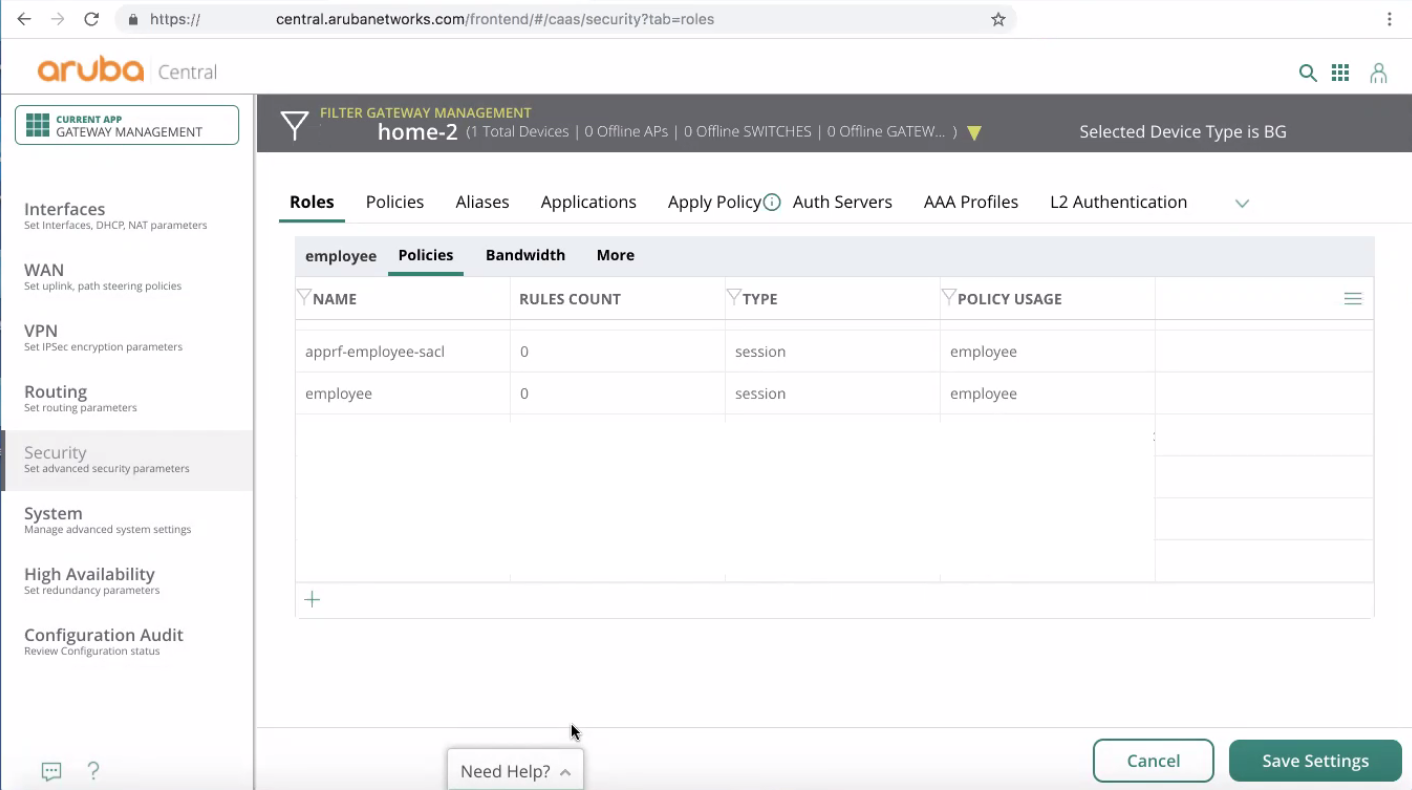
Select Policies > Create a New Policy.
The Add policy window opens.
-
Configure these parameters:
-
Add an existing policy must be selected.
-
Policy type must be set to Route.
-
Policy name must be set to the name of the policy-based routing that was defined in the previous step.
-
-
Click Save Settings.
-
-
Deploy the Changes
-
Go back to Security > Roles page.
-
Click Save Settings.
The changes immediately apply to the Aruba SD-WAN device.
-
To test your configuration, you must check its activity on your branch device.
After that go to the Check Point Infinity Portal and monitor Cybersecurity Events. See Monitoring Cybersecurity Events.
To test the configuration:
-
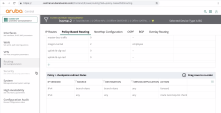
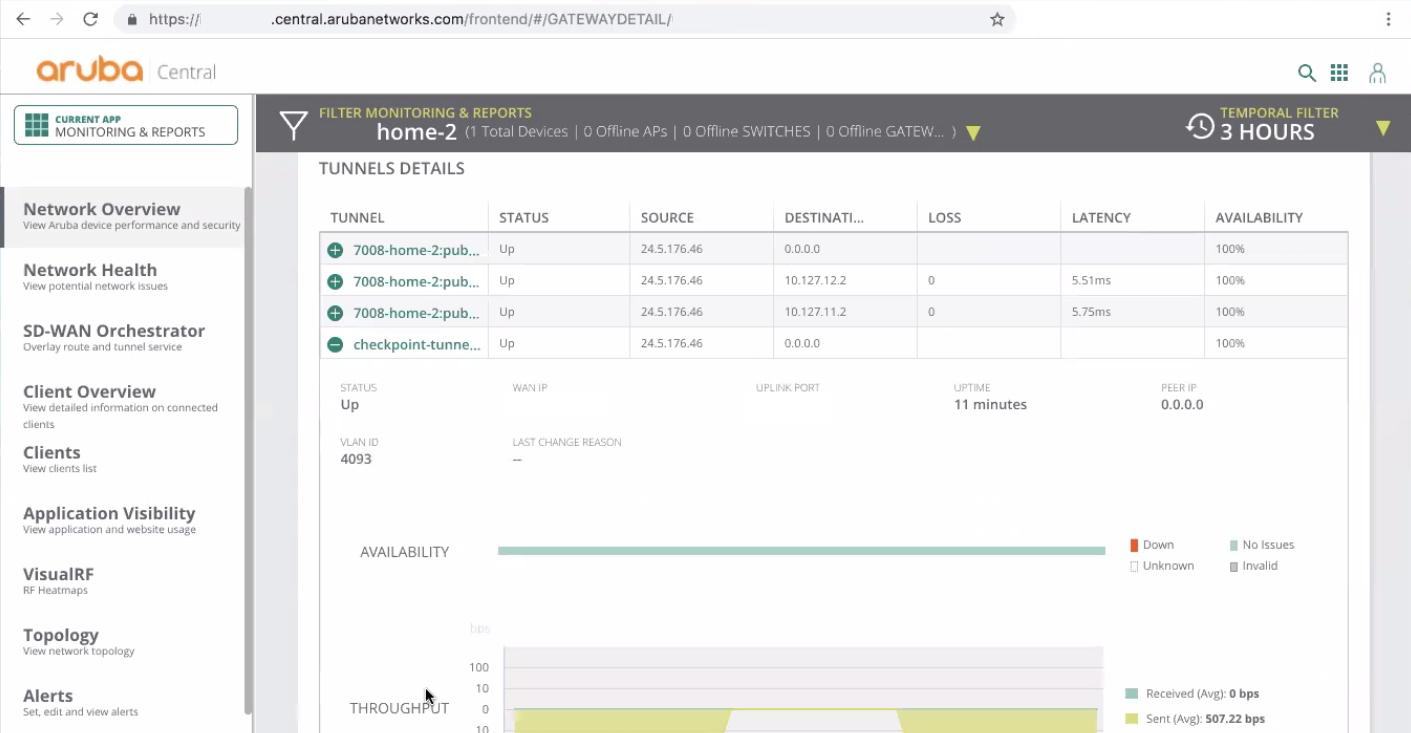
From the Aruba Central SD-WAN User Interface, go to the Monitoring & Reports application > Network Overview > Tunnels page.
-
Click the funnel (filter) icon.

-
Enter the name of your device.
-
Go to Tunnels > Tunnel Details.
Make sure that the Check-Point-tunnel-1 and Check-Point-tunnel-2 tunnels are up.
They must show the amount of traffic that is sent and received.
Now you can monitor the Cybersecurity Events in the Check Point Infinity Portal. See Monitoring Cybersecurity Events.