Google Workspace
Use these steps to configure the SSO![]() Single Sign-On (SSO) - A session/user authentication process that permits a user to enter one name and password in order to access multiple applications. authentication with Google Workspace.
Single Sign-On (SSO) - A session/user authentication process that permits a user to enter one name and password in order to access multiple applications. authentication with Google Workspace.
Prerequisite
-
Permissions to your company's DNS server if you select login-based domain verification as the integration type.
-
In the Check Point Portal, go to
 > Identity & Access and click the plus icon.
 -
Enter a name for the Integration Title and select Google Workspace.
-
Click Next. The DNS (Domain Name System) record is generated.
In this step of the IdP Integration Wizard, you can configure SSO authentication for Check Point Portal administrators and for end users of Check Point services.
-
Select Enable Administrators to log in to the portal using this IdP.
-
Select one of these options:
-
Login based on domain verification - Check Point Portal Administrators can log in to this Check Point Portal account with SSO from the Identity Provider
 A system entity that creates, maintains, and manages identity information for principals and also provides authentication services to relying applications within a federation or distributed network. Acronym: IdP or IDP.. Administrators log in through the Check Point Portal login page.
 -
Login with a unique URL - Check Point Portal Administrators can log in to multiple Check Point Portal accounts with SSO from the Identity Provider. Administrators log in using the URL that appears at the bottom of the Login with a unique URL section. Copy this URL and keep it in a safe place.
-
-
In the Service(s) Integration section, select one of these options:
-
No Services - End users of Check Point Portal services cannot authenticate with SSO from the Identity Provider. This is the default configuration.
-
All Services - End users can log in with SSO from the Identity Provider to all Check Point services that support SSO.
-
Specific Service(s) - From the list of services, select service(s) to allow end users to log in with SSO from the Identity Provider. Available services:
-
Connect
-
Quantum Gateways
-
-
-
Click Next (or, if you are editing a configuration, Apply) to complete the Integration Type configuration.
|
|
Note - If you selected Login with a unique URL for Integration Type, the Verify Domain step is not necessary. |
-
Connect to your DNS server.
-
Copy the DNS Value from the Check Point Portal IdP Integration wizard > Verify Domain step.
-
On your DNS server, enter the Value as a TXT record.
-
In the Check Point Portal > Domain(s) section, enter a public DNS domain server name and click the plus icon.
Check Point makes a DNS query to verify your domain's configuration.
-
Optional - add more DNS domain servers.
-
Click Next.

Note - Wait until the DNS record propagates and becomes resolvable.
To configure the Google Workspace settings, you must have administrator permissions. In this step, you create a SAML![]() Security Assertion Markup Language. An XML-based, open-standard data format for exchanging authentication and authorization data between parties, in particular, between an identity provider and a service provider. Application in the Google Workspace Portal.
Security Assertion Markup Language. An XML-based, open-standard data format for exchanging authentication and authorization data between parties, in particular, between an identity provider and a service provider. Application in the Google Workspace Portal.
-
Navigate to the Google Workspace Admin console.
-
From the side toolbar, select Apps > Web and mobile apps.
-
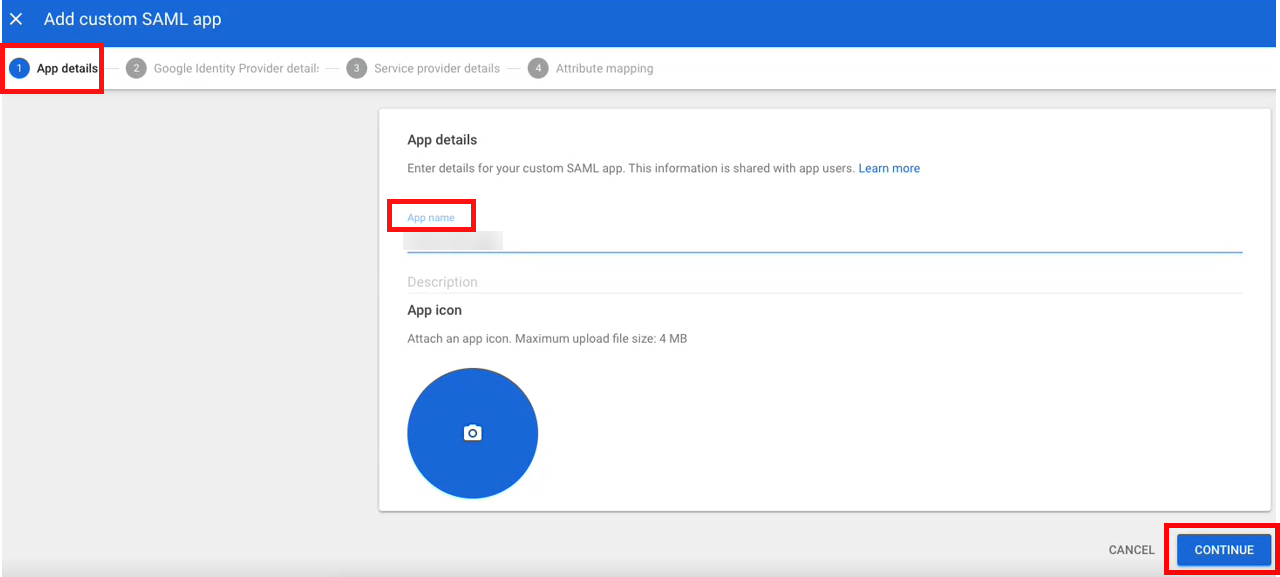
In the top toolbar, select Add app > Add custom SAML app.
-
On the App details pages, below the App name, enter a name and click Continue.
-
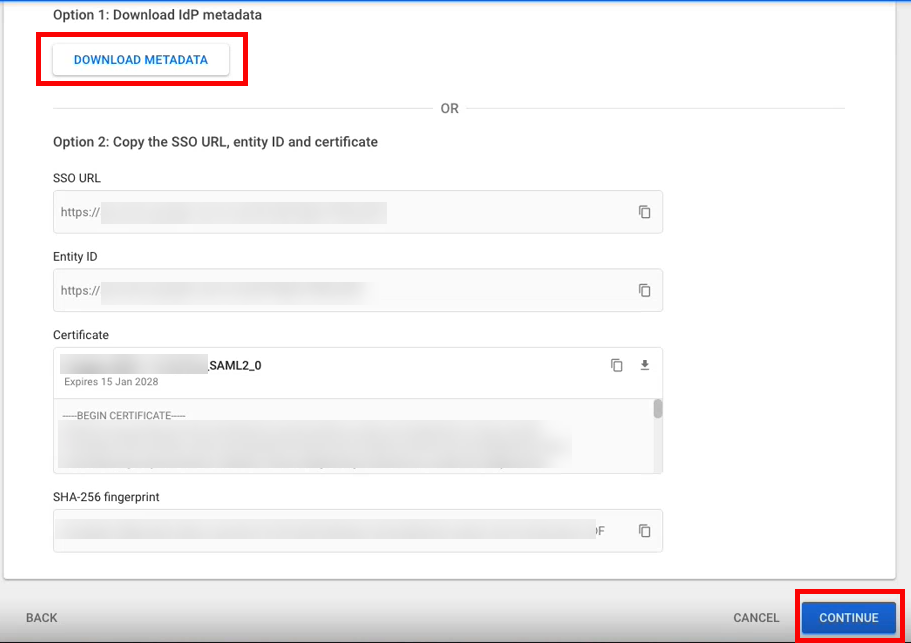
Click Download Metadata and click Continue.
-
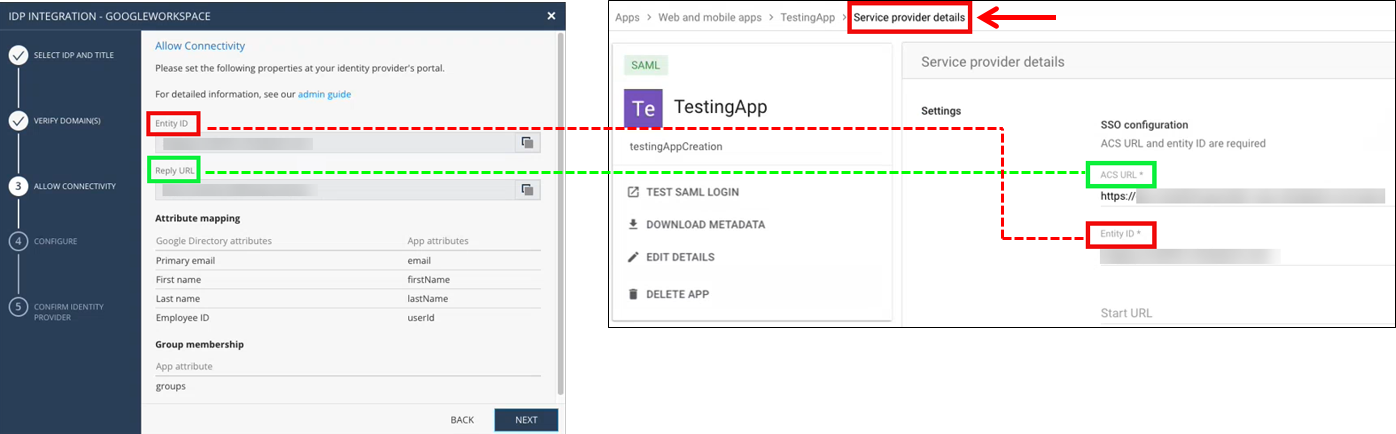
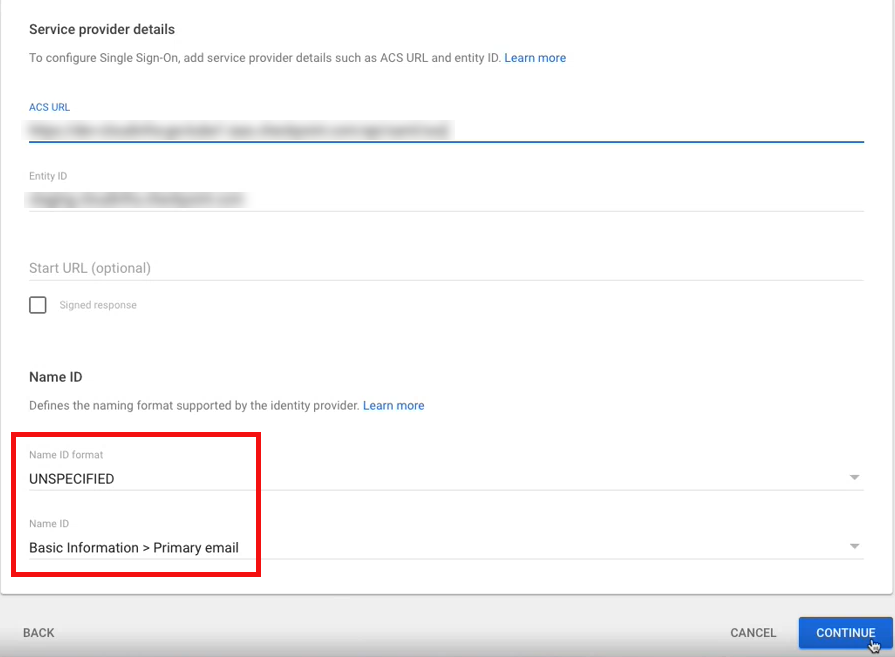
On the Service provider details page, enter the ACS URL and Entity ID from the Check Point Portal. For the ACS URL, use the Reply URL from the IdP Integration page, as shown in this screenshot:
-
Keep Name ID format as Unspecified and Name ID as Basic Information > Primary Email.
IdP Initiated lets you connect directly to the Check Point Portal from your Google Workspace Admin Console. To do this, you must create a Check Point Portal app card in your Google Workspace Admin Console. See the Google Workspace documentation for Add-ons.
Step 1: In Check Point Portal, enable IdP Initiated flow:
In the Check Point Portal > IdP Integration Allow Connectivity step, select the checkbox Enable IDP initiated flow.
The Start URL field appears.
Step 2: In your Google Workspace account, configure the IdP Settings:
-
Navigate to your Google Workspace Admin Console.
-
From the left toolbar, click Apps > Web and mobile Apps.
The Web and mobile apps menu opens.
-
From the Web and mobile apps menu, open the application object for the SAML connection to Check Point Portal.
-
Expand the Service provider details menu.
-
In the Start URL field, enter the Start URL from Check Point Portal.
-
Click Save.
|
|
Important - Before you can test the connectivity between Google Workspace and Check Point Portal, you must complete all of the IdP integration steps in the Check Point Portal. |

In this step, you configure the attribute mapping and group membership in Google Workspace.
-
Go to Google Workspace > Attribute mapping > Attributes.

-
Below Google directory attributes, click Add Mapping to add an attribute field.
-
Enter these corresponding attributes from the Check Point Portal IdP Integration page.
Google Directory attributes
App attributes
Primary email
email
First name
firstName
Last name
lastName
-
In Group membership, enter these details:
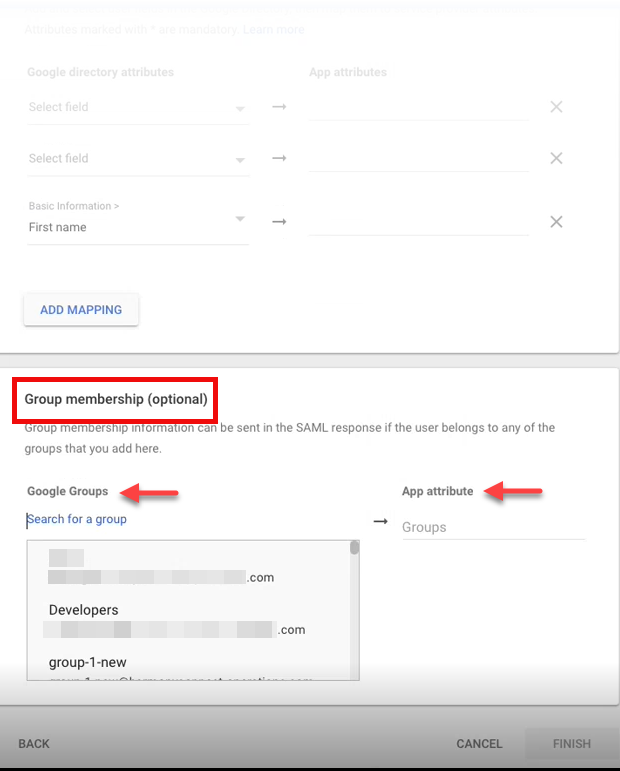
Google Groups
App attribute
Enter the group(s) name
groups
-
Click Finish.
-
On the Check Point Portal IdP Integration page, click Next.
-
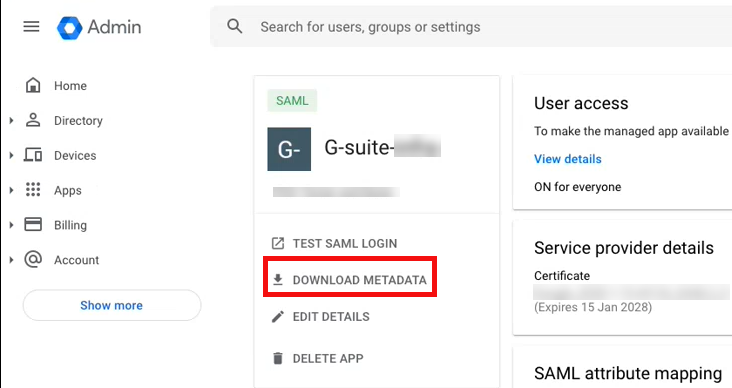
If you did not already download the metadata file, then go to your Google Workspace account, go to Apps > Web and mobile apps, and open the applicable application.
-
In the application page that opens, click Download Metadata.
-
In the Download metadata window, click Download Metadata.
-
To exit the window, click Close.
-
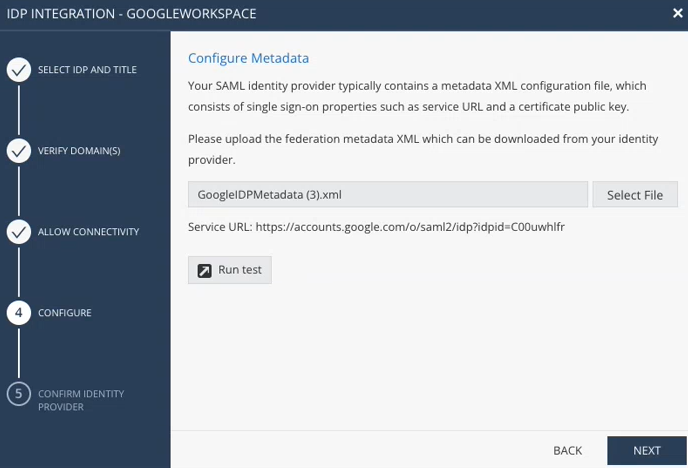
On the Check Point Portal IdP Integration page, click Select File and upload the Google Workspace metadata file.
-
Optional: Run test - This test makes sure the SAML connection between the Check Point Portal and Google Workspace is configured correctly.
-
Click Next.
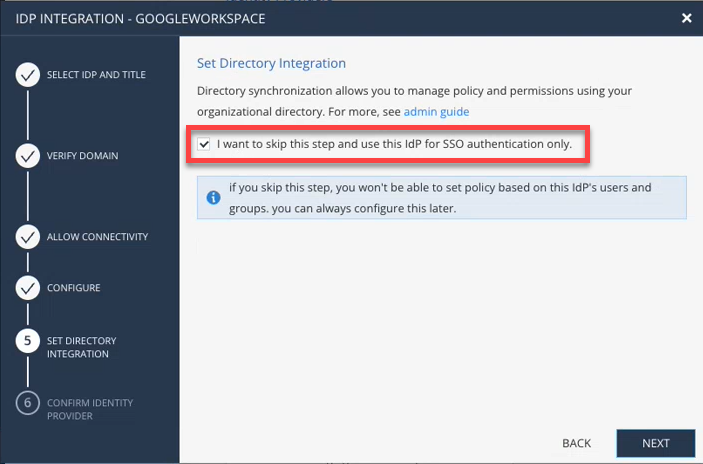
You can select to continue and configure Set Directory Integration (see Directory Integration). Or to finish, select the checkbox I want to skip this step and use this IdP for SSO authentication only and then click Next.
Directory Integration gets information about users and groups for the services you selected in the Integration Type step > Service(s) Integration section.
Directory Integration does not apply to Users and User Groups in the Check Point Portal.
|
|
Important - After you create a Directory Integration, you cannot change it. To create a different Directory Integration, you must create a new Identity Provider (IdP) Integration. |
For Check Point Portal SSO authentication, this feature is optional. To use Google Workspace for SSO authentication only, select the checkbox I want to skip this step and use this IdP for SSO authentication only.
Directory Integration enables Check Point services to query for changes to Google Workspace users and groups. The Check Point Portal pulls all users and groups from Google Workspace.
Some Check Point services may need a permanent user ID (SID) from your directory. This ID lets the service reliably identify each employee and keep their access and permissions accurate, even when their profile changes.
Prerequisites
A Google Workspace with Super Administrator permissions.
-
In the Google Cloud console, create a New Project and name it dss-sync.
-
From the menu, select APIs and services > Library and enable these APIs:
-
Admin SDK API
-
Cloud Identity
-
-
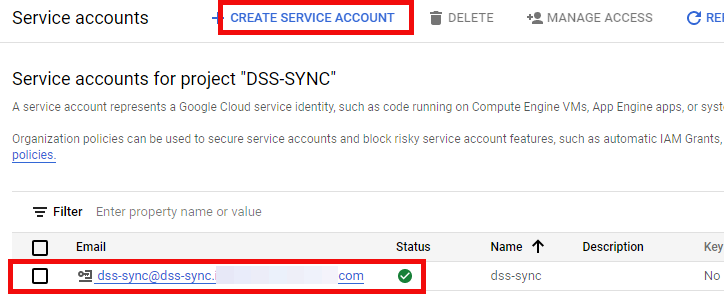
From the menu, select IAM and admin > Service Accounts > and select Create Service Account.
-
In the Service account details, enter a service account name (such as dss-sync) and then click Create and Continue.
-
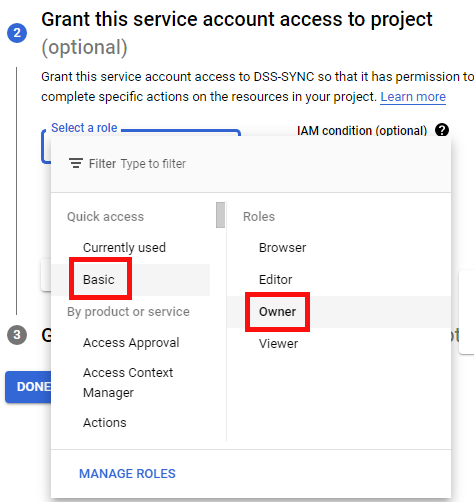
Below Grant this service account access to project, for Quick access select Basic and for Roles select Owner.
-
Below Grant users access to this service account, click Done.
-
-
On the Service accounts page that opens, click the dss-sync project.
-
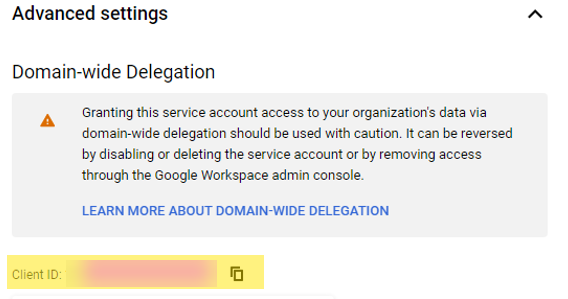
On the Service details page, click Advanced settings.
-
Save the Client ID. Go to Advanced settings > Domain wide delegation.
-
From the menu, click Keys > Add Key > Create a new key.

-
For the Key type, select JSON.

-
Click Create. This downloads a JSON credential file. Save the file.
-
Close the window.
-
-
Sign in to the Google Admin console with a super admin account.
-
Go to Security > Access and data control > API controls.
-
Below Domain wide delegation, click Manage Domain Wide Delegation.
-
Click Add new.
-
Enter the Service
A Check Point service offering that helps customers with deployments or technical services for Check Point products. Account's Client ID from "Create Service Account", step 3. -
Enter these scopes:
Copyhttps://www.googleapis.com/auth/admin.directory.user.readonly,
https://www.googleapis.com/auth/admin.directory.group.readonly,
https://www.googleapis.com/auth/admin.directory.device.chromeos.readonly,
https://www.googleapis.com/auth/admin.directory.device.mobile.readonly,
https://www.googleapis.com/auth/admin.directory.device.chromebrowsers.readonly,
https://www.googleapis.com/auth/cloud-identity.devices.readonly -
Click Authorize.
-
-
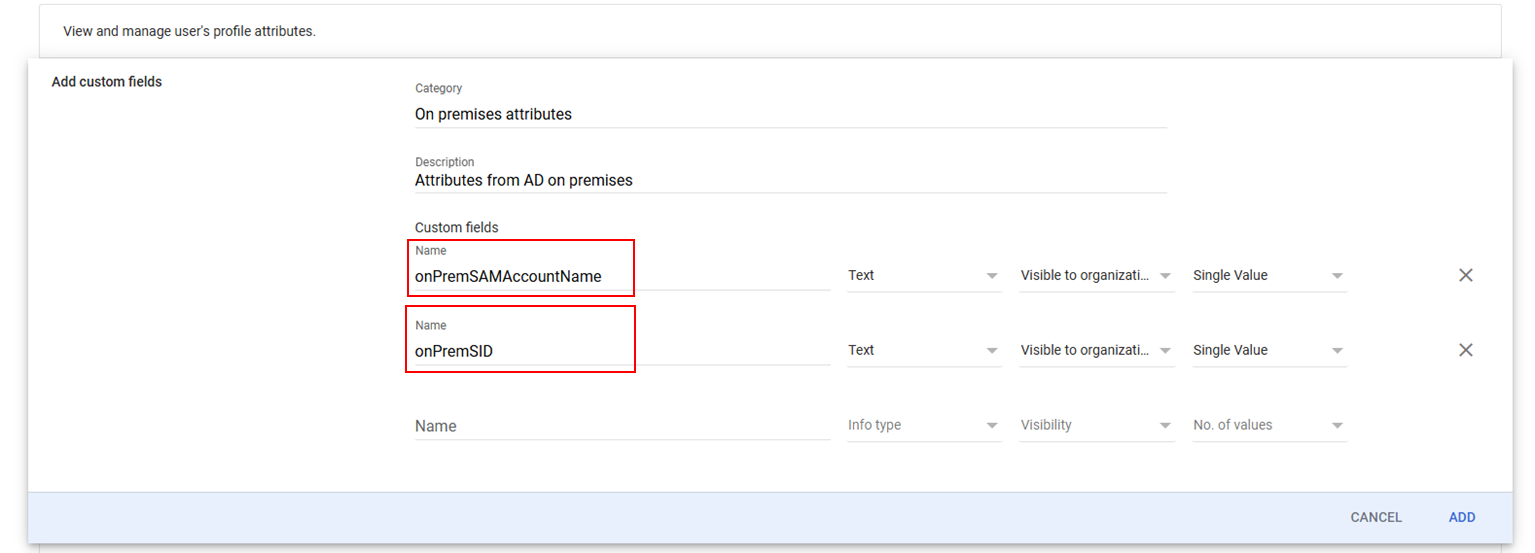
Go to Directory > Users > More options > Manage custom attributes.

-
Click Add Custom Attribute.
-
Enter these custom fields and click Add:
-
Go to Directory > Directory sync and select a directory to synchronize.
-
On User sync, click the pen icon to edit it.

-
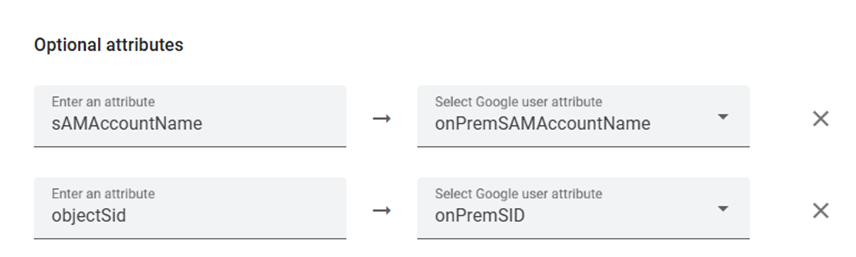
Click Continue until you get to Attribute Mapping. Map these attributes:
-
sAMAccountName - onPremSAMAccountName
-
objectSID - onPremSID
-
-
Click Continue to complete the configuration.
-
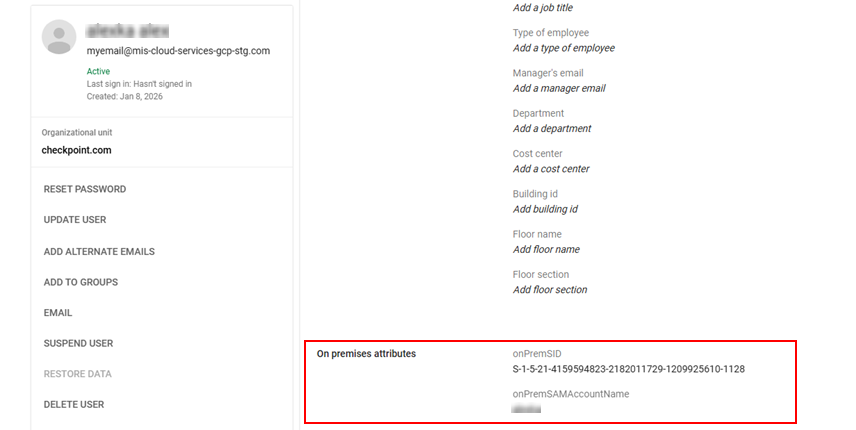
To test the mapping, go to Directory > Users and select an AD user. The SID data appears in the user profile under On premises attributes.
-
Below Admin Email, enter your Google Super Admin email.
-
For Credentials, upload the service account credentials from "Create Service Account", step 3.
-
Click Test Connectivity.
Note - Allow about five minutes for Google to authorize the Domain Wide Delegation (a maximum of twenty-four hours).
Review the details of the SSO configuration and click Submit.
|
|
Important - Create a user group with the applicable roles and assign it to the related IdP group name or ID. This depends on the applicable identity provider before you log out. For more information, see User Groups. |