Deploying CloudGuard Network Cross AZ Cluster in AWS
Before you deploy the Cross AZ Cluster![]() Two or more Security Gateways that work together in a redundant configuration - High Availability, or Load Sharing. in AWS
Two or more Security Gateways that work together in a redundant configuration - High Availability, or Load Sharing. in AWS![]() Amazon® Web Services. Public cloud platform that offers global compute, storage, database, application and other cloud services., you must prepare your AWS account and subscribe to a CloudGuard Network Security product.
Amazon® Web Services. Public cloud platform that offers global compute, storage, database, application and other cloud services., you must prepare your AWS account and subscribe to a CloudGuard Network Security product.
After completing these two steps, decide whether to deploy the CloudGuard Network Cross AZ Cluster in a new or existing VPC.
Then, deploy the Check Point Security Management Server![]() Dedicated Check Point server that runs Check Point software to manage the objects and policies in a Check Point environment within a single management Domain. Synonym: Single-Domain Security Management Server. and configure the CloudGuard Network Cross AZ Cluster in SmartConsole
Dedicated Check Point server that runs Check Point software to manage the objects and policies in a Check Point environment within a single management Domain. Synonym: Single-Domain Security Management Server. and configure the CloudGuard Network Cross AZ Cluster in SmartConsole![]() Check Point GUI application used to manage a Check Point environment - configure Security Policies, configure devices, monitor products and events, install updates, and so on..
Check Point GUI application used to manage a Check Point environment - configure Security Policies, configure devices, monitor products and events, install updates, and so on..
Finally, examine and test your deployment.
Step 1: Prepare Your AWS Account
To prepare your AWS account, do these steps:
-
If you do not already have an AWS account, create one at AWS.
-
Use the region selector in the navigation bar to choose the AWS region where you want to deploy the Check Point CloudGuard Cross AZ Cluster.
-
Create a key pair in your preferred region.
-
If necessary, request a service limit increase for the AWS resources you are going to use.
You may need to do this if you have an existing deployment that uses the AWS resources below and you may exceed the default limit with this deployment.
The resources that may need a service limit increase are:
-
Number of On-demand EC2 instances
-
Number of Elastic IP addresses
-
Number of VPCs for each region
-
Number of VPN connections for each region
-
Number of Customers for each region
-
Number of virtual private gateways for each region
-
VPN connections for each VPC
-
By default, this Deployment guide uses c5.xlarge for the Security Gateways and m5.xlarge for the Security Management Server![]() Check Point Single-Domain Security Management Server or a Multi-Domain Security Management Server..
Check Point Single-Domain Security Management Server or a Multi-Domain Security Management Server..
Deployment minimum permissions
For a successful deployment, the relevant IAM policy must have the minimum permissions set as configured below.
In the AWS VPC![]() AWS Virtual Private Cloud. A private cloud that exists in the public cloud of Amazon. It is isolated from other Virtual Networks in the AWS cloud. Console, navigate to the IAM service, select the relevant IAM policy, copy and paste this text:
AWS Virtual Private Cloud. A private cloud that exists in the public cloud of Amazon. It is isolated from other Virtual Networks in the AWS cloud. Console, navigate to the IAM service, select the relevant IAM policy, copy and paste this text:
{
    "Version": "2012-10-17",
    "Statement": [
        {
            "Sid": "Permissions",
            "Effect": "Allow",
            "Action": [
                "cloudformation:CreateStack",
                "cloudformation:DeleteStack",
                "cloudformation:DescribeStacks",
                "cloudformation:ListStackResources",
                "cloudformation:ValidateTemplate",
                "ec2:AllocateAddress",
                "ec2:AssociateAddress",
                "ec2:AssociateRouteTable",
                "ec2:AttachInternetGateway",
                "ec2:AttachNetworkInterface",
                "ec2:AuthorizeSecurityGroupEgress",
                "ec2:AuthorizeSecurityGroupIngress",
                "ec2:CreateInternetGateway",
                "ec2:CreateLocalGatewayRouteTable",
                "ec2:CreateNetworkInterface",
                "ec2:CreateRoute",
                "ec2:CreateRouteTable",
                "ec2:CreateSecurityGroup",
                "ec2:CreateSubnet",
                "ec2:CreateTags",
                "ec2:CreateVpc",
                "ec2:DeleteInternetGateway",
                "ec2:DeleteNetworkInterface",
                "ec2:DeleteRoute",
                "ec2:DeleteRouteTable",
                "ec2:DeleteSecurityGroup",
                "ec2:DeleteSubnet",
                "ec2:DeleteVpc",
                "ec2:DescribeAccountAttributes",
                "ec2:DescribeAddresses",
                "ec2:DescribeAvailabilityZones",
                "ec2:DescribeInstanceAttribute",
                "ec2:DescribeInstances",
                "ec2:DescribeInternetGateways",
                "ec2:DescribeKeyPairs",
                "ec2:DescribeNetworkAcls",
                "ec2:DescribeNetworkInterfaces",
                "ec2:DescribeRegions",
                "ec2:DescribeRouteTables",
                "ec2:DescribeSecurityGroups",
                "ec2:DescribeSubnets",
                "ec2:DescribeVolumes",
                "ec2:DescribeVpcAttribute",
                "ec2:DescribeVpcClassicLink",
                "ec2:DescribeVpcClassicLinkDnsSupport",
                "ec2:DescribeVpcs",
                "ec2:DetachInternetGateway",
                "ec2:DetachNetworkInterface",
                "ec2:DisassociateAddress",
                "ec2:DisassociateRouteTable",
                "ec2:ModifyNetworkInterfaceAttribute",
                "ec2:ModifySubnetAttribute",
                "ec2:ModifyVpcAttribute",
                "ec2:ReleaseAddress",
                "ec2:RevokeSecurityGroupEgress",
                "ec2:RunInstances",
                "ec2:TerminateInstances",
                "iam:AddRoleToInstanceProfile",
                "iam:AttachRolePolicy",
                "iam:CreateInstanceProfile",
                "iam:CreatePolicy",
                "iam:CreateRole",
                "iam:DeleteInstanceProfile",
                "iam:DeletePolicy",
                "iam:DeleteRole",
                "iam:DeleteRolePolicy",
                "iam:DetachRolePolicy",
                "iam:GetInstanceProfile",
                "iam:GetPolicy",
                "iam:GetPolicyVersion",
                "iam:GetRole",
                "iam:ListAttachedRolePolicies",
                "iam:ListInstanceProfilesForRole",
                "iam:ListPolicyVersions",
                "iam:PutRolePolicy",
                "iam:RemoveRoleFromInstanceProfile"
            ],
            "Resource": "*"
        },
        {
            "Sid": "IAMPassRole",
            "Effect": "Allow",
            "Action": "iam:PassRole",
            "Resource": "*",
            "Condition": {
                "StringEquals": {
                    "iam:PassedToService": "ec2.amazonaws.com"
                }
            }
        }
    ]
}{
"Version": "2012-10-17",
"Statement": [
{
"Sid": "Permissions",
"Effect": "Allow",
"Action": [
"cloudformation:CreateStack",
"cloudformation:DeleteStack",
"cloudformation:DescribeStacks",
"cloudformation:ListStackResources",
"cloudformation:ValidateTemplate",
"ec2:AllocateAddress",
"ec2:AssociateAddress",
"ec2:AssociateRouteTable",
"ec2:AuthorizeSecurityGroupEgress",
"ec2:AuthorizeSecurityGroupIngress",
"ec2:CreateNetworkInterface",
"ec2:CreateRoute",
"ec2:CreateSecurityGroup",
"ec2:CreateTags",
"ec2:DeleteNetworkInterface",
"ec2:DeleteRoute",
"ec2:DeleteSecurityGroup",
"ec2:DescribeAddresses",
"ec2:DescribeInstanceAttribute",
"ec2:DescribeInstances",
"ec2:DescribeKeyPairs",
"ec2:DescribeNetworkInterfaces",
"ec2:DescribeRouteTables",
"ec2:DescribeSecurityGroups",
"ec2:DescribeSubnets",
"ec2:DescribeVolumes",
"ec2:DescribeVpcs",
"ec2:DetachNetworkInterface",
"ec2:DisassociateAddress",
"ec2:DisassociateRouteTable",
"ec2:ModifyNetworkInterfaceAttribute",
"ec2:ReleaseAddress",
"ec2:RevokeSecurityGroupEgress",
"ec2:RunInstances",
"ec2:TerminateInstances",
"iam:AddRoleToInstanceProfile",
"iam:AttachRolePolicy",
"iam:CreateInstanceProfile",
"iam:CreatePolicy",
"iam:CreateRole",
"iam:DeleteInstanceProfile",
"iam:DeletePolicy",
"iam:DeleteRole",
"iam:DeleteRolePolicy",
"iam:DetachRolePolicy",
"iam:GetInstanceProfile",
"iam:GetPolicy",
"iam:GetPolicyVersion",
"iam:GetRole",
"iam:ListAttachedRolePolicies",
"iam:ListInstanceProfilesForRole",
"iam:ListPolicyVersions",
"iam:PutRolePolicy",
"iam:RemoveRoleFromInstanceProfile"
],
"Resource": "*"
},
{
"Sid": "IAMPassRole",
"Effect": "Allow",
"Action": "iam:PassRole",
"Resource": "*",
"Condition": {
"StringEquals": {
"iam:PassedToService": "ec2.amazonaws.com"
}
}
}
]
}Step 2: Subscribe to Check Point CloudGuard Network Security
To subscribe to Check Point CloudGuard Network, do these steps:
-
Log in to the AWS Marketplace.
-
Search for "CloudGuard Network Security".
-
Select one of these licensing options for Check Point CloudGuard Security Gateways:
-
CloudGuard Network Security with Threat Prevention & SandBlast BYOL
-
CloudGuard Network Security Next-Gen Firewall with Threat Prevention
-
CloudGuard Network Security with Threat Prevention and SandBlast
Or one of these licensing options for a Check Point CloudGuard Security Management Server:

Note - If you want to manage more than five Security Gateways, select the BYOL option and contact Check Point Sales to purchase a license.
-
-
Select Continue to subscribe.
-
Select Accept Terms to confirm that you accept the AWS Marketplace license agreement.
|
|
Note - In the deployment steps that follow, the system prompts for the licensing information for the Security Gateways and Security Management Server that you selected. |
Step 3: Deploy the CloudGuard Cross AZ Cluster in AWS
|
|
Note - To deploy the Transit GatewayHigh Availability (HA) in AWS, see Deploying CloudGuard Network Cross AZ Cluster Members without an Elastic IP. |
Before you deploy the Cross AZ Cluster for AWS:
-
Select a CloudFormation template for a new or existing VPC.
-
Follow the instructions in this section to deploy the AWS HA.
-
Examine and test the deployment.
If you decide to deploy the Cross AZ Cluster without an association of Elastic IP to the Cluster Members, see Deploying CloudGuard Network Cross AZ Cluster Members without an Elastic IP
Select one of the CloudFormation templates to launch the Cross AZ Cluster template into your AWS account:
|
CloudFormation Template |
Description |
||
|---|---|---|---|
|
This template deploys:
|
|||
|
Cross AZ cluster for an existing VPC
|
This template deploys:
|
|
|
Notes:
|
Parameters for Deploying a Cross AZ Cluster in a New VPC
VPC Network Configuration:
|
Parameter Name |
Default Value |
Description |
|---|---|---|
|
|
Requires input |
The Availability Zones for the Cross AZ Cluster. This field shows the Availability Zones in your selected region. You must select two Availability Zones from this list. The system preserves the logical order of your selections. Each member is deployed in a different Availability Zone. |
|
|
10.0.0.0/16 |
The CIDR block for the VPC. |
|
|
10.0.10.0/24 |
The CIDR block for the Public Subnet 1 in the first Availability Zone. |
|
|
10.0.20.0/24 |
The CIDR block for the Public Subnet 2 in the second Availability Zone. |
|
|
10.0.11.0/24 |
The CIDR block for the Private Subnet 1 in the first Availability Zone. |
|
|
10.0.21.0/24 |
The CIDR block for the Private Subnet 2 in the second Availability Zone. |
EC2 Instance Configuration:
|
Parameter Name |
Default Value |
Description |
||
|---|---|---|---|---|
|
|
Check-Point-Cluster |
The name tag for Cluster Members instances (the name ends with "member-A" or "member-B"). |
||
|
|
c5.xlarge |
The EC2 instance type for Cluster Members instances. |
||
|
|
Requires input |
The EC2 Key Pair to allow SSH access to the Cluster Members instance. |
||
|
|
True |
When true, the system deploys Cross AZ Cluster members with Elastic IP addresses, in addition to the shared cluster Elastic IP address. When false, you must make sure Cross AZ Cluster members can connect to a VPC endpoint. For more information, see Deploying CloudGuard Network Cross AZ Cluster Members without an Elastic IP. |
||
|
|
100 |
The size of the root volume in gigabytes. |
||
|
|
alias/aws/ebs |
The KMS or CMK key Identifier. Use key ID, alias, or ARN. Add the prefix 'alias/' to the key alias (for example, for KMS default alias 'aws/ebs', enter 'alias/aws/ebs'). |
||
|
|
False |
When true, the system enables AWS Instance Connect on the Cross AZ Cluster. You can open an SSH console to the instances over HTTPS through the AWS web console. |
||
|
|
Optional |
A predefined IAM role to attach to the cluster profile. |
||
|
|
False |
Prevents accidental termination of an instance.
|
Check Point Settings:
|
Parameter Name |
Default Value |
Description |
|---|---|---|
|
|
"version"-"license" |
The license for Cross AZ Cluster members. By default, "version" points to the current recommended version and "license" is set to NGTX. |
|
|
/etc/cli.sh |
The default administrator shell to log into the Gaia |
|
|
Optional |
The administrator password hash.To get the password hash, run this command: |
|
|
Requires input |
A one-time activation key. Enter a string with 8 to 127 alphanumeric characters. |
|
|
Optional |
Specify the name tag prefix for the resources. |
|
|
Optional |
Specify the host name. It will be appended with Cluster Member |
|
|
True |
Automatically download updates and send statistical data to Check Point to improve the product experience. |
|
|
Optional |
Report Check Point-specific CloudWatch metrics. |
|
|
Optional |
Specify an optional script with commands separated by semicolons (;) to run on the initial boot. |
|
|
169.254.169.123 (Optional) |
Specify a different Primary NTP server. |
|
|
0.pool.ntp.org (Optional) |
Specify a different Secondary NTP server. |
Quick Connect to Smart-1 Cloud:
Smart-1 Cloud (Check Point’s management server as a Service) is a recommended option to use CloudGuard Network Security gateways.
|
Parameter Name |
Default Value |
Description |
|---|---|---|
Smart-1 Cloud Token for member A
|
Requires input |
Follow the instructions in sk180501 to create tokens for each member and paste them into the applicable fields. |
|
|
Requires input |
Follow the instructions in sk180501 to create tokens for each member and paste them into the applicable fields. |
Parameters for Deploying a Cross AZ Cluster in an Existing VPC
VPC Network Configuration:
|
Parameter Name |
Default Value |
Description |
|---|---|---|
|
|
Requires input |
The ID of your existing VPC. |
|
|
Requires input |
Select a Public Subnet in the first Availability Zone of your VPC. |
|
|
Requires input |
Select a Public Subnet in the second Availability Zone of your VPC. |
|
|
Requires input |
Select a Private Subnet in the first Availability Zone of your VPC. |
|
|
Requires input |
Select a Private Subnet in the second Availability Zone of your VPC. |
|
|
Optional |
Set 0.0.0.0/0 route to the Active Cluster member instance in this route table (for example, rtb-12a34567). The route table must not have an existing 0.0.0.0/0 route. If this field is empty, traffic will not be routed through the Security Cluster. This requires manual configuration in the Route Table. |
EC2 Instance Configuration:
|
Parameter Name |
Default Value |
Description |
||
|---|---|---|---|---|
|
|
Check-Point-Cluster |
The name tag for Cluster Members instances (the name ends with "member-A" or "member-B"). |
||
|
|
c5.xlarge |
The EC2 instance type for Cluster Members instances. |
||
|
|
Requires input |
The EC2 Key Pair to allow SSH access to the Cluster Members instance. |
||
|
|
True |
When true, the system deploys Cross AZ Cluster members with Elastic IP addresses, in addition to the shared cluster Elastic IP address. When false, you must make sure Cross AZ Cluster members can connect to a VPC endpoint. For more information, see Deploying CloudGuard Network Cross AZ Cluster Members without an Elastic IP |
||
|
|
100 |
The size of the root volume in gigabytes. |
||
|
|
alias/aws/ebs |
The KMS or CMK key Identifier. Use key ID, alias, or ARN. Add the prefix 'alias/' to the key alias (for example, for KMS default alias 'aws/ebs', enter 'alias/aws/ebs'). |
||
|
|
False |
When true, the system enables AWS Instance Connect on the Cross AZ Cluster. You can open an SSH console to the instances over HTTPS through the AWS web console. |
||
|
|
Optional |
A predefined IAM role to attach to the cluster profile. |
||
|
|
False |
Prevents accidental termination of an instance..
|
Check Point Settings:
|
Parameter Name |
Default Value |
Description |
|---|---|---|
|
|
"version"-"license" |
The license for Cross AZ Cluster members. By default, "version" points to the current recommended version and "license" is set to NGTX. |
|
|
/etc/cli.sh |
The default administrator shell to log into the Gaia OS on your instance. |
|
|
Optional |
The administrator password hash.To get the password hash, run this command: |
|
|
Requires input |
A one-time activation key. Enter a string with 8 to 127 alphanumeric characters. |
Quick Connect to Smart-1 Cloud:
Smart-1 Cloud (Check Point’s management server as a Service) is a recommended option to use CloudGuard Network Security gateways.
|
Parameter Name |
Default Value |
Description |
|---|---|---|
Smart-1 Cloud Token for member A
|
Requires input |
Follow the instructions in sk180501 to create tokens for each member and paste them into the applicable fields. |
|
|
Requires input |
Follow the instructions in sk180501 to create tokens for each member and paste them into the applicable fields. |
Advanced Settings:
|
Parameter Name |
Default Value |
Description |
|---|---|---|
|
|
Optional |
Specify the name tag prefix for the resources. |
|
|
Optional |
Specify the host name. It will be appended with Cluster Member-a/b correspondingly. |
|
|
True |
Automatically download updates and send statistical data to Check Point to improve the product experience. |
|
|
Optional |
Report Check Point-specific CloudWatch metrics. |
|
|
Optional |
Specify an optional script with commands separated by semicolons (;) to run on the initial boot. |
|
|
169.254.169.123 (Optional) |
Specify a different Primary NTP server. |
|
|
0.pool.ntp.org (Optional) |
Specify a different Secondary NTP server. |
Step 4: Deploy the Check Point Security Management Server
We recommend you to use Smart-1 Cloud (Check Point's management server as a Service) to manage CloudGuard Network Security Gateways.
Refer to sk180501 for step-by-step instructions for connecting CloudGuard Network Public Cloud Gateways to Smart-1 Cloud management.
You can also use one of these options to deploy the Check Point Security Management Server.
-
Use the existing on-premises Security Management Server or existing Security Management Server in AWS.
Note - The Security Management Server must be version R81.20 or higher.
If the Security Management Server communicates over private IP addresses with the Cross AZ Cluster Members, make sure that the Security Management Server has a connection to the Security VPC in which they are deployed.
-
Deploy a new Security Management Server with the Management CloudFormation template (see sk130372).
Note - For direct access to the Cross AZ Cluster, deploy the management in the same Security VPC where you deployed the Cross AZ Cluster in Step 3.
Step 5: Configure the CloudGuard Cross AZ Cluster in SmartConsole
To enforce a Security Policy![]() Collection of rules that control network traffic and enforce organization guidelines for data protection and access to resources with packet inspection., you must configure the CloudGuard Cross AZ Cluster on the Security Management Server with the Check Point SmartConsole application.
Collection of rules that control network traffic and enforce organization guidelines for data protection and access to resources with packet inspection., you must configure the CloudGuard Cross AZ Cluster on the Security Management Server with the Check Point SmartConsole application.
Configuring the Cluster Object
|
|
Important:
|
To configure the Cluster object:
-
Use SmartConsole to connect to your Check Point Security Management Server.
-
If the Security Management Server and the Cluster Members communicate over public IP addresses, make sure that the Security Management Server object defined with the public IP address.
-
(Optional) Edit the Security Management Server object and change the IP address to the public one.

Important - If you change the primary IP address of the Security Management Server, you must issue and install the license(s) for the new IP address.
-
In SmartConsole, at the top click
 > select Cluster.
-
Select Legacy ClusterXL >Classic Mode and click Next.
-
Configure the cluster's general properties:
-
In the Cluster Name field, enter a name for the cluster object (example: Cluster_HA).
-
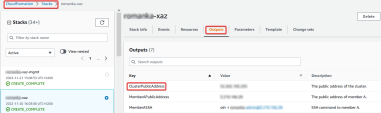
In the IPv4 Address, enter the Cluster's public IP address.
To get the IP address in AWS Console:
Navigate to CloudFormation service -> Click the Cross AZ Cluster stack > select the IP address with the key ClusterPublicAddress.
-
If you use the IPsec VPN Software Blade
 Specific security solution (module): (1) On a Security Gateway, each Software Blade inspects specific characteristics of the traffic (2) On a Management Server, each Software Blade enables different management capabilities., you must configure the VPN settings in the cluster object before you click OK.
If you do not use this Software Blade, clear its check box.
-
-
Configure the Cluster Members:
Note - If you manage this cluster from Smart-1 Cloud, use the existing cluster member and start from step 7.b.iv.
-
In the Cluster's object left pane, click Cluster Members.
-
Configure Member A:
-
Click Add > New Cluster Member.
-
In the Name field, enter the member's name (in our example:
Member_A). -
In the IPv4 Address field, enter the member's IP address of its external interface (eth0).
-
If the Management Server connects to the Cross AZ Cluster Members over a private IP address, enter the private IP address of the interface.
-
If the Management Server connects to the Cross AZ Cluster Members over a public IP address, enter the Elastic Primary IP address of the interface. You can find it in the Cross AZ Cluster stack, the same as the Cluster Public IP address.
-
-
Click Communication.
-
Enter the one-time activation key used in the Cross AZ Cluster CloudFormation Template.
-
Click Initialize > Close > OK.
-
-
Configure Member B:
Note - If you manage this cluster from Smart-1 Cloud, use the existing cluster member and start from step 7.c.iv.
-
Click Add > New Cluster Member.
-
In the Name field, enter a member's name (in our example:
Member_B). -
In the IPv4 Address field, enter the member's IP address of its external interface (eth0)
-
If the Management Server connects to the Cross AZ Cluster Members over private IP address, enter the private IP address of the interface.
-
If the Management Server connects to the Cross AZ Cluster Members over public IP address, enter the Elastic Primary IP address of the interface. You can find it in the Cross AZ Cluster stack, the same as the Cluster Public IP address.
-
-
Click Communication.
-
Enter the one-time activation key used in the Cross AZ Cluster CloudFormation Template.
-
Click Initialize > Close > OK.
-
-
-
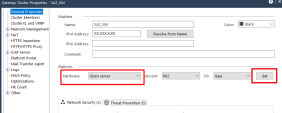
In R82 and higher, after configuring the cluster object and cluster members, you must change the Hardware type of the Security Gateways object that report to the Security Management Server.
For that:
-
In SmartConsole, double-click the cluster object to open its properties.
-
On the General Properties page, in the Platform section, click Get.
The value in the Hardware field must change from Open Server to CloudGuard IaaS.
-
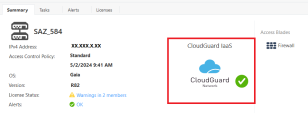
Click OK to save the changes and close cluster object properties.
As a result, on the Summary tab of this cluster object, a CloudGuard Network logo with a green mark is displayed.
-
-
Configure the ClusterXL mode:
-
In the Cluster's object left tree, click ClusterXL and VRRP.
-
Select High Availability.
-
Select Use Geo Mode in a Cloud.
-
Click OK. (It closes the Cluster object configuration).

-
-
Open the Cluster object again to continue the configuration.
-
Configure the Cluster's Topology:
-
In the Cluster's object left tree, click Network Management.
-
Click Get Interfaces > Get Interfaces with Topology > click Yes.
-
Configure the eth0 interface:
-
Select eth0.
-
Click Edit.
-
In the General section, in the Network Type field, select Private.
-
In the Topology section, in the Anti-Spoofing section click Modify.
-
Make sure the option Perform Anti-Spoofing based on interface topology is cleared.
-
Click OK.
-
-
Configure the eth1 interface:
-
Select eth1.
-
Click Edit.
-
In the General section, in the Network Type field, select Sync.
-
In the Topology section, in the Anti-Spoofing section click Modify.
-
Make sure the option Perform Anti-Spoofing based on interface topology is cleared.
-
Click OK.
-
Note - This network is also used for State Synchronization.
-
-
Add an alias interface to the Cluster members:
-
In the Cluster's object left tree, click Network Management.
-
At the top click Actions > New Interfaces.
-
Configure Network properties: Enter a name for the interface (for example: Private VIP).
-
Keep the Network Type as Private.
-
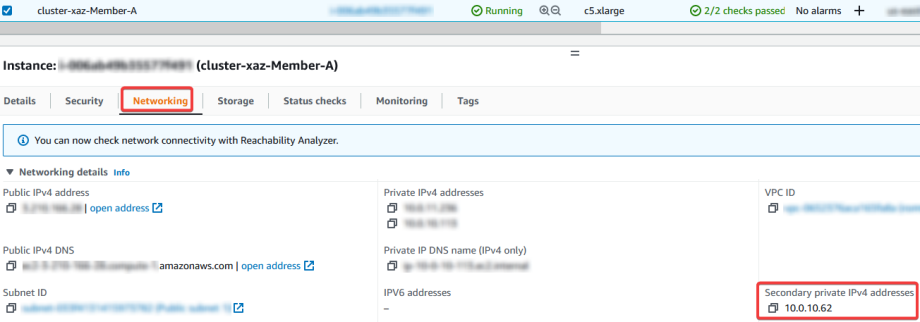
Configure Member IP addresses: Enter secondary private IPv4 address of the external interface for each cluster member and click OK.
To get the IP address in the AWS console:
In AWS Console, select Cluster member > Navigate to the Networking tab.
-
Change the interface topology to External: In the Topology section click Modify and select Override > Internet (External) and click OK. It is not necessary to make more changes.
-
-
Click OK.
-
Install the Access Control policy on the Cluster object.


Allowing Outbound Traffic
-
Use SmartConsole to connect to your Check Point Security Management Server.
-
Create a Network object for the Web Servers subnet:
In the right navigation bar, click New > More > Network Object > Network.
-
Configure the general properties:
-
Enter a name for your network (example: Web_Network).
-
In the IPv4 section, enter the Network Address and the Net mask of the Web Servers subnet.
-
-
Create a NAT rule
Set of traffic parameters and other conditions in a Rule Base (Security Policy) that cause specified actions to be taken for a communication session. for the network to hide behind the Cluster Gateways:-
Follow steps 2.a - 2.e in the "Configuring Inbound Protection" chapter, "Using NAT on the Cluster" topic below.
-
Create a NAT rule with these values:
-
-
Install the Access Control policy on the Cluster object.
Configuring Inbound Protection
There are 2 options to configure inbound protection with AWS Cross-AZ Cluster:
Check Point recommends using ingress topology for inbound traffic inspection whenever possible.
-
Using ingress routing
In AWS Console:
-
Create a new routing table and associate it with the Internet Gateway as edge association.
In the route table:
-
The target must be the Active Cluster Member's external ENI (Elastic Network Interface).
-
The destination must be the subnet that you want to protect.
-
Add a specific route for every subnet that you want to protect.
Route example to Web Server subnet:
Destination
Target
Status
Propagated
172.31.7.0/24
eni-xxxx
Active
No
Note: Ingress routing only supports routes to existing subnets.
-
-
Add a default route to the Active member's internal ENI to the route table of every subnet that you want to protect.
-
Connect over SSH to each of the Cluster Members.
-
Log in to Gaia Clish
The name of the default command line shell in Check Point Gaia operating system. This is a restricted shell (role-based administration controls the number of commands available in the shell)., or Expert mode. -
Add this route:
-
In Gaia Clish, run these two commands:
set static-route <Internal-Subnet-IP-address/Prefix> nexthop gateway address <eth1-AWS-VPC-router-IP-address> onsave config -
In Expert mode, run this command:
clish -c 'set static-route <Internal-Subnet-IP-address/Prefix> nexthop gateway address <eth1-AWS-VPC-router-IP-address> on' -s
For example:
The internal subnet is 172.31.7.0/24 (Web Servers subnet) and the Cluster Members internal subnets are 172.31.5.0/24 for Member "A" and 172.31.6.0/24 for Member "B".
The result is that Member A must have static route for 172.31.7.0/24 to go through 172.31.5.1 (AWS VPC router IP address) and Member B 172.31.7.0/24 to go through 172.31.6.1 (AWS VPC router IP address).
For more information regarding VPC Ingress Routing integration with CGI, see the Ingress Routing in sk166575.
-
-
-
-
Using NAT on the Cluster
Create a Dynamic Object
Special object type, whose IP address is not known in advance. The Security Gateway resolves the IP address of this object in real time. named LocalgatewayAlias on both Cluster members:-
Connect over SSH to each of the Cluster Members.
-
Log in to Expert mode.
-
Add Dynamic Object:
dynamic_objects -n LocalgatewayAlias -r < eth0:1 (secondary)-interface-IP-address> <eth0:1 (secondary)-interface-IP-address> -aFor example:
dynamic_objects -n LocalgatewayAlias -r 172.31.3.40 172.31.3.40 -a
Note - The first and second IP addresses in the command must be the same.
-
Use SmartConsole to connect to your Check Point Security Management Server.
-
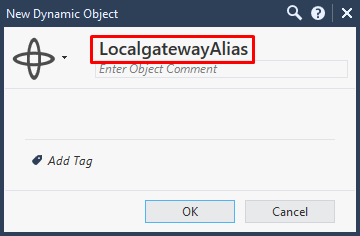
Create a Dynamic Object named LocalgatewayAlias:
-
In the Object Browser, click on New > go to More menu > go to Network Object menu > click on Dynamic Object...

-
Enter the name LocalgatewayAlias:
-
-
Create a new Host object that represents internal machine (for example Web Server).
-
Create a new Service object with internet facing protocol and port of the internal machine:
For example:
-
From the Objects menu, select More object types > Service > New TCP.
-
Enter a name. For example:
http-8084 -
In the Protocol field, select the protocol (HTTP).
-
In the Port field, select Customize and enter the port number: 8084
-
Click OK.
-
-
Create a NAT rule for north-south inbound traffic.
Notes:
-
This NAT rule matches any traffic that arrives at the CloudGuard Cluster on the applicable internal port.
-
This NAT rule translates the destination IP address to the IP address of the Web Servers.
Create a NAT rule with these values:
-
-
Configuring VPN
For more information, see the Check Point Security Management Administration Guide for your Management Server version.
To configure a VPN:
-
Verify in the Cluster's object left tree > Network Management that an alias interface is configured. If the alias interface is not configured, perform Configuring the Cluster Object > step 11.
-
Create a Network Group object to represent the encryption domain of the Cross AZ Cluster:
-
In SmartConsole, click Objects > Object Explorer.
-
From the top toolbar, select New > Network Group.
-
In the Enter Object Name field, enter a name.
-
Click the '+' icon, and select the applicable network objects.
-
Click OK.
-
Close the Object Explorer.
-
-
Edit the cluster object:
-
From the left navigation panel, click Gateways & Servers.
-
Double-click the cluster object.
-
-
Configure your Network Group as the Encryption Domain:
-
In the left tree, click Network Management > VPN Domain.
-
Select User defined.
-
In the right corner of this field, click the [...] button and select the Network Group object you created in Step 1.
-
-
Select the VPN community:
-
In the left tree, click IPsec VPN.
-
In the section: This Security Gateway participates in the following VPN Communities, select the applicable VPN community.
-
-
Configure the VPN Community settings:
-
From the top, click the Objects menu > Object Explorer.
-
In the left tree, clear all boxes except for VPN Communities.
-
Double-click the VPN community in which this Cross AZ Cluster object participates.
-
Configure the VPN Community to use Permanent Tunnels (recommended, not required):
-
In the left tree, click Tunnel Management.
-
Select Set Permanent Tunnels.
-
Select the applicable option.
-
-
Disable NAT in the VPN community:
-
In the left tree, click Advanced.
-
Select Disable NAT inside the VPN community.
Note - Using NAT in the VPN community affects the state sync, causing cluster failover to be stateless. To make sure the cluster failover is stateful, you must disable NAT in the VPN community.
-
-
Click OK to close the VPN Community properties window.
-
Close the Object Explorer.
-
-
Install the applicable Access Control Policy on the cluster object.
Configuring Remote Access VPN
Check Point's Remote Access VPN solutions let you create a VPN tunnel between a remote user and the internal network.
For more information, see the R81.20 Remote Access VPN Administration Guide.
Step 6: Review and Test the Deployment
Follow these steps to examine the configuration and set up all the components:
-
In AWS WebUI:
-
In the VPC console, under Route Tables, go to the Private Route table (which is associated with the Private Subnets of the Security VPC).
-
In the Routes table, make sure there is a default route to the Active member’s private interface (eth1).
-
-
Connect to the CLI on the two cluster members. Log in to the Expert mode:
-
Run the
cphaprob statcommand to make sure that the Cross AZ Cluster works correctly. The output of thecphaprob statcommand on both Cross AZ Cluster member must show the same information (except for the "(local)" string).Example:
[Expert@HostName:0]# cphaprob state
Cluster Mode: High Availability (Active Up) with IGMP Membership
Number
Unique Address
Assigned Load
State
1 (local)
172.31.3.20
0%
Active
2
172.31.4.20
100%
Standby
-
Run the
python3 $FWDIR/scripts/aws_ha_test.pycommand and make sure that it finishes successfully without errors.
-
-
Simulate a Cross AZ Cluster failover:
-
On the Active cluster member, run this command in Expert mode:
clusterXL_admin down -
After two seconds, you should see in AWS WebUI > VPC Console > Route Tables that all route tables (that had a default route directed to the Active cluster member) point to the Standby cluster member.
Notes:
-
To see the changes, update the data on the AWS WebUI.
-
It can take a few minutes until failover is fully configured to pass traffic through the Active cluster member.
-
-
Bring back the former Active cluster member. For that, on the former Active cluster member, run in Expert mode:
clusterXL_admin up