Gaia OS Hardening
Gaia Default Hardening Overview
Gaia OS is delivered in a hardened baseline state. After the Gaia OS installation, the only network services on Gaia OS are OpenSSH (TCP 22), Gaia Portal secure web server (HTTPS TCP 443), cprid (TCP 18208), and Gaia REST API server (HTTPS via TCP 443).
Restrict access to these ports to internal trusted networks.
Gaia OS administrator settings
Review all users with access to the Gaia OS and ensure all users are authorized, use strong passwords, configure the access role to allow the minimal access required per user role, ensure the shell is set to Gaia Clish and force users to use MFA for access
-
In Gaia Portal, navigate to User Management > Users:

-
Select each user and click Edit.
-
Make sure the Shell is set to /etc/cli.sh:

-
Click OK.
Implementation reference:
R82.10 Gaia Administration Guide > User Management > Authentication.
Password Policy Hardening (Complexity, Age, Reuse)
Recommendation: Enforce password complexity, multi-factor authentication (R82 or higher), password history (reuse prevention), password aging, auto lock out of admins with multiple authentication failures or with long inactivity periods.
Strong password policy reduces brute force and credential reuse risk. Automatically disabling dormant administrator accounts significantly reduces the attack surface by preventing access from accounts associated with former employees.
-
In Gaia Portal, navigate to User Management > Password Policy.
-
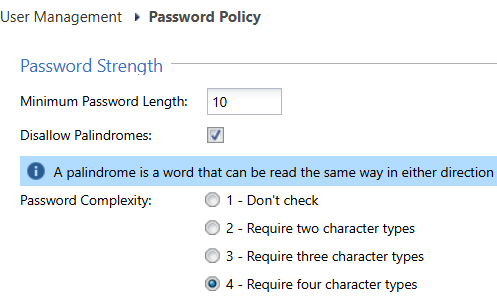
In the section Password Strength:
Item
Default
Recommended
Minimum Password Length
6 characters
10 characters
Disallow Palindromes
Enabled
Enabled
Password Complexity
2 – Require two character types
4 – require four character types
-
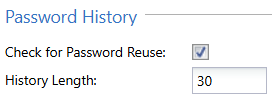
In the section Password History:
Item
Default
Recommended
Check for Password Reuse
Enabled
Enabled
-
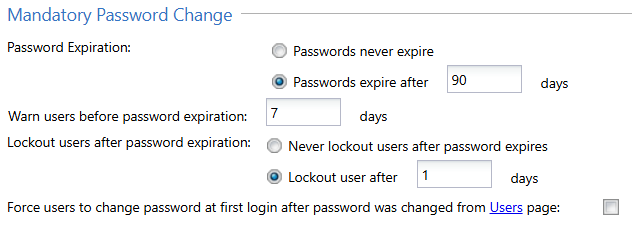
In the section Mandatory Password Change:
Item
Default
Recommended
Password Expiration
Passwords never expire
Passwords expire after 90 days
Lockout users after password expiration
Never lockout users after password expires
Lockout user after 1 days
-
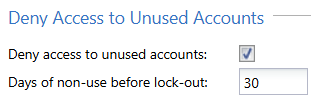
In the section Deny Access to Unused Accounts:
Item
Default
Recommended
Deny access to unused accounts
Disabled
Enabled
Days non-use before lock-out
365 days
30 days
-
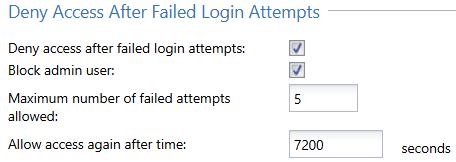
In the section Deny Access After Failed Login Attempts:
Item
Default
Recommended
Deny access after failed login attempts
Disabled
Enabled
Block admin user
Disabled
Enabled
Maximum number of failed attempts allowed
10
5
Allow access again after
1200 seconds (20 min)
7200 seconds (2 hours)
-
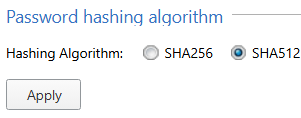
In the section Password hashing algorithm:
Item
Default
Recommended
Password Hashing
SHA512
SHA512
Important: If the Gaia server has been through multiple upgrades, you should reset the passwords to force them to be re-hashed with a stronger hashing function.
-
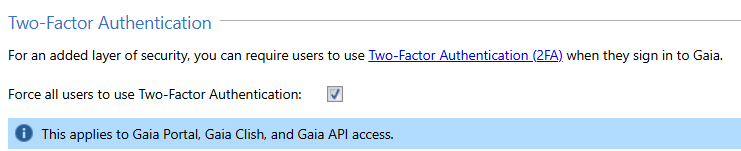
In the section Two-Factor Authentication (available in R82 and higher):
Item
Default
Recommended
Force all users to use Two-Factor Authentication
Disabled
Enabled
Implementation reference:
-
R82.10 Gaia Administration Guide > User Management > Password Policy in Gaia Portal.
Dynamic Routing Hardening
Recommendation: Enable only routing protocols required, accept routing protocols only from predefined list or routing peers, apply authentication (e.g., BGP MD5), use route filters to restrict learned routes impact.
Dynamic routing protocols require the Security Gateway to listen on specific ports to exchange routing information. Routing peers may be outside your organization, which increases risk. To reduce attack surface and prevent abuse or misconfiguration that could lead to security issues, allow routing updates only from approved peers, use authentication, and apply route filtering.
Start with disabling the implied rules relating to dynamic routing as mentioned in Decreasing Security Gateway Exposure with Policy. Instead use an explicit access rule that will let only routing peers connect to the Security Gateway.
In the example below, the group "BGP_routing_peers" contains the relevant IP address of the routing peers that it must communicate with, with a destination set to be the Security Gateway itself. Use the BGP protocol from application control as it will verify the protocol is indeed BGP and not an attempt to tunnel other traffic over a well known port.

To find the list of configured peers in Gaia Portal, navigate to Advanced Routing > BGP.
Example (it is for BGP, but should be repeated for other dynamic routing protocols):

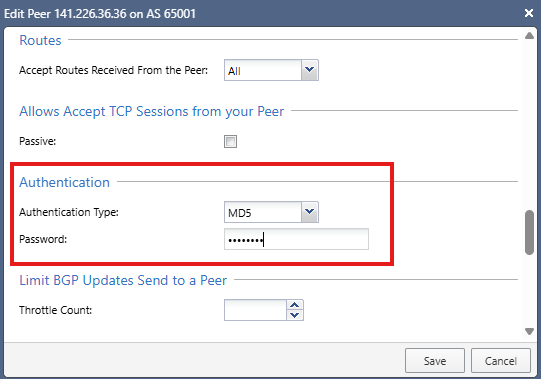
Configure MD5 authentication for BGP to improve the level of trust with peer routers:
-
In Gaia Portal, navigate to Advanced Routing > BGP.
-
Select the peer group and click Edit.
-
Select the specific peer and click Edit.
-
Click Show Advanced Settings.
-
Scroll down to the Authentication section.
-
In the Authentication Type field, select MD5.
-
In the Password field, enter the applicable password.
Recommendation: Rotate this password every 90 days.
Example:
-
-
Click Save.
Configure inbound route filters to ensure only desired routes are learned from peers.
For example, do not allow external routers to advertize routes for internal networks.
Implementation reference:
-
R82.10 Gaia Advanced Routing Administration Guide > Configuring BGP Remote Peers in Gaia Portal.
-
sk98936 - How to configure route redistribution and inbound route filters in Gaia Portal.
SNMP Monitoring Hardening
Recommendation: Disable SNMP if not needed. If SNMP is required, use SNMPv3 with SHA512 authentication and AES256 encryption (do not use SNMPv1 or SNMPv2). Run the SNMP agent only on internal interfaces and only allow specific IPs to send requests to these interfaces. For monitoring of Check Point Security Gateways and Management Server, a read-only permission is sufficient.
SNMP can expose operational details. Secure configuration reduces information disclosure risk.
-
In Gaia Portal, navigate to System Management > SNMP.
-
In the section SNMP Genera Settings:
-
In the Version field, select v3-Only.
-
Click Apply.
-
-
In the section Agent Interfaces:
-
Select only the relevant internal interfaces.
-
-
In the section V3 - User-Based Security Model (USM):
-
Add a new USM user.
-
Configure the Privacy Protocol level to AES256.
-
Configure the Authentication Protocol level to SHA512.
-

Implementation reference:
R82.10 Gaia Administration Guide > System Management > SNMP > Configuring SNMP in Gaia Portal.
Expert mode Governance
Recommendation: Restrict the Expert mode access to a limited, authorized set of administrators. Use integration with Check Point Playblocks to alert every time the Expert mode is activated (this Playblocks automation does not require a subscription to Playblocks).
The Expert mode provides full OS access as root user and should be tightly controlled.
-
In Gaia Portal, navigate to User Management > Roles.
-
Click Add to create a new role for administrators.
In this role, in the leftmost column R/W, set the following features to None or Read Only:
-
Clish Environment
-
Expert Mode
-
Expert Authentication Method
-
Expert Password
-
Expert Password Hash

-
-
Click OK.
-
In Gaia Portal, navigate to User Management > Users.
-
Create new administrator users - in the Available Roles list, select the above limited administrator role.
-
In SmartConsole, connect your Management Server to Check Point cloud services.
-
Activate the Playblocks service.
Note: This is supported for both on-premises servers and Smart-1 Cloud.

-
In the Playblocks card, click the button Open in a Browser to sign in to Check Point Portal and to go to the correct tenant.
-
In the left panel, click the Automations page.
Search for: expert.
Enable Notify for Expert Shell login.

This setting will generate a notification as configured in Playblocks upon each attempt to log in to the Expert mode.
Use these notifications to identify any unauthorized access to Expert mode.
Implementation reference:
-
R82.10 Gaia Administration Guide > User Management > Roles > Configuring Roles in Gaia Portal.
-
Check Point Playblocks Administration Guide > Automations > Predefined Automations > Notify on Expert Shell Login.
Enable Security Gateway system logging to the Management Server
Recommendation: Configure each Security Gateway to forward its Gaia OS system logs (syslog) to the Management Server and avoid relying solely on local log files on the Security Gateway.
Local syslog retention on the Security Gateway should be treated as a temporary buffer only, not as the primary source of system level visibility, for these reasons:
-
Centralized operational visibility: Forwarding syslog to the Management Server allows administrators to review the Security Gateway's Gaia OS events alongside management plane activity.
-
Improved troubleshooting: Many platform issues (for example routing daemon events, authentication failures, or service restarts) are visible only in system logs.
-
Ability to audit. Central retention of system logs supports forensic analysis and operational audits.
-
Resilience: Security Gateway local logs may be lost during reboot, disk issues, or hardware failure; central collection reduces this risk.
System logs complement - but do not replace - Security Gateway and traffic logging.
-
In Gaia Portal, navigate to System Management > System Logging.
-
In the System Logging section, select the checkbox Send Syslog messages to management server.
Item
Default
Recommended
Send syslog messages to management server
Disabled
Enabled

-
Click Apply.
This allows the Security Gateway to send its syslog messages to the Management Server / Log Server.
You can later use these syslog messages for forensics in case of suspicious activity.
Example:

Implementation reference:
R82.10 Gaia Administration Guide > System Management > System Logging > Configuring System Logging in Gaia Portal > Configuring the System Logging.
Enable Management Server system logging to an external server
Recommendation: Configure the Management Server to forward its Gaia OS system logs (syslog) to an external centralized log server, in addition to retaining a local copy for short term operational troubleshooting.
System logs generated by the Management Server should not be retained only locally.
Centralized retention supports investigations, regulatory audits, and compliance evidence requirements.
-
In Gaia Portal, navigate to System Management > System Logging.
-
In the Remote System Logging section, add the applicable remote syslog server.
Example:

Implementation reference:
R82.10 Gaia Administration Guide > System Management > System Logging > Configuring System Logging in Gaia Portal > Configuring the Remote System Logging.
Restrict Access to Lights Out Management (LOM / Out of Band Management)
Many Check Point Appliances include a Lights Out Management (LOM) or out of band management interface that provides direct, low level access to the system, including remote console, power control, and hardware monitoring capabilities.
This interface operates independently of the Gaia OS and security policy, and therefore must be treated as highly privileged infrastructure access.
Recommendation:
Ensure that the LOM interface is:
-
Not directly exposed to the Internet.
-
Connected only to a dedicated, secured management network.
-
Accessible only from explicitly authorized source IP addresses.
Access to the LOM interface must be tightly restricted and monitored.
Why:
-
LOM provides direct hardware level control, bypassing operating system and security policy enforcement.
-
Unauthorized access to LOM can allow:
-
Full system control (including reboot and console access).
-
Modification of boot behavior.
-
Access to sensitive system information.
-
-
As attackers increasingly target management and control planes, out of band interfaces represent a high impact entry point if not properly isolated.
-
Improper exposure (for example, direct Internet connectivity) significantly increases the risk of unauthorized access.