Outlook Add-In
The Outlook Add-In enhances your email security by integrating protection features directly into the Outlook application.
Depending on your organization’s policy configuration, the Outlook Add-In provides the following capabilities:
-
Misdirected Email Prevention
The add-in automatically checks emails before they are sent and alerts you to potential issues, such as incorrect recipients, lookalike domains, or unintended external recipients. This allows you to review and correct mistakes before the email is delivered.
-
Report Phishing
You can quickly report suspicious or phishing emails directly from Outlook. It helps your security team investigate threats and protect other users in the organization.
-
Email Security Portal Access
You can access the Email Security Portal directly from Outlook without re-authentication. It allows you to manage quarantined emails, submit restore requests, and review security actions.
How to Respond to Misdirected Email Warnings in Outlook
If your administrator has configured the misdirected email notifications in the Outlook Add-In, it performs real-time checks during actions such as Send, Reply, Reply All, and Forward.
When a potential risk is detected, an on-screen warning banner appears in your Outlook before any action, allowing you to review the details.
To respond to a misdirected email:
When the warning banner appears, review the email details shown in the alert.
-
If the information you entered is correct, select Send Anyway to proceed.
-
If the suggested correction is correct, select Replace & Send to apply the change and send the email.
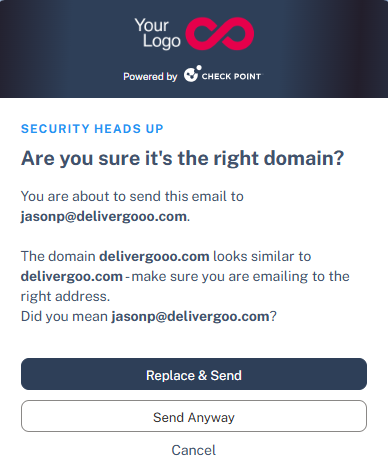
This ensures emails are sent to the intended recipients while reducing the risk of accidental data exposure.
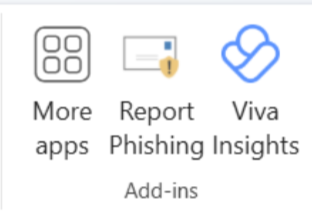
How to Report a Phishing Email in Outlook
If your administrator has enabled the report phishing option in the Outlook Add-In, the Outlook application displays the add-in name (as configured by your administrator), allowing you to report phishing emails directly.
To report a phishing email from Outlook:
-
Access the Outlook application.
-
Select the suspected phishing email.
-
Open the add-in and report the email as phishing.
After submitting the report, you will receive a confirmation email indicating that a support request has been created.
How to Access the Email Security Portal from Outlook
If your administrator has enabled the email security portal option in the Outlook Add-In, the Outlook application displays the add-in name (as configured by your administrator), allowing secure access without re-authentication.
To access the Email Security Portal from Outlook:
-
Access the Outlook application.
-
Go to the Add-Ins section.
-
Click the Email Security Portal option to access the portal without re-authentication.