Security Checkup Report
The Security Checkup report gives a periodic overview of all the threats detected in the SaaS applications protected by Avanan.
It gives insights into the threats detected and how Avanan handled these threats based on the configured policies.
Security Checkup Report Recipients
By default, all the
To exclude users from receiving the Security Checkup report:
-
Click System Settings > User Management.
-
Search for the user and click the
 icon on the last column of the user.
 -
Click Edit.
-
Scroll down to the Alerts and Reports section and clear the Receive Weekly Reports checkbox.

-
Click Update.
Generating a Security Checkup Report
When required, administrators can generate the Security Checkup report from the
To generate Security Checkup report:
-
Go to Analytics > Security Checkup.
-
Click Generate now.
-
Enter the required report name.
-
Select the required Time Frame.
-
Last 7 days
-
Last 14 days
-
Last 30 days
-
Previous month
-
Previous quarter
-
Date range, and select the dates
-
-
Select the scope of the report:
-
All users
-
Company and then enter the company name as specified in the Company field in Azure AD.
-
Department and then enter the department name.
-
-
Click Generate.
The system starts generating the Security Checkup report.
-
Click OK.
You can track the report generation status from the System Settings > System Tasks page.
After the report gets generated, you can view the report from the Security Checkup page.

Note - The data in the Security Checkup Report is always displayed in the GMT time zone.
Last 30 Days Security Checkup Report
The Security Checkup report for the last 30 days has fewer sections than the 14-day and 7-day reports. The report does not show these:
-
Number of incoming emails
-
Number of scanned elements (files, messages, attachments, emails, and so on)
-
Malicious file types and
-
Detection samples
In addition, specific pages in the report include a note stating that the data on these pages is based only on the last 14 days.
Scheduling the Security Checkup Report
Avanan allows you to schedule the Security Checkup reports and send them to specific internal and external recipients.
To view the Report Scheduler page, go to Analytics > Reports Scheduler.
By default, the Security Checkup report is sent on every Sunday to all the administrators configured to receive it.
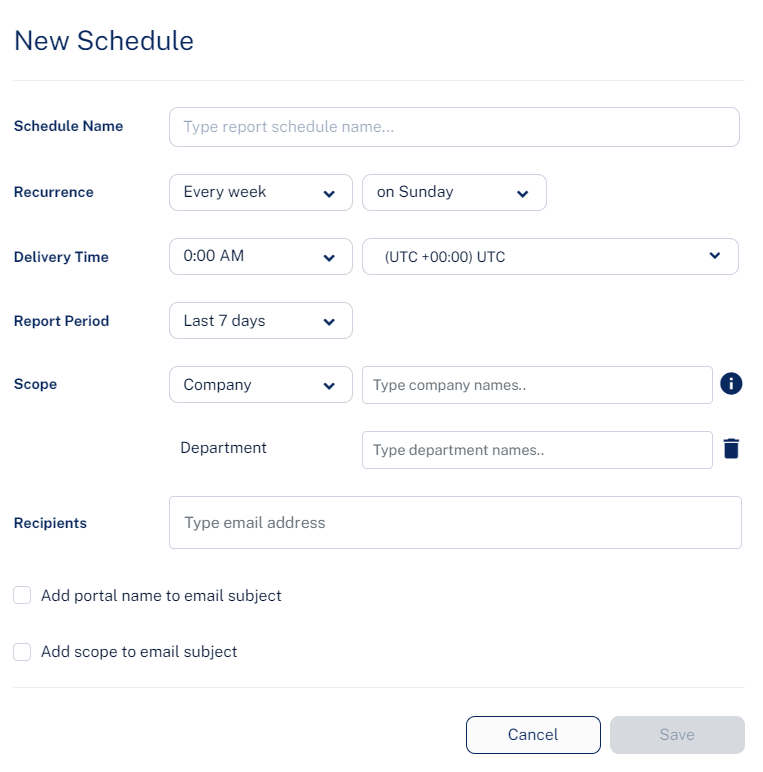
Configuring a Report Schedule
To configure a report schedule:
-
Go to Analytics > Report Scheduler.
-
Click Create Schedule.
-
Enter the required Schedule Name.
-
For Recurrence, select when you need to schedule the report.
-
Every week
-
Select the week day.
-
-
Every month
-
To schedule the report for specific week of every month:
-
Select the week of the month (on first, on second, on third, on fourth, on last).
-
Select the week day.
-
-
To schedule the report for specific day of every month:
-
Select on specific day.
-
Enter the specific date (1st to 28th) of the month.
-
-
To schedule the report for last day of every month, select last day.
-
-
-
For Delivery Time, select the required time and time zone.
-
For Report Period, select the period over which the report has to be generated:
-
Last 7 days
-
Last 14 days
-
Last 30 days
-
Previous month
-
Previous quarter
-
-
Select the scope of the report:
-
All users
-
Company and then enter the company name as specified in the Company field in Azure AD.
-
Department and then enter the department name.
-
-
For Recipients, enter the email addresses of users for whom the report has to be sent.
-
To add the
-
Click Save.
Default Weekly Report
By default, the Default weekly report is configured to send the Security Checkup report to all the administrators in your organization.
By default, the report has these values.
-
Schedule Name - Default weekly report
-
Report Period - Last week
-
Recipients - All administrators
Note - The Security Checkup report is sent to all the administrators
The Default weekly report schedule appears as the first row of the Report Scheduler table.
To edit the report schedule, click on the vertical ellipses icon (in the right side of the scheduled report row) and select Edit. For more information on how to schedule a report, see Configuring a Report Schedule.
Sending a Scheduled Report Immediately
After you schedule a report, if needed, you can send the scheduled report immediately.
To send a scheduled report immediately:
-
Go to Analytics > Report Scheduler.
-
Click on the vertical ellipses icon (in the right side of the scheduled report row) and select Run now.
Avanan generates the report immediately and sends it to the configured recipients.
-
In the confirmation pop-up that appears, click Yes.
Editing a Report Schedule
To edit a report schedule:
-
Go to Analytics > Report Scheduler.
-
Click on the vertical ellipses icon (in the right side of the scheduled report row) and select Edit.
-
Make the required changes and click Save.
Deleting a Report Schedule
To delete a report schedule:
-
Go to Analytics > Report Scheduler.
-
Click on the vertical ellipses icon (in the right side of the scheduled report row) and select Delete.
-
In the confirmation pop-up that appears, click Yes.