MLS400
General Requirements for Racks
Check Point appliances are designed for a standard 19-inch (48.26 cm) rack. For more information, see the specification EIA-310-D.The telescopic rails are designed for racks with these specifications:
|
Minimum Depth |
Maximum Depth |
|---|---|
|
22 inches (55.9 cm) |
32 inches (81.3 cm) |
|
24 inches (61 cm) |
36 inches (91.4 cm) |
Front and rear rack doors must have equally distributed holes on at least 65% of the surface area to give sufficient airflow. Make sure that the racks have sufficient clearance to service the Check Point appliances that are mounted on telescopic rails.
The telescopic rails support racks with either round holes or square holes.
|
Rack Side |
Clearance Requirement |
|---|---|
|
Front |
36 in (91.4 cm) plus additional clearance, if necessary, for the mechanical lift used to move the appliance and rails equipment. |
|
Rear |
16 in (40.6 cm) from the rear of the rack or appliance without the rear cabinet door. 22 in (55.9 cm) from the rear of the rack or appliance with the rear cabinet door. |
These are the physical specifications of the appliance:
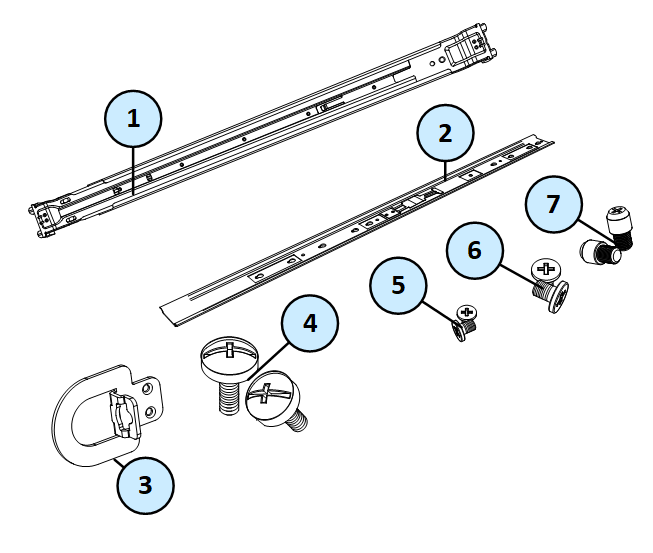
Telescopic Rails Hardware
|
|
Important - We recommend that at least two people work together to install the appliance in a rack to prevent injury, or damage to the appliance. |

Rack Mounting Tools
We recommend that you use a Phillips PH2 screwdriver with a magnetic head to hold and retrieve screws. A powered screwdriver is also useful.
Installation Overview
Telescopic rails installation consists of these procedures:
-
Attaching the inner rails to the appliance
-
Attaching the ear mounts to the appliance
-
Attaching the outer rack rails to the rack
-
Installing the appliance in the rack
Step 1 - Attaching the Inner Appliance Rails
The outer rack rail section and the inner appliance rail section come as one unit when you open the box.
Before you can attach each appliance rail to the side of the appliance, you must remove the inner appliance rails from the outer rack rails.
To remove the inner appliance rail from the telescopic rail unit:
-
Extend the inner appliance rail from the outer rail until the rails locks in place.
-
Press the inner rail release latch, as shown, and pull the inner appliance rail straight out.

Legend Item
Description
1
Inner rack rail
2
Release latch
3
Outer appliance rail
-
Repeat steps 1 and 2 for the other telescopic rack rail unit.
To install the inner appliance rails to the appliance:
-
Place the appliance rail on the side of the appliance and make sure:
-
The release latch is facing away from the appliance
-
The arrow on the release latch points to the front of the appliance
-
The appliance rail is longer than the appliance
-
-
Install the appliance rails to the side of the appliance with the six provided screws. Refer to the below appliance rail image.
Note - Do not over-tighten the screws. Check Point recommends that you leave the rail mounting screws loose until the server is completely installed. This eases installation by preventing binding of the server in the rack.
-
Do steps 1 and 2 again to install the appliance rail on the other side of the appliance.
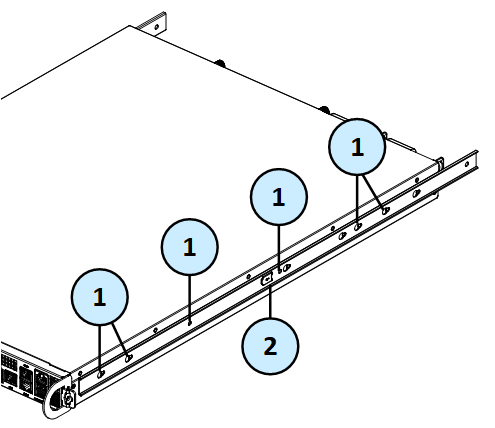
|
Item |
Description |
|---|---|
|
1 |
Appliance rail screws |
|
2 |
Release latch (press this latch to remove the appliance from the rack) |
Step 2 - Attaching the Ear Mounts
Attach the ear mounts to the left and right side of the front of the appliance to allow:
-
Easy pulling in and pulling out of the appliance while it is in the rack using the extraction handles
-
Locking the appliance into the rack using the rack mounting screws
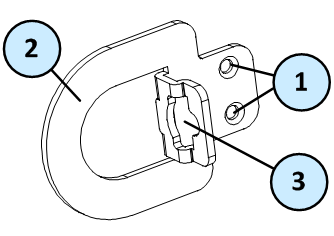
|
Item |
Hardware Description |
Use |
|---|---|---|
|
1 |
Holes for ear bracket screws |
Attaches ear mount to the appliance |
|
2 |
Extraction handle |
Pulls appliance away from the rack |
|
3 |
Rack post mounting hole for the rack mounting screw |
When the screw is fastened, the appliance cannot be pulled out of the rack |
To attach the ear mounts to the appliance:
-
Place the ear mount on the side of the appliance near the front panel.
-
Attach the ear mount to the appliance using two bracket screws.

-
Do steps 1 - 2 again for the other side of the appliance.
Step 3 - Attaching the Outer Rack Rails
Attach the outer rack rails to the rack. Make sure that you have the two rack rails ready.
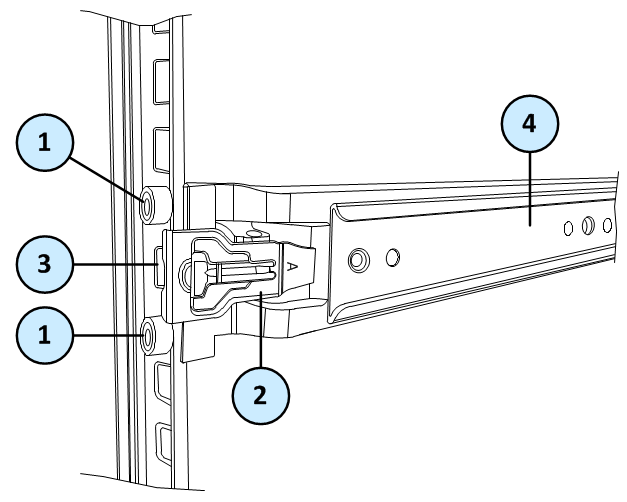
|
Item |
Description |
|---|---|
|
1 |
Rack rail screws (attached to the end of the rack rail) |
|
2 |
Securing clip |
|
3 |
Screw hole for ear mount screw |
|
4 |
Rack rail |
To attach the outer rails to the rack:
-
If your rack has round holes, remove the screws from the end of the rack rail and replace them with the round hole pins.
-
Align the front end of the outer rail with the hole number.
-
The front securing clip is marked with the letter
A. -
Make sure that the securing clip faces the inner part of the rack.
-
-
Press the securing clip and connect the outer rail to the rack.
-
For square-hole racks: Insert the screws into the rack holes.
-
For round-hole racks: Reattach the screws that you removed to the rack. Tighten the screws.
-
-
Do steps 1 - 3 again to attach the rear end of the outer rail to the rack.
The rear securing clip is marked with the letter
B. -
Use an ear mount screw (with washer) to secure the rear end of the outer rail to the rack.
-
Do steps 1 - 5 again for the other outer rail.
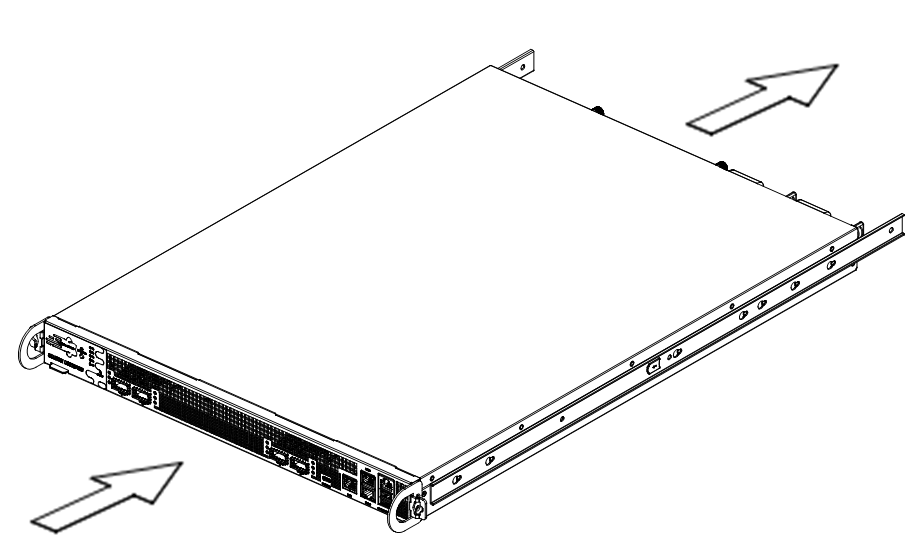
Step 4 - Installing the Appliance in the Rack
Install the appliance in the telescopic rails in the rack.
|
|
Important - To prevent injury or damage, at least two people are required to install the appliance in a rack. |
|
|
Important - Do not attempt to lift, drag, or otherwise move the appliance using the handles on the power supply units. |
To install the appliance in the rack:
-
Align the appliance rails to be level with the rack rails.
-
Move the appliance into the rack as far as it can go.
-
Slide the appliance in and out of the rack several times to allow the rails to position properly.
Tighten all of the rail mounting screws.
-
For each ear mount, use a rack mount screw to secure it to the rack and make sure that the appliance cannot move. This disables the telescopic rails.
Use the rack post mounting hole that is between the rack rail screws (see item 3 in the next figure).

|
Item |
Description |
|---|---|
|
1 |
Extraction handle |
|
2 |
Rack rail screws |
|
3 |
Rack post mounting hole for rack mount screw |
Removing the Appliance
|
|
Important - We recommend that at least two people work together to remove the appliance from a rack to prevent injury, or damage to the appliance. |
|
|
Important - Do not attempt to lift, drag, or otherwise move the appliance using the handles on the power supply units. |
To remove the appliance from the rack:
-
Remove the rack mounting screws from the rack post mounting holes that attach the ear mounts to the rack.
-
Pull the appliance away from the rack as far as possible.
The release strip on the telescopic rails stops the appliance from sliding too far.
-
On the appliance rails:
-
Press and hold the release strips to unlock the telescopic rails.
-
Pull out the appliance from the rack.
-

Appliance Air Vents
Make sure that the appliance air vents have sufficient airflow from front to rear when the appliance is mounted in a rack.
|
|
Important - If the appliance vents are blocked, the appliance can become too hot and it can be damaged. |
The appliance and rack rails have been tested in extreme conditions and do not block air flow to the appliance.
These appliances are specifically designed to install with these rails.
The air flow in MLS400 appliances: