3920 and 3950
General Requirements for Racks
You can mount Check Point 3920 and 3950 Appliances on a Rack Mount Shelf or with ear brackets (as an optional accessory instead of the supplied wall mount hardware).
These are the appliance physical specifications:
|
Appliance |
Width |
Depth |
Height |
|---|---|---|---|
|
3920 |
8.268 in (21 cm) |
7.638 in (19.4 cm) |
1.673 in (4.25 cm) |
|
3950 |
8.268 in (21 cm) |
8.264 in (20.99cm) |
1.673 in (4.25 cm) |
Mounting 3920 / 3950 Appliances on a Rack Mount Shelf
The Rack Mount Shelf (shelf) can hold a single appliance or two appliances in a side by side (double) installation.
The shelf dimensions are 482mm x 340mm x 44.4mm and it weighs 1.73Kg. Mount the shelf on a 19-inch (48.26 cm) rack.
For all installation setups, the ambient temperature range is -40 to 70 °C.
|
|
Note - The appliances include top/rear venting holes. Do not block them. |

Shipping Carton Contents
We recommend that you use a Phillips PH2 screwdriver with a magnetic head to hold and retrieve screws. A powered screwdriver may also be helpful.
Rack Mount Shelf carton
|
Hardware description |
Qty |
|---|---|
|
Rack mount shelf |
1 |
|
Accessory carton |
1 |
Accessory carton contents
|
Bag Label |
Hardware description |
Qty |
Use |
Icon |
|---|---|---|---|---|
|
Washer x 4 and tool |
Rack mount washers |
4 1 |
Fasten the appliance to the shelf |
|
|
M3 black screw x 4 |
M3x5 black flat head machine screw |
4 |
Fasten the appliance to the shelf |
|
|
Power adapter bracket x 2 (two bags) |
Power adapter bracket |
4 |
Secure the power adapter to the shelf |
|
|
M3 black round head screw x 8 |
M3x6 black round head screw with washer |
8 |
Fasten the power adapter to the shelf |
|
|
Rack screws and nuts |
M5 screws |
4 4 |
Fasten the shelf to the rack post |
|
|
Cable tie x 4 |
Cable ties (black) |
4 |
Organize the power adapter cables |
|


Installation Workflow
-
Attach the appliance(s) to the shelf.
-
Attach the shelf to the rack.
Appliance Orientation:
You can install the 3920 appliance on the shelf with either the front or rear panel facing the front of the rack.
The 3950 appliance must be installed on the shelf with the front panel (appliance ports) facing the front of the rack.
Installation Types:
-
Single
-
Side by side
Workflow:
-
Identify the correct position of the appliance on the shelf.
-
Install the appliance and power adapter.
-
Attach the cables and power adapter cables to the appliance.
-
Install the shelf in the rack.
Appliance Positions on the Shelf
The screw holes on the shelf are marked with letters for proper positioning of the appliance. Make sure to use the correct screw holes for your appliance model and setup.
|
Shelf hole |
Used for Appliance |
Setup |
|---|---|---|
|
A |
N / A |
|
|
B |
3920 |
Side by side |
|
C |
3950 |
Side by side |
|
D |
N / A |
|
|
E |
3920 |
Single unit in the middle |
|
F |
3950 |
Single unit in the middle |
For example, to install two 3920 appliances side by side, locate the B markings on the shelf:

Appliance Installation
Shelf top view

Shelf bottom view

Single Appliance Installation
|
|
Note - You must install a single appliance in the middle of the shelf, not on the side. |
-
Place the shelf on a flat surface.
-
Identify the location and holes to use for your appliance (see Appliance Positions on the Shelf).
-
Attach the appliance to the shelf using two M3x5 screws and two rack mount washers:
-
Lift the shelf from the flat surface and insert the screw from underneath through the hole next to the applicable letter.
-
Place the washer on top of the screw, with the wider part facing up.
-
Place the spacer tool so that its indentation is fixed against the screw on the top side of the shelf.

-
Turn the washer a few times until it reaches the spacer tool and remove the tool so there is a gap. The spacer tool prevents you from twisting the washer too far.

-
-
If there are rubber feet installed on the bottom of the appliance, remove them.
-
Align the holes on the bottom of the appliance with the screw / washer assembly.
-
Place the appliance on top of the screw / washer assembly and slide it forward until it settles into position.
-
To secure the appliance, use a screwdriver (not included in the kit) to tighten the screws on the bottom of the shelf. After you fasten the screws, the appliance is locked to the shelf.
3920 bottom view (single appliance)

3920 top view (single appliance)
|
|
Note - You can optionally install the 3920 appliance on the shelf with its rear panel (where the appliance ports are located) facing the front of the rack. |
|
Front panel facing front of the rack |
Rear panel facing front of the rack |
|---|---|
|
|
|


3950 bottom view (single appliance)

3950 top view (single appliance)

Side by Side Appliance Installation
The steps for a side-by-side installation are the same as for a single appliance. However, in a side-by-side setup, you need to place one appliance on each side of the shelf.
-
Place the shelf on a flat surface.
-
Identify the locations and holes to use for your appliances (see Appliance Positions on the Shelf).
-
Attach an appliance to one side the shelf using two M3x5 screws and two rack mount washers:
-
Lift the shelf from the flat surface and insert the screw from underneath through the hole next to the applicable letter.
-
Place the washer on top of the screw, with the wider part facing up.
-
Place the spacer tool so that its indentation is fixed against the screw on the top side of the shelf.
-
Turn the washer a few times until it reaches the spacer tool and remove the tool so there is a gap. The spacer tool prevents you from twisting the washer too far.
-
-
If there are rubber feet installed on the bottom of the appliance, remove them.
-
Align the holes on the bottom of the appliance with the screw / washer assembly.
-
Place the appliance on top of the screw / washer and slide it forward until it settles into position. See the following diagrams.
-
Repeat steps 3 - 6 for the second appliance.
-
To secure the appliances, use a screwdriver (not included in the kit) to tighten the screws on the bottom of the shelf. After you fasten the screws, the appliances are locked to the shelf.
3920 bottom view (side by side appliances)

3920 top view (side by side appliances)
|
|
Note - You can optionally install the 3920 appliance on the shelf with its rear panel (where the appliance ports are located) facing the front of the rack. |
|
Front panel facing front of the rack |
Rear panel facing front of the rack |
|---|---|
|
|
|


3950 bottom view (side by side appliances)

3950 top view (side by side appliances)

Installing the Power Adapter
|
|
Note - The number of AC adapters shown in the diagram is for illustration only. By default, one AC adapter is provided.The actual number depends on the purchased components in your system. |
-
Attach the DC jack of the adapter and plug it into the appliance.
-
Place the adapter in the correct position on the shelf and push it until you reach the stopper. For reference, see the top view diagrams in the previous sections.
-
Place a bracket (pictured in green in the diagram) on the top of the adapter.
-
Use the provided M3x6 screws to fasten each side of the bracket to the shelf.
-
As needed, attach cable ties to hold the cables together.

Legend
Item
description
1
Cable tie slot
2
Power adapter bracket
3
Power adapter
-
Repeat steps 1 - 5 for each installed power adapter.
Installing the Shelf in the Rack
|
|
Important - To prevent injury or damage, at least two people are required to install the shelf in a rack. |

-
Insert two M5 cage nuts on the back side of the front rack post.

Item
description
1
M5 cage nut
2
Front rack post
3
Shelf ear bracket
-
Align the shelf and the shelf ear bracket with the rack post holes where the cage nuts were inserted.
-
Fasten the shelf to the rack post with two M5 screws.

-
Repeat steps 1 - 3 for the other side of the shelf.
Uninstalling the appliance
|
|
Note - This applies to both single and side-by-side installations. |
-
Unplug the cables from the power adapters and the appliance.
-
Loosen the screws from the adapter brackets and remove the brackets.
-
Remove the adapters.
-
Remove the appliance.
-
Repeat steps 1 - 4 for the second appliance (if applicable).
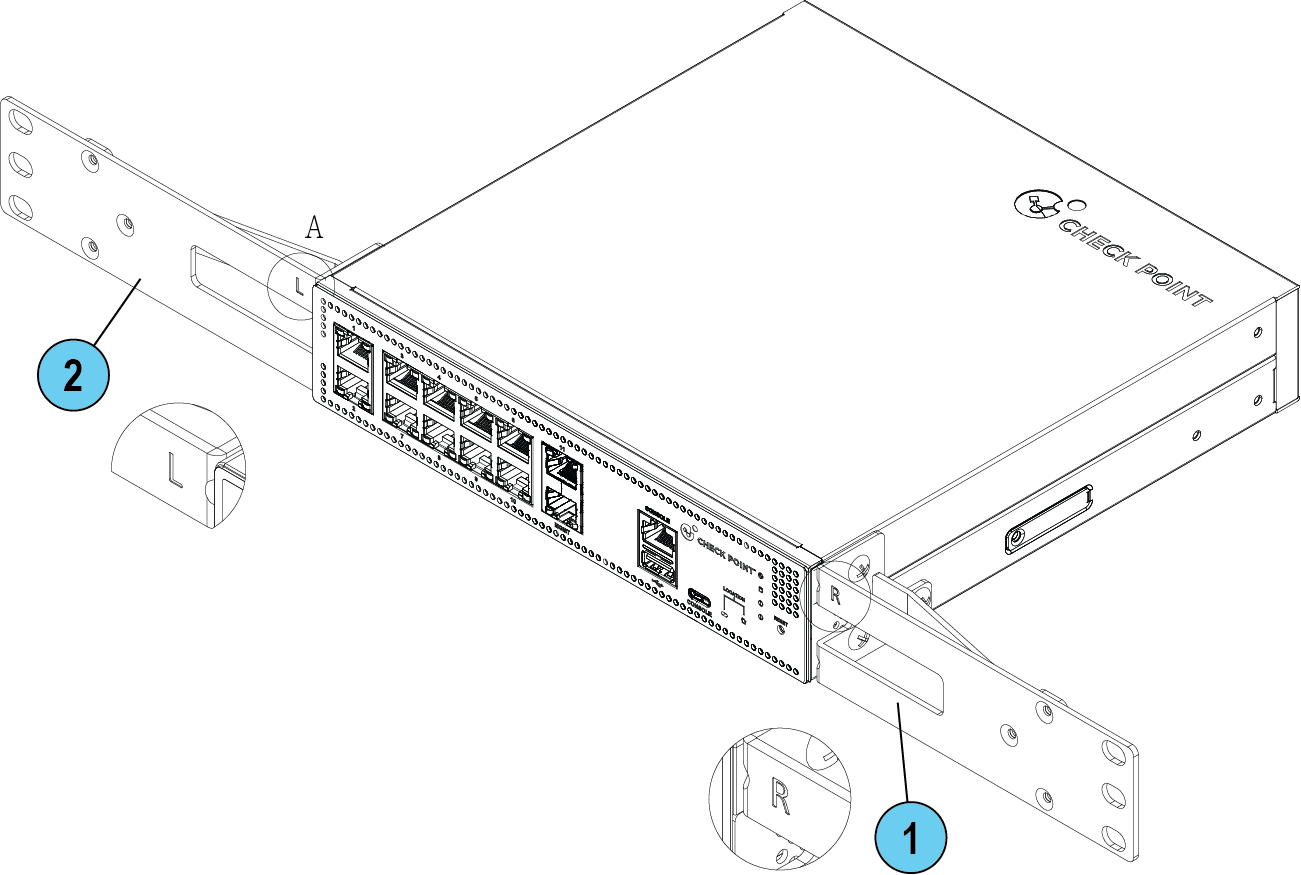
Mounting 3920 / 3950 Appliances with Ear Brackets
Shipping Carton Contents
We recommend that you use a Phillips PH2 screwdriver with a magnetic head to hold and retrieve screws. A powered screwdriver may also be helpful.
|
Hardware description |
Qty |
Use |
|---|---|---|
|
Ear brackets |
2 |
Attach the appliance to the rack |
|
Screws |
6 |
Attach the ear brackets to the appliance |
Installation Workflow
To mount the appliance with ear brackets to the 19" rack:
-
Attach the left ear bracket to the left-side appliance panel with three M3 screws.
-
Attach the right ear bracket to the right-side appliance panel with three M3 screws.
-
Front view:
3920:

3950
-
Back view:
3920:

3950
Legend
Item
Hardware description
1
Right ear mount bracket
2
Left ear mount bracket
3
Ear mount bracket screws
-
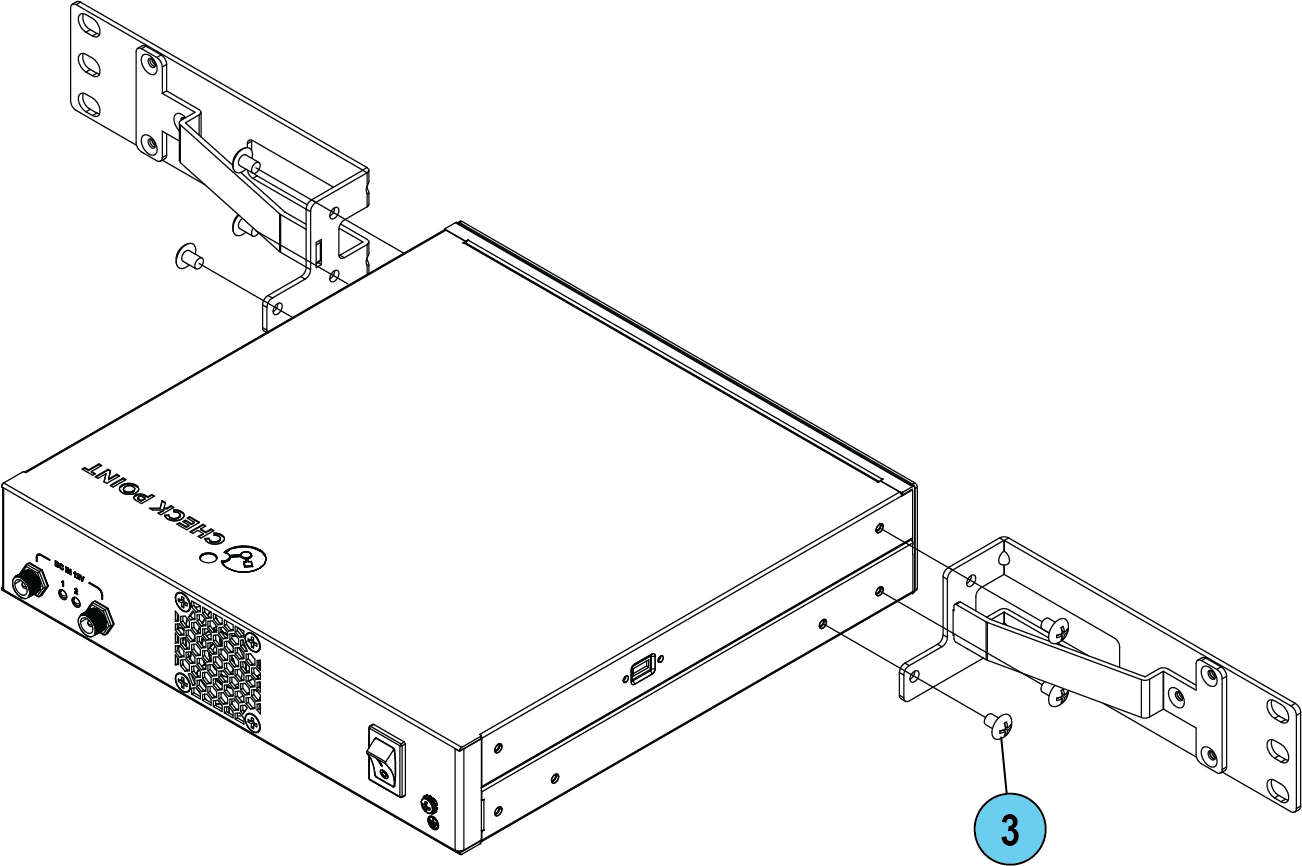
-
Align the front end of the ear mount brackets with the rack post holes.
-
Attach each ear mount bracket to the 19-inch rack with three screws.
|
|
Important:
|