
Smart-1 700-S and Smart-1 700-M

|
|
Important - Make sure that you are electromagnetically grounded when you perform these procedures. ESD (electrostatic discharge) can damage the appliance. |

Removing a Storage Device
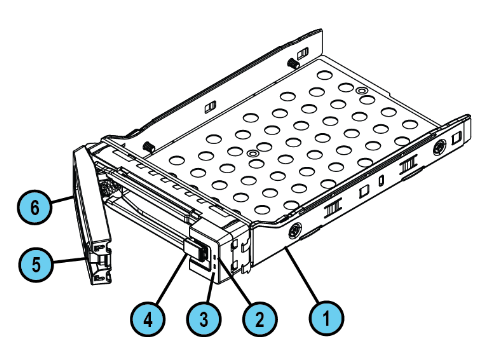
|
Item |
Description |
|---|---|
|
1 |
Storage device casing |
|
2 |
Activity LED |
|
3 |
Status LED |
|
4 |
Release latch |
|
5 |
Lock button |
|
6 |
Ejector handle |
To remove a storage device:
-
Push the release latch to the right.
The ejector handle pops out.
-
Hold the ejector handle and gently pull the storage device casing to remove the solid-state disk from the appliance.
|
|
Important - Be careful when you pull the ejector handle. If you pull too hard on the ejector handle, it can break off from the storage device casing. |
Installing a Storage Device
Insert the replacement storage device into the appliance.
To install a storage device:
-
Hold the storage device casing and insert the replacement storage device into the slot.
-
Push the ejector handle to close it.
The storage device clicks into position.
Synchronizing RAID
The appliances support two storage devices.
-
RAID-1 mirroring across both storage devices is used.
This enables the appliance to continue to work if there is a storage device failure.
-
The mirror rebuild is automatic.
-
Both storage devices must be the same type and same capacity.
First Boot Up
At first boot up, wait for up to six hours to allow the storage devices to fully synchronize.
If you reboot the appliance before the storage devices are synchronized, the synchronization starts again from the beginning at the next boot.
To monitor the RAID status of the storage devices in the CLI:
-
Connect to the command line on the appliance.
-
Log in to Gaia Clish.
-
Run this command to monitor the RAID status of the storage devices:
raid_diagnosticThe output of this command shows data about the RAID and storage devices, with the percent of synchronization complete.
-
DiskID 0is the left most storage device (numbered 0 on the appliance's chassis). -
DiskID 1is the right storage device (numbered 1 on the appliance's chassis).
After the first boot and after you replace a second storage device, the RAID state (in the VolumeID line) shows
DEGRADED(this indicates that the drives are not synchronized). The DiskID:0 state showsONLINEand the DiskID:1 state showsINITIALIZING.After the RAID is synchronized, the RAID state (in the VolumeID line) shows
OPTIMAL(this indicates that the drives are synchronized). The DiskID:0 and DiskID:1 states showONLINE.Example:
Smart-1-700-M> raid_diagnostic
Raid status:
VolumeID:0 RaidLevel: RAID-1 NumberOfDisks:2 RaidSize:7452GB State:OPTIMAL Flags:ENABLED
DiskID:0 DiskNumber:0 Vendor:ATA ProductID:ST8000NM017B-2T  Revision:SN02 Size:7452GB State:ONLINE Flags:NONE
DiskID:1 DiskNumber:1 Vendor:ATA ProductID:ST8000NM017B-2T  Revision:SN02 Size:7452GB State:ONLINE Flags:NONE
Smart-1700-M>
This example shows that the storage devices are fully synchronized (disk sizes and vendor may vary).
-
To monitor the RAID status of the storage devices in Gaia Portal:
-
Log in to the Gaia Portal.
-
From the left tree, click Maintenance > RAID Monitoring.
To monitor the RAID status of the storage devices in SmartConsole:
-
From the left navigation panel, click Gateways & Servers.
-
In the top pane, select the Security Management object that represents the appliance.
-
In the lower pane, on the Summary tab, click Device Information.
-
Click RAID Volumes.
The window shows volume and disk information.
Example:

To monitor the RAID status of the storage devices using SNMP:
Set up SNMP traps to send information about the RAID.
Use this OID: 1.3.6.1.4.1.2620.1.6.7.7
For more information about how to configure the SNMP settings on the appliance, see the (missing or bad snippet).
To hot swap a storage device:
|
|
Important - Make sure that there is at least one fully synchronized storage device in the appliance. |
-
When the appliance is up, remove the failed storage device.
-
Wait 15 seconds.
The appliance recognizes that you removed a storage device.
-
Insert a new storage device.
If necessary, you can reboot the appliance with one storage device and install the new storage device later.
The appliance automatically adds the new storage device to the RAID configuration.