QLS250, QLS450, QLS650, and QLS800
Preparing the Appliance
Before you start to install or remove the LOM Card, make sure that:
-
The appliance is shut down and you disconnect the power cables.
-
The appliance is in a clean environment and on a level surface.
-
You can physically access and open the cover of the appliance.
-
You have the Check Point LOM Card kit.
Important
-
To protect the appliance and LOM Card from electrostatic discharge, make sure that you are grounded.
-
Read the Health and Safety Information in the Getting Started Guide.
See the Quantum LightSpeed Appliances Getting Started Guide.
LOM Card Kit Contents:
-
QR code page - Installing and Replacing a LOM Card in Check Point Appliances
-
LOM Card
-
Screwdriver
-
ESD grounding strap (anti-static)
To prepare the appliance:
-
Shut down the appliance by one of these methods:
-
From the Gaia Portal (see the Shut Down section in the Gaia Administration Guide for your version).
-
Through Gaia Clish commands (see the Shut Down section in the Gaia Administration Guide for your version).
-
Quickly press and release the power switch.

Note - We do not recommend the use of the power switch as it results in a forced and immediate shut down.
-
-
Remove the power cords from the appliance.
-
Remove the appliance from the rack and put it on a flat surface.
-
Put the ESD strap on your wrist and attach the other end to the ESD grounding point on the rear panel of the appliance.
-
Remove the top cover from the appliance.
To remove the top cover:
-
Unscrew the cover screws (number 2 in the diagram).
-
Pull the top cover back in the direction of the red arrows on the diagram.
-
Pull the cover up to remove it fully.
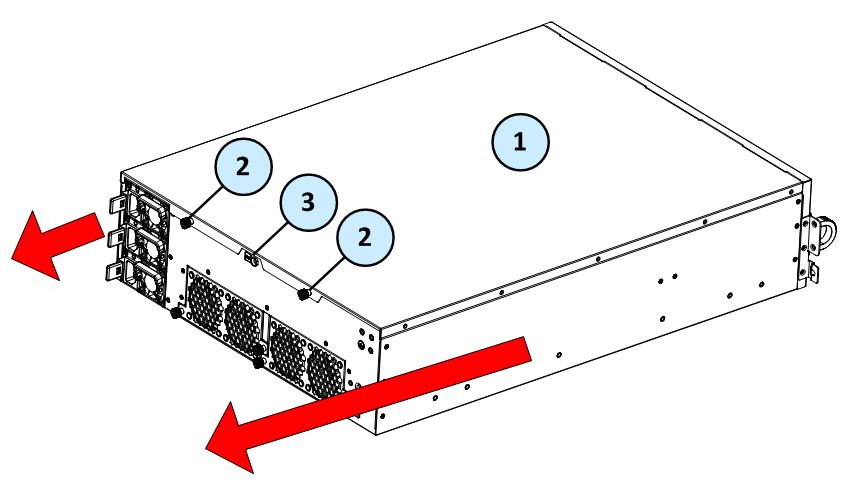
The image shows the QLS800 appliance model.
Removal of the top cover is the same in the other LightSpeed Appliances QLS models.
|
Item |
Description |
|---|---|
|
1 |
Appliance cover |
|
2 |
Appliance cover screws |
|
3 |
ESD grounding point |
Finding the LOM Card Socket
The diagram shows the location of the LOM Card in the appliances.
QLS250, QLS450, QLS650, and QLS800
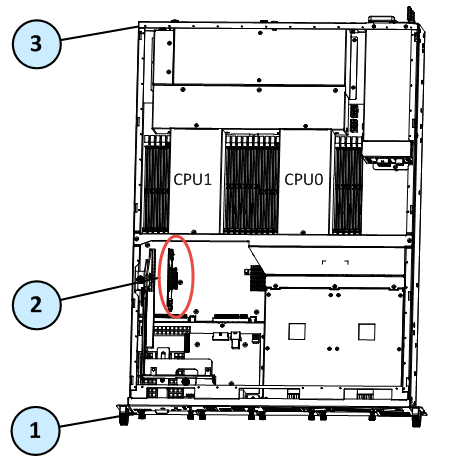
|
Item |
Description |
|---|---|
|
1 |
Front panel |
|
2 |
LOM Card (in socket) |
|
3 |
Rear panel |
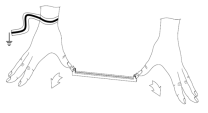
Removing the LOM Card
Make sure that you prepare the appliance before you remove the LOM Card.
To remove the LOM Card:
-
Find the LOM Card socket on the system board.
-
Press outward on the two retaining clips.

-
Carefully lift the front end of the LOM Card and pull it out of the socket.

Installing the LOM Card
To install the LOM Card in the appliance:
-
Find the LOM Card socket on the system board.

Important - Be careful. There are sharp metal parts in the appliance, such as the heat sink fins and bracket, which can cause injury to fingers and can damage the LOM Card.
-
Press outward on the two white retaining clips.
-
Align the new LOM Card above the socket.
-
Press the new LOM Card into the socket until it clicks into position.
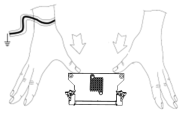
-
Close the appliance cover.


To make sure the LOM Card is installed correctly:
-
Connect the power cords to the appliance.
The appliance turns on.
-
Use an Ethernet cable to connect the LOM port to a computer and make sure that the LOM port LED is lit.
Initial Login to the LOM Card WebUI
To log in to the LOM Card WebUI:
-
Use an Ethernet cable to connect the LOM port to a computer.
-
On the computer, configure a static IP address from this subnet:
192.168.0.0 / 255.255.255.0 -
Open a web browser and enter the default IP address of the LOM Card:
https://192.168.0.100The login window opens.
-
Enter the default username (
admin) and password (admin).Guidelines to change the password for the default user come into view.
For more information, see the First-Time Setup section in the Lights Out Management (LOM) HTML5-based Card Administration Guide.