TE250XN
TE250XN Appliances have a redundant power supply unit (PSU) and support DC PSUs.
If necessary, you can replace a PSU. Note that all PSUs on an appliance must be of the same type (DC).
|
|
Warning:
|

|
|
Warning - All work related to the |
|
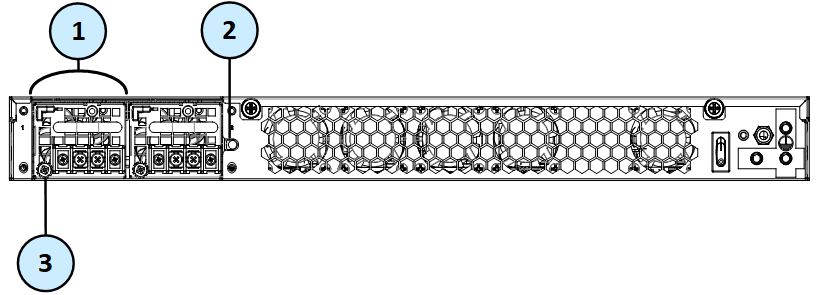
Item |
Description |
|---|---|
|
1 |
DC Power Supply Units |
|
2 |
Alarm reset button |
|
3 |
Grounding lug |
Removing a DC Power Supply Unit

|
Item |
Description |
|---|---|
|
1 |
DC power connector |
|
2 |
Terminal for - 48V DC wire |
|
3 |
Terminal for 0V battery return wire |
|
4 |
Release lever |
|
5 |
Extraction handle |
|
6 |
Power LED |
|
7 |
Grounding lug |
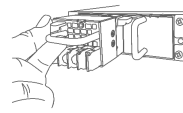
To remove a DC Power Supply Unit:
-
Turn off the circuit breaker that supplies power to the DC Power Supply Unit.
Make sure that the power supply LED is not lit up.
-
On the DC power connector, loosen the screws to these wires:
-
0V battery return
-
- 48V DC
-
-
Remove the wires from the DC Power Supply Unit.
-
Loosen the grounding lug screw and remove the wire from the ground connection.
-
While holding the release lever and pushing it to the right, pull the extraction handle to remove the DC Power Supply Unit.

|
|
Note - To prevent damaging the power supply, use only the extraction handle to remove the DC Power Supply Unit |

Installing a Replacement DC Power Supply Unit
|
|
Important - To protect the appliance and the DC Power Supply Units from damage, make sure that you connect the wires to the DC power connector terminals correctly. |

To install a replacement DC power supply:
-
Insert the DC PSU into its slot and push until it clicks into place.
-
Connect the ground wire to the grounding lug.
-
Connect the 0V battery return wire to the 0V terminal on the DC power connector.
-
Tighten the 0V screw on the DC power connector.
-
Connect the - 48V battery return wire to the - 48V terminal on the DC power connector.
-
Tighten the - 48V screw on the DC power connector.
-
Turn on the circuit breaker that supplies power to the DC PSU.
-
If the alarm sounds, press the red Alarm Off button to the right of the DC PSUs.
-
Make sure that the green power supply LED on the DC PSU is illuminated.