6000 and 7000 Appliances Replacing and Installing Storage Devices
|
|
Important - Make sure that you are electromagnetically grounded when you perform these procedures. ESD (electrostatic discharge) can damage the appliance. |

This document is for 6800, 6900, and 7000 appliance models. Appliance shown is 6800.

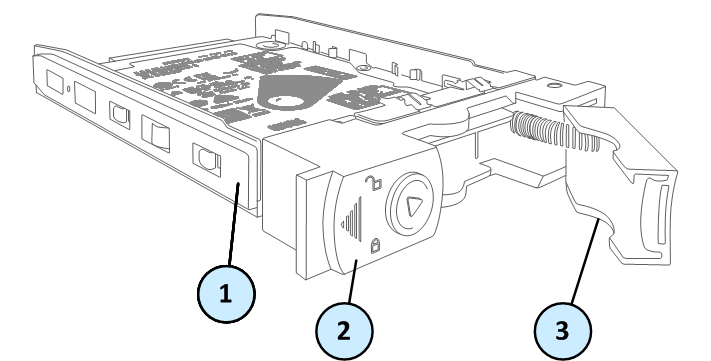
Parts of the Storage Device
6800
6900 and 7000

|
|
Note - This section applies to a hard disk drive and a solid state disk. The illustrations above show a hard disk drive. |

|
Item |
Description |
|---|---|
|
1 |
Storage device casing |
|
2 |
Release latch |
|
3 |
Ejector handle |
Overview
6800, 6900, and 7000 appliances support up to two storage devices.
You can perform these operations:
-
Adding a Second Storage Device in a System with One Storage Device
-
Hot Swapping a Storage Device in a System with Two Storage Devices
Replacing a Storage Device in a Non-redundant System
A system with only one storage device is a non-redundant system.
To replace a storage device in a system with only one storage device (non-redundant system):
-
Backup the data and configuration settings (see sk112215).
-
Remove the existing storage device:
-
If necessary, in 6800 appliances, use the key in the accessories bag to unlock the storage device.
-
Move the release latch to the left.
The extraction handle pops out.
-
Hold the extraction handle and carefully pull the storage device casing to remove the storage device from the appliance.
Important - Be careful when you pull the ejector handle to remove the storage device from the appliance. If you pull too hard on the ejector handle, it can break off from the storage device casing.
-
-
Install the new storage device:
-
Insert the replacement storage device into the slot.
-
Push the extraction handle until it closes and the device clicks into position.
-
-
Restore the data and configuration settings (see sk112215).
Adding a Second Storage Device in a System with One Storage Device
Follow the below procedures when you add a second storage device in a system with only one storage device (non-redundant system).
To add a second storage device in a system with one storage device:
-
Install the new storage device:
-
Insert the replacement storage device into the slot.
Important - Both storage devices must be the same type. You cannot mix hard disk drives with solid state disks.
-
Push the extraction handle until it closes and the device clicks into position.
-
-
Activate RAID on the system:
-
Enter expert mode.
-
Run:
activate_sw_raid.Software RAID is activated and the appliance synchronizes the storage devices. The first synchronization can continue for over an hour. If you reboot or turn off the appliance before the storage devices are synchronized, the synchronization starts again from scratch at the next boot.
-
-
Monitor the RAID status, see Monitoring RAID.
Hot Swapping a Storage Device in a System with Two Storage Devices
For appliances with two storage devices, the appliance uses RAID1 mirroring across both storage devices. This lets the appliance continue to work if there is a storage device failure.
The mirror rebuild is automatic. Both storage devices must be the same type.
To hot swap a storage device:
-
Make sure that there is at least one fully synchronized storage device (state =
ONLINE) in the system. For more information, see Monitoring RAID. -
When the system is up, remove the failed storage device:
-
If necessary, in 6800 appliances, use the key in the accessories bag to unlock the storage device.
-
Move the release latch to the left.
The extraction handle pops out.
-
Hold the extraction handle and carefully pull the storage device casing to remove the storage device from the appliance.
Important- Be careful when you pull the ejector handle to remove the storage device from the appliance. If you pull too hard on the ejector handle, it can break off from the storage device casing.
-
-
Wait 15 seconds.
The appliance recognizes that you removed a storage device. See example 2 in Monitoring RAID.
-
Install a new storage device.
-
Insert the replacement storage device into the slot.
-
Push the extraction handle until it closes and the device clicks into position.
Software RAID is activated and the appliance synchronizes the storage devices. The first synchronization can continue for over an hour. If you reboot or turn off the appliance before the storage devices are synchronized, the synchronization starts again from scratch at the next boot.
-
-
Monitor the RAID status, see Monitoring RAID.
Monitoring RAID
You can monitor the RAID status of the storage devices on the appliance from CLI, WebUI, or SNMP.
To monitor the RAID status from the CLI:
-
Log in to the appliance.
-
Run:
raid_diagnosticThe output shows data about the RAID and storage devices, with the percent of synchronization completed.
DiskID:0is the top storage device.DiskID:1is the bottom storage device.
After you install a second storage device, the RAID State (in the VolumeID line) shows DEGRADED (this indicates that the drives are not synchronized). The DiskID:0 state shows ONLINE and the DiskID:1 state shows INITIALIZING.
After the RAID is synchronized, the RAID State (in the VolumeID line) shows OPTIMAL (this indicates that the drives are synchronized). The DiskID:0 and DiskID:1 state shows ONLINE.
Example 1: RAID status for fully synchronized storage devices (disk size and vendor may vary):
Server123> raid_diagnostic
Raid status:
VolumeID:0 RaidLevel: RAID-1 NumberOfDisks:2 RaidSize:465GB State:OPTIMAL Flags:ENABLED
DiskID:0 DiskNumber:0 Vendor:ATA ProductID:HGST HTE25050A7 Revision:GS2O Size:465GB State:ONLINE Flags:NONE
DiskID:1 DiskNumber:1 Vendor:ATA ProductID:HGST HTE25050A7 Revision:GS2O Size:465GB State:ONLINE Flags:NONE
Example 2: RAID status for one fully synchronized storage device and another device that was removed (disk size and vendor may vary):
Server123> raid_diagnostic
Raid status:
VolumeID:0 RaidLevel: RAID-1 NumberOfDisks:2 RaidSize:465GB State:DEGRADED Flags:VOLUME_INACTIVE
DiskID:0 DiskNumber:0 Vendor:NONE ProductID:NONE Revision:NONE Size:0GB State:MISSING Flags:NONE
DiskID:1 DiskNumber:1 Vendor:ATA ProductID:HGST HTE25050A7 Revision:GS2O Size:465GB State:ONLINE Flags:NONE
To monitor the RAID status from the WebUI:
-
Log in to the WebUI.
-
Select Maintenance> RAID Monitoring.
The window shows volume and disk information.


To monitor the RAID status from SmartConsole:
-
Log in to SmartConsole.
-
From Gateways & Servers, select the object that represents the appliance.
-
Click Monitor.
A window opens that shows appliance details.
-
Click System Information > RAID Volumes.
The window shows volume and disk information.


To monitor the RAID status with SNMP:
Set up SNMP traps to send information about the RAID.
Use OID: 1.3.6.1.4.1.2620.1.6.7.7
For more information on how to configure the SNMP settings on the appliance, see the Gaia Administration Guide for the applicable version.